ProColor 750U PCAP Interactive User Guide. mimio.boxlight.com
|
|
|
- Malcolm Reeves
- 6 years ago
- Views:
Transcription

1 ProColor 750U PCAP Interactive User Guide mimio.boxlight.com
2 Contents 1. Important safety Instructions Safety precautions 1.2 Care and maintenance 2. Introduction Each Description Front View 3.2 Rear View 4. PC Connection When using OPS PC CAUTION Remote Control OSD Menu Description Product Specification LED Specification 8.2 OPS Specification 9. Product Dimensions LED Dimensions 9.2 OPS Dimensions 10. Troubleshooting Product self-diagnosis 10.2 Before Requesting service 11. Customer Support and AS Guide Before Request AS 11.2 AS COST Version 1.0 2
3 1. Important Safety Instructions ICON NAME MEANING Warning Caution Failing to follow the precautions marked with this sign may result in a serious injury or even a fatality. Failing to follow the precautions marked with this sign may result in a personal injury or property damage. Before operating the set, please read this manual carefully. After products wrapping paper out, Grasp the upper handle as shown in the image, Go to the bottom bezel. The Product must be taken to erect and maintain a horizontal product is stable. When put up product the bottom, edge of the portion of product do not. 1PH M8x60l(Natural Color) 2M8 Washer 3M8 Nut WARNING : To reduce the risk of electric shock do not remove cover (or back). No user serviceable parts inside. Refer servicing to qualified service personnel. To prevent fire or shock hazard, do not expose the rear of the set to rain or moisture. Do not rub or strike the Active Matrix LCD with anything hard as this may scratch, mark, or damage the Active Matrix LCD permanently. CAUTION: Unauthorized tampering with the inside of the monitor invalidates the warranty. The manufacturer shall not warrant for any damage caused by improper maintenance and/or repair work by third parties. Important safeguards for you and your new product: Your product has been manufactured and tested with your safety in mind. However, improper use can result in potential electrical shock or fire hazards. To avoid defeating the safeguards that have been built into your new product, please read and observe the following safety points when installing and using your new product and save them for future reference. Version 1.0 3
4 1) Read Instructions 2) Follow Instructions All operating and use instructions should be followed. 3) Retain Instructions The safety and operating instructions should be retained for future reference. 4) Heed Warnings All warnings on the product and in the operating instructions should be adhered to. 5) Cleaning Disconnect the unit from the electricity supply before cleaning. Do not use abrasive cleaners. Use a damp cloth for cleaning. 6) Water and Moisture Do not use this apparatus near water. 7) Transporting Product A product and cart combination should be moved with care. Quick stops, excessive force and uneven surfaces may cause the product and cart combination to overturn. 8) Ventilation Do not block any of the ventilation openings. Install in accordance with the manufacturer s instructions. 9) Power Sources This product should be operated only from the type of power source indicated on the marking label. If you are not sure of the type of power supply to your home, consult your supplying dealer. 10) Power Lead Polarization This product is equipped with a three-wire grounding-type cord. This is a safety feature. Do not defeat the safety purpose of the grounding-type cord. 11) Power Cord Protection Power-supply cords should be routed so that they are not likely to be walked on or pinched by items placed upon or against them, paying particular attention to cords at plugs, convenience receptacles and the point where they exit from the product. 12) Outdoor Antenna Grounding If an outside antenna or cable system is connected to the product, be sure the antenna or cable system is grounded so as to provide some protection against voltage surges and built-up static charges. A face plate also needs to be installed with an isolating capacitor to prevent any damage from static. Version 1.0 4
5 13) Lightning For added protection for this product during a lightning storm, or when it is left unattended and unused for long periods of time, unplug it from the wall outlet and disconnect the antenna or cable system. This will prevent possible damage to the product due to lightning and power-line surges. 14) Power Lines An outside antenna system should not be located in the vicinity of overhead power lines or other electric light or power circuits, or where it can fall into such power lines or circuits. When installing an outside antenna system, extreme care should be taken to avoid contact with such power lines or circuits, as contact with them might be fatal. 15) Earthing the product This product must be earthed properly to comply with the safety regulations in the country of use. If you are unsure of these regulations, please consult a qualified electrician. 16) Servicing Do not attempt to service this product yourself as opening or removing covers may expose you to dangerous voltages or other hazards. Refer all servicing to qualified service personnel. If the Set does not operate properly, switch it off and call your dealer. 17) Damage Requiring Service Isolate this product from the mains supply and refer servicing to qualified service personnel under the following conditions: 1. If the power-supply cord or plug is damaged. 2. If the glass front has been damaged. 3. If there is ingress of water between the glass and the LCD screen. 4. If the product does not operate normally by following the operating instructions. Adjust only those controls that are covered by the operating instructions as an improper adjustment of other controls may result in damage and will often require extensive work by a qualified technician to restore the product to its normal operation. 5. If the product has been dropped or the cabinet has been damaged. 6. If the product exhibits a distinct change in performance. 18) Safety Check Upon completion of any service or repairs to this product, ask the service technician to perform safety checks to determine that the product is in proper operating condition and the front seal is intact. 19) Mounting The product should be mounted on a wall only as recommended in the instructions. 20) Power This set operates on an AC supply; the voltage is as indicated on the label on the Manual. This appliance must be earthed at all times through the chassis as well as through the power lead. 21) Location Do not install on an unstable location with support area smaller than the DID SET. Please secure enough space for safety use. Version 1.0 5

6 Products at the same time holding the products when building or product, do not hold the back of the handle. under the product makes. the handle is a secondary role. Table stand and put them on the table by using the installation gets the nose does not necessarily prevent a fall on the floor using the screws fixed. Version 1.0 6
7 1-2. Care and Maintenance External Surface and Screen Maintenance Clean the product with a soft dry cloth. Avoid cleaning the product with an inflammable substance such as benzene or thinner or with a wet cloth. This may result in a problem with the product. Avoid scratching the screen with your fingernails or a sharp object. Avoid cleaning the product by spraying water onto it. If water enters the product, it may result in fire, electric shock or a problem with the product. A white stain may be generated on the surface of the model if a supersonic humidifier is used near it. The appearance and the color may differ depending on models. Securing the Installation Space Keep the required distances between the product and other objects (e.g. walls) to ensure proper ventilation. Failing to do so may result in fire or a problem with the product due to an increase in the internal temperature. Install the product so the required distances shown in the figure are kept. The appearance may differ depending on the product. When installing the product with a stand When installing the product with a wall-mount About persistent images Displaying a still image for a long time may create a persistent image or stain on the screen. If you do not use the product for a long time, set the power-saving mode or screen saver. Due to technological constraints of the Panel manufacturer, the images generated by this product may appear either brighter or darker than normal by appr. 1ppm (parts per million) pixel. The number of sub-pixels of an panel by size: The number of Sub-Pixels = Max. Horizontal Resolution x Max. Vertical Resolution x 3 Example) If the maximum resolution is 1920 x 1080, the number of sub-pixels is 1920 x 1080 x 3 = 6,220,800. Version 1.0 7


8 2. Introduction 2-1. Package Contents Unpack the product and check if all of the following contents have been included. Store the packaging box in case you need to move the product later. If any items are missing, contact your dealer. Contact a local dealer to purchase optional items. LED Display Contents User Manual Cable HDMI Cable USB Cable(for Touch) Power Cable Accessory Remote Control Batteries(CR-2025 x 1 Version 1.0 8

9 3. Each description 3.1 Front View LED Indicator Shows Power ON mode -- BLUE Power Saver mode by blinking RED. Shows Power OFF mode -- RED. 2 SOURCE( ) : Selection Input Signal button Version 1.0 9
10 3.2 Rear View USB for TOUCH L(8 )R(8 ) SPEAKER USB OUT (Option) USB RS-232C DVI FHD HDMI 1 FHD HDMI 2 PC-RGB AUDIO IN UHD HDMI DP Interface Description Interface DP UHD HDMI AUDIO IN PC(RGB) FHD HDMI2 FHD HDMI1 DVI RS-232 USB USB(Option) USB for TOUCH Notes Description DISPLAY PORT Input- up to UHD Input High Definition Multimedia Input- up to UHD input Audio IN for DVI and PC source PC Screen Input High Definition Multimedia Input- up to FHD input, Support MHL High Definition Multimedia Input- up to FHD input High Definition Multimedia Input Facility to control the screen via RS232 protocol Download-software update, Play contents When connecting the USB for touch dual touch External PC using USB touch sensor connection Service port: For factory uses only. For products built in OPS, if connecting USB cables, it can be connected TOUCH Sensor automatically, but display should be converted by manually. Version
11 Key Power Menu Source POWER: ON and OFF MENU: Display the main on-screen menu SOURCE: TV, AV, COMPONENT, HDMI 1, HDMI 2, HDMI 3, VGA, USB Vol -: Volume Down Vol +: Volume Up : Channel Up : Channel Down Vol - Vol + Version
 3. External speaker will be connected to R, L input with using Ø3.")
 Don t connect NC Notes : Please turn off the power when connecting external speakers.")
 2.")
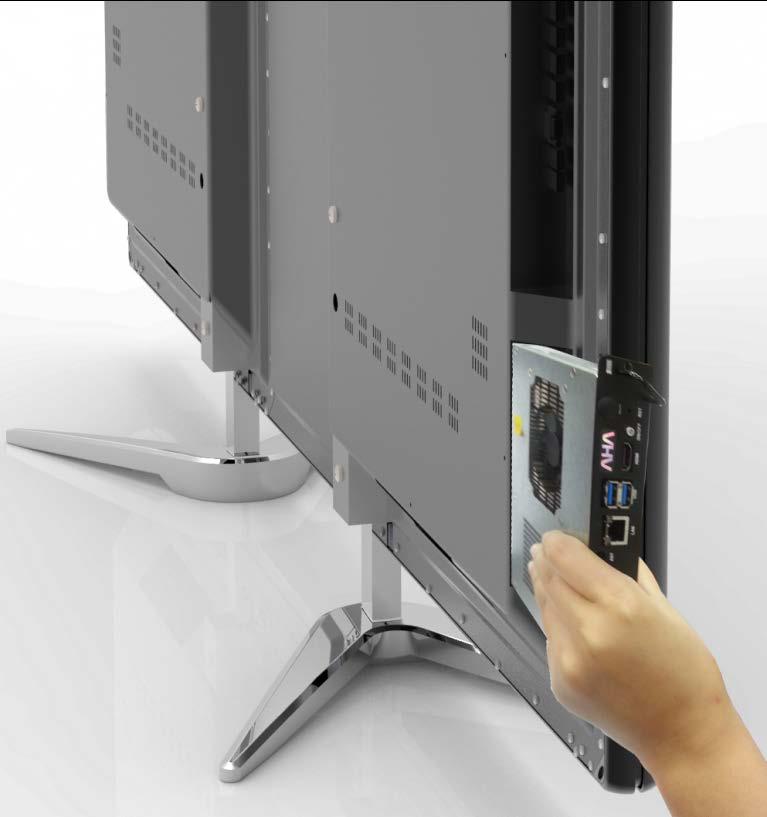
12 4. PC Connection 1. Connect RGB cable to RGB, Voice connection will be connected to PC AUDIO IN with stereo cable. 2. HDMI cable will be connected to (display and voice are available at the same time) 3. External speaker will be connected to R, L input with using Ø3.5 stereo cable and then connect same as below drawing. L, R connection is same. Internal speaker will not output. Note) Don t connect NC Notes : Please turn off the power when connecting external speakers. : If there are no any sound when connecting to speaker with power-on, please restart it once again 5. When using OPS PC CAUTION 1. Do not connect to touch sensor USB cable. (Touch sensor cable is already connected by internal OPS docking board) 2. After connecting adapter, turn on the OPS PC. 3. Refer to bottom when remove the OPS PC OR use external PC. 4. OPTIONS- OPS- After the change in use Enable to Disable. Version

. Same as PLAY on keypad. Fast Forward function (contents play). Move before contents play mode (contents play). Stop function (contents play).")
13 6. Remote Controller Key Name POWER Power ON/OFF. Description SOURCE PC AV Activates OSD menu of input source selecting. Navigates input source. PC. AV. HDMI HDMI 1, HDMI 2, HDMI 3. PSM SSM MENU EXIT FREEZE MUTE ECO SLEEP INFO ZOOM Picture mode: Standard, Dynamic, Soft, User. Sound mode: Standard, Flat, Music, Movie. Activates main OSD menu. Escapes main OSD menu. Videos are saved with pictures. Toggles sound status of speaker. Screen Bright. Set the sleep timer. Displays input source information. Activates OSD of aspect ratio control. Fast Backward function (contents play). Same as PLAY on keypad. Fast Forward function (contents play). Move before contents play mode (contents play). Stop function (contents play). Move next contents play mode (contents play). Navigates upper menu in main OSD menu. Navigates input source. 6.1 How to insert battery. Insert the battery into proper polarities Battery model:(cr V) > Navigates down menu in main OSD menu. Navigates input source Increases sound volume of speaker. Same as + Key on keypad. Navigates next menu in main OSD menu. < Decreases sound volume of speaker. Same as -Key on keypad. Navigates before menu in main OSD menu. Version

14 7. OSD MENU DESCRIPTION 7.1. MENU OVERVIEW In this menu system, there are several ways to customize the menu settings provided. Most menus consist of three levels to set up the options, but some require greater depth for the variety of settings. If you press the MENU button, only the first and second level of the menu system will appear on the monitor screen. The third level can be displayed by pressing SELECT. If a menu has more than three levels, the pop-up dialogue box will be displayed as the fourth or fifth level. 1) To show and remove the Menu: Press the MENU button on the Remote Control to display the menu. A second press of the MENU button or a press of the MENU button will take you back to monitor viewing. 2) To go to the next level: Press OK on the Remote Control. 3) To go back to the previous level: Press MENU on the Remote Control. 4) Typical Menu Operation 1. Press MENU button: The main menu will appear. 2. Use to select the desired menu option (icon). 3. While the desired menu option is selected, press OK to move to the second level. 4. Press OK to move to the third level: Some menu options require additional steps. 5. Press MENU to return to the previous menu. Version

15 7.2. Video Input Selection 1) How to select a video source from the OSD 1. Select a button you can click the SOURCE button to select each video source. 2. To go to the desired video source, press the OK button. Version
16 7.3 BASIC OPERATION 1) Turning On the Monitor 1. First, connect power cord correctly. At this moment, the monitor switches to standby or power on mode. In standby mode, in order to turn monitor on, press the POWER button on the remote control. 2. Select the viewing source by using SOURCE button on the remote control. 2) Volume Adjustment (A/V extension option) 1. Press the VOL+/- button to adjust the volume. 2. If you want to switch the sound off, press the MUTE button on the remote control. 3. You can cancel this function by pressing the MUTE or VOL+/- button. 3) On Screen Menus Language Selection - The menus can be shown on the screen in the selected language. First select your language. 1. Press the MENU button and then use button to select the OPTION icon. 2. Press the button to select Menu Language menu. 3. Press the OK button and then use / button to select your desired language: From this point on, the on-screen menus will be shown in the selected language. 4. Press MENU to return to the previous menu. Supported Languages English, Francais, Italiano, Nederlands, Espanol, Chinese, etc. Version
17 7.4 On Screen Menus Selection and Adjustment 1) How to adjust the OSD screen 1. Press the MENU button and then button to select each menu. 2. Press the OK button and then use button to display the available menus. Your monitor's OSD (On Screen Display) may differ slightly from what is shown in this manual. Version

18 7.5 PICTURE MENU OPTIONS 1) Picture Mode - Adjust the picture appearance to suit your preference and viewing situations. 1. Press the MENU button and then button to select the PICTURE mode. 2. Press the button and then use OK button to select Picture Mode menu. Standard, Dynamic, Mild, User 3. Press the button to select Picture Mode - User menu Contrast, Brightness, Color, Sharpness, Tint. 4. Press OK button and then use button to make appropriate adjustments. 5. Press MENU to return to the previous menu. - Contrast : Control the difference between the bright and dark regions of the screen picture. (Only user-mode Support) - Brightness: Adjust brightness of the picture. (Only user-mode Support) - Color: Adjust color of the picture. (Only user-mode Support) - Sharpness: Set the amount of fine detail in the picture. (Only user-mode Support) - Tint: Control the fresh tones to make them appear natural. (Does not work in any mode) Version
19 2) Color Temperature Control - Choose one of five automatic color adjustments. Set to warm to enhance hotter colors such as red, or set to cool to see less intense colors with more blue. 1. Press the MENU button and then use button to select the PICTURE icon. 2. Press the button and then use ENTER button to select Color Temperature menu. 3. Press the OK button and then use button to select desired option: User, Cool, Medium, Warm. 4. Press the button to select Picture Mode - User menu. Red, Green, Blue 5. Press MENU to return to the previous menu. - Color Temperature : select between Normal, Cool and Warm. (Only user-mode Support) Version

20 3) Aspect Ratio - Selects the screen format. 1. Press the MENU button and then use button to select the PICTURE icon. 2. Press the button and then use OK button to select Aspect Ratio menu. 3. Press the OK button and then use button to select desired option: Auto, 4:3, 16:9, Zoom1, Zoom2. When the HDMI signal through DVI JACK behaves for all the support. When the DVI input signal 4:3, 16:9 support. 4. Press MENU to return to the previous menu. 4) MFC - Select the picture appearance to suit your preference and viewing situations. 1. Press the MENU button and then button to select the PICTURE icon. 2. Press the button and then use OK button to select MFC menu 3. Press the OK button and then use button to select the desired picture option; Off, Low, Middle, High, Default. 4. Press MENU to return to the previous menu. MFC - When the video screen is set to HIGH if the phenomenon will be broken - Touch Speed is Degraded - Motion compensated Frame Rate Conversion - JUDDER phenomenon occurs in the video, it is possible to change the setting to HIGH. Version
21 5) PC Menu 1. Press the MENU button and then use button to select the PICTURE icon. 2. Press the button and then use OK button to select PC Menu. 3. Press button and then use button to make appropriate adjustments. Only PC mode Support. 4. Press MENU to return to the previous menu. 6) Color Range 1. Press the OK button. [Range scaling changes from to 0-255] Not Support in PC mode, Usb mode. Version
22 7.6 SOUND MENU OPTIONS 1) Sound Standard Mode - Adjust the sound to suit your taste and room situations. 1. Press the MENU button and then use button to select the SOUND icon. 2. Press the button and then use OK button to select Sound Mode menu : Standard, Music, Movie, Sports, User. 3. Press the button and then use button to select - User menu : Treble, Bass. 4. Press MENU to return to the previous menu. - Treble: Controls the relative intensity of higher pitched sounds. (Only user-mode Support) - Bass: Controls the relative intensity of lower pitched sounds. (Only user-mode Support) 2) Sound Balance - Adjust the sound to suit your taste and room situations. 1. Press the MENU button and then use button to select the SOUND icon. 2. Press the button and then use OK button to select the Balance menu. 3. Press button to make appropriate adjustments. [L50 ~ 0 ~ R50] 4. Press MENU to return to the previous menu. Version
23 3) Auto Volume Automatic Volume Limit System: For protecting the hearing - Adjust the sound to suit your taste and room situations. 1. Press the MENU button and then use button to select the SOUND icon. 2. Press the button and then use OK button to select the Auto Volume menu. 3. Press OK button to make appropriate adjustments : On, Off 4. Press MENU to return to the previous menu. 4) Surround Sound - Adjust the sound to suit your taste and room situations. 1. Press the MENU button and then use button to select the SOUND icon. 2. Press the button and then use OK button to select the Surround Sound menu. 3. Press the button OK button to make appropriate adjustments : 4. Press MENU to return to the previous menu. Version

24 5) Volume - Adjust the sound to suit your taste and room situations. 1. Press the MENU button and then use button to select the SOUND icon. 2. Press the button to select the Volume menu. 3. Press OK button and then use button to make appropriate adjustments. [0 ~ 100] 4. Press MENU to return to the previous menu. 6) User Control for 5 Band Equalizer - If the Equalizer settings are changed, sound mode setting goes to User automatically. 1. Press the MENU button and then use button to select the SOUND icon. 2. Press the button to select the EQ(Equalizer) menu. 3. Press the OK button and then use button to make appropriate adjustments; 120Hz, 500Hz, 1.5KHz, 5KHz, 10KHz. 4. Press MENU to return to the previous menu. Version
25 7.7 SETUP MENU OPTIONS 1) Language - Select a language for the menus to appear in. 1. Press the MENU button and then use button to select the OPTION icon. 2. Press the button to select the OSD Language menu. 3. Press the OK button and then use / button to select the desired option: Supports Language English, Franais, Espanol, Deutsch, Italiano, Nederlands, Chinese, etc. 4. Press MENU to return to the previous menu. 2) Dimm Control 2-1) Dimming - Automatic dimming controls by Adjusting the brightness of the set in Dimming menu. 1. Press the MENU button and then use button to select the OPTION icon. 2. Press the button to select the Dimm Control Menu. 3. Press the OK button and then use button to select the Dimming Menu. 4. Press the / button to set Dimming options. 5. Press MENU to return to the previous menu. Version
26 2-1-1) Dimming Menu Auto Dimming (Light Ambient Sensor Option only) - Enable/disables auto dimming control by light ambient sensor 1. Press the MENU button and then use button to select the OPTION icon. 2. Press the button to select the Dimm Control Menu. 3. Press the OK button and then use button to select the Dimming Menu. 4. Press the button to select the Auto Dimming functions. 5. Press the button to set Auto Dimming options. 6. Press MENU to return to the previous menu. ON : Dim level is adjusted by light sensor (automatic control system) OFF : Dim level is adjusted by manual control (manual control system) 2-1-2) Dim Level : Auto Dimming - off - Controls Inverter dimming level Inverter brightness control. 1. Press the MENU button and then use button to select the OPTION icon. 2. Press the button to select the Dimm Control Menu. 3. Press the OK button and then use button to select the Dimming Menu. 4. Press the button to select the Level functions. 5. Press the button to set Level functions. 6. Press MENU to return to the previous menu. Version
27 2-1-3) Dimming Menu MAX Ambient (Light Ambient Sensor Option only) - Adjusts detected light ambient to set the maximum dimming 1. Press the MENU button and then use button to select the OPTION icon. 2. Press the button to select the Dimm Control Menu. 3. Press the OK button and then use button to select the Dimming Menu. 4. Press the button to select the Max Ambient functions. 5. Use button to set detected light ambient value by LUX unit. 6. Press MENU to return to the previous menu ) Dimming Menu MIN Ambient (Light Ambient Sensor Option only) - Adjusts detected light ambient to set the minimum dimming 1. Press the MENU button and then use button to select the OPTION icon. 2. Press the button to select the Dimm Control Menu. 3. Press the OK button and then use button to select the Dimming Menu. 4. Press the button to select the Min Ambient functions. 5. Use button to set detected light ambient value by LUX unit. 6. Press MENU to return to the previous menu. Version
 Heat Control - Automatic Fan controls by internal/external temperature sensor 1. Press the MENU button and then use button to select the OPTION icon. 2.")
28 2-1-5) Dimming Menu Ambient (Light Ambient Sensor Option only) - Displays current detected light ambient level by LUX unit. Read Only. 3) Heat Control - Automatic Fan controls by internal/external temperature sensor 1. Press the MENU button and then use button to select the OPTION icon. 2. Press the button to select the Heat Control Menu. 3. Press the OK button and then use / button to set Heat Control options. 4. Press MENU to return to the previous menu. Version

29 3-1) Heat Control Menu Fan Control - Controls fan driving option by temperature sensor / force on / force off 1. Press the MENU button and then use button to select the OPTION icon. 2. Press the button to select the Heat Control Menu. 3. Press the OK button and then use button to select the Fan Control functions. 4. Press the button to set Off, On, Auto options. 5. Press MENU to return to the previous menu. 3-2) Heat Control Menu Fan Active Temperature - Adjusts fan driving temperature by Celsius degree. It works only when the Fan Control setting is Auto. 1. Press the MENU button and then use button to select the OPTION icon. 2. Press the button to select the Heat Control Menu. 3. Press the OK button and then use button to select the Fan Active Temperature Menu. 4. Use button to set fan driving temperature by Celsius degree unit. 5. Press MENU to return to the previous menu. Version
30 3-3) Heat Control Menu Hysteresis - Adjusts fan driving hysteresis temperature by Celsius degree. 1. Press the MENU button and then use button to select the OPTION icon. 2. Press the button to select the Heat Control Menu.. 3. Press the OK button and then use button to select the Hysteresis Menu. 4. Use button to set fan driving hysteresis temperature by Celsius degree unit. 5. Press MENU to return to the previous menu. 3-4) Heat Control Shutdown - Adjusts shutdown mode temperature by Celsius degree. When current temperature reaches the shutdown temp, the monitor enters shutdown mode. 1. Press the MENU button and then use button to select the OPTION icon. 2. Press the button to select the Heat Control Menu. 3. Press the OK button and then use button to select the shutdown Menu. 4. Use button to set fan driving hysteresis temperature by Celsius degree unit. 5. Press MENU to return to the previous menu. Version

31 3-5) Heat Control Current temperature - Displays current detected main sensor s temperature and auxiliary sensor s (option) temperature Read Only. 4) Reset Resets user setting values as default 1. Press the MENU button and then use button to select the OPTION icon. 2. Press the button to select Restore Factory Default menu 3. Press the OK button and then use button to select the Are you sure? menu. 4. Press MENU to return to the previous menu. 5) Set ID Number assigned to the SET in RS-232C communication. 1. Press the MENU button and then use button to select the OPTION icon. 2. Press the button to select Set ID menu 3. Press button to make appropriate adjustments. [ 0 ~ +99] 4. Press MENU to return to the previous menu. Version
32 6) 3D Type 3D used and whether adjustments. 1. Press the MENU button and then use button to select the OPTION icon. 2. Press the button to select 3D Type menu 3. Press the OK button to select the Details Menu : 3D OFF, Side by Side, Top and Bottom, Frame Packing. 4. Press MENU to return to the previous menu. 7) DPMS Shut off the panel power after the input source has been unused for some time (idle), to save power. 1. Press the MENU button and then use button to select the OPTION icon. 2. Press the button to select DPMS menu 3. Press the OK button to select the Details Menu : ON, OFF 4. Press MENU to return to the previous menu. Version
33 8) Media Effect - Adjusting the slideshow effect in picture playback of USB mode. Photo playback applies only 9) OPS Whether to use OPS PC adjustment 1. Press the MENU button and then use button to select the OPTION icon. 2. Press the button to select OPS menu 3. Press the OK button to select the Details Menu : Disable, Enable 4. Press MENU to return to the previous menu. 10) Software Update (USB) When downloading software via USB memory. - Must be new version software (merge. bin) in USB memory Version
34 7.8 CLOCK MENU 1) Time Settings Enable the user to set up the clock information. 1-1) Clock If current time setting is wrong, reset the clock manually. 1. Press the MENU button and then use button to select the TIME icon. 2. Press the OK button and then use button to select Clock. 3. Press the button to select the Hour, Minute. 4. Use button to adjust clock. 5. Press MENU to return to the previous menu. Version
35 2) On Timer Timer function operates only if current time has been set. 1. Press the MENU button and then use button to select the TIME icon. 2. Press the button to select On Timer. 3. Press the OK button and then use button to select the On, Off. 4. Use button, button to adjust on time schedule and activation. 5. Press MENU to return to the previous menu. 3) Off Timer Timer function operates only if current time has been set. 1. Press the MENU button and then use button to select the TIME icon. 2. Press the OK button and then use button to select Off Timer. 3. Press the button and then use button to select the On, OFF. 4. Use button, button to adjust off time schedule and activation. 5. Press MENU to return to the previous menu. Version
36 4) Sleep Timer Timer function operates only if current time has been set. 1. Press the MENU button and then use button to select the TIME icon. 2. Press the button to select Sleep Timer. 3. Press the OK button and then use button to select the desired time. 4. Press MENU to return to the previous menu. Version
37 8.Product Specification 8-1. LED Specification System Specifications Items Specification Touch detection method Capacitive Touch system Touch tool / Reaction Hand or Conductive Pen Multi Touch 20 Point Resolution (Pixel) x 2,160 Front Glass Tempered Glass 4.0t (Antiglare Type) Overall dimensions(wxhxd) 1771 x 1050 x 88 mm VESA Mount 600(H) x 400(V) mm, M8 SCREW Effective Screen size(mm) (H)x928.26(V) LED Panel Specifications Items Specification Active screen size (Diagonal) 75 inches (1905mm) Contrast Ratio 5000 : 1 Responst Time 6.0ms(Typ G to G) Pixel Format QWUXGA (3,840 x 2,160) Display Colors 10bit(D), 1.07Billon colors Brightness 450cd/ m2 (Typ) Aspect Ratio 16 : 9 View Angle(Typ) Hor. 178, Ver. 178 Ratings of Environment Items Specification Storage Temperature -20 ~ +60 Operating Temperature/Humidity Power Supply Voltage Power Consumption 0 ~ +35 / 20~98%RH (no condensation) AC V, 50/60Hz MAX 400W Version
38 Input / Output Description Video Sound Terminals Others Items Display Format(Not support at UHD mode.) Specifications 5 Modes(Auto,4:3, 16:9, Zoom1, Zoom2) Picture Status Memory 4 Modes(Contrast, Brightness, Color, Sharpness) Color Temperature Status Memory 4 Modes(User, Cool, Medium, Warm) Output(RMS) EQ Max. 10W X 2 Channels Sound System Stereo Equalizer 5 Bands (120Hz, 500Hz, 1.5KHz, 5KHz, 10KHz) Sound Status Memory 5 Modes (Standard, Music, Movie, Sports, User) Balance Yes Surround Yes PC-RGB 1 ( D-SUB 15P) PC/DVI-Audio 1 ( Ø3.5 JACK ) UHD HDMI 1 FHD HDMI 2 (1ea-MHL Supported) UHD DP 1 DVI-D 1 EXT, Speaker Output 1 ( Ø3.5 JACK L/R ) RS232C 1 ( D-SUB 9P ) USB(Touch Sensor Optional) 2 (For Touch Sensor Control, Etc) Component (Optional) 1 ( Y-Pb-Pr, RCA JACK ) Media Play USB / Software Update 1 / Yes(Through USB) DPMS Mode All OPS Yes ( Internal ) Sleep Timer Yes(Max 240Min.) Time Zone Yes Dimm Control( TV Only work.) 6 Modes(Auto Dimming, Local Dimming, Manual Dimming mode) Resolution Freeze Function Auto Bright Component (Optional) DVI UHD DP/UHD HDMI HDMI PC - RGB Yes Yes 480i/480P/576I/576P/720P/1080I/1080P DTV TIMING : 1080P(50/60Hz), 1080i, 720P(50Hz/60Hz), 576P(50Hz), 480P(60Hz) VESA TIMING : up to 1920x1080@60Hz 4Kx2K@30Hz,1080P(50/60Hz), 1080i, 720P(50Hz/60Hz), 576P(50Hz), 480P(60Hz) VESA TIMING : up to 1920x1080@60Hz DTV TIMING : 1080P(50/60Hz), 1080i, 720P(50Hz/60Hz), 576P(50Hz), 480P(60Hz) VESA TIMING : up to 1920x1080@60Hz DOS VGA SVGA XGA SXGA 720*400(70Hz) 640*480(60Hz/72Hz/75Hz) 800*600(56Hz/60Hz/72Hz/75Hz) 1024*768(60Hz/70Hz/75Hz) 1280*1024(60Hz) WXGA 1280*768(60Hz/75Hz),1360*768(60Hz/75Hz) WSXGA WUXGA 1600*1200(60Hz), 1920*1080(60Hz) 1920*1080(60Hz) Version
39 Signal specification PC AV YPbPr (Optional) HDMI Media Play Parameter Sync Video Level MODE Color system Video Level Audio Level Video Level Audio Level Format Video Level Format MPEG1 MPEG2 Video MPEG4 MJPEG JPEG Photo BMP PNG Audio Video File Photo Specification Sync H: 30-75KHz V: 56-75Hz Video Level Max PAL/NTSC/SECAM 500mV rms 500mV rms 480i, 480p, 576i, 576p, 720p, 1080i, 1080p Standard TMDS 480i, 480p, 576i, 576p, 720p, 1080i, 1080p,4k2k MPEG1 MPEG2 AVC, MPEG-4 Visual, DivX5, DivX4, DivX3, XviD, MS-MPEG4 V3, MWV3 M-JPEG Up to 1920 x 1080, 30fps, Bitrate: 20Mbps The maximum display resolution is 15360*8640, the Minimum is 100*100 AC-3, AAC, MP3, PCM.avi,.mpg,.vob,.mp4,.mkv,.flv,.mov.jpg,.bmp,.png Version
40 8-2. OPS(Open Pluggable Specification) Item Description Intel OPS Architecture Thermal Architecture System FAN with heat sink for heat dissipation Chassis Made by heavy steel Dimension 119mm(D) x 200mm(W) x 30mm(H) Color Front Panel in Black Mount Fit into support OPS display device System CPU Onboard 4th generation Intel Core Mobile Haswell processor family System Chipset Intel QM87 System BIOS AMI SPI Flash BIOS System Main Memory 2x SO-DIMM sockets to support up to 16GB DDR3 un-buffered and non-ecc SDRAM Display Intel integrated Intel HD 5000 supports TMDS and DisplayPort through JAE TX25 80-pin connector and 1x HDMI output in front panel Network Interface 1x RJ45 for Ethernet 10/100/1000M bps by using Intel PCIexpress Ethernet controller i210 Super I/O 1x LPC Super I/O support Serial port, GPIO, Watchdog timer and Hardware monitor Audio HD Audio codec for mic-in and line-out phone-jack connectors in front panel; Audio L/R channel through JAE TX25 80-pin connector USB 2x External Type-A USB 3.0 in front panel 2x USB 2.0 and 1x USB 3.0 through JAE TX25 80-pin connector Storage 1x external access 2.5 Drive bay for SATA-interface storage Expansion 1x mini-pciexpress socket for mini-card module RTC Battery By using CR2032 Li-battery Power Requirement DC+12~19V +/- 5% input minimum 5A, maximum up to 8A External Front I/O Audio 1x mic-in phone Jack and 1x Line-out phone jack connector Power on button 1x Toggle switch for Power on/off system Reset 1x Toggle Switch for Reset LED 1x green for power-on status, 1x green for Storage status Ethernet 5x RJ45 with LED connectors (1x WAN and 4x LAN) USB 1x double-stack type A USB connector for 2x USB 3.0 ports HDMI 1x HDMI connector Antenna Hole 2x SMA-type for WiFi Antenna External Rear I/O through JAE TX pin connector Display 1x TMDS and 1x DisplayPort Audio Output Audio output for R/L channels USB 2x USB2.0 and 1x USB 3.0 Power DC input from +12~+19V Control Signal 1x UART (TX/RX), Pluggable Module Power Status, Power ON via display panel, Pluggable Board Detect, Consumer Electronics Control (CEC), and System Fan Control Internal I/O SO-DIMM 2x DDR3 SO-DIMM sockets SATA 1x SATA port for 1x 2.5" SSD/HDD drive bay Mini-PCIexpress 1x mini-pciexpress socket with SIM-Card reader Environment Specification Operating Temperature Operating: -5 C to +45 C Storage: -20 C~80 C FCC/CE Class A RoHS AHA DOC AOPS-7080 OPS, onboard Intel Core i5-4400e Processor Version
41 9. Product Dimensions 9-1. LED Dimensions Version


42 9-2. OPS Dimensions Version
43 10. Troubleshooting Product Self-Diagnosis You can check if the product is working properly using the Self-Diagnosis function. If a blank screen is displayed and the Power LED blinks even if the product and the PC are properly connected, perform the self-diagnosis function according to the procedures below. Turn the product and the PC off. Remove the D-Sub cable from the product. Turn the product on. If the product is working properly, the<check Signal Cable>message appears. In this case, if a blank screen is displayed again, make sure that there is no problem with the PC and the connection Before Requesting Service Please check the following before requesting After-Sales service. If the problem continues, please contact your nearest Service Center. 1) PROBLEMS RELATED TO SCREEN. 1. Screen is blank and power indicator is off.» Ensure that the power cord is firmly connected and the monitor is on. 2. <Mode Not Supported> Message.» Check the maximum resolution and the frequency of the video adapter.» Compare these values with the data in the Standard Signal Mode Table. 3. Picture rolls vertically.» Check if the signal cable is securely connected. Connect it again securely. 4. Image is not clear. Picture is blurred.» Run frequency<coarse> and <Fine> tuning.» Turn on again after removing all accessories(video extension cable, etc.) Set resolution and frequency to the recommended ranges. 5. The image is too light or too dark.» Adjust the <Brightness>and<Contrast>. 6. Screen is blank and the power indicator light blinks every 0.5 or 1 seconds.» The monitor is using its power management system. Press a key on the keyboard. 2 )PROBLEMS RELATED TO AUDIO. 1. No sound» Ensure that the audio cable is firmly connected to both the audio-in port on your monitor and the audio-out port on your sound card. 2. The sound level is too low.» Check the volume level. If the volume is still too low after turning the control to its maximum, check the volume control on the computer sound card or software program. 3. PROBLEMS RELATED TO REMOTE CONTROL. 4. The remote control buttons do not respond.» Check the battery polarities(+/-).» Check if the batteries have been exhausted.» Check if the power is on.» Check if the power cord is securely connected.» Check if a special fluorescent or neon lamp is on in the vicinity. Version
44 11. Customer support and AS guide Before request AS 1) When the product does not operate normally, product manuals can be found on the troubleshooting please refer to the page AS Cost 1) Our warranty period is 1 years. 2) A/S is the cost incurred to our bylaws, item rated A/S price is determined according to the criteria, accurate repair cost, please contacts a customer support counseling over the phone. 3) Even within the warranty period if you use a shipping and negligence A/S will be charged. Version
HDi 84 UHD 4k Commercial LED
 HDi 84 UHD 4k Commercial LED Multi-touch Screen -with OPS Slot Features: UHD 4K native resolution (3840 x 2160px) 84 (Actual) Interactive & viewable area IR Multi-touch responsive (10 points) Familiar
28 4K LED monitor. User Manual M284K
 28 4K LED monitor User Manual M284K CONTENTS Safety Information... 2 What s included..... 4 Getting Started....... 8 Troubleshooting.... 14 Specification.... 15 2 of 15 SAFETY INFORMATION Read these instructions
USER MANUAL. 27 Full HD Widescreen LED Monitor L27ADS
 USER MANUAL 27 Full HD Widescreen LED Monitor L27ADS TABLE OF CONTENTS 1 Getting Started 2 Control Panel/ Back Panel 3 On Screen Display 4 Technical Specs 5 Care & Maintenance 6 Troubleshooting 7 Safety
USER MANUAL. 22" Class Slim HD Widescreen Monitor L215DS
 USER MANUAL 22" Class Slim HD Widescreen Monitor L215DS TABLE OF CONTENTS 1 Getting Started Package Includes Installation 2 Control Panel / Back Panel Control Panel Back Panel 3 On Screen Display 4 Technical
USER MANUAL. 28" 4K Ultra HD Monitor L28TN4K
 USER MANUAL 28" 4K Ultra HD Monitor L28TN4K TABLE OF CONTENTS 1 Getting Started 2 Control Panel/ Back Panel 3 On Screen Display 4 Technical Specs 5 Care & Maintenance 6 Troubleshooting 7 Safety Info &
USER MANUAL. 27 Full HD Widescreen LED Monitor L270E
 USER MANUAL 27 Full HD Widescreen LED Monitor L270E TABLE OF CONTENTS 1 Getting Started 2 Control Panel/ Back Panel 3 On Screen Display 4 Technical Specs 5 Care & Maintenance 6 Troubleshooting 7 Safety
17 19 PROFESSIONAL LCD COLOUR MONITOR ART
 17 19 PROFESSIONAL LCD COLOUR MONITOR ART. 41657-41659 Via Don Arrigoni, 5 24020 Rovetta S. Lorenzo (Bergamo) http://www.comelit.eu e-mail:export.department@comelit.it WARNING: TO REDUCE THE RISK OF FIRE
10.4" LCD Monitor with Aluminum Front Bezel YPM1040PHB
 SPECIFICATION FOR APPROVAL M0DEL: 10.4" LCD Monitor with Aluminum Front Bezel YPM1040PHB BASE MODEL Customer's Confirmation Approved by: Reviewed by: Prepared by: Supplier's Confirmation Approved by: Reviewed
P-2 Installing the monitor (continued) Carry out as necessary
 Carry out as necessary") P-2 Installing the monitor (continued) Carry out as necessary Using the monitor without the bezel MDT552S satisfies the UL requirements as long as it is used with the bezel attached. When using the monitor
P-2 Installing the monitor (continued) Carry out as necessary Using the monitor without the bezel MDT552S satisfies the UL requirements as long as it is used with the bezel attached. When using the monitor
TFT LCD MONITOR USER MANUAL. L80AP and L101AP
 TFT LCD MONITOR USER MANUAL L80AP - 8.0 and L101AP - 10.1 Table Of Contents Table of contents/ Warning.... 2 Precautions...3 About this user manual and products / Items included in the delivery..... 4
PLL2210MW LED Monitor
 PLL2210MW LED Monitor USER'S GUIDE www.planar.com Content Operation Instructions...1 Safety Precautions...2 First Setup...3 Front View of the Product...4 Rear View of the Product...5 Quick Installation...6
LCD VALUE SERIES (32 inches)
") LCD VALUE SERIES (32 inches) http://www.orionimages.com All contents of this document may change without prior notice, and actual product appearance may differ from that depicted herein 1. SAFETY INSTRUCTION
LCD VALUE SERIES (32 inches) http://www.orionimages.com All contents of this document may change without prior notice, and actual product appearance may differ from that depicted herein 1. SAFETY INSTRUCTION
CONTENTS 8 ACCESSORIES 13 9 TROUBLE SHOOTING AND ADVICE SPECIFICATIONS BATTERY USAGE CAUTION 13
 CONTENTS 1 PREFACE 2 2 SAFETY PRECAUTIONS 2 3 FRONT & BACK VIEW, REAR CONNECTION OF LCD 3 4 TV INSTALLATION DRAWINGS 4 4.1 ANTENNA CONNECTION 4 4.2 AV1 INPUT CONNECTION 4 4.3 AV2 INPUT CONNECTION 4 4.4
Winmate Communication INC.
 20.1 Military Grade Display Model: R20L100-RKA2ML User s Manual Winmate Communication INC. May, 2011 1 IMPORTANT SAFETY INSTRUCTIONS Please read these instructions carefully before using the product and
TABLE OF CONTENTS Important Safety Instructions Package Content Setting Up the Display Trouble shooting Specifications Product Dimensions
 TABLE OF CONTENTS Important Safety Instructions...1 1.1 Safety precautions and maintenance....1 1.2 Use.......4 1.3 Installation Notes.......7 Package Content...9 2.1 Unpacking...9 2.2 Accessories......10
VITEK VTM-TLM191 VTM-TLM240
 VTM-TLM191 VTM-TLM240 19 & 24 Professional LED Monitors with HDMI, VGA, and Looping BNC VITEK FEATURES 19 & 24 Wide Screen LED Display Panel HDMI, VGA, and Looping BNC Composite Video Inputs & Stereo Audio
35 INCH CURVED QHD LED MONITOR
 35 INCH CURVED QHD LED MONITOR eiq-35cmuwq60gafs Thank you for choosing electriq Please read this user manual before using this monitor and keep it safe for future reference. Visit our page www.electriq.co.uk
USER MANUAL Full HD Widescreen LED Monitor L236VA
 USER MANUAL 23.6 Full HD Widescreen LED Monitor L236VA TABLE OF CONTENTS 1 Getting Started 2 Control Panel/ Back Panel 3 On Screen Display 4 Technical Specs 5 Care & Maintenance 6 Troubleshooting 7 Safety
USER MANUAL Full HD Widescreen LED Monitor L215IPS
 USER MANUAL 21.5 Full HD Widescreen LED Monitor L215IPS TABLE OF CONTENTS 1 Getting Started 2 Control Panel/ Back Panel 3 On Screen Display 4 Technical Specs 5 Care & Maintenance 6 Troubleshooting 7 Safety
PLL1920M LED LCD Monitor
 PLL1920M LED LCD Monitor USER'S GUIDE www.planar.com Content Operation Instructions...1 Safety Precautions...2 First Setup...3 Front View of the Product...4 Rear View of the Product...5 Installation...6
USER MANUAL Full HD Widescreen LED Monitor L215ADS
 USER MANUAL 21.5 Full HD Widescreen LED Monitor L215ADS TABLE OF CONTENTS 1 Getting Started 2 Control Panel/ Back Panel 3 On Screen Display 4 Technical Specs 5 Care & Maintenance 6 Troubleshooting 7 Safety
USER MANUAL. 27" 2K QHD LED Monitor L27HAS2K
 USER MANUAL 27" 2K QHD LED Monitor L27HAS2K TABLE OF CONTENTS 1 Getting Started 2 Control Panel/ Back Panel 3 On Screen Display 4 Technical Specs 5 Troubleshooting 6 Safety Info & FCC warning 1 GETTING
Monochrome Video Monitors
 Instructions for Use Monochrome Video Monitors En F D E NL I LTC 2009 LTC 2012 LTC 2017 Philips Communication & Security Systems GB F D E NL I Instructions for Use...1.1 Mode d emploi...2.1 Bedienungsanleitung...3.1
PL2410W LCD Monitor USER'S GUIDE.
 PL2410W LCD Monitor USER'S GUIDE www.planar.com Content Operation Instructions...1 Safety Precautions...2 First Setup...3 Front View of the Product...4 Rear View of the Product...5 Quick Installation...6
TFT LCD USER MANUAL TFT-15 TFT-17 TFT-19
 TFT15, 17, 19 Manual_Layout 2 01/03/2013 15:35 Page 1 TFT LCD monitor USER MANUAL TFT-15 TFT-17 TFT-19 TFT15, 17, 19 Manual_Layout 2 01/03/2013 15:35 Page 2 2 TFT15, 17, 19 Manual_Layout 2 01/03/2013 15:36
User Manual 15" LCD Open frame SAW Touch Monitor KOT-0150US-SA4W. Table of Contents
 User Manual 15" LCD Open frame SAW Touch Monitor KOT-0150US-SA4W Table of Contents Chapter 1. Introduction...2 1.1 Product Description 1.2 About the Product Chapter 2. Installation and Setup...2 2.1 Unpacking
DC162 Digital Visualizer. User Manual. English - 1
 DC162 Digital Visualizer User Manual English - 1 Table of Contents CHAPTER 1 PRECAUTIONS... 5 CHAPTER 2 PACKAGE CONTENT... 7 CHAPTER 3 PRODUCT OVERVIEW... 8 3.1 PRODUCT INTRODUCTION... 8 3.2 I/O CONNECTION...
SAFETY WARNINGS AND GUIDELINES
 SAFETY WARNINGS AND GUIDELINES Please read this manual thoroughly, paying extra attention to these safety warnings and guidelines: Do not expose this monitor to water or moisture of any kind. Do not handle
LA1500R USER S GUIDE.
 LA1500R USER S GUIDE www.planar.com The information contained in this document is subject to change without notice. This document contains proprietary information that is protected by copyright. All rights
Quick Reference Guide
 Multimedia Projector Quick Reference Guide MODEL 103-011100-01 Projection lens is optional. English Use this book as a reference guide when setting up the projector. For detailed information about installation,
42" 47" 55" 42.1, 47.1, 55.1 STORM. Outdoor Television USER MANUAL. Serial No:
 42" 47" 55" 42.1, 47.1, 55.1 STORM Outdoor Television USER MANUAL Serial No: www.seura.com Thank you for selecting Séura s Storm Outdoor Television. This product has been inspected and packaged carefully
Camera 220C Document Camera User s Guide
 Camera 220C Document Camera User s Guide #401-220C-00 Table of Contents TABLE OF CONTENTS... 0 TABLE OF CONTENTS... 1 COPYRIGHT INFORMATION... 2 CHAPTER 1 PRECAUTIONS... 3 CHAPTER 2 PACKAGE CONTENT...
DH551C/DH550C/DL550C Double Sided Display User Manual
 DH551C/DH550C/DL550C Double Sided Display User Manual Disclaimer BenQ Corporation makes no representations or warranties, either expressed or implied, with respect to the contents of this document. BenQ
AUTO - SCANNING WITH DIGITAL CONTROL LCD COLOR MONITOR FS-L1903C. User manual (Rev.01) SMITHS HEIMANN
 SMITHS HEIMANN") AUTO - SCANNING WITH DIGITAL CONTROL LCD COLOR MONITOR FS-L1903C User manual (Rev.01) SMITHS HEIMANN www.smithsdetection.com Table of Contents Safety Instructions... 5 Accessories... 8 Power Connections...
AUTO - SCANNING WITH DIGITAL CONTROL LCD COLOR MONITOR FS-L1903C User manual (Rev.01) SMITHS HEIMANN www.smithsdetection.com Table of Contents Safety Instructions... 5 Accessories... 8 Power Connections...
L1900J L1900R L1900E. User s Guide
 User s Guide L1900J L1900R L1900E Make sure to read the Important Precautions before using the product. Keep the User's Guide(CD) in an accessible place for future reference. See the label attached on
Table of Contents Precautions... 2
 Table of Contents Precautions... 2 Special notes on LCD monitors... 2 Package contents... 3 Installation instructions... 3 Assembling the monitor... 3 Adjusting the viewing angle... 4 Connecting the devices...
DM-1CH SD DVB-T MODULATOR INSTRUCTION MANUAL
 DM-1CH SD DVB-T MODULATOR INSTRUCTION MANUAL 2. Caution Statements and Table of Contents Table of Contents 2. Caution Statements and Table of contents 3. Important Safety Instructions 4. Important Safety
INSTRUCTIONAL MANUAL FOR LCD ZOOM MICROSCOPE
 INSTRUCTIONAL MANUAL FOR LCD ZOOM MICROSCOPE ? 8 LCD Screen? 10.4 LCD Screen LCD Zoom Microscope Instruction Manual Please read the Instruction Manual carefully before installation and keep it for future
MP 35" Zero-G 100Hz Curved Monitor with AMD FreeSync 2.0
 MP 35" Zero-G 100Hz Curved Monitor with AMD FreeSync 2.0 P/N 31005 User's Manual SAFETY WARNINGS AND GUIDELINES Please read this entire manual before using this device, paying extra attention to these
DCL9AW. User Manual. English
 DCL9AW User Manual English PRECAUTIONS Information for users applicable in European Union countries 1 Information for users applicable in United States of America 1 Installation 1 Power connection 1 Maintenance
Acer LCD TV AT2001 User's Guide
 Acer LCD TV AT2001 User's Guide Copyright 2005. Acer Incorporated. All Rights Reserved. Acer AT2001 User' s Guide Original Issue: May 2005 Acer and the Acer logo are registered trademarks of Acer Incorporated.
19 / 20.1 / 22 WIDE SCREEN TFT-LCD MONITOR
 19 / 20.1 / 22 WIDE SCREEN TFT-LCD MONITOR V193/ V220 Series V202 Series USER MANUAL www.viewera.com Rev. 2.0 Table of Contents EMC Compliance......1 Important Precautions...2 1. Package contents....3
26 Inch CGA/EGA/VGA/DVI to WXGA/1080p LCD - ID#703
 26 Inch CGA/EGA/VGA/DVI to WXGA/1080p LCD - ID#703 Operation Manual Introduction This monitor is an open frame LCD Panel monitor. It features the VESA plug & play system which allows the monitor to automatically
MP Zero-G 27" WQHD 144Hz TN-LED Monitor with AMD FreeSync
 MP Zero-G 27" WQHD 144Hz TN-LED Monitor with AMD FreeSync P/N 31004 User's Manual SAFETY WARNINGS AND GUIDELINES Please read this entire manual before using this device, paying extra attention to these
ACUBRITE 23 SS. Manual. Stainless Steel Chassis 23" LCD Display. Content
 ACUBRITE 23 SS Stainless Steel Chassis 23" LCD Display Manual Introduction... 2 Hardware Installation... 2 The Display Timing... 5 The Display Outline Dimensions... 6 The Display Controls... 7 The Screen
HD Digital Set-Top Box Quick Start Guide
 HD Digital Set-Top Box Quick Start Guide Eagle Communications HD Digital Set-Top Box Important Safety Instructions WARNING TO REDUCE THE RISK OF FIRE OR ELECTRIC SHOCK, DO NOT EXPOSE THIS PRODUCT TO RAIN
2.0 Wall Mount TV Soundbar Instruction Manual
 8010275 2.0 Wall Mount TV Soundbar Instruction Manual Read all of the instructions before using this soundbar and keep the manual in a safe place for future reference. Safety Information CA UT IO N RISK
Evolution Digital HD Set-Top Box Important Safety Instructions
 Evolution Digital HD Set-Top Box Important Safety Instructions 1. Read these instructions. 2. Keep these instructions. 3. Heed all warnings. 4. Follow all instructions. 5. Do not use this apparatus near
USER S Manual NGLT104WPD NGLT150WPD LCD TV / Monitor (IP67 Grade)
") USER S Manual NGLT104WPD NGLT150WPD LCD TV / Monitor (IP67 Grade) This Manual is revisable without further notice Contents CONTENTS ------------------------------------------------------------------- 1
USER S Manual NGLT104WPD NGLT150WPD LCD TV / Monitor (IP67 Grade) This Manual is revisable without further notice Contents CONTENTS ------------------------------------------------------------------- 1
PXL2760MW LED LCD Monitor
 PXL2760MW LED LCD Monitor USER'S GUIDE www.planar.com Content Operation Instructions...1 Safety Precautions...2 Package Overview...3 First Setup...4 Front View of the Product...5 Rear View of the Product...6
USER MANUAL. VP-425 PC / Component to HDMI Scaler MODEL: P/N: Rev 3
 KRAMER ELECTRONICS LTD. USER MANUAL MODEL: VP-425 PC / Component to HDMI Scaler P/N: 2900-300111 Rev 3 Contents 1 Introduction 1 2 Getting Started 2 2.1 Achieving the Best Performance 2 2.2 Safety Instructions
Dell Wyse 5030 PCoIP Zero Client
 Dell Wyse 5030 PCoIP Zero Client User Guide Regulatory Model: PxN Regulatory Type: PxN001 Notes, cautions, and warnings NOTE: A NOTE indicates important information that helps you make better use of your
42 Freestanding Infrared Multi Touch Screen Kiosk User s Manual
 42 Freestanding Infrared Multi Touch Screen Kiosk User s Manual Manual Version L42HD-T2.2 Safety Instructions Please keep the display away from any heat sources such as radiators or direct sunlight. Place
27'' Full HD LED Monitor KALED27MONSC Quick Start Guide
 Safety Warnings 27'' Full HD LED Monitor KALED27MONSC Quick Start Guide TO REDUCE THE RISK OF ELECTRIC SHOCK, DO NOT REMOVE ANY COVERS (OR BACKINGS). NO USER SERVICEABLE PARTS ARE INSIDE. REFER ALL SERVICING
INFORMATION TO THE USER
 U.S.FEDERAL COMMUNICATIONS COMMISSION RADIO FREQUENCY INTERFERENCE STATEMENT INFORMATION TO THE USER NOTE: This equipment has been tested and found to comply with the limits for a Class B digital device
PLL2710W LED LCD Monitor
 PLL2710W LED LCD Monitor USER'S GUIDE www.planar.com Content Operation Instructions...1 Safety Precautions...2 Package Overview...3 First Setup...4 Front View of the Product...5 Rear View of the Product...6
Introduction...2. Features...2 Safety Precautions...2. Installation...4
 PE1900 Contents Introduction...2 Features...2 Safety Precautions...2 Installation...4 Unpacking the Display...4 Locations and Functions of Controls...4 Connections...5 Using Your Display...7 Turning the
Displays Open Frame Monitor Model Number: AND-TFT-150Bxx
 Displays 15.0 Open Frame Monitor Model Number: AND-TFT-150Bxx The AND-TFT-150Bxx 15.0 Open Frame Monitor series are rugged, high performance Industrial LCD Monitors, designed for commercial and industrial
17 /19. User's Manual
 17 /19 Color TFT LCD Monitor User's Manual Version: 03 * All other brand names are registered trademarks of their respective owners Table of Contents Important Safety Instructions FCC Regulation Class
32" LED Television. Initial Assembly B. Main Unit. 1. Fix the Left Base Stand to the main unit using 2 pcs provided screws.
 2 3 4 8047922B 32" LED Television Initial Assembly 8047922 Main accessories: Installation Steps: 1. Fix the Left Base Stand to the main unit using 2 pcs provided screws. 2. Fix the Right Base Stand to
FLAT DISPLAY TECHNOLOGY
 15.0 Open Frame Monitor Model Number: LOF1506xx This product is RoHS compliant SPEC No.: SAS-1008002 Version: 0.0 Issue Date: September 6, 2010 1. Introduction: 1.1 About the Product The LOF1506xx 15.0
Operating Instructions
 Operating Instructions LCDRV700 Digital LCD Color Monitor Please read this manual thoroughly before operating the unit, and keep it for future reference. V1.0 Contents 1. Precautions 2. Features 1 3 3.
Safety Precautions and Maintenance
 Safety Precautions and Maintenance 1. Unplug the monitor before cleaning it with a slightly damp cloth. 2. Wiping the screen with a dry cloth is recommendable, and only during the power has been switched
CP-255ID Multi-Format to DVI Scaler
 CP-255ID Multi-Format to DVI Scaler Operation Manual DISCLAIMERS The information in this manual has been carefully checked and is believed to be accurate. Cypress Technology assumes no responsibility
CAUTION RISK OF ELECTRIC SHOCK NO NOT OPEN
 Evolution Digital HD Set-Top Box Important Safety Instructions 1. Read these instructions. 2. Keep these instructions. 3. Heed all warnings. 4. Follow all instructions. 5. Do not use this apparatus near
FD Trinitron Colour Television
 R 4-205-569-32(1) FD Trinitron Television Instruction Manual GB KV-14LM1U 2000 by Sony Corporation NOTICE FOR CUSTOMERS IN THE UNITED KINGDOM A moulded plug complying with BS1363 is fitted to this equipment
Color TFT LCD Monitor The Art of Surveillance
 Color TFT LCD Monitor The Art of Surveillance User Manual Table of contents Safety Information---------------------------------------------------- 1-3 Accessories----------------------------------------------------------------3
TFT LCD MONITOR USER MANUAL HMDE Series 104AV-HMDE 121AV-HMDE 151/152AV-HMDE 156AV-HMDE, 171/172AV-HMDE 185AV-HMDE 191/192AV-HMDE 215AV-HMDE
 TFT LCD MONITOR USER MANUAL HMDE Series 104AV-HMDE 121AV-HMDE 151/152AV-HMDE 156AV-HMDE, 171/172AV-HMDE 185AV-HMDE 191/192AV-HMDE 215AV-HMDE 220AV-HMDE 236AV-HMDE 240AV-HMDE 270AV-HMDE 320AV-HMDE 420AV-HMDE
COLOR TFT LCD MONITOR WITH MULTI-TOUCH FUNCTION Manual
 COLOR TFT LCD MONITOR WITH MULTI-TOUCH FUNCTION Manual DEAR CUSTOMERS Thank you for choosing our TFT LCD (liquid crystal display) monitor. This product employs integrate circuits, low power consumption,
For safe and correct use, be sure to read the Safety Information in Read This First before using the machine. Operating Instructions
 For safe and correct use, be sure to read the Safety Information in Read This First before using the machine. Operating Instructions Table of Contents 1 Disclaimer...2 1. Using the Remote control... 3
Model#: IN-MDRI3MF. Hardware User Manual. 3MP Indoor Mini Dome with Basic WDR, Fixed lens. (PoE) Ver. 2013/02/04
 Ver. 2013/02/04") Model#: IN-MDRI3MF 3MP Indoor Mini Dome with Basic WDR, Fixed lens Hardware User Manual (PoE) Ver. 2013/02/04 Table of Contents 0. Precautions 3 1. Introduction 4 Package Contents... 4 Features and Benefits...
Model#: IN-MDRI3MF 3MP Indoor Mini Dome with Basic WDR, Fixed lens Hardware User Manual (PoE) Ver. 2013/02/04 Table of Contents 0. Precautions 3 1. Introduction 4 Package Contents... 4 Features and Benefits...
PXL2470MW LED LCD Monitor
 PXL2470MW LED LCD Monitor USER'S GUIDE www.planar.com Content Operation Instructions...1 Unpacking Instructions...2 Safety Precautions...2 Package Overview...3 First Setup...4 Front View of the Product...5
User Manual rev: Made in Taiwan
 CV-500S HDMI to Component/CVBS & Audio Scaler Converter User Manual rev: 131218 Made in Taiwan The CV-500S HDMI to Component/CVBS & Audio Scaler Converter has been tested for conformance to safety regulations
USER MANUAL. VP-435 Component / UXGA HDMI Scaler MODEL: P/N: Rev 13
 KRAMER ELECTRONICS LTD. USER MANUAL MODEL: VP-435 Component / UXGA HDMI Scaler P/N: 2900-000262 Rev 13 Contents 1 Introduction 1 2 Getting Started 2 2.1 Achieving the Best Performance 2 2.2 Safety Instructions
COLOR TFT LCD MONITOR. Manual
 COLOR TFT LCD MONITOR Manual Safety defended: Properly maintains your system to be possible to guarantee its service life and to reduce the damage risk. It should avoid the damp and exceeding temperature
HMX Analyser HDMI 3D Mini Analyser. Operating Manual. Part No TRIAX - your ultimate connection
 HMX Analyser HDMI 3D Mini Analyser Part No. 310012 Operating Manual TRIAX - your ultimate connection Operating Manual The illustrations in this operation manual are for explanation and guidance purposes
User Manual. Innovative LCD Display Solutions AP-20 Series DP-20 Series OP-20 Series NAP-20 Series
 Innovative LCD Display Solutions AP-20 Series DP-20 Series OP-20 Series NAP-20 Series 1. Table of Content 1. Table of Content P.1 2. Introduction 3. Installation A) Overview P.2 B) Features P.2 C) Dimension
LCD DISPLAY. quick start guide. 460UTn-2, 460UT-2, 460UTn-B, 460UT-B
 LCD DISPLAY quick start guide 460UTn-2, 460UT-2, 460UTn-B, 460UT-B ii Introduction Package Contents Checking the Contents of the Package Remove the lock from the package box, as shown in the figure above.
PRO-ScalerHD2V HDMI to VGA & Audio Scaler Converter. User s Guide. Made in Taiwan
 PRO-ScalerHD2V HDMI to VGA & Audio Scaler Converter User s Guide Made in Taiwan Congratulations for owning a gofanco product. Our products aim to meet all your connectivity needs wherever you go. Have
Owner s Manual. TFT-LCD TV High Brightness & Contrast NICAM/A2 Stereo Sound MODEL: L15SV6-A0, L17LV6-A1,L20AV6-A0 L17L6A-G1,L20L6A
 TFT-LCD COLOUR TV Owner s Manual TFT-LCD TV High Brightness & Contrast NICAM/A2 Stereo Sound Please read this manual carefully before using your television and keep this manual in a good place for future
OWNER'S MANUAL MODEL: DTV-2000 STANDBY/ON
 OWNER'S MANUAL MODEL: DTV-2000 STANDBY/ON CH+ CH- TABLE OF CONTENTS SAFETY PRECAUTIONS IMPORTANT SAFETY INSTRUCTIONS and FEATURES ACCESSORIES and LOADING BATTERIES REMOTE CONTROL UNIT FRONT PANEL and REAR
USER MANUAL. VP-426 HDMI-PC Scaler MODEL: P/N: Rev 4.
 USER MANUAL MODEL: VP-426 HDMI-PC Scaler P/N: 2900-300277 Rev 4 www.kramerav.com Contents 1 Introduction 1 2 Getting Started 2 2.1 Achieving the Best Performance 2 2.2 Safety Instructions 2 2.3 Recycling
Multi-function Portable. HD LCD Monitor. User Manual
 Multi-function Portable HD LCD Monitor User Manual Product description: Thank you for purchasing our photography, broadcast color LCD Monitor kit. This product adopts proprietary digital signal processing
P XGA TFT Monitor. User s Manual
 P6151 15 XGA TFT Monitor User s Manual Disclaimers This manual has been carefully checked and believed to contain accurate information. Axiomtek Co., Ltd. assumes no responsibility for any infringements
22" Touchscreen LED Monitor USER'S GUIDE
 22" Touchscreen LED Monitor USER'S GUIDE Content Operation Instructions...1 Unpacking Instructions...2 Safety Precautions...2 Front View of the Product...3 Rear View of the Product...4 Quick Installation...5
PX1710M LCD Monitor USER S GUIDE
 PX1710M LCD Monitor USER S GUIDE www.planar.com The information contained in this document is subject to change without notice. This document contains proprietary information that is protected by copyright.
9" B/W MONITOR CEM-09/09A-2 12" B/W MONITOR CEM-12/12A-2 OPERATION MANUAL
 9" B/W MONITOR CEM-09/09A-2 12" B/W MONITOR CEM-12/12A-2 OPERATION MANUAL CONTENTS PRECAUTIONS FOR USE AND INSTALLATION IMPORTANT SAFEGAURDS SAFETY INSTRUCTIONS INSTRUCTION MANUAL CLASS B COMPUTING DEVICES
USER S MANUAL MANUEL DE L UTILISATEUR MANUAL DEL USUARIO VM-42F140S VM-47F140S. 1080p Monitor Moniteur 1080p
 USER S MANUAL MANUEL DE L UTILISATEUR MANUAL DEL USUARIO VM-42F140S VM-47F140S 1080p Monitor Moniteur 1080p TABLE OF CONTENTS 1. IMPORTANT SAFETY AND PRECAUTIONS.... 1 1.1 Important Information. 1 1.2
User Manual LED TV CLOUD TV 55SU CLOUD TV 65SU. Design and Specification are subject to change without prior notice
 User Manual Thank you for purchasing CloudWalker LED TV. Please feel free to reach out to us for any service related query/complaints or for any feedback/suggesstions on the contact details mentioned below
NMS ETA TM Stereo Advanced Digital TV Set-top Box
 Digital TV HD Set-top Box STB2-T2 NMS ETA TM Stereo Advanced Digital TV Set-top Box User Guide CONTENTS Safety Information... 3 Introduction... 4 Set-top Box Front Panel... 4 Set-top Box Back Panel...
A Perfect Solution for Digital Signage in Commercial Areas CDE4600-L
 The ViewSonic is a 46" commercial LED display with a 19.5mm narrow-bezel design. Featuring Full HD 1080p resolution, 350-nit high brightness, 4000:1 high contrast ratio, SuperClear technology for wide
39" 1080p LCD Television PLCD3992A
 PROSCAN 39" 1080p LCD Television PLCD3992A Contents Contents Caution Safety Information Unit and Accessories Product Feature 2 3 4 4 Introduction 5-9 1. Front View 5 2. Rear View 6 3. Instruction for
User Manual TL-2X1-HDVC 2x1 HDMI & VGA Switcher with Control All Rights Reserved Version: TL-2X1-HDVC_160630
 User Manual TL-2X1-HDVC 2x1 HDMI & VGA Switcher with Control All Rights Reserved Version: TL-2X1-HDVC_160630 Preface Read this user manual carefully before using this product. Pictures shown in this manual
28 & 32 & 40 & 55 & 65 & 84-INCH TFT-LCD 4K MONITOR
 28 & 32 & 40 & 55 & 65 & 84-INCH TFT-LCD 4K MONITOR INSTRUCTION MANUAL Please read this manual thoroughly before use, and keep it handy for future reference. TABLE OF CONTENTS 1, General information...
Overview U508CV-UMK. Display
 U508CV-UMK Overview With a Sceptre 49" LED 4K UHD TV (U508CV-UMK), entertainment is transformed into an epic adventure. The unequalled color and clear brilliance of 4K (3,840 x 2,160 or over 8 million
Operating Instruction Manual LCD MONITOR
 Operating Instruction Manual LCD MONITOR Table of contents Safety Symbols & Precautions--------------------------------------------------2~4 Accessories-----------------------------------------------------------------------------5
User s Guide L1734S Important Precautions
 User s Guide L1734S Make sure to read the Important Precautions before using the product. Keep the User's Guide(CD) in an accessible place for future reference. See the label attached on the product and
Safety warning Important Safety Instructions. Wall Mount Specifications. Electronic Program Guide. Lock Menu 18. PVR File System
 LT-32N370Z 32 INPUT Safety warning Important Safety Instructions Wall Mount Specifications Electronic Program Guide Lock Menu 18 PVR File System 11 11 11 14 15 16 17 19 20 21 21 22 23 24 25 INPUT AAA
Table of Contents Table of Contents... 1 Usage Notice... 2 Introduction... 4 Installation User Controls Appendices...
 Table of Contents Table of Contents... 1 Usage Notice... 2 Precautions... 2 Introduction... 4 Product Features... 4 Package Overview... 5 Product Overview... 6 Main Unit... 6 Control Panel... 7 Connection
2013, 2014 Hewlett-Packard Development Company, L.P.
 User Guide 2013, 2014 Hewlett-Packard Development Company, L.P. The only warranties for HP products and services are set forth in the express warranty statements accompanying such products and services.