Instruction Manual PARAGON Series DVR
|
|
|
- Drusilla Edwina Pope
- 5 years ago
- Views:
Transcription
1 Instruction Manual PARAGON Series DVR
2 E V E R F O C U S E L E C T R O N I C S C O R P O R A T I O N PARAGON Series DVR Instruction Manual 2009 EverFocus Electronics Corp All rights reserved. No part of the contents of this manual may be reproduced or transmitted in any form or by any means without written permission of the Everfocus Electronics Corporation. Release Date: June QuickTime is a registered trademark of the Apple Computer, Inc. Windows is a registered trademark of the Microsoft Corporation. Linksys is a registered trademark of the Linksys Corporation. D-Link is a registered trademark of the D-Link Corporation. DynDNS is a registered trademark of the DynDNS.org Corporation. Other product and company names mentioned herein may be the trademarks of their respective owners.


3 Safety Precautions To avoid any damage, please consider the following safety warnings: Never place the recorder near to heaters, furnaces, other heat sources or under direct solar irradiation. Operate the device only in locations providing the tolerable operating temperature range 0 C~40 C/32 F ~ +104 F. Make sure that the device s ventilation slots are not covered or sheeted. For cleaning, make sure the device is plugged off and only use a damp cloth without acid detergent. Install the device only in dry and dustproof surroundings. Protect the device against any liquid s penetration. Avoid the penetration of any artifacts, e.g. through ventilation slots. Do not attempt to disassemble the appliance. To prevent electric shock, do not remove screws or covers. There are no user-serviceable parts inside. Contact qualified service personnel for maintenance. Handle the appliance with care. Do not strike or shake, as this may damage the appliance. Do not operate appliance with other than specified power supplies. The input power source of the power supply is 100 ~ 240 VAC. Avoid any affection of the device through vibrations or mechanical shock at the recorder s installation location. Avoid to power off DVR during playback or recording operation. ATTENTION! This is a class A product which may cause radio interference in a domestic environment; in this case, the user may be urged to take adequate measures. Federal Communication Commission Interference Statement This equipment has been tested and found to comply with the limits for a Class B digital device, pursuant to Part 15 of the FCC Rules. These limits are designed to provide reasonable protection against harmful interference in a residential installation. This equipment generates, uses and can radiate radio frequency energy and, if not installed and used in accordance with the instructions, may cause harmful interference to radio communications. However, there is no guarantee that interference will not occur in a particular installation. If this equipment does cause harmful interference to radio or television reception, which can be determined by turning the equipment off and on, the user is encouraged to try to correct the interference by one of the following measures : Reorient or relocate the receiving antenna. Increase the separation between the equipment and receiver. Connect the equipment into an outlet on a circuit different from that to which the receiver is connected. Consult the dealer or an experienced radio/tv technician for help. FCC Caution: Any changes or modifications not expressly approved by the party responsible for compliance could void the users authority to operate this equipment. ii

4 WEEE This Product is RoHS compliant. The information in this manual was current upon publication. The manufacturer reserves the right to revise and improve his products. Therefore, all specifications are subject to change without prior notice. Misprints reserved. Please read this manual carefully before installing and using this unit. Be sure to keep it handy for later reference. iii
5 TABLE OF CONTENTS 1 PRODUCT OVERVIEW FEATURES PACKAGE CONTENTS SPECIFICATIONS FRONT PANEL REAR PANEL INSTALLATION VIDEO INPUTS/OUTPUTS INSTALLATION AUDIO INSTALLATION ALARM / CONTROL CONTACTS INSTALLATION Alarm Input Contacts Control Input Contact Alarm Output Relay RS-485 KEYBOARD / PTZ INSTALLATION General RS-485 bus installation RS-485 socket pin assignment EKB-500 connection with network patch cable EKB-500 connection to several DVRs Speed Dome Installation RS-232 CONNECTION USB-MOUSE INSTALLATION NETWORK CONNECTION Direct PC Connection through Crossover Network Cable Network Connection through Patch Cable FINAL INSTALL PROCESS MOUSE AND FRONT PANEL OPERATION GENERAL USB MOUSE OPERATION How to select a channel / Enable audio OSD Root Menu Operation in Configuration Menu Component Options GENERAL FRONT PANEL OPERATION How to select a channel / Enable audio OSD Root Menu Front Panel Key Review Operation in Configuration Menu Component Options GENERAL DVR OPERATIONS RECORD iv
6 4.2 LOGIN SELECT CAMERA OPERATION CHANGE AUDIO OUTPUT OPERATION PLAYBACK PTZ General PTZ control Express control PTZ LAYOUT Bring to full screen mode CHANNEL SWITCHING DISPLAY SEQUENCE MONITOR ZOOM SEARCH Time Search Event Search Motion Search COPY LOGOUT DVR CONFIGURATION CONFIGURATION MENU EXPRESS CAMERA SETTING Basic Setting Video Adjust Motion Video Loss RECORD & PLAY SETTING Record Built-in Cal Play ALARM & EVENT SETTING Alarm Event SCHEDULE SETTING Express Setup Holidays Schedule NETWORK SETTING LAN DDNS Alarm Server DISPLAY SETTING Monitor OSD Main M/T SEQ...81 v
7 5.8.3 Call M/T SEQ DISK SETTING Disk Lock/Format SYSTEM SETTING Date/Time Daylight Saving User I/O Control Misc INFORMATION SETTING System Log NETWORKING OVERVIEW INTRODUCTION TO TCP/IP SUBNET MASKS GATEWAY ADDRESS VIRTUAL PORTS PRE-INSTALLATION WHAT IS YOUR NETWORK SETUP? SIMPLE ONE TO ONE CONNECTION DIRECT HIGH SPEED MODEM CONNECTION ROUTER OR LAN CONNECTION REMOTE OPERATION FROM BROWSER CONNECTING TO PARAGON BROWSER SECURITY SETTING Installing ActiveX controls Enabling ActiveX Controls REMOTE LIVE VIEW REMOTE PTZ CONTROL REMOTE PLAYBACK EVERFOCUS DDNS SETUP LINKSYS & D-LINK PORT FORWARDING LINKSYS PORT FORWARDING D-LINK PORT FORWARDING TROUBLESHOOTING APPENDIX A: TIMING OF ALARM MODES APPENDIX B: CHANGING RULE FOR EXPRESS SETUP vi
8 Chapter 1 1 PRODUCT OVERVIEW The latest EverFocus digital video recorder generation is based on MPEG-4 compression technology, resulting in enhanced recording capacity and improved network image transmission speed with high image quality. Comprehensive features and extended event recording settings enable the almost universal application of this DVR series. The Paragon Series DVR comes with multiple control inputs. These inputs include mouse control, front panel control, IR remote control and EverFocus keyboard (EKB500) control. Mouse control is supported with the simple Graphical User Interface (GUI), offering experienced PC users the similarity of interactive command of a computer-controlled device. With the GUI, users can command specific actions on the Paragon Series DVR through graphical icons and visual indicators. Simply point, click and drag the playback bar on the screen to playback our recordings in any time slot. All GUI functions can be operated via front panel, IR remote and keyboard as well. Hop on the Express Lane! The Paragon series DVR is engineered for express operations. Setup, copy, search and playback recordings in seconds with a simple point and click on the command icons. 1.1 FEATURES Pentaplex Operation (Simultaneous live, recording, playback, archiving and remote viewing) User friendly GUI with graphical icons and visual indicators Multiple Control Inputs: mouse/front panel/remote control Free EverFocus DDNS Service Built-in DVR calculator for fast recording estimation Express Setup: Located in menu option for quick & easy installation Express Copy: Record video instantly while playing back (USB) Express Playback: Simply point, click and drag the playback bar to view previous recordings Express Search: Use intuitive playback bar with a simple drag & drop operation Remote configuration support from built-in web interface Gigabit Ethernet interface for remote network viewing and controlling Real-time live display for all cameras 1
9 On-screen PTZ control via mouse or front panel Support EKB500 keyboard control Audio recording capabilities* 2 Hot Swappable HDD or 4 internal HDD Built-in DVD burner* Support esata 2 USB 2.0 ports (located on front panel) for video archive and mouse usage Multi-language support Simultaneous VGA, composite and S-Video output Watermark capabilities to identify intentional modifications of recorded data Rack mountable *Feature not available for all models 1.2 PACKAGE CONTENTS -HDD fixing bracket x 4 (Internal HDD model) -HDD tray x 2 (External HDD model) -DVR fixing bracket x 2 -Remote controller x 1 -Battery x 2 -Shockproof rubber x 16(Internal HDD model) -Screws x 16(Internal HDD model) -Expanding screws x 16(Internal HDD model) -SATA cable(internal HDD model x4, Removable HDD model x 2) -Hard Disc Tray x 2(Removable HDD model) -Power cord x 1 -Mouse x 1 -DVR x 1 -User manual x 1 2
10 1.3 SPECIFICATIONS Video Format Operating System Video Input Video Loop Video Output Video Compression Video Display Recording Resolution Audio* Alarm Input Alarm Output Hard Disk NTSC / PAL (auto detected by system) Embedded Linux EDR16: 16 x 1 Vpp FBAS, BNC, 75 Ohm EDR8: 8 x 1 Vpp FBAS, BNC, 75 Ohm EDR16: 16 x 1 Vpp FBAS, BNC, 75 Ohm EDR8: 8 x 1 Vpp FBAS, BNC, 75 Ohm Main monitor: 1 Vpp FBAS, BNC at 75 Ohm 1 x VGA ( res. 800x600@60 Hz), S-Video MPEG-4 Full screen, Picture In Picture (Live only), 4-channel, 9-channel, 10- channel, 13-channel, 16-channel NTSC: 704 x 480, 704 x 240 or 352 x 240 PAL: 704 x 576, 704 x 288 or 352 x 288 Input: EDR16: 16 Line In, 1 20 KOhm (RCA) EDR8: 8 Line In, 1 20 KOhm (RCA) Output: 1 x Line out 1 20 KOhm (RCA) (* audio models only) EDR16: 16 Inputs EDRR8: 8 Inputs 4 Alarm Outputs (N.C/COM/N.O) 4 x 3.5 SATA hard disk(internal HDD model) 2 x 3.5 SATA hard disk(removable HDD model) Recording Rate NTSC 352 x 240: 480 IPS 704 x 240: 240 IPS 704 x 480: 120 IPS PAL 352 x 288: 400 IPS 704 x 288: 200 IPS 704 x 576: 100 IPS 3
11 Recording Modes Continuous, schedule, or event recording Playback Rate NTSC 352 x 240: 480 IPS 704 x 240: 240 IPS 704 x 480: 120 IPS PAL 352 x 288: 400 IPS 704 x 288: 200 IPS 704 x 576: 100 IPS Playback Search Function Motion Detection Video Loss Detection Event Log Event Alarm Setup Operation Real-time Clock Watchdog Function Network File Export RS-232 RS-485 Power Source Power Consumption Dimensions Weight By time / date; by event (alarm / motion); Smart Motion Grid Search Adjustable by channel, 22x16 sensor fields each with 10 levels sensitivity Yes Maximum events Fan failure, hard disk failure, hard disk temperature over, hard disk full, HD off, power loss, record stop, network loss Graphical On-Screen-Display Via front panel, USB optical mouse, IR remote control, or RS-485 operation from EKB500 Internal with optional network synchronization (NTP server) Yes 10/100/1000Mbps, RJ45 connection USB 2.0 interface Built-in DVD+RW (D models only) 9-pin D-Sub socket Terminal connector 100 ~ 240 VAC 150 W max 430 (W) x 410 (D) x 88 (H) mm ; 16.9 (W) x 16.2 (D) x 3.5 (H) 6.35 kg ( 14 LBS) 4
12 Ambient Temperature Remote Control 0 C ~ 40 C ; 32 F ~ 104 F (20%~80% humidity) Handheld IR remote control; RS-485 keyboard EKB-500 (optional) 5
13 1.4 FRONT PANEL Your primary interaction with your new DVR will be through the Front Panel buttons and their corresponding buttons on the included Remote Control. Take a moment to learn where the keys are as the remainder of the manual will refer to them often. Figure 1-1 Front Panel 1) 2 x USB-2.0 port for USB mouse, USB-Flash-Drive 2) Multiview Keys: 16x 4x 9x 13x 10x PiP NOTE: The LED will show the selected screen layout. The Multiview keys are only active in Main monitor - operation. 3) Channel keys 1~16 / 1~8 for full screen display of selected channel. The LED will show the active channel. 4) DVD+RW: DVD+RW drive for video data export. (for D model only) 5) DISPLAY: The DISPLAY key switches titles and status messages on the Screen in 4 steps. For details please consult chapter 4.9 DISPLAY. 6
 MONITOR: The MONITOR key switches operation between MAIN and CALL.")
 SEARCH: The SEARCH key opens the SEARCH menu, details in chapter 4.13 SEARCH. 11) COPY: The COPY key opens the menu for video data export, details in chapter 4.14 COPY.")
14 6) SEQ: Sequence key for automatic switching of a defined camera sequence 7) ZOOM: 2x electronical zoom. For details please consult chapter 4.12 ZOOM. NOTE: The Zoom key is only active in Full screen at Main monitor. 8/9) MONITOR: The MONITOR key switches operation between MAIN and CALL. The active screen will be Main monitor when LED is in M and Call monitor when LED is in 1. For more details, please refer to Chapter 4.11 MONITOR. 10) SEARCH: The SEARCH key opens the SEARCH menu, details in chapter 4.13 SEARCH. 11) COPY: The COPY key opens the menu for video data export, details in chapter 4.14 COPY. 12) IR Receiver: Receiver for IR remote control 13) HDD1: Removable SATA HDD #1 (only for HD removable model) 14) Key lock: Lock for hard disk door (only for HD removable model) 15) HDD2: Removable SATA HDD #2 (only for HD removable model) 16) REC: RECORD key for manual start of recording / recording standby (event recording). LED will be ON if DVR is recording or in record standby 17) STOP: STOP key for Playback and Record 18) BACK: Reverse Playback key 19) PAUSE: Image freeze in playback mode 20) PLAY: Playback key 21) ENTER: Enter Key for menu operation and alarm acknowledge Turn camera audio ON/OFF when viewing full screen camera. For more details, please refer to Chapter ) MENU/ESC: Used to bring up Main Menu or exit from sub-menus. 23) JOG/SHUTTLE: Shuttle (outer wheel): In playback mode, use the SHUTTLE for fast forward / fast reverse playback. 7
15 JOG (inner wheel): In PAUSE mode, use the jog to move frame by frame. Within menu functions, use the jog to adjust the values / parameters. Use Jog to highlight individual cameras. Use either Shuttle or Jog to switch between MENU parameters. 24) POWER: LED indicating power on. 25) HDD1/2: LED indicating HDD1 / HDD2 active (HDD1: Internal HDD 1~4, HDD2: External HDD 4~8) 26) LAN: LED for network traffic 27) ALARM: LED for alarm status 8
16 1.5 REAR PANEL During initial setup you will be connecting your DVR to multiple input and output devices. This is done through the rear panel.,1,2,5 gdg,6,3,4 Fehle Fehle,7,8,9 Fehle Figure 1-2 Rear Panel,1 POWER: Power socket for external power supply, 100~240VAC power source,2 Audio output: Audio output,3 Audio inputs: Audio inputs 1~16(1~8 for EDR8),4 MAIN monitor: Main monitor for live and playback display and on-screen display,5 CALL monitor: CALL monitor output. Spot monitor for full screen live display, sequence mode and alarm camera switching,6 Video inputs: PARAGON8: VIDEO IN (1~8): BNC video inputs for 1 Vpp Composite video signals, automatic 75 Ohm termination (high impedance switching upon loop-through output load) PARAGON16: VIDEO IN (1~16): BNC video inputs for 1 Vpp Composite video signals, automatic 75 Ohm termination (high impedance switching upon loop-through output load) 9
17 ,7 Alarm inputs: 8 (EDR8) resp. 16 (EDR16) alarm inputs for dry contacts, programmable NO or NC in alarm menu.,8 Alarm outputs: 4 x NO/NC alarm output relay.,9 LAN: RJ45 network socket,10 RS232 socket: 9-pin D-Sub control input for RS-232,11 RS485 socket: For remote control via RS-485 keyboards and telemetry control,12 esata port: Used for external SATA HDD bay 10
, antenna cable and further types of coax cable are not suitable.")
18 Chapter 2 2 INSTALLATION 2.1 VIDEO INPUTS/OUTPUTS INSTALLATION Cameras have to be cabled with 75 Ohm video cable, e.g. RG-59, RG-12 and suitable BNC plugs. Due to inappropriate absorbability, 50 Ohm coax cable (e.g. RG58), antenna cable and further types of coax cable are not suitable. 11
19 All connected video sources must provide a 1 Vpp NTSC/EIA or PAL/CCIR standard video signal (depending on DVR version PAL / NTSC). When interconnecting transmission lines (twisted pair, fibre optics, radio) to the video inputs, make sure all receivers are accurately calibrated. The Main monitor can be connected to BNC, Composite, or VGA monitor output. NOTE: VGA monitor must support 800x600@60Hz resolution. For local DVR operation, MAIN monitor connection is required. Call monitor connection is optional. 12

20 2.2 AUDIO INSTALLATION The PARAGON DVRs provide 16/8 audio inputs and 1 audio output. The inputs are designed for max KOhm input. The installation has to be effected with audio coax cable and RCA plugs. The output provides a max KOhm output line audio signal and may be connected to e.g. a monitor s audio input. The direct connection of (passive) speakers is not supported. ATTENTION: The direct connection of a non-amplified microphone is not supported (a microphone amplifier is required). AUDIO RECORDING FUNCTIONALITY: Audio recording is activated / deactivated in the RECORD menu (chapter 5.4.1) for all channels. Audio of all channels is always recorded together with (each) video and is independent of the image recording rate. During playback/live, use the JOG to select camera and press ENTER to turn audio ON or OFF. 13
21 2.3 ALARM / CONTROL CONTACTS INSTALLATION The PARAGON alarm inputs can be used for recording start or recording rate adjustment. Furthermore, alarm reactions such as camera switching to monitors, buzzer, and network alarm are available. 4 alarm output relays can be switched if required. Additionally the PARAGON DVR provides 4 x TTL - level control outputs with similar functionality as the relay outputs Alarm Input Contacts PARAGON8 provides 8 alarm inputs, PARAGON16 provides 16. All inputs are programmable N.O. (Normal Open) or N.C. (Normal Closed) Inputs have to be switched by dry contacts. Alarm input with N.O. (Normal Open) contact in idle state Alarm input with N.C. (Normal Closed) contact in idle state All settings are programmed in the ALARM menu (chapter 5.5.1) Control Input Contact The Control Input CTRL IN is a N.O. (Normal Open) contact. Changing to N.C. is not possible. Control Input relay in idle state The Control Input Contact CTRL IN is defined in I/O Control menu ( possible functions: chapter ) for following 14
22 1. Playback: Playback is active as long the contact is closed. This function is helpful in combination with the "Quickplay" function ( chapter 5.4.3) CTRL IN CTRL IN GND GND Idle state Playback 2. Record: The input switches to Record (or Record Standby) as long the contact is closed. CTRL IN CTRL IN GND GND Idle state Record / Record Standby 3. Armed / Disarmed: If the contact is closed, the DVR will switch off alarm (alarm contact and motion alarm) operation. System alarm events are always active. CTRL IN CTRL IN GND GND DVR armed DVR disarmed Alarm Output Relay The relay outputs provide either Normally Open or Normally Closed dry contacts. Output relay in idle state 2.4 RS-485 keyboard / PTZ Installation All PARAGON functions can be remote-controlled by the EKB-500 universal keyboard. Using the EEPbus protocol, digital video recorders, keyboards and speed domes can be installed on one single RS-485 bus. One system can comprise up to 8 keyboards. 15
23 2.4.1 General RS-485 bus installation The EKB-500 keyboard uses an RS-485 simplex wiring; the signal is transferred via a single twisted pair line. CAT5 network cable is recommended, UPT version (unshielded) is sufficient for normal application. A shielded cable should be used if the installed cables are expected to be highly susceptible to interferences. The number of devices installed in one bus is limited to 32, and the maximum cable length is 1200m. Both of these can be expanded using a signal distributor (see below). Both the first and the last device in series should be terminated with 120 Ohm resistance in order to minimize line reflections. RS-485 bus serial wiring Cable length from box to device ( Stubs ) has to be limited to 2m using connector boxes. RS-485 bus serial wiring with connector boxes and connection cable A direct RS-485 bus star wiring is not supported unless using a signal distributor (see below). Improper RS-485 bus star wiring An RS-485 signal distributor may be used to use a star wiring configuration. Star wiring with RS-485 signal distributor 16
.")
24 An RS-485 distributor can also be used to increase the maximum number of devices on the bus as well as the total range. Each distributor output provides another RS-485 bus. This allows each output to extend an additional 1200m, and it also enables the additional connection of 31 further devices to each output (the output itself represents one device). The maximum system expandability depends on the RS-485 address range of the installed devices. System expansion with RS-485 signal distributor ATTENTION: Most signal distributors are unidirectional! This means that the signal only flows from the input towards the outputs. Therefore, e.g. the interconnection of several keyboards is not possible with these types of signal distributor! RS-485 socket pin assignment The two RS-485 input RJ-45 sockets are looped through and pin-compatible. The following RJ-45 pin assignment has to be considered for connection: Pin 6: RS (B) Pin 3: RS (A) 17
25 2.4.3 EKB-500 connection with network patch cable For a simple, short distance installation, recorder and keyboard can directly be connected using a standard CAT5 network cable (patch cable, uncrossed!) EKB-500 connection to several DVRs For long distance installations connecting several DVRs, the use of the optional EDA998 connection kit is recommended: For further details on keyboard connection, please refer to the EKB-500 manual. RS-485 port communication settings are configured in the I/O CONTROL menu ( chapter System Setup: I/O - control) Speed Dome Installation Speed dome or telemetry receiver pan/tilt/zoom control is available through web browser or the optional PowerCon software if the DVR is connected to a network. Local telemetry control is provided by USB - mouse control or by the optional EKB-500 keyboard. Supported protocols: EverFocus, ED2200/2250, Pelco-D, Pelco-P Required DVR settings: RS-485 receiver address in CAMERA menu ( chapter ) RS-485 parameters and protocol in the I/O CONTROL menu ( chapter ) ATTENTION: Some Pelco-D / -P protocol domes and receivers require an address offset of -1, i.e. the address assigned to the dome / receiver in the DVR camera menu must be 1 below the address set in the dome / receiver itself! 2.5 RS-232 Connection Pin Function 2 TXD 3 RXD 5 Ground 18

26 2.6 USB-Mouse installation Connect the USB mouse to one of the 2 USB ports. (This can be done while DVR is powered on) NOTE: Recommended mouse types are Logitech and Microsoft wired USB wheel-mouse. Wireless USB mouse is not supported. 2.7 NETWORK CONNECTION This section only describes physical connection to an Ethernet network. This step must be completed before the DVR s can connect to the network. There are two basic types of connection: Direct PC Connection through Crossover Network Cable The point-to-point connection of DVR and PC requires a crossover (crossed) network cable. This type of connection is ONLY used for direct connection to a single PC. Make sure that the PC is equipped with a 10/100/1000 Mbps compatible network connection. Figure 2-1 Direct PC Connection Pinout of crossover-cable 19
27 2.7.2 Network Connection through Patch Cable The connection to an existing network requires a normal patch cable (straight-through). The illustration shows the connection to a network switch, router, or modem. Figure 2-2 Network Connection through Patch Cable Pinout of straight patchcable 2.8 FINAL INSTALL PROCESS Once you have completed the basic wiring connections, you are ready to turn on the DVR. Simply plug in the power source. The POWER LED will light up if power is normal. Once the system has finished loading, you can begin to set up the menu options for the DVR. 20
28 Chapter 3 3 MOUSE AND FRONT PANEL OPERATION Paragon series DVR supports multiple sources to control the DVR. It can be controlled with a mouse, the front panel, an EKB500, the handheld remote control, or serial command from RS232 port. This chapter will cover the basic operation using mouse and front panel. 3.1 GENERAL USB MOUSE OPERATION How to select a channel / Enable audio 1. In a view consisting of more than one channel, user can select a channel by clicking once on desired channel screen. The selected screen will be highlighted by white frame. 2. Double clicking on a channel screen will display full screen of this channel. 3. To enable audio out, click audio icon(ex: ) at lower side of the screen. This system can have only one audio out for one camera at a time. Click this button to select a camera for audio out, or to select none audio-out mode OSD Root Menu 1. Right-click the mouse to obtain DVR control bar (see Figure 3-1 OSD Root Menu ). When you move the mouse over each icon, the appropriate title will be displayed on top of the control bar. Figure 3-1 OSD Root Menu 2. Click on any icon to perform that action. These actions are covered in detail in Chapter Click the X in the top-right corner to close the DVR control bar Operation in Configuration Menu The Main menu (shown in Figure 3-2 OSD Menu) is divided into 3 main sections. 21
29 Fehle Fehle Fehle Figure 3-2 OSD Menu,1 In section 1, there are ten setup options available. Move the mouse over an icon and click to select it.,2 In section 2, the categories for the selected icon will be displayed. Click on a word to select it.,3 In section 3, all the details for the selected option will be available. Click on a field to make changes Component Options The following are examples of different fields available in the Configuration menu. below) Textbox: Click on the box and an on-screen keyboard will appear. (see Dropdown box: Click on the down arrow to see all selections, then directly click on an option to select it. Check box: Click on the box to enable it (checked) or disable it (unchecked). Button: Click the button to execute the function. Bar: Click and hold on the bar to adjust the cursor Left or Right. 22
30 * Note about on-screen keyboard: Click on a button to input that character. The buttons on the right and bottom have the following functions: Delete Done All Caps Space Cancel Delete the letter Confirm the selection Switch to capital letters Enter a space Move to left Move to right Cancel and exit from the keyboard 23
31 3.2 GENERAL FRONT PANEL OPERATION How to select a channel / Enable audio 1. In a view consisting of more than one channel, turning Jog or Shuttle can scroll through each channel that is displayed. The selected channel will be highlighted by white frame. 2. While one channel is selected, click Enter button to turn Audio On/ Off OSD Root Menu 1. Press Menu key to obtain DVR control bar. Use Jog or Shuttle to scroll over each icon. The title for each icon will be displayed on top of the control bar. 2. Press Enter key on any icon to perform that action. These actions are covered in detail in Chapter 4 3. Press Menu to close the DVR control bar Front Panel Key Review The basic principle of front panel operation is to use Jog and Shuttle to navigate among the menu items. Use Enter key to confirm a selection or enter the next level menu. Press Menu key to enter the Main Menu or exit from the current level of the menu Operation in Configuration Menu Press Menu and press Enter with Configuration icon highlighted to bring up Configuration menu. NOTE: If password is active, you will need to log in first. Refer to 4.2 LOGIN for information on logging in. The menu (shown in Figure 3-3 (OSD Menu) ) is divided into 3 main sections. 24
32 Fehle Fehle Fehle Figure 3-3 (OSD Menu),1 In section 1, there are ten setup options available. Use Jog or Shuttle to highlight an icon and press Enter to select it.,2 In section 2, the main options for the selected icon will be displayed. Use Jog to highlight an option and press Enter to select it.,3 In section 3, all the details for the selected option will be available here. Use Jog to move between items and press Enter to make changes. Note: press Menu button to go back to the previous menu section Component Options below) Textbox: Press Enter key and an on-screen keyboard will appear. (see Dropdown box: Press Enter key to show the available options. Use Jog to highlight the desired option and press Enter again to select it. Check box: Press Enter key on a setting to enable it (checked) or disable it (unchecked). Button: Press Enter key to execute the function. 25
33 Bar: Press Enter key to activate the slider, then use Jog to adjust the setting. Press Enter again to finalize the changes. 26

34 4 GENERAL DVR OPERATIONS This chapter introduces the operations on major functions including playback, layout change, sequence, triplex operations, copy, and search. 4.1 RECORD By default, the Paragon series DVR will always be in record mode. When the DVR is turned on, it will start to record. The exceptions are: 1. Paragon DVR will not record any uninstalled cameras (Refer to section for more detail) 2. If a schedule is active, Paragon DVR will follow the record settings of the schedule. 4.2 LOGIN In order to access Paragon options, users may be asked to log in for authority identification. To log in, follow these steps. 1. Click (or press Enter key) on the Configuration icon to bring up the following screen: Chapter 4 Figure 4-1 Login page 2. Select the user name from the drop-down list and input the password. The defaults are: User name: admin (lower case) Password:
.")
35 + To input password by mouse: click the password field to bring up the on-screen keyboard (see Figure 4-2 On-screen Keyboard). Click on each button to input the desired characters for the password. When finished, click Done on the on-screen keyboard to confirm the password. + To input password using front panel: press Enter key to show the on-screen keyboard (see Figure 4-2 On-screen Keyboard). Use Jog or Shuttle to highlight each character and press Enter key on front panel to input the selected characters. When finished, highlight Done and press Enter key on front panel to confirm the password. + Click (or press Enter key) on Login button to log in to the system. Figure 4-2 On-screen Keyboard 4.3 SELECT CAMERA OPERATION Paragon is a pentaplex DVR, user can control each camera individually. User can control camera which has been selected. For camera selection: Mouse: Right-click the screen, there will show a white frame on screen if the camera has been selected. When in split display mode, press same layout icon in layout menu to select all. Front panel: Use Jog to change selection. Turn Jog one more step to select all camera at last turn(ex: when camera16 is selected, turn jog one more step can select all) 4.4 CHANGE AUDIO OUTPUT OPERATION Use Jog to select a camera and press Enter key to switch audio output to that camera. An audio icon will appear on the screen. 4.5 PLAYBACK To playback: By mouse: Right-click to bring up the menu bar and click on to enter Playback Menu. 28
36 By front panel: Press key to enter Playback Setup Menu. A playback bar will show as the figure below: /05/25 09:09:30PM 2009/05/25 09:09:40PM 2009/05/25 09:10:30PM Stop key: press to stop playback 2. Slow Reverse key: press to slow reverse playback 3. Pause key: press to pause playback 4. Slow Forward key: press to slow forward playback 5. Fast Reverse key: press to fast reverse playback 6. Reverse key: press to reverse playback 7. Forward key: press to forward playback 8. Fast Forward key: press to fast forward playback 9. Time bar: Move the cursor on the time bar to select time to playback(the start time and end time of time bar is showed below) and - signs are used to adjust time scale level. Press + or - to select between L1 ~ L5. When change level, the start time and end time of time bar will change) L1: Whole time bar is 2 days L2: Whole time bar is 30 hours. L3: Whole time bar is 1 hour. L4: Whole time bar is 10 minutes. L5: Whole time bar is 1 minute. 11. Express copy: Press to start express copy when camera is in playback (only one camera) 12. Playback speed 13. Press X to close playback bar. 14. Start time of time bar 15. Current playback time 16. End time of time bar 29
 to move the camera to the desired direction and angle. 2. In Zoom option, Click Z+ to zoom closer or Z- to zoom farther away. 3.")
37 4.6 PTZ General PTZ control Right-click to bring up the menu bar and click on to enter PTZ Menu. The following actions can be performed using the PTZ Menu: 1. Use Direction Arrows (up, down, left, right) to move the camera to the desired direction and angle. 2. In Zoom option, Click Z+ to zoom closer or Z- to zoom farther away. 3. In Focus option, click F+ to increase the focus or click F- to decrease the focus. 4. In Iris option, you can increase the amount of light by clicking I+ or decrease it by clicking I-. 5. To program a preset position a. Move PTZ camera to the specified position b. Click Preset button c. Click the number of the desired position (This will be displayed in the box) d. Click Set button 6. Steps to jump to a preset position a. Click Preset button b. Click the number of the desired position c. Click Go button 7. Shortcut steps for presets #1-9 a. Click digit 1-9 button without clicking any other buttons 8. Steps to delete a preset position a. Click Preset button b. Click the number of the desired position c. Click Delete button 9. Steps to run Auto Pan a. Click Auto Pan button 10. Pattern Operation (Pattern is the 0 Tour in Everfocus and Pelco PTZ cameras) a. Click Pattern button 11. Steps to run a tour a. Click Tour button b. Click the number of the desired tour c. Click Go button 12. Steps to remove a tour a. Click Tour button b. Click the number of the desired tour 30
38 c. Click Delete button Click C to clear the digit in cell Click X at top-right corner to close PTZ menu. Click Exit to leave PTZ function Express control PTZ When PTZ menu is closed, the mouse cursor will change to a different icon in different areas of the screen. User can control PTZ direction, zoom, and focus by clicking directly on screen Focus + 6 Zoom Focus - Zoom Figure 4-3 Express Control PTZ The screen is divided into a 4x4 grid. The function of each section is defined as below: 1: PTZ pan/tilt left and up 2, 3: PTZ tilt up 4: PTZ pan/tilt right and up 5, 9: PTZ pan left 8,12: PTZ pan right 13: PTZ pan/tilt left and down 14, 15: PTZ tilt down 16: PTZ pan/tilt right and down 6: Focus closer 10: Focus further 7: Zoom in 31
39 11: Zoom out 32
40 4.7 LAYOUT The Paragon DVR has a total of seven display modes available. The different available layouts are shown below: (Full screen) (PIP) (4 screens) (9 screens) (10 screens) (13 screens) (16 screens) To change layout, follow the steps below: By mouse: Right-click to bring up the menu bar and click NOTE: PIP display is not available in Playback mode to scroll through each display option. By front panel: Push the appropriate display button on the front of the DVR (see red marker in below image) Bring to full screen mode By mouse: Double left-click on the selected channel to put that camera in full screen mode. 33
41 By front panel: Press any channel key to bring that channel to full screen mode. 4.8 CHANNEL SWITCHING Use this function to change channel position 1. Select one camera 2. Press Channel button. 3. Click on the channel number you wish to switch on channel bar. The display of channel will be switched. EX: Select camera1 and enter Channel menu and choose 2, than camera1 will show on position of camera2, camera2 will show on position of camera1 4.9 DISPLAY 1. Press Display button on menu by using mouse or press Display button on the front panel. 2. Press once to show camera information. Please see the following table for status representation. Recording Playback Fast forward Fast backward Back pause Alarm Motion Video loss Express copy Audio out 3. Press again to show status information. Please see the following table for status representation. Alarm Audio 1~16 Control call monitor Event Fan failure HD failure HD temp. too high Monitor 1 status Motion New firmware No network Record in HD1 Record in HD2 Seq. Video loss 34
42 4. Press again to show both status information and camera information. 5. Press again to hide all information SEQUENCE 1. By mouse: Click Sequence button to enter the auto sequential switching mode. 2. By front panel: Click Sequence button on front panel to enter the auto sequential switching mode MONITOR The DVR can connect to main monitor and call monitor simultaneously, but only one of them can be controlled at one time. This feature allows user to switch control between two monitors. Switch control by using a mouse Click on Monitor button in menu or click global information icon to switch control to call monitor. button means the main monitor is selected. button means the call monitor is selected. Switch control from front panel Click Monitor button on front panel to switch control of monitor. The light right next to Monitor button indicates which monitor is active: M indicates main monitor and 1 indicates call monitor. Operation of Call Monitor OSD View: Click this button to view different layouts. Change: Switch channels. Display: Turn OSD display on/ off. Sequence: Turn sequence on/off. Monitor: Click this button switch control to main monitor. 35

43 4.12 ZOOM 1. Make sure no cameras are in playback mode 2. Select one camera 3. Right-click to bring up the menu bar and click button, or press Zoom key on front panel. 4. When in ZOOM mode, the mouse cursor will change to a different icon in different areas of the screen. User can control PTZ direction, zoom, and focus by clicking directly on screen: Figure 4-4 Zoom Express Control The screen is divided into a 4x4 grid. The function of each section is defined as below: 1: Left and up 2, 3: Up 4: Right and up 5, 9: Left 8,12: Right 13: Left and down 14, 15: Down 16: Right and down 6, 7, 10, 11: Not used 36

44 4.13 SEARCH By mouse: Right-click to bring up the menu bar and click to enter Search Menu. By front panel: Press Search key to enter Search Menu directly Time Search Figure 4-5 Search Menu Time Search Play From: Select the time to be searched by choosing the Date and Time. Click on the Play button to start search. The DVR will automatically play the video being searched. DVR will play the nearest time if there is no data in selected time. In search playback mode, press stop button to come back to search menu. 37
 to search for. Choose from Alarm, Motion, Video Loss, or Others. Click on the Search button to start searching.")
45 Event Search Figure 4-6 Search Menu Event Search From: Select starting date and time To: Select ending date and time. Camera: Select which cameras to search for. Event: Select which event type(s) to search for. Choose from Alarm, Motion, Video Loss, or Others. Click on the Search button to start searching. The search results will be shown as a list of events. 38
 Delete: Delete item if it is not locked Play: Playback")
46 Prev Page: Go to previous page. Next Page: Go to next page Unlock: Unlock the item if the item is locked Lock: Lock the item (The selected item will show Locked or Partial) Delete: Delete item if it is not locked Play: Playback selected item Copy: Copy selected item In Lock status, there will show Partial in some case, it means there has a time period which has been locked in whole search result time period Motion Search In order to perform a Motion Search, motion must be enabled first (see Chapter ). 39


47 From: Select motion search starting date/time. To: Select motion search ending date/time. Camera: Select camera number to be searched. Figure 4-7 Search Menu Motion Search Figure 4-8 Search Menu Set Grid Grid Setting: 40

48 Choose which areas of the motion grid will be included in the search. The areas you set in motion search must also be active in the motion settings of the Camera Setting Menu. Use the mouse to drag your desired area. Press Set All button to select the entire area. Press Clear All to deselect the entire area. Press Save & Back to save the motion grid setting and go back to Motion Search menu. Press Cancel to skip edition Press Search button to start searching COPY To bring up Copy menu: By mouse: Right-click to bring up the menu bar and click on to enter Copy Menu. By front panel: Press Copy key to enter Copy Menu directly. Figure 4-9 Copy Menu Camera: Select which cameras will be archived. Choose Select All to select all the cameras. Player: Check the box to include the eplayer program as part of the copy. Start Date/Time: Select the starting date/time to be archived. End Date/Time: Select the ending date/time to be archived. 41
.")
49 Archive To: Select whether you want to copy to USB or DVD. Data Size: Shows the estimated total size for the selected time period. Archive Now: Press Archive button to start archiving LOGOUT Right-click to bring up the menu bar and click (see Figure 4-10). button to bring up the Logout Confirmation window Figure 4-10 Logout Confirmation window Press Yes button when you are ready to logout from the system. You will need to login again before accessing any other options. 42
50 Chapter 5 5 DVR CONFIGURATION This chapter will walk you through the DVR Menu Settings step by step and show you how to set the DVR for your specific application. 5.1 CONFIGURATION MENU 1. To bring up the Main Menu, press the Menu/Esc key on the front panel or right-click with the USB mouse to bring up the OSD menu bar. 2. Press Enter or left-click on the Configuration icon to enter configuration menu. 5.2 EXPRESS Figure 5-1 Express Menu is a screen shot of the EXPRESS SETTING MENU. This menu is used to configure express setting for all 16 cameras. For example, if user selects Event Only in Record Mode and presses Apply button, all 16 cameras will be set to Event only. If user selects Blank in Recording Mode and presses Apply button, 16 cameras will keep their own current record modes without changing. Figure 5-1 Express Menu 43


51 Date: Set the current date of DVR. Time: Set the current time of DVR. Resolution: Select recording resolution based on video format. NTSC: 704x480 / 704x240 / 352x240 PAL: 704x576 / 704x288 / 352x288 Record Mode: Blank: No change for Record mode Normal+Event: Normal recording plus event recording. Event Only: Event recording only. Schedule Rec: Schedule recording. Record With: Blank: No change for Record with Max. Recording Days: Set the maximum recording days. Available selection will be shown in the next column, including 1, 3, 5, 7, 14, 20, 30, 40, 50 and 60 day. DVR will auto adjust relative settings for 16 cameras to fit the selected max recording day. For more detail, please refer to APPENDIX B: CHANGING RULE FOR EXPRESS SETUP Preset Settings: Select preset setting or recording quality. Available options are Best Quality, Standard and Extended Record in the next column. For more detail, please refer to APPENDIX B: CHANGING RULE FOR EXPRESS SETUP Network Type: Fixed IP: User can set a fixed IP for network connection. 44

52 DHCP: DHCP server in LAN will automatically assign IP for network connection. PPPoE: IP Address: This field shows the current IP Address for the DVR. A Fixed IP address must be set manually. If DHCP or PPPoE is selected, this value will be assigned automatically. Subnet Mask: This field shows the subnet mask for your network so the DVR will be recognized within the network. If DHCP or PPPoE is selected, this value will be assigned automatically. Gateway: This field shows the gateway for your network so the DVR will be recognized within the network. If DHCP or PPPoE is selected, this value will be assigned automatically. Apply: Press Apply button to save and apply Express settings to DVR. The system will automatically adjust recording frame rate according to settings. The following message will pop up, press YES to change Resolution, Recording frame rate and Quality depending on your express setting. 5.3 CAMERA SETTING Figure 5-2 is a screen shot of the CAMERA SETTING MENU. This menu is used to configure individual camera settings. 45


53 Figure 5-2 Camera Menu-Basic Setting Basic Setting Camera: Select the camera number. Title: The title setting allows you to assign a title to selected camera. Each title supports up to 16 characters. The on-screen keyboard will appear when you click the title option. Install: Check the box to enable the current camera. To take full advantage of the DVR s recording abilities, any unused cameras should have this option disabled. Covert: Check the box to hide the camera picture in live and sequence modes. However, the image will still be recorded and can be played back by any user who has playback rights. Record Mode: 2 record modes are available. Normal + Event: This recording mode includes continuous and event recording. Event Only: Video will be recorded only when events occur. 46
54 Resolution: Select recording resolution based on video format. NTSC: 704x480 / 704x240 / 352x240 PAL: 704x576 / 704x288 / 352x288 Record Quality: Select an image quality for recording. There are five different qualities available: Superior, High, Standard, Basic and Low. A higher image quality uses more HDD space. Normal Speed: Frame rate in images per second (IPS) for continuous recording. The speed is limited to the maximum recording rate of the DVR (displayed in the bottom left corner) divided by the number of installed cameras. If the resolution option is changed, the unit of this field will also be changed. Recording capacity for all 16 cameras (shown next to the Normal Speed field): The number here indicates the remaining recording capacity available for all 16 cameras. When this number is positive, it means there is still recording capacity. If this number is negative, it means the recording capacity has been exceeded, and the user must lower Normal Speed or Resolution. This number must be positive before saving the changes. Otherwise, a pop-up window will display Total FPS exceed maximum recording rate, discard changes! and the settings for all cameras will return to previous values. Event Speed: Frame rate in images per second (IPS) for event recording. PTZ ID: When using a PTZ Camera, this ID must match the ID used by the connected camera in order to control the camera using the DVR. Click Done to confirm selection, Cancel to cancel selection. Apply To: This button can be used to copy the recording settings to other cameras. Select which cameras you wish to copy to. "Select All" selects all cameras, Unselect All deselects all cameras. Click OK to copy the settings or "Cancel" to exit without copying. 47

55 5.3.2 Video Adjust Figure 5-3 Camera Menu Video Adjust Camera: Select the camera you wish to adjust. Title will change to the name of the selected camera. Brightness: Adjusts how bright/dark the picture appears. If details appear to be lost in the shadows or darker regions, try increasing the Brightness. If the image appears too saturated or if the colors appear overwhelmed by glare, try decreasing the Brightness. Contrast: Adjusts the total amount of light output from the display. If details are lost or lines appear distorted, try decreasing the contrast. Color: Adjusts the amount of color information in the picture. Apply To: This button can be used to copy the video settings to other cameras. Select which cameras you wish to copy to. "Select All" selects all cameras, Unselect All deselects all cameras. Click OK to copy the settings or "Cancel" to exit without copying. 48

56 5.3.3 Motion Figure 5-4 Camera Menu Motion Camera: Select the camera you wish to adjust. Title will change to the title name of the selected camera. Enable: Check box to enable motion detection. Other motion options will not be available unless this feature is selected. Log: Check box to record motion events in the log. Main Monitor: Monitor display options when a motion event occurs. No change: No change on the main monitor display. Full screen: A full screen of the active camera will display on the main monitor. Call Monitor: Monitor display options when a motion event occurs. No change: No change on the call monitor display. Full screen: A full screen of the active camera will display on the call monitor. Pre-alarm Record: Check box to record several moments before the motion event. (Pre-alarm recording rate will follow Normal frame rate setting) Buzzer: Check box to enable buzzer when a motion event is triggered. Notify: Check box to send notification when a motion event is detected. Network Alarm: Check box to send out a network alarm to client PC when motion occurs. (requires PowerCon software and setting up Alarm Server in Network Setup menu) 49
57 Auto Lock: Check the box and the events will be recorded in the write protected segment of the Hard Disk. (DVR will lock a period of time when alarm happen, the length of time will depend on DVR setting) Alarm Output: This will transmit a signal through one of the alarm outputs. It can be set to either NONE (not active), 1, 2, 3, or 4. Output Type: Output action when motion is triggered. Timeout: Alarm output lasts for the set time duration. Permanent: Alarm will remain on until user presses Enter key on front panel. Transparent: Alarm output continues as long as there is a motion event. Trans+Timeout: Alarm output continues until event ends, then lasts for the set time duration. Timeout Duration: Time duration selectable from 1 to 150 seconds. Edit Motion Grid: Press this button to edit the motion grid (See Figure 5-5 Camera Menu Motion Grid Setting ). Sensitivity: Set the threshold value for sensitivity. Select from 1 (lowest) to 10 (highest). Min Area: To avoid false detections by small objects this value defines, how many grids have to be detected for generating a motion event. Select a value between 1 (default) to 5 grids. Delay: Filter function for avoiding false alarms (set to 1 for the easiest trigger) Preview: Turn off display for motion grid Set All: Press this button to select the entire area. Clear All: Press this button to clear all the grids selected. Save & Back: Press this button to save the motion grid setting and return to motion setting menu. Cancel: Press this button to cancel all changes and return to motion setting menu. How to select motion grid by mouse: 1. Select left-up grid 2. Select right-down grid. 3. The area between left-up and right-down grid will be selected. 50

58 Figure 5-5 Camera Menu Motion Grid Setting Apply To: This button can be used to copy the motion settings to other cameras. Select which cameras you wish to copy to. "Select All" selects all cameras, Unselect All deselects all cameras. Click OK to copy the settings or "Cancel" to exit without copying. 51
59 5.3.4 Video Loss Figure 5-6 Camera Menu Video Loss Camera: Select the camera you wish to adjust, Title will change to the title name of the selected camera. Enable: Check box to enable Video Loss. Log: Check box to record video loss events in the log. Pre-alarm Record: Check box to record several moments before the video loss. (Pre-alarm recording rate will follow Normal frame rate setting) Buzzer: Check box to enable buzzer when a video loss event occurs. Notify: Check box to enable notification when a video loss event occurs. Network Alarm: Check box to send out a network alarm to client PC when video loss occurs. (requires PowerCon software and setting up Alarm Server in Network Setup menu) Alarm Output: This will transmit a signal through one of the alarm outputs. It can be set to either NONE (not active), 1, 2, 3, or 4. Output Type: Output action when alarm is triggered. Timeout: Alarm output lasts for the set time duration. Permanent: Alarm will remain active until user presses Enter key on front panel. Transparent: Alarm output continues as long as there is a video loss. Trans+Timeout: Alarm output continues until event ends, then lasts for the set time duration. Timeout Duration: Time duration selectable from 1 to 150 seconds. 52
60 Apply To: This button can be used to copy the video loss settings to other cameras. Select which cameras you wish to copy to. "Select All" selects all cameras, Unselect All deselects all cameras. Click OK to copy the settings or "Cancel" to exit without copying. 5.4 RECORD & PLAY SETTING Figure 5-7 is a screen shot of the RECORD & PLAY SETTING MENU. This menu is used to configure basic recording and playback settings. Figure 5-7 Record & Play Menu Record Record Audio: Check the box to record audio. Record Overwrite: Check the box and disk will begin overwriting when full. Schedule Rec.: Use schedule recording mode. 53
61 For Schedule recording, the only way to stop schedule recording is to turn schedule recording off. Pressing any keypad on front panel to change schedule recording will not work during scheduling record mode. When schedule recording is disabled, DVR will auto turn on recording Time Stamp: Select if the time and date will display while recording. Choose from Top, Bottom, or Off. Record Status Relay Output: Select from NONE, 1, 2, 3, or 4. Auto Erase Video: The hard drive will automatically erase after the selected number of days. To use the maximum hard drive space, choose OFF Built-in Cal. The built-in record period calculator can give a rough estimation of the total recording time of the DVR with current settings. Figure 5-8 Record & Play Menu-Built-in Cal. Motion: Enter the expected amount of hours per day using motion record. Alarm: Enter the expected amount of hours per day using alarm records. If total amount of Motion and Alarm hour more than 24 hours, it will assume that total motion and alarm hours is 24 hours. Click on the ESSTTI IIMATTEE button to display the result at the bottom of the screen: " xx days of data can be stored based on current setting" 54
62 5.4.3 Play Figure 5-9 Record & Play Menu - Play Quick Playback: Check the box to enable quick playback function. Playback From X Seconds ago: When the DVR is put into playback, it will begin playing from the selected time. Choose from 60 to 3600 seconds. 55

63 5.5 ALARM & EVENT SETTING Figure 5-10 is a screen shot of the ALARM & EVENT SETTING MENU. This menu will walk you through alarm and event setup. Figure 5-10 Alarm & Event Menu - Alarm Alarm Alarm: Select the alarm number from 1 to 16. Enable: Check box to enable alarm. Log: Check box to record alarm events in the log. Pre-alarm Record: Check box to record several moments before the alarm event. (Pre-alarm recording rate will follow Normal frame rate setting) Buzzer: Check box to enable buzzer when an alarm occurs. Main Monitor: Monitor display options when a motion occurs. No change: No change on the main monitor display. Full screen: A full screen of the active camera will display on main monitor. Call Monitor: Monitor display options when a motion occurs. No change: No change on the call monitor display. Full screen: A full screen of the active camera will display on call monitor. 56
64 Recording: Select which cameras will start recording when alarm happens. Notify: Check box to enable notification when an alarm occurs. Input Type: This field is to change the type of alarm trigger. N.O.: Normal Open contact. N.C.: Normal Close contact. Network Alarm: Check box to send out a network alarm to client PC when motion occurs. (requires PowerCon software and setting up Alarm Server in Network Setup menu) Active Camera: This field is for assigning the alarm to a specific camera. For example if you had an external motion detector on camera one you would set this option to 1. Auto Lock: Check the box and the events will be recorded in the write protected segment of the Hard Disk. (DVR will lock a period of time when alarm happen, the length of time will depend on DVR setting) PTZ Preset: Select PTZ Preset from 1 to 255. If the Active Camera is a PTZ speed dome, the alarm will move the camera to the specified preset position for event recording. Click Done to confirm selection, Cancel to cancel selection. Alarm Output: This will transmit a signal through one of the alarm outputs. It can be set to either NONE (not active), 1, 2, 3, or 4. Output Type: Output action when alarm is triggered. Timeout: Alarm output lasts for the set time duration. Permanent: Alarm will remain active until user presses Enter key. Transparent: Alarm output keeps working according to the signal of alarm input. Trans+Timeout: Alarm output continues until event ends, then lasts for the set time duration. Timeout Duration: Time duration selectable from 1 to 150 seconds. Apply To: This button can be used to copy the alarm settings to other cameras. Select which cameras you wish to copy to. "Select All" selects all cameras, Unselect All deselects all cameras. Click OK to copy the settings or "Cancel" to exit without copying. Alarm16 will be used to Trigger Alarm, Start Record, Start Playback and Arm/Disarm. 57
65 58
66 5.5.2 Event This section covers internal system event warnings. Figure 5-11 Alarm & Event Menu Event Event: Select from the following event types. Fan Failure: The internal fans are equipped with rotation detection. Any fault of a fan will cause "Fan Failure" event. HD Temperature: Hard drive is over the safety warning temperature HD Failure: If DVR fails to detect a HDD on start up, the system will create a HD failure event. HD Full: If the DVR is not set to Overwrite in the Record Menu, an event will be created when all HDDs are filled. HD Off: If HDDs are switched off or are removed, the DVR will create a HD OFF event. Power Loss: The DVR keeps a record of any time the system is powered off. NOTES: When using a contact output for this feature, make sure the control output is 5V effective. Record Stop: If recording is stopped, the DVR will create an event. If an output is assigned to Record Stopped, any other events assigned for that alarm output will automatically change to None. Network Loss: If connection to network is lost, DVR will create a Network Loss event. NOTE: This function only checks physical connection to the network. Any network behavior that blocks connection (blocked ports, wrong IP setup, etc.) is not detected by this function. Fan Failure: 59
67 Figure 5-12 Alarm & Event Menu Event-Fan Failure Log: Check box to record events in the log. Buzzer: Check box to enable buzzer when a fan fails to work. Notify: Check box to enable notification when a fan fails to work. Network Alarm: Check box to send out a network alarm to client PC. (requires PowerCon software and setting up Alarm Server in Network Setup menu) Alarm Output: This will transmit a signal through one of the alarm outputs. It can be set to either NONE (not active), 1, 2, 3, or 4. Output Type: Output action is locked to Transparent 60
68 HD Temperature: Figure 5-13 Alarm & Event Menu Event - HD Temperature Log: Check box to record events in the log. Buzzer: Check box to enable buzzer when hard drive s temperature is over the Temp. Warning Limit. Notify: Check box to enable notification when temperature is over the Temp. Warning Limit. Network Alarm: Check box to send out a network alarm to client PC. (requires PowerCon software and setting up Alarm Server in Network Setup menu) Stop Recording: Check box to stop recording when HD s temperature is over the Temp. Warning Limit. Temp. Warning Limit: Sets the trigger temperature for all other active settings in HD Temperature. Choose from 55 C /131 F~85 C /185 F. Alarm Output: This will transmit a signal through one of the alarm outputs. It can be set to either NONE (not active), 1, 2, 3, or 4. Output Type: Output action is locked to Transparent 61
69 HD Failure: Figure 5-14 Alarm & Event Menu Event - HD Failure Log: Check box to record events in the log. Buzzer: Check box to enable buzzer when no hard drive is detected. Notify: Check box to enable notification function when HD fails. Network Alarm: Check box to send out a network alarm to client PC. (requires PowerCon software and setting up Alarm Server in Network Setup menu) Alarm Output: This will transmit a signal through one of the alarm outputs. It can be set to either NONE (not active), 1, 2, 3, or 4. Output Type: Output action is locked to Transparent 62
70 HD Full: Figure 5-15 Alarm & Event Menu Event - HD Full Buzzer: Check box to enable buzzer when hard drive is full. Notify: Check box to enable notification when HD is full. Network Alarm: Check box to send out a network alarm to client PC. (requires PowerCon software and setting up Alarm Server in Network Setup menu) Alarm Output: This will transmit a signal through one of the alarm outputs. It can be set to either NONE (not active), 1, 2, 3, or 4. Output Type: Output action when alarm is triggered. Timeout: Alarm output lasts for the set time duration. Permanent: Alarm will be continuously active until user presses Enter key. Transparent: Alarm output remains active until event ends. Trans+Timeout: Alarm output continues until event ends, then lasts for the set time duration. Timeout Duration: The amount of time the buzzer sounds when the HD is full. Duration selectable from 1 to 150 seconds. 63
71 HD Off: Figure 5-16 Alarm & Event Menu Event - HD Off Buzzer: Check box to enable buzzer when hard drive is off. Notify: Check box to enable notification when HD is off. Network Alarm: Check box to send out a network alarm to client PC. (requires PowerCon software and setting up Alarm Server in Network Setup menu) Alarm Output: This will transmit a signal through one of the alarm outputs. It can be set to either NONE (not active), 1, 2, 3, or 4. Output Type: Output action when alarm is triggered. Timeout: Alarm output lasts for the set time duration. Permanent: Alarm will be continuously active until user presses Enter key. Transparent: Alarm output remains active until event ends. Trans+Timeout: Alarm output continues until event ends, then lasts for the set time duration. Timeout Duration: The amount of time the buzzer sounds when the HD is off. Duration selectable from 1 to 150 seconds. 64
72 Power Loss: Figure 5-17 Alarm & Event Menu Event Power Loss Log: LOG is permanently checked for this feature. Power Loss events are always recorded by the DVR. Notify: Check box to enable notification when HD is off. Network Alarm: Check box to send out a network alarm to client PC. (requires PowerCon software and setting up Alarm Server in Network Setup menu) 65
73 Record Stop: Figure 5-18 Alarm & Event Menu Event Record Stop Log: Check box to record events in the log. Buzzer: Check box to enable buzzer when DVR stops recording. Notify: Check box to enable notification when DVR stops recording. Network Alarm: Check box to send out a network alarm to client PC. (requires PowerCon software and setting up Alarm Server in Network Setup menu) Alarm Output: This will transmit a signal through one of the alarm outputs. It can be set to either NONE (not active), 1, 2, 3, or 4. (If an output is assigned to Record Stopped, any other events assigned for that alarm output will automatically change to None ) Output Type: Output action when alarm is triggered. Timeout: Alarm output lasts for the set time duration. Permanent: Alarm will be continuously active until user presses Enter key. Transparent: Alarm output remains active until event ends. Trans+Timeout: Alarm output continues until event ends, then lasts for the set time duration. Timeout Duration: The amount of time the buzzer sounds when DVR stops recording. Duration selectable from 1 to 150 seconds. 66
74 Network Loss: Figure 5-19 Alarm & Event Menu Event Network Loss Log: Check box to record events in the log. Buzzer: Check box to enable buzzer when network is lost. Alarm Output: This will transmit a signal through one of the alarm outputs. It can be set to either NONE (not active), 1, 2, 3, or 4. Output Type: Output action when alarm is triggered. Timeout: Alarm output lasts for the set time duration. Permanent: Alarm will be continuously active until user presses Enter key. Transparent: Alarm output remains active until event ends. Trans+Timeout: Alarm output continues until event ends, then lasts for the set time duration. Timeout Duration: The amount of time the buzzer sounds when DVR stops recording. Duration selectable from 1 to 150 seconds. 67

75 5.6 SCHEDULE SETTING Figure 5-20 is a screen shot of the SCHEDULE SETTING MENU. In this menu you can set a unique timer to start recording during a specified time period. This menu is used to configure Express Setup, Holidays and Schedule settings. Figure 5-20 Schedule Menu-Express Setup Express Setup Weekend Starts: Select day and time when weekend starts. Weekend End: Select day and time when weekend ends. Daytime Starts: Select daytime starting time. (Nighttime schedule ends when Daytime begins) Daytime End: Select daytime ending time. (Nighttime schedule begins when Daytime ends) Record Type: Select the type of recording for each time period. Disabled: No recording during scheduled time period Normal+Event: Continuous and Event recording Event Only: Event recording only Normal Frame Rate: Conntinuous FPS recording rate for the scheduled time period. The maximum rate is limited to the DVR s maximum recording rate divided by the number of active cameras. Selectable frame rate includes 30fps, 15fps, 10fps, 7.5fps, 5fps, or 1fps. Event Action: FPS recording rate for events. Selectable frame rate includes 30fps, 15fps, 10fps, 7.5fps, 5fps, or 1fps. 68


76 Event Action: Check this box to enable Buzzer, Alarm out, and Network actions when an event occurs on the selected time period. Apply: Press Apply button bring up a confirmation window. Select Yes to confirm and apply express schedule settings or No to cancel changes Holidays In addition to setting a weekly record schedule, user can also schedule recording for specific days of the year. Figure 5-21 Schedule Menu-Holidays Data Type: Select either Holiday or Others. (Holiday and Others means two different group, you can assign special days in these two group) Recurrent Type: Choose how often each scheduled day should be recorded. Disable: Recording is disabled. One time: Records date only once. Month/date: Repeats recording on the same specific date. 69
77 Month/weekday: Repeats recording on a specific day of the month/week. Details: Specifies the date to be recorded. Prev: Previous Page (30 Holidays Total) Next: Next Page (30 Holidays Total) Schedule Figure 5-22 Schedule Menu-Schedule Camera: Select a number to change the schedule for that camera. Each camera can be set on a 24 hour time block for Holiday (Hol), Other (Oth), Sunday (Sun), Monday (Mon), Tuesday (Tue), Wednesday (Wed), Thursday (Thu), Friday (Fri), or Saturday (Sat). Time Bar: The time bar uses three different colors to distinguish each recoding mode. Gray (No Rec): No recording during this time block. Orange (E): Only events are recorded during this time block. Blue (N+E): (Default) Normal and event recording during this time block. To Set Schedule using Mouse 1. Click on desired start time block (no numbers on it) on a time bar. At this time, the selected block will be highlighted in blue frame and the selected time bar will be highlighted by red frame. There are 24 blocks on the time bar representing 24 hours respectively. Set a schedule start time by clicking on a desired start time block on a time bar and clicking again to confirm it. At this time, the selected block and all following blocks will turn gray, which means this gray timezone has been set to the recording mode of gray(no Rec). 70
78 2. Click again to confirm, then a new number (for the new section) will show on this block and current and all following blocks will turn to gray. This means this new gray timezone has a new record mode (No record). Change the section to different mode (with different color) by clicking on the first block of each section. The color swatches from gray -> orange -> blue, everytime user click the first block of a section. 3. Repeat clicking on the first block (with number on it) of any timezone, this timezone will change from one color to another, which means switching the record mode. The color switch sequence is gray- >orange->blue. Schedule Setting from front panel 1. Enter schedule setting mode: press Enter button to enter schedule setting mode. At this time, the whole editing area at right-down side will be highlighted within a blue frame. See below image. 2. Enter camera selection mode: turn Jog knob to switch to Camera selection mode. When Camera selection mode is selected, all 16 cameras will be highlighted in a blue frame. See below image. 3. Selecting camera: Turn Shuttle knob to select desired camera to configure. Selected camera number will be highlighted by a blue frame. See above image. 4. Enter time bar editing mode: turn Jog knob to switch to time bar editing mode. When this mode is selected, all 9 time bars will be highlighted within a blue frame. 5. Select desired time bar for setting: press Enter button, the first time bar will be selected for setting and highlighted in a red frame. See below image. Press Jog to switch to desired time bar for setting. 71

79 6. Editing blocks in a time bar: when a time bar is selected (highlighted in red frame), press Enter button, then the first block of this bar will be selected (highlighted in blue frame). Turning Jog knob to switch to desired block as starting time, and press Enter button again to confirm. At this time, the current and all following blocks will turn into gray, which means this gray timezone has been set to the recording mode of gray(no Rec). User can also change the timezone to a different record mode (with different color) by following instruction in next step. 7. Changing recording mode (color) of a timezone: Turn Jog knob to switch to the first block (with number on it) of a timezone. Clicking Enter button, and this timezone will switch to another color, which means switching to another record mode. The color switch sequence is gray->orange->blue. Press Edit Timezone button to edit the time zone. 72

80 Figure 5-23 Schedule Menu-Schedule-Edit Timezone Editing Timezone: From: Displays schedule start time To: Displays schedule end time Record: Displays Record mode Resolution: Select recording resolution. NTSC: 704x480; 704x240; 352x240 PAL: 704x576, 704x288, 352x288 Normal: Frame rate in images per second for continuous recording. The speed is limited to the maximum recording rate of the DVR divided by the number of installed cameras. Event Speed: Frame rate in images per second for event recording. Event record speed can be set from 1 to 30 (25 for PAL). Action: Check this box to enable Buzzer, Alarm out, , and Network when an event occurs. Apply to Days: This button can be used to copy schedules to other days. Select which days you wish to copy to. "Select All" selects all days, Clear All deselects all days. Click OK to copy the settings or "Cancel" to exit without copying. 73


81 Apply to Cameras: This button can be used to copy schedules to other cameras. Select which cameras you wish to copy to. "Select All" selects all cameras, Clear All deselects all cameras. Click OK to copy the settings or "Cancel" to exit without copying. 74

82 5.7 NETWORK SETTING Figure 5-24 is a screen shot of the NETWORK SETTING MENU. This menu is for configuring the DVR for a network connection. NOTE: Since every Network Configuration is different, please check with your Network Administrator or ISP to see if your DVR requires specific IP addresses and/or port numbers. Figure 5-24 Network Menu LAN LAN Network Type: Static IP: User can set a fixed IP for network connection. DHCP: DHCP server in LAN will automatically assign IP for network connection PPPoE: For direct connection to DSL ONLY. Verify with your ISP if they use PPPoE. IP: This field shows the DVR s current IP Address. A static IP address must be set manually. If DHCP or PPPoE is selected, this value will be assigned automatically. Subnet Mask: This field shows the subnet mask for your network so the DVR will be recognized within the network. If DHCP or PPPoE is selected, this value will be assigned automatically. Gateway: This field shows the gateway for your network so the DVR will be recognized within the network. If DHCP or PPPoE is selected, this value will be assigned automatically. DNS Server 1: This field shows the primary DNS server for your network. If DHCP is selected and an internet connection is available, this value will be assigned automatically. This field must have a valid DNS address in order to use the DDNS feature (see for more detail). DNS Server 2: This field shows the secondary DNS server for your network. 75
 server s name. NOTE: For more reliable email service, use the server s IP address.")
83 HTTP Port: Port number for HTTP/WEB communication. Bandwidth Limit: Allows user to limit the bandwidth used by the DVR Figure 5-25 Network Menu SMTP Server: Assign the SMTP ( ) server s name. NOTE: For more reliable service, use the server s IP address. SMTP Port: Assign the port number used by the SMTP server. Authentication: Check this box if the SMTP server requires authentication (user name / password). SSL: Check the box if mail server needs to be encrypted by SSL. User name: Input the login user name if the SMTP server requires authentication. Password: Input the password if the SMTP server requires authentication. Sender Input the address of the sender (DVR). Receiver 1: Input the first address that event messages are sent to. Receiver 2: Input the second address that event messages are sent to. Receiver 3: Input the third address that event messages are sent to. Subject: Input subject. 76
84 5.7.3 DDNS DDNS Server: Select either EverfocusDDNS or as the DDNS provider. If DDNS will not be used, simply select Disable. EverfocusDDNS DVR Name: Input the desired name for the DVR Figure 5-26 EverfocusDDNS Register/Update: Click the button to submit and register the name to the Everfocus server. 77

85 Figure Host name: Host name created through the dyndns account. User name: User name of the dyndns account. Password: Password of the dyndns account. Confirm: Re-enter password. Note: For more details on DDNS setup, please see Chapter 8 - Everfocus DDNS Setup. 78
86 5.7.4 Alarm Server Figure 5-28 Network Menu Alarm Server Server IP1~3: IP address of client PC with installed PowerCon Software. The network alarm can be transmitted to up to 3 addresses. Protocol: Select the protocol type for alarm transmission: UDP: User Datagram Protocol TCP: Transmission Control Protocol Port: Select the transmission port for network alarm messages Network ID: The network ID is an identifier for the alarm transmitter. 79
87 5.8 DISPLAY SETTING Figure 5-29 is a screen shot of the DISPLAY SETTING MENU. This menu will walk you through Monitor On- Screen Display (OSD) and Sequential setup. Figure 5-29 Display Menu Monitor OSD Monitor OSD These are the display options for the Main Monitor. Main Monitor Camera Title: Check the box to display camera titles. Date/Time: Check the box to display current date/time. Playback Date/Time: Check the box to display playback date/time. Playback Status: Check the box to display playback status. Event Status: Check the box to display event status. HDD Status: Check the box to display hard drive status. Text Insert: Check the box to display data transmitted from external RS232 device. Main Monitor Output: This system supports both VGA and BNC monitor displays at the same time but only one of them can have optimized display quality. Use this feature to select which output is optimized. Call Monitor Camera Title: Check the box to display camera titles. Date/Time: Check the box to display current date/time. 80
: Set the dwell time for each step. Sequence dwell time can be set from 0 to 99 seconds. 5.8.3 Call M/T SEQ Figure 5-31 Display Menu Call M/T SEQ Step: Sequence order. Cannot be changed.")
88 5.8.2 Main M/T SEQ Figure 5-30 Display Menu Main M/T SEQ Step: Sequence order. Cannot be changed. Camera: Select which camera appears on the current step. Dwell (sec): Set the dwell time for each step. Sequence dwell time can be set from 0 to 99 seconds Call M/T SEQ Figure 5-31 Display Menu Call M/T SEQ Step: Sequence order. Cannot be changed. Camera: Select which camera appears on the current step. Dwell (sec): Set the dwell time for each step. Sequence dwell time can be set from 0 to 99 seconds. 81
89 5.9 DISK SETTING Figure 5-32 is a screen shot of the DISK SETTING MENU. This menu is used to review and manage the DVR s hard drive settings Disk Disk: Select the disk number. Figure 5-32 Disk Menu Health Status: Displays current status of the selected disk. Disk Temperature: Displays current disk temperature. Disk Size/Total: Shows total disk size. Disk Size/Usage: Shows percentage of used disk space. If DVR is set to automatically overwrite the disk, this option will show Overwrite mode currently. Record Time (Start): Shows earliest recorded time on the hard drive. Record Time (End): Shows latest or most current recorded time on the hard drive. 82
90 5.9.2 Lock/Format Figure 5-33 Lock/Format Menu Maximum Lock (%): User can set the maximum lock percentage of the HDD volume. After setting lock percentage, it can be enabled/disabled in three places 1. Camera > Basic Setting > Motion > Auto Lock 2. Alarm & Event > Alarm > Auto Lock. 3. Lock or unlock the file manually in search result list Current Lock (%): Here displays the current lock percentage of HDD volume. If locked data has reach the maximum lock percentage, it will stop lock new data. Unlock All: Click this button to unlock the locked part of HDD. Delete All: Click this button to delete all the unlocked data in HDD. Format: Click this button to format the whole HDD. 83
91 5.10 SYSTEM SETTING Figure 5-34 is a screen shot of the SYSTEM SETTING MENU. This menu is for setting up the system configurations of the DVR. Figure 5-34 System Menu Date/Time Date/Time Date: Set current Date. Time: Set current Time. Date Format: Choose date format from yyyy/mm/dd, dd/mm/yyyy, and mm/dd/yyyy. Time Format: Change time format between 12H and 24H mode. Time Zone: Set the time zone that the DVR adjusts to when updating from the time server. NTP: Select Enable or Disable NTP time synchronization. NTP Server: Displays the time server address that the uses for time synchronize. To find a compatible NTP address, please follow these steps: a) Go to a PC that is connected to the internet. b) Click on START -> RUN -> type command and press OK. c) In the DOS Prompt, type ping pool.ntp.org to find out the IP address of an NTP Server. NTP Update Interval: The frequency that the system automatically updates the time. Select Daily, Weekly, or Monthly. 84
92 Daylight Saving Figure 5-35 System Menu Daylight Saving Daylight Saving: Check the box to enable daylight saving time. Start Date: Set the start date of daylight saving time. Start Time (hh:mm): Set the time when daylight saving time begins. Set To (hh:mm): This is what the time will change to when daylight saving begins. For most regions, this will be one hour ahead of the Start Time. End Date: Set the end date of daylight saving time. End Time (hh:mm): Set the time when daylight saving time ends. 85
, password, and access level.")
93 User User Menu is where you can add or delete different users on the system as well as set administrator rights. Figure 5-36 System Menu User Add Click Add button to add a new user. Set the name (case-sensitive), password, and access level. Press Add button to confirm a new user or Cancel to exit without making changes. Figure 5-37 System Menu User - Add 86

94 Edit Click Edit button to make changes to an existing user account. Press Save button to save changes or Cancel to exit without making changes. Figure 5-38 System Menu User - Edit User Login: Check this box to activate user login. When this is disabled, no username or password is required to access the system, and all users operate with ADMIN rights. Auto Logoff: Check this box to automatically logoff the current user after 3 minutes of inactivity. 87
95 I/O Control Figure 5-39 is a screen shot of the I/O Control Setting Menu. This menu is used to define the settings for controlling the DVR through RS232 or RS485. RS232 Figure 5-39 System Menu I/O Control Baud Rate: The speed used to transmit instruction or information through the RS232 port on the DVR. Choose from the following speeds: 1200, 2400, 4800, 9600, 19200, 38400, 57600, or BPS. Data Bit: The data bit used for transferring. This can be set to 8 or 7. Stop Bit: This field is to set the stop bit for the RS232 connection. This can be set to 1 or 2. Parity: This selects the transmission level of the connection. Choose either None, Odd, or Even. RS485 PTZ Protocol: Select PTZ protocol Choose from the following protocols: Transparent, Pelco D, Pelco P, Everfocus, or Samsung. (NOTE: all cameras must be on the same protocol) 485 ID: If more than one DVR is used through the RS485 connection, each one must be assigned a unique ID number between 0 and 127. Baud Rate: The speed used to transmit instruction or information through the RS485 port on the DVR. Choose from the following speeds: 1200, 2400, 4800, 9600, 19200, 38400, 57600, BPS. Data Bit: The data bit used for transferring. This can be set to 8 or 7. Stop Bit: This field is to set the stop bit for the RS485 connection. This can be set to 1 or 2. Parity: This selects the transmission level of the connection. Choose either None, Odd, or Even. Control IR Remote ID: ID used by the remote control. This can be set from 1 to 4. 88
96 Misc. Figure 5-40 System Menu Firmware & Misc. Firmware Current Firmware Version: Displays the current version. Firmware Upgrade: Press Upgrade to upgrade the firmware. NOTE: To perform a Firmware Upgrade, you will need to connect a USB flash device with the latest version of the firmware. Do not disconnect USB device or turn off the power of the unit during the upgrade; this can cause the system to crash. Configurations Load Factory Default: Click Load to restore all menu settings to the default values. User Account, Network Setting, and Time are not affected. Load From USB: Click Load to upload saved DVR configuration settings from a USB flash device. Save To USB: Click Save to save the current DVR configuration settings to a USB flash device. Language: Choose which language the DVR uses. The available languages may vary based on region. 89

97 5.11 INFORMATION SETTING Figure 5-41 is a screen shot of the INFORMATION SETTING MENU. This menu displays important system information. Figure 5-41 Information Menu System System System Version: Displays firmware version number. Model: Displays DVR model number. NTSC/PAL: Displays current video format. Network IP: Displays the DVR s current IP Address. MAC: Unique address of the DVR s internal network card. This option cannot be changed. DVR Name: Displays DVR name Network ID: The ID number for the alarm network. Status Disk: Displays disk temperature. Fans: Displays fan status. 90
98 Log Figure 5-42 Information Menu Log Log Type: Event: to see log sorted by event. User: to see log sorted by user. Operation: to see log sorted by operation. View Log: Press View Log button to view the log. See Figure 5-43 for more detail. Clear Log: Press Clear Log button to clear the log. Export Log to USB: Export log data to USB. 91

99 Figure 5-43 Log List Prev Page: Go to the previous page of log. Next Page: Go to the next page of log. Close: Close the window 92
100 Chapter 6 6 Networking Overview This chapter will give you a basic instruction on how to set up the DVR for network connection. It is highly recommended that you have a working knowledge of what a network is and how it works. This will be helpful in completing the networking process. 6.1 Introduction to TCP/IP TCP/IP is the group of protocols used by the Internet and most Local Area Networks (LANs) throughout the world. In TCP/IP, every computer or other communications device that is connected to the network has a unique IP address. By doing this you are giving your device a unique address similar to the address of your house. An IP address is composed of four octets (numbers in the range of 0 to 255) separated by decimal points. The IP address is used to uniquely identify a host or computer on the LAN. For example, one computer on a network could have an IP address of You should never give two or more devices the same exact IP address, but the first three octets of an IP address should be the same for all computers in the local area network. For example, if a total of 253 computers exist in a single LAN, the IP addresses could be assigned starting with x, where x represents a number in the range of 2 to Subnet Masks Each host in a LAN has a subnet mask. The subnet mask is a set of octets that is used to determine which LAN or class it belongs to. The number 255 is usually used to represent the network address portion of the IP address and a zero is placed at the end to identify the host portion of the address. Basically the subnet mask can be compared to the city you live in for your home address, but in this case you are stating the network you belong too. 6.3 Gateway Address Each host in a LAN has a gateway. A gateway address is composed of four octets separated by decimal points. The gateway address is used to uniquely identify the main host or computer on the LAN that assigns the IP addresses to your network (usually a router). This is comparable to the zip code of your address. 93
101 6.4 Virtual Ports A port number represents a "channel" or entryway for network communications. Port numbers allow different applications on the same computer to utilize network resources without interfering with each other. Port numbers most commonly appear in network programming, particularly socket programming. Sometimes, though, port numbers are made visible to the casual user. For example, some websites on the Internet use a URL like the following: In this example, the number 8100 refers to the port number used by the browser to connect to the web server. The standard port number used by web sites is 80, so this number does not need to be included with the URL (although it can be). In IP networking, port numbers can theoretically range from 0 to Most popular network applications, though, use port numbers at the lower end of the range (such as 80 for HTTP). Ports are similar to doors and windows of your house, with port 80 acting as the front door. If these are not open you could not enter the house. This is the same case with ports on a network. If the ports for a specific IP address are not open then you could not gain access to that IP address. Note: The term port also refers to several other aspects of network technology. A port can refer to Ethernet connection points, such as those on a hub, switch, or router. The term port is also used to refer to a physical connection point for peripheral devices such as serial, parallel, and USB ports. 6.5 Pre-Installation Before beginning the installation, please answer the following questions: Do you have Hi-speed Internet? There are many types of high speed Internet available. The most common ones are T1, Cable, and DSL (in order of speed). The DVR is not compatible with a dial-up connection. Note: EverFocus suggests having a minimum upload speed of 256KBps. This can be addressed by your Internet Service Provider. What type of modem/router do you have? Modem/router model name/ # The modem/router was either installed by your Internet service provider or purchased by you to establish a connection to the Internet. A router assigns different internal IP addresses to local computers; this allows multiple computers to access the Internet through the same external IP address. 94
102 Do you have a static IP address? A Static IP address means you use the same IP address every time you connect to the Internet. With a static IP address, other Internet users always know the address of your location and can easily connect with it. This makes it much simpler to host a website, server, or other type of server connection. Everfocus suggests using a static IP address. If this is not available, you will need to use a dynamic IP address. This is explained below. Do you have a dynamic IP address? A Dynamic IP address means your IP address changes each time you connect to the Internet. We recommend asking your Internet service provider for a Static IP address. If this is not a possibility, you may use the DDNS feature of the DVR. DDNS stands for Dynamic Domain Name Server, a service that provides a central database where IP information can be stored and retrieved. It allows those using a dynamic IP address to be registered centrally so users can connect to it by name. See Chapter 8 for details on using EverFocus DDNS. What type of DVR are you installing? Everfocus EDR series: EDR 410, 810, 920, 1620, 1640, or 1680 Everfocus EDVR series: EDVR 4D1, 9D1, 16D1, 16D3 Everfocus ECOR series: ECOR 4, What is your Network Setup? Everfocus DVR s can operate using one of three types of networking connections. 1. Simple One to One Connection: A simple one to one connection is the simplest type of network connection. It uses a cross-over cable to make a direct connection from one computer to another (or in this case a computer to a DVR). 2. Direct High Speed Modem Connection: A direct modem connection uses a standard network cable to connect the modem directly to a computer (or in this case a modem to the DVR). This type of connection only covers single-port modems. For a combination modem/router, use the setup described below. 3. Router or LAN Connection A local area network connection requires either a router or a preexisting LAN connection. This is the most common type of connection. A router allows multiple computers and DVR s to access each other as well as the Internet. It assigns different internal IP addresses to the computers. 95

103 6.7 Simple One to One Connection Crossover Ethernet Cable Pin outs: The Figure below shows the pin configurations for a cross-over cable. Connection Procedure: The First step is to purchase or make a cross-over cable. We recommend purchasing one if you have never made a cross-over cable. Please remember you can not use a straight through network cable for this application Once you have a cross-over cable plug one end into the LAN port on the back of the DVR and the other into the network card on the back of the computer. Log into the EverFocus DVR menu and go to the Network Setting Menu. You must use the Static IP option for this type of connection. 96

104 Assign an IP of , a Subnet Mask of , and a Gateway of You can ignore DNS Server. The next step is to set the computer s network settings to match those of the DVR. You will need Administrator privileges on your Windows machine to do this. To assign a fixed IP address in Windows 2000/XP. 97

105 98
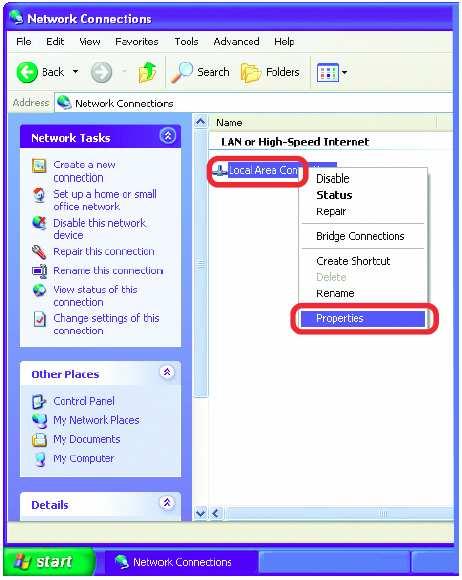
106 99

107 Click on the option that says Use the following IP address Assign an IP address of , a Subnet Mask of , and a Default Gateway of , then click OK. Restart both the computer and the DVR. To access the DVR from the computer, simply open Internet Explorer and in the address bar type: 100
108 6.8 Direct High Speed Modem Connection Straight Through Ethernet Cable Pin outs: The Figure below shows the pin configurations for a straight cable. Connection Procedure: The first step is to purchase or make a straight through cable. We recommend purchasing one if you have never made a straight through cable. Please remember you can not use a cross-over network cable for this application 101
109 Once you have a straight through cable plug one end into the LAN port on the back of the recorder and the other into the high speed modem. Log into the EverFocus DVR menu and go to the Network Setting Menu. Input the Static IP address, the Subnet Mask, and the Gateway that you obtained from the internet service provider. Note: If you have a dynamic IP address, you can set the DVR to DHCP to automatically detect the network settings settings. Therefore, it can use a dynamic IP address. Exit from the DVR s Menu to save the settings. To access the DVR from a computer, open Internet Explorer and in the address bar type: (IP address given by your internet service provider) Note: When using this type of connection, only one device can be connected to the modem at a time. You will need to use a computer at a different location to test the connection. 102
110 6.9 Router or LAN Connection Straight Through Ethernet Cable Pin outs: The Figure below shows the pin configurations for a straight cable. Connection Procedure: The First step is to purchase or make a straight through cable. We recommend purchasing one if you have never made a straight through cable. Please remember you can not use a cross-over network cable for this application 103

111 Once you have a straight through cable plug one end into the LAN port on the back of the recorder and the other into the router. Log into the EverFocus DVR menu and go to the Network Setting Menu. To let the router automatically assign an address: Set the Network Type to DHCP. Make sure to write down the IP address and the Gateway. Exit from the Menu to save settings. To manually assign an address: Go to a computer connected on the same network as the DVR. Click on the Start button and choose Run. o If using Windows Vista, choose Search instead. Type command and click on OK. o In Vista, you will need to double-click on the Command Prompt file to open it.. In the DOS prompt, type ipconfig and press Enter. The network information will be displayed on a screen similar to the one below. o In Windows Vista, look for the information that says IP v4. Take the values for Subnet Mask and Default Gateway and input them into the DVR; these values should be exactly the same in both devices. However, you should change the last 104
112 number of the IP address. For example, if the IP address of the computer is , the DVR s IP address should be To access the DVR from a computer simply open Internet Explorer and in the address bar type: (IP address of the DVR) Note: The DVR s IP address will only work at the location of the DVR. To connect from a different location over the Internet, see below. To set DVR for Internet Connection through router The next step is to open ports within your router. Log into the router using a PC and open the following ports. o Ports to open: 80 o If your Internet service provider blocks port 80, you can change it to a different port in the DVR s Network Menu Setup. o If you are using a Linksys or D-Link router, see Chapter 9 for basic support on setting up ports. For any other router, you will need to contact the manufacturer for support. To access the DVR from a computer simply open Internet Explorer and in the address bar type: (the IP address given by your internet service provider) Note: If you changed to a different port other than 80, you will need to include this at the end of the IP address Example: If you have a Dynamic IP address and have opened the ports, go to the next chapter to setup DDNS. 105
113 7 REMOTE OPERATION FROM BROWSER 7.1 CONNECTING TO PARAGON To access the DVR from a computer, open an Internet Explorer window and in the address bar type: Local connection: (IP address from the DVR s Network Menu) Internet connection: (IP address given by your Internet Service Provider) Chapter 7 The login page will appear on the screen similar to the one shown above. Enter a user name and password to access the recorder. These can be changed in the System section of the Main Menu. The default user name is admin. The default password is Click on the Login button and you will log in to the recorder s Network Viewer. 106

114 7.2 BROWSER SECURITY SETTING Installing ActiveX controls When you first connect to the DVR s IP address, you should see a screen like the one below. If you do not see a yellow bar like the one the arrow is pointing at, your security settings may be too high. If so, go to Section Enabling ActiveX Controls. Right click on the yellow bar and select Install ActiveX Control 107
115 Install the eplusdvr.cab file when prompted to do so. Once the file finishes installing, you will return to the same login page as before. Type in the username and password and click Login to view the cameras. Default username: admin Default password:


116 7.2.2 Enabling ActiveX Controls Note: This section is only necessary if you DO NOT see the yellow ActiveX bar at the top of your browser screen when you first connect to the DVR. At the top of the Internet Explorer Window, click on Tools, then select Internet Options. Click the Security tab at the top of the window, then choose Custom Level near the bottom. 109
 Allow scriptlets (IE7 only) Automatic prompting for ActiveX controls Binary and script behaviors Display video and animation on a webpage that does not use external media player (IE7 only) Run")
117 In the Security Settings window, scroll to ActiveX controls and plug-ins Set the controls as follows: Enable : Allow previously unused ActiveX controls to run without prompt (Internet Explorer 7 only) Allow scriptlets (IE7 only) Automatic prompting for ActiveX controls Binary and script behaviors Display video and animation on a webpage that does not use external media player (IE7 only) Run ActiveX controls and plug-ins Script ActiveX controls marked safe for scripting Prompt : Download signed ActiveX controls Download unsigned ActiveX controls Disable : Initialize and script ActiveX controls not marked as safe Click OK and then choose Yes to change the security settings. 110

118 Close the window so you are back at the login screen. Click the Refresh button to reload the page. Install the eplusdvr.cab file when prompted to do so. Once the file finishes installing, you will return to the same login page as before. Type in the user name and password and click Login to view the cameras. Default user name: admin Default password:

119 7.3 REMOTE LIVE VIEW In the main page, you will see live images in a 16-screen display (or 8 screens, depending on the model). 2. The status of each camera is represented by different colors on the left side of the screen. Green means normal; orange indicates a Motion; blue indicates Vloss, red indicates an alarm event. Click on a camera number to switch that camera to full screen. Click on 4UP, 9UP, or 16UP to display 4, 9, or 16 screens. You can also press Mic button to transfer audio to DVR from client side if there has microphone. 3. There are 13 icons at the top of screen. The first twelve have the same functions as the icons in the DVR s Main Menu. The last icon is used for PTZ control (described in the next section). 112

120 7.4 REMOTE PTZ CONTROL 1. Use Direction Arrows (up, down, left, right) to move the camera to the desired direction and angle. 2. In Zoom option, Click Z+ to zoom closer or Z- to zoom farther away. 3. In Focus option, click F+ to increase the focus or click F- to decrease the focus. 4. In Iris option, you can increase the amount of light by clicking I+ or decrease it by clicking I-. 5. To program a preset position a. Move PTZ camera to the specified position b. Click Preset button c. Click the number of the desired position (This will be displayed in the box) d. Click Set button 6. Steps to jump to a preset position a. Click Preset button b. Click the number of the desired position c. Click Go button 7. Shortcut steps for presets #1-9 a. Click digit 1-9 button without clicking any other buttons 8. Steps to delete a preset position a. Click Preset button b. Click the number of the desired position c. Click Delete button 9. Steps to run Auto Pan 113
121 a. Click Auto Pan button 10. Pattern Operation (Pattern is the 0 Tour in Everfocus and Pelco PTZ cameras) a. Click Pattern button 11. Steps to run a tour a. Click Tour button b. Click the number of the desired tour c. Click Go button 12. Steps to remove a tour a. Click Tour button b. Click the number of the desired tour c. Click Delete button 114
 Playback Control Keys Playback Control Keys: 1. Fast rewind the video. 2. Play Reverse the video. 3.")
122 7.5 REMOTE PLAYBACK To playback the video, press Search button. Select from Time Search, Event Search, or Motion Search. For more details about Search setting, please refer to 4.13 Search Setting. Event Search and Motion Search will show maximum 400 search result items(near start time) Playback Control Keys Playback Control Keys: 1. Fast rewind the video. 2. Play Reverse the video. 3. Stop playback. 4. Playback the video. 5. Fast forward the video. 6. Pause 115
123 Chapter 8 8 EVERFOCUS DDNS SETUP Setup Steps: Step 1. Set up the Network Menu according to the instructions detailed in the Networking chapter. (Make sure that DNS Server 1 is set correctly or DDNS will not work) Step 2. Go to the website and check for an available name. Note: This step is optional, as it is only used to check the availability of host name. If the name is available, proceed to step 3 for DDNS setup. Step 3. Step 4. In DVR s Network Menu, go to DDNS. Choose EverfocusDDNS for the Server and put in your chosen name for DVR Name. Press Submit/Update button to confirm. Step 5. You should now be able to connect by typing the name you created into the address bar. Example: 116

124 9 LINKSYS & D-LINK PORT FORWARDING 9.1 LINKSYS PORT FORWARDING Chapter 9 This section will cover a few simple configurations for the Linksys router. This chapter is only to offer some help to the installer and end user. Please understand we DO NOT support this product and will not give tech support on it. If you need additional technical support on this router you must call Linksys. To access the Web-based Utility, launch a web browser and type the Router s default IP address, , in the address bar. Then press Enter. A password request page will appear. (Non-Windows XP users will see a similar screen.) Leave the User Name field blank. The first time you access the router, use the default password admin. Click the OK button to continue. The first screen that appears displays the Setup tab. This allows you to change the Router's general settings. Change these settings as described here and click the Save Settings button to apply your changes or Cancel Changes to cancel your changes. Click on the Applications & Gaming tab. 117
 To forward a port, enter the information on each line for the criteria required. Descriptions of each criterion are described here.")
125 Applications and Gaming allows you to set up public services on your network, such as web servers, ftp servers, servers, or other specialized Internet applications. (Some Internet applications may not require any forwarding) To forward a port, enter the information on each line for the criteria required. Descriptions of each criterion are described here. Application - In this field, enter the name you wish to give the application. Start/End - Enter the starting number of the range under Start and the ending number under End. Protocol - Enter the protocol used for this application, either TCP or UDP, or Both. IP Address - For each application, enter the IP Address of the PC running the specific application. Enable - Click the Enable checkbox to enable port forwarding for the relevant application. When finished making changes, click the Save Settings button to apply your changes or Cancel Changes to cancel them. Here is an example for how the port information might look: HTTP 80 to 80 Both Enable CTRL 1600 to 1600 Both Enable Note: If you changed port 80 in the DVR s Network Menu, open that port instead of

126 9.2 D-LINK PORT FORWARDING This section will cover a few simple configurations for the D-Link router. This chapter is only to offer some help to the installer and end user. Please understand we DO NOT support this product and will not give tech support on it. If you need additional technical support on this router you must call D-Link. Whenever you want to configure your network or the DI-624, you can access the Configuration Menu by opening a web-browser and typing in the IP Address of the DI-264. The DI-264 default IP Address is Type admin in the User Name field Leave the Password blank Click OK The first screen that shows up is the Home Tab. This is the starting point for all the router s settings and functions. 119

127 Click Virtual Servers on the left to bring up the following screen. Virtual Servers allows users who are connecting remotely to access services on the router s Local Network. The functions of each field are described below. Virtual Server - Select Enabled or Disabled Name - Enter the name referencing the virtual service Private IP - The IP address of the device running the local services. Protocol Type - The protocol used for the virtual service. Private Port The port number that the service uses on the LAN (Local Area Network). Public Port - The port number that the services uses on the WAN (Wide Area Network). Schedule The time period the virtual server will be active. When you have input all the information for a virtual server, click on Apply to add it to the list at the bottom or Cancel to clear all fields. 120
128 Here is an example of the information for each service: Name Private IP Protocol Private Port Public Port Schedule HTTP Both Enable CTRL Both Enable Note: If you changed port 80 in the DVR s Network Menu, open that port instead of
129 Chapter TROUBLESHOOTING If you have problems with the system, run through the following checklist to see if you can solve the problem. The DVR will not go into record mode. Bring up the DVR s Menu and check under the Camera Menu. Verify that all connected cameras are checked as Installed and that Record Mode is set to Continuous. Check the Disk or Information Menus and verify that the internal hard drive is being detected. The DVR displays no picture. Make sure the monitor is connected to either the Video Out port or the VGA port. If the monitor has multiple inputs, make sure it is on the correct display setting. Check that the monitor cables are good. Verify the recorder is getting the correct amount of power. There is no display coming from one of the channels on the DVR. In the DVR s Camera Menu, make sure that all cameras are checked as Installed and unchecked for Covert. Verify that all cameras are connected on the Input row on the back of the DVR. If there is still no picture, connect a working camera to the port that has no picture. If you get an image, the problem is coming from the camera. I cannot connect to the recorder via the internet. Check that the DVR s ports are forwarded correctly in the router. Verify that your Internet Service Provider does not block any ports. Make sure you are using the correct IP address given by the ISP, or, if you have a Dynamic IP, check if the number has changed. 122
130 Appendix A APPENDIX A: TIMING OF ALARM MODES Transparent Mode Input Event Alarm Duration t Event = t Reaction t t Event: t reaction: Duration of alarm input source (motion, contact, system events...) Resulting duration for this alarm mode, related to event record, alarm outputs, OSD message, buzzer Timeout + Transparent Mode Input Event Alarm Duration t Event t Duration t t Reaction t Event: t Duration: t reaction: Duration of alarm input source (motion, contact, system events...) Alarm duration for timeout, defined in the event setup menus Resulting duration for this alarm mode, related to event record, alarm outputs, OSD message, buzzer 123
131 Timeout Mode Input Event Alarm Duration t Event: t Duration: t reaction: t Event t Duration = t Reaction Duration of alarm input source (motion, contact, system events...) Alarm duration for timeout, defined in the event setup menus Resulting duration for this alarm mode, related to event record, alarm outputs, OSD message, buzzer t Permanent Mode Alarm Reset Input Event Alarm Duration t Event: t Duration: t reaction: t Event t Reaction Duration of alarm input source (motion, contact, system events...) Alarm duration for timeout, defined in the event setup menus Resulting duration for this alarm mode, related to event record, alarm outputs, OSD message, buzzer t 124
132 Timeout Mode: Retrigger of Alarms t Event: t Duration: t reaction: Duration of alarm input source (motion, contact, system events...) Alarm duration for timeout, defined in the event setup menus Resulting duration for this alarm mode, related to event record, alarm outputs, OSD message, buzzer Timeout+Transparent Mode: Retrigger of Alarms t Event: t Duration: t reaction: Duration of alarm input source (motion, contact, system events...) Alarm duration for timeout, defined in the event setup menus Resulting duration for this alarm mode, related to event record, alarm outputs, OSD message, buzzer 125
133 Appendix B APPENDIX B: CHANGING RULE FOR EXPRESS SETUP Case 1: Record Mode: Normal + Event Record With: Recording days DVR will Auto adjust Quality and Event frame rate to match the Recording days which user selected: According to resolution, event hours and assumption above, DVR will select one set of suitable quality and event frame rate from Changing Order 1 to 8. If DVR can t match require record days from 8 sets of Change Order, it will just use the set of Changing Order 8. Changing Order Normal Frame Rate Quality Superior Standard Low Low Low Low Low Low Event Frame Rate Case 2: Record Mode: Event Only Record With: Recording days DVR will Auto adjust Quality and Event frame rate to match the Recording days which user need: According to resolution, event hours and assumption above, DVR will select one set of suitable quality and event frame rate from Changing Order 1 to 8. If DVR can t match require record days from 8 sets, it will just use the set of Changing Order 8. Changing Order Quality Superior Standard Low Low Low Low Low Low Event Frame Rate
134 Case 3: Record Mode: Normal + Event or Event Only Record With: Preset Setting DVR will apply setting in below table to all cameras according to different Preset Setting. Preset Setting Option Camera Item Apply value Best Quality Standard Quality Extended Quality Quality Superior Normal Frame Rate Max recording frame rate of DVR Event Frame Rate 30 Quality Standard Normal Frame Rate Half of max recording frame rate of DVR Event Frame Rate 30 Quality Normal Frame Rate 1 Basic Event Frame Rate

135 Headquarter Office 12F, No.79 Sec.1 Shin-Tai Wu Road, Hsi-Chi, Taipei, Taiwan Tel: Fax: Beijing office Room 609,Technology Trade Building. Shangdi Information Industry Base, Haidian District,Beijing China Tel: Fax: European Office Albert-Einstein-Strasse 1, D Emmerich, Germany Tel: Fax: Japan Office 1809 WBG Marive East 18F, 2-6 Nakase, Mihama-ku, Chiba city , Japan Tel: Fax: USA California Office 1801 Highland Ave. Unit A Duarte, CA 91010,U.S.A Tel: Fax: USA New York Office 415 Oser Ave Unit S Hauppauge, NY Sales: Fax: Your EverFocus product is designed and manufactured with high quality materials and components which can be recycled and reused. This symbol means that electrical and electronic equipment, at their end-oflife, should be disposed of separately from your household waste. Please, dispose of this equipment at your local community waste collection/recycling centre. In the European Union there are separate collection systems for used electrical and electronic product. Please, help us to conserve the environment we live in! Ihr EverFocus Produkt wurde entwickelt und hergestellt mit qualitativ hochwertigen Materialien und Komponenten, die recycelt und wieder verwendet werden können. Dieses Symbol bedeutet, dass elektrische und elektronische Geräte am Ende ihrer Nutzungsdauer vom Hausmüll getrennt entsorgt werden sollen. Bitte entsorgen Sie dieses Gerät bei Ihrer örtlichen kommunalen Sammelstelle oder im Recycling Centre. Helfen Sie uns bitte, die Umwelt zu erhalten, in der wir leben! P/N: MDHRG
PARAGON264x4-32CH Series DVR
 Instruction Manual PARAGON264x4-32CH Series DVR EVERFOCUS ELECTRONICS CORPORATION PARAGON264x4-32CH Series DVR Instruction Manual 2011 EverFocus Electronics Corp www.everfocus.com All rights reserved.
ECOR264-D2 Series Model: ECOR264-4D2/4F2 ECOR264-8D2/8F2
 User Manual ECOR264-D2 Series Model: ECOR264-4D2/4F2 ECOR264-8D2/8F2 EVERFOCUS ELECTRONICS CORPORATION ECOR264-D2 Series Model: ECOR264-4D2/4F2 ECOR264-8D2/8F2 Instruction Manual 2010 EverFocus Electronics
EPHD04+ HDcctv DVR Slimline, 4CH, 1080p, Real Time
 Slimline, 4CH, 1080p, Real Time User s Manual Copyright EverFocus Electronics Corp, Release Date: November, 2012 E VERFOCUS ELECTRONICS CORPORATION EPHD04H+ HDcctv DVR User s Manual 2012 EverFocus Electronics
User Manual. 8 channel HD-CCTV Digital Video Recorder
 User Manual EPHD08 DVR 8 channel HD-CCTV Digital Video Recorder EVERFOCUS ELECTRONICS CORPORATION EPHD08 DVR Instruction Manual 2010 EverFocus Electronics Corp www.everfocus.com All rights reserved. No
Quick Operation Guide of LTN7700/7600 Series NVR
 Quick Operation Guide of LTN7700/7600 Series NVR UD.6L0202B0042A02 Thank you for purchasing our product. If there is any question or request, please do not hesitate to contact dealer. This manual is applicable
MPEG4 Digital Recording System THE VXM4 RANGE FROM A NAME YOU CAN RELY ON
 MPEG Digital Recording System THE VXM RANGE FROM A NAME YOU CAN RELY ON 8 6 THE FIRST CONCEPT PRO DIGITAL RECORDING SYSTEM DESIGNED TO OUR SPECIFICATION AND FOCUSED ON YOUR REQUIREMENTS VXM KEY FEATURES
DS-7200HVI/HFI-SH Series DVR Quick Operation Guide
 DS-7200HVI/HFI-SH Series DVR Quick Operation Guide UD.6L0202B0019A01 Thank you for purchasing our product. If there is any question or request, please do not hesitate to contact dealer. This manual is
EL-NVR. Quick Start Guide
 EL-NVR Quick Start Guide ABOUT THIS DOCUMENT This document includes instructions for basic operating the EL-NVR 5-Megapixel Series Network Video Recorder. ELECTROMAGNETIC COMPATIBILITY (EMC) This equipment
MPEG4 Digital Recording System THE VXM4B RANGE 100 IPS
 MPEG Digital Recording System THE VXMB RANGE 00 IPS 8 6 THE FIRST CONCEPT PRO DIGITAL RECORDING SYSTEM DESIGNED TO OUR SPECIFICATION AND FOCUSED ON YOUR REQUIREMENTS VXMB KEY FEATURES Enhanced Graphical
LOCAL MONITORING RECORDING HARDDISK MANAGEMENT ALARM & EXCEPTION BACKUP
 FEATURES User-friendly GUI for easy operation Up to 1024 768 resolution Simultaneous VGA and 4CIF/2CIF/CIF resolution Normal and event recording parameters configurable per individual camera Partial digital
DS-7204/7208/7216HVI-ST Series DVR Technical Manual
 DS-7204/7208/7216HVI-ST Series DVR Technical Manual Notices The information in this documentation is subject to change without notice and does not represent any commitment on behalf of HIKVISION. HIKVISION
Digital Video Recorder
 Digital Video Recorder Quick Operation Guide UD.6L0202B0067A02 Thank you for purchasing our product. If there is any question or request, please do not hesitate to contact dealer. This manual is applicable
DINOX&Digital&Video&Recorder&
 DINOX&Digital&Video&Recorder& & & & & & & & & & &&&Quick&Operation&Guide& UD.7L0X02B1228B01& Thank you for purchasing our product. If there is any question or request, please do not hesitate to contact
FEATURES MPEG4/MJPEG DVR
 FEATURES MPEG4/MJPEG DVR Technology Compression format providing crystal clear images with real time performance. Multiplex Allow live display, record, playback, backup and network operation at the same
THD601DC Set-top box
 THD601DC Set-top box Contents 1. Safety... 1 2. Appearance... 2 3. Rear Panel Connection... 3 4. Remote... 4 5 First Time Set-Up... 7 6. Network Settings... 8 6.1 Available Networks and Checking Current
EVD-L04/100A1-960 EVD-L08/200A1-960 EVD-L16/400A1-960
 EVD-L04/100A1-960 EVD-L08/200A1-960 EVD-L16/400A1-960 www.eurovideo-cctv.com Main Features Main stream supports encoding at up to WD1 resolution in real time and sub stream at CIF/QCIF resolution. Simultaneous
Instruction Manual. Digital Sixteen/Nine Channels Video Recorder
 Instruction Manual Digital Sixteen/Nine Channels Video Recorder EDR1640 EDR1620 EDR920 Federal Communication Commission Interference Statement This equipment has been tested and found to comply with the
DS-7200HFI-SL Series DVR. Technical Specification
 DS-7200HFI-SL Series DVR Technical Specification Notices The information in this documentation is subject to change without notice and does not represent any commitment on behalf of HIKVISION. HIKVISION
B. The specified product shall be manufactured by a firm whose quality system is in compliance with the I.S./ISO 9001/EN 29001, QUALITY SYSTEM.
 VideoJet 8000 8-Channel, MPEG-2 Encoder ARCHITECTURAL AND ENGINEERING SPECIFICATION Section 282313 Closed Circuit Video Surveillance Systems PART 2 PRODUCTS 2.01 MANUFACTURER A. Bosch Security Systems
DS-7200HVI-ST/RW Series DVR. Technical Manual
 DS-7200HVI-ST/RW Series DVR Technical Manual Notices The information in this documentation is subject to change without notice and does not represent any commitment on behalf of HIKVISION. HIKVISION disclaims
Part 1 Basic Operation
 This product is a designed for video surveillance video encode and record, it include H.264 video Compression, large HDD storage, network, embedded Linux operate system and other advanced electronic technology,
CI-218 / CI-303 / CI430
 CI-218 / CI-303 / CI430 Network Camera User Manual English AREC Inc. All Rights Reserved 2017. l www.arec.com All information contained in this document is Proprietary Table of Contents 1. Overview 1.1
EVD-L04/100A1-960, EVD-L08/200A1-960 and. EVD-L16/400A1-960 DVRs. Quick Operation Guide
 EVD-L04/100A1-960, EVD-L08/200A1-960 and EVD-L16/400A1-960 DVRs Quick Operation Guide Thank you for purchasing our product. If there is any question or request, please do not hesitate to contact dealer.
USER MANUAL. 22" Class Slim HD Widescreen Monitor L215DS
 USER MANUAL 22" Class Slim HD Widescreen Monitor L215DS TABLE OF CONTENTS 1 Getting Started Package Includes Installation 2 Control Panel / Back Panel Control Panel Back Panel 3 On Screen Display 4 Technical
SCode V3.5.1 (SP-601 and MP-6010) Digital Video Network Surveillance System
 Digital Video Network Surveillance System") V3.5.1 (SP-601 and MP-6010) Digital Video Network Surveillance System Core Technologies Image Compression MPEG4. It supports high compression rate with good image quality and reduces the requirement of
V3.5.1 (SP-601 and MP-6010) Digital Video Network Surveillance System Core Technologies Image Compression MPEG4. It supports high compression rate with good image quality and reduces the requirement of
Provide144ch FREE CMS software. Time / Event / POS / Thumbnail / Panorama
 20CH DVR Real time and Playback Search Mode: Time / Event / POS / Real HD Live Display and Playback Thumbnail / Panorama Full Graphic User Interface(Multiple High-Resolution & High-Quality Language Support)
4CH DVR, AS-DVR004A. AL - Aswar Trading Group Co., FEATURES. Pentplex ( Recording, Playback, Network simultaneously ) Up to 60fps Recording Speed
 Up to 60fps Recording Speed") 4CH DVR, AS-DVR004A FEATURES Pentplex ( Recording, Playback, Network simultaneously ) Up to 60fps Recording Speed USB flash disk backup Adjust Up/Down/Left/Right screen position Video Input signal: NTSC/PAL
4CH DVR, AS-DVR004A FEATURES Pentplex ( Recording, Playback, Network simultaneously ) Up to 60fps Recording Speed USB flash disk backup Adjust Up/Down/Left/Right screen position Video Input signal: NTSC/PAL
USER MANUAL V /16CH DVR. This document contains preliminary information and subject to change without notice.
 V. 1.3 USER MANUAL 8/16CH DVR This document contains preliminary information and subject to change without notice. WARNING TO REDUCE THE RISK OF FIRE OR ELECTRIC SHOCK, DO NOT EXPOSE THIS APPLIANCE TO
NX-series User Manual
 NX-series User Manual http://www.iviewtech.com 1 CONTENT INDEX 1 NX-SERIES OVERVIEW... 4 1.1. NX-Series Features 4 1.2. NVR CONTROL PANEL 5 1.3. NVR BACK PANEL 5 2 GETTING STARTED... 8 3 LIVE VIEW... 10
SCode V3.5.1 (SP-501 and MP-9200) Digital Video Network Surveillance System
 Digital Video Network Surveillance System") V3.5.1 (SP-501 and MP-9200) Digital Video Network Surveillance System Core Technologies Image Compression MPEG4. It supports high compression rate with good image quality and reduces the requirement of
V3.5.1 (SP-501 and MP-9200) Digital Video Network Surveillance System Core Technologies Image Compression MPEG4. It supports high compression rate with good image quality and reduces the requirement of
MAGICLiteSeries-16CH1080pDVRSystem-SupportsEX- SDI/HD-SDI/960H/Analog/IP
 MAGICLiteSeries-16CH1080pDVRSystem-SupportsEX- SDI/HD-SDI/960H/Analog/IP EX-SDI Magic Lite 1080p 16 CH MagicDVRdetectsAnalog/960H/EX-SDI/HD-SDIcamerasautomatically Records up to 4 IP cameras REAL-TIME
TFT LCD MONITOR USER MANUAL. L80AP and L101AP
 TFT LCD MONITOR USER MANUAL L80AP - 8.0 and L101AP - 10.1 Table Of Contents Table of contents/ Warning.... 2 Precautions...3 About this user manual and products / Items included in the delivery..... 4
VF-STB IP Appliance User Guide
 VF-STB IP Appliance User Guide Copyright 2007 Video Furnace, Inc. All Rights Reserved. Copyright 2002-2007 Video Furnace, Inc. All Rights Reserved This document refers to the current published version
Intelligent Security and Fire Ltd
 User Manual Product ranges covered by this manual Vi-P14 Vi-P14A Document Reference Date Firmware Vi-Q4C1 Viq601a.doc 26/11/2009 From Viq001a21 Videoswitch Telephone 01252-851510 Ocean House, Redfields
HD Digital MPEG2 Encoder / QAM Modulator
 HD Digital MPEG2 Encoder / QAM Modulator HDMI In QAM Out series Get Going Guide ZvPro 800 Series is a one or two-channel unencrypted HDMI-to-QAM MPEG 2 Encoder / QAM Modulator, all in a compact package
USER MANUAL. 27 Full HD Widescreen LED Monitor L27ADS
 USER MANUAL 27 Full HD Widescreen LED Monitor L27ADS TABLE OF CONTENTS 1 Getting Started 2 Control Panel/ Back Panel 3 On Screen Display 4 Technical Specs 5 Care & Maintenance 6 Troubleshooting 7 Safety
Model#: IN-MDRI3MF. Hardware User Manual. 3MP Indoor Mini Dome with Basic WDR, Fixed lens. (PoE) Ver. 2013/02/04
 Ver. 2013/02/04") Model#: IN-MDRI3MF 3MP Indoor Mini Dome with Basic WDR, Fixed lens Hardware User Manual (PoE) Ver. 2013/02/04 Table of Contents 0. Precautions 3 1. Introduction 4 Package Contents... 4 Features and Benefits...
Model#: IN-MDRI3MF 3MP Indoor Mini Dome with Basic WDR, Fixed lens Hardware User Manual (PoE) Ver. 2013/02/04 Table of Contents 0. Precautions 3 1. Introduction 4 Package Contents... 4 Features and Benefits...
VNS2200 Amplifier & Controller Installation Guide
 VNS2200 Amplifier & Controller Installation Guide VNS2200 Amplifier & Controller Installation 1. Determine the installation location for the VNS2200 device. Consider the following when determining the
Instruction Manual EDR1640/1620/920
 Instruction Manual EDR1640/1620/920 EVERFOCUS ELECTRONICS CORPORATION EDR1640 / 1620 / 920 Instruction Guide 2005 EverFocus Electronics Corp www.everfocus.com All rights reserved. No part of the contents
USER MANUAL. 27 Full HD Widescreen LED Monitor L270E
 USER MANUAL 27 Full HD Widescreen LED Monitor L270E TABLE OF CONTENTS 1 Getting Started 2 Control Panel/ Back Panel 3 On Screen Display 4 Technical Specs 5 Care & Maintenance 6 Troubleshooting 7 Safety
HD Digital MPEG2 Encoder / QAM Modulator
 HD Digital MPEG2 Encoder / QAM Modulator YPrPb VGA In QAM Out series Get Going Guide ZvPro 600 Series is a one or two-channel Component or VGA-to-QAM MPEG 2 Encoder/ Modulator, all in a compact package
17 19 PROFESSIONAL LCD COLOUR MONITOR ART
 17 19 PROFESSIONAL LCD COLOUR MONITOR ART. 41657-41659 Via Don Arrigoni, 5 24020 Rovetta S. Lorenzo (Bergamo) http://www.comelit.eu e-mail:export.department@comelit.it WARNING: TO REDUCE THE RISK OF FIRE
Model#: IN-DI2MIRF 2MP Indoor Dome with True Day/Night, IR, Basic WDR, Fixed lens
 Model#: IN-DI2MIRF 2MP Indoor Dome with True Day/Night, IR, Basic WDR, Fixed lens Hardware User Manual (PoE) Ver.2013/01/17 Table of Contents 0. Precautions 3 1. Introduction 4 Package Contents...4 Features
IPSTB1200 /IPC3200 Media Client User guide
 IPSTB1200 /IPC3200 Media Client User guide Safety/Compliance Important Safety Instructions Please carefully read these safety and compliance instructions and this entire user guide. Follow all instructions
RS Part No Instruction Manual Solid State DVR. (Single Chanel for Mobile) SSD01CA
 SSD01CA") RS Part No. 696-1210 Instruction Manual Solid State DVR (Single Chanel for Mobile) RS PART NO.: 696-1210 MJPEG 1CH CAR DVR (Compact size 1ch Stand Alone DVR) Simple & Max Low cost but great guality MJPEG
RS Part No. 696-1210 Instruction Manual Solid State DVR (Single Chanel for Mobile) RS PART NO.: 696-1210 MJPEG 1CH CAR DVR (Compact size 1ch Stand Alone DVR) Simple & Max Low cost but great guality MJPEG
USER MANUAL. 28" 4K Ultra HD Monitor L28TN4K
 USER MANUAL 28" 4K Ultra HD Monitor L28TN4K TABLE OF CONTENTS 1 Getting Started 2 Control Panel/ Back Panel 3 On Screen Display 4 Technical Specs 5 Care & Maintenance 6 Troubleshooting 7 Safety Info &
1. Get support Attention Safety Caution Applications View Cameras on Screen (ex. HD TV or PC monitor) 3. Change Time Zone 5
 3. Change Time Zone 5") 1. Get support 1 2. Attention 1 3. Safety Caution 1 4. Applications 1 5. View Cameras on Screen (ex. HD TV or PC monitor) 3 Change Time Zone 5 6. Installation Guide for ONWOTE Cameras 6 7. View Cameras
1. Get support 1 2. Attention 1 3. Safety Caution 1 4. Applications 1 5. View Cameras on Screen (ex. HD TV or PC monitor) 3 Change Time Zone 5 6. Installation Guide for ONWOTE Cameras 6 7. View Cameras
MAGICQLSeries-4CH1080pDVRSystem-SupportsEX- SDI/HD-SDI/960H/Analog/IP
 MAGICQLSeries-4CH1080pDVRSystem-SupportsEX- SDI/HD-SDI/960H/Analog/IP EX-SDI 1080p 4 CH MagicDVRdetectsAnalog/960H/EX-SDI/HD-SDIcamerasautomatically Records up to 1 IP cameras REAL-TIME Live / 1080p@ Pentaplex
EDR CHANNEL DIGITAL VIDEO RECORDER INSTRUCTION MANUAL
 EDR1600 16 CHANNEL DIGITAL VIDEO RECORDER INSTRUCTION MANUAL Before installing and using this unit, please read this manual carefully. Be sure to keep the manual handy for later reference. WARNING TO REDUCE
OPERATING INSTRUCTIONS TOM-0431IP
 OPERATING INSTRUCTIONS TOM-0431IP Table of Contents FCC Information -------------------------------------------------------------------- 2 Safety and Environmental Precautions ------------------------------------------------
MAGICUSeries-32CHDVR4Koutput-SupportsEX-SDI/ HD-SDI/HD-TVI/A-HD/960H/Analog/IP
 MAGICUSeries-32CHDVR4Koutput-SupportsEX-SDI/ HD-SDI/HD-TVI/A-HD/960H/Analog/IP Magic U 1080p 3MP 32 CH MagicUDVRdetectsAnalog/960H/HD-TVI/A-HD/EX-SDI/HD-SDIcameras automatically Records up to 4 IP cameras
USER GUIDE FOR NETmc MARINE X-Ops
 USER GUIDE FOR NETmc MARINE X-Ops Rev.2.2 Firmware v.1.2.8 X-Ops, 1.2.9 Pipeline September 2013 NETmc Marine X-Ops Manual-Rev.2.2 September 2013 1 of 17 Contents 1. Introduction... 3 1.1 Multi-channel
Network Camera Operating Manual
 Network Camera Operating Manual Model No. WV-NW484S Before attempting to connect or operate this product, please read these instructions carefully and save this manual for future use. Preface About these
Digital Video Recorder. User s Manual. MAGIC Series & TVI MAGIC Series
 Digital Video Recorder User s Manual MAGIC Series & TVI MAGIC Series 1 Thank you for using our product. 1. This is user's manual for Analog / HD-SDI Hybrid DVR(Digital Video Recorder). 2. This manual contains
USER MANUAL Full HD Widescreen LED Monitor L215IPS
 USER MANUAL 21.5 Full HD Widescreen LED Monitor L215IPS TABLE OF CONTENTS 1 Getting Started 2 Control Panel/ Back Panel 3 On Screen Display 4 Technical Specs 5 Care & Maintenance 6 Troubleshooting 7 Safety
PLL2210MW LED Monitor
 PLL2210MW LED Monitor USER'S GUIDE www.planar.com Content Operation Instructions...1 Safety Precautions...2 First Setup...3 Front View of the Product...4 Rear View of the Product...5 Quick Installation...6
MAGICUSeries-16CHDVR4Koutput-SupportsEX-SDI/ HD-SDI/HD-TVI/A-HD/960H/Analog/IP
 MAGICUSeries-16CHDVR4Koutput-SupportsEX-SDI/ HD-SDI/HD-TVI/A-HD/960H/Analog/IP EX-SDI Magic U 1080p 16 CH MagicUDVRdetectsAnalog/960H/HD-TVI/A-HD/EX-SDI/HD-SDIcameras automatically Records up to 4 IP cameras
16CH 1080p HD-SDI Security MAGIC Lite Series DVR System - Auto detects Analog/960H/HD-SDI
 HD-SDI Magic Lite 1080p 16 CH Magic DVR detects Analog / 960H / HD-SDI camera automatically. H.264 High Compression CODEC Programmable Spot Out iphone Android remote view App Available. Crystal clear 1080p
USER S MANUAL CCTV LED MONITOR MODEL: ADE-117N1 ADE-119N1 ADE-118W1 ADE-121W1 ADE-124W Atherton Electronics Corp. All rights reserved.
 USER S MANUAL CCTV LED MONITOR MODEL: ADE-117N1 ADE-119N1 ADE-118W1 ADE-121W1 ADE-124W1 2015 Atherton Electronics Corp. All rights reserved. TABLE OF CONTENTS FCC information -------------------------------------------------------------------
ZXV10 B760H ZXV10 B760E RichMedia Box User Guide
 ZTE CORPORATION NO.55,Hi-techRoadSouth,ShenZhen,P.R.China Postcode:518057 Tel: (86) 755 26771900 800-9830-9830 Fax: (86) 755 26772236 URL: http://support.zte.com.cn E-mail: doc@zte.com.cn ZXV10 B760H ZXV10
Hardware User s Manual
 Hardware User s Manual Megapixel Day & Night Economy Bullet Network Camera English 1 Table of Contents Before You Use This Product... 2 Regulatory Information... 3 Chapter 1 - Package Contents... 4 Chapter
USER MANUAL Full HD Widescreen LED Monitor L215ADS
 USER MANUAL 21.5 Full HD Widescreen LED Monitor L215ADS TABLE OF CONTENTS 1 Getting Started 2 Control Panel/ Back Panel 3 On Screen Display 4 Technical Specs 5 Care & Maintenance 6 Troubleshooting 7 Safety
ViewCommander- NVR Version 3. User s Guide
 ViewCommander- NVR Version 3 User s Guide The information in this manual is subject to change without notice. Internet Video & Imaging, Inc. assumes no responsibility or liability for any errors, inaccuracies,
PL2410W LCD Monitor USER'S GUIDE.
 PL2410W LCD Monitor USER'S GUIDE www.planar.com Content Operation Instructions...1 Safety Precautions...2 First Setup...3 Front View of the Product...4 Rear View of the Product...5 Quick Installation...6
PS600 Digital Visualizer. User Manual. English - 0
 PS600 Digital Visualizer User Manual English - 0 Table of Content COPYRIGHT INFORMATION... 3 CHAPTER 1 PRECAUTIONS... 4 SAFETY PRECAUTIONS... 5 FCC WARNING... 5 EN55022 (CE RADIATION) WARNING... 5 CHAPTER
MAGICUSeries-4CH1080pDVRSystem4Kouput- SupportsEX-SDI/HD-SDI/HD-TVI/A-HD/960H/Analog/ IP
 MAGICUSeries-4CH1080pDVRSystem4Kouput- SupportsEX-SDI/HD-SDI/HD-TVI/A-HD/960H/Analog/ IP Magic U 1080p 3MP 4 CH MagicUDVRdetectsAnalog/960H/HD-TVI/A-HD/EX-SDI/HD-SDIcameras automatically Records up to
Video Extender DS128 DSRXL. Instruction Manual. 8-Port Cat5 VGA Digital Signage Broadcaster with RS232 and Audio
 DS128 DSRXL Instruction Manual Video Extender 8-Port Cat5 VGA Digital Signage Broadcaster with RS232 and Audio Cat5 VGA Digital Signage Receiver with RS232 and Audio FCC Compliance Statement This equipment
PLL1920M LED LCD Monitor
 PLL1920M LED LCD Monitor USER'S GUIDE www.planar.com Content Operation Instructions...1 Safety Precautions...2 First Setup...3 Front View of the Product...4 Rear View of the Product...5 Installation...6
Disclaimer. Warning and Caution CAUTION!
 Disclaimer While every effort has been made to ensure that the information contained in this guide is accurate and complete, no liability can be accepted for any errors or omissions NUVICO reserves the
USER MANUAL Full HD Widescreen LED Monitor L236VA
 USER MANUAL 23.6 Full HD Widescreen LED Monitor L236VA TABLE OF CONTENTS 1 Getting Started 2 Control Panel/ Back Panel 3 On Screen Display 4 Technical Specs 5 Care & Maintenance 6 Troubleshooting 7 Safety
Content. General information. Main features. For your safety. Unpacking RCU. Front Panel. Real Panel. System wizard and activation.
 User manual This device complies with Part 15 of the FCC Rules. Operation is subject to the following two conditions: (1) this device may not cause harmful interference, and (2) this device must accept
DS-9600NI-XT Series NVR. Technical Specification
 DS-9600NI-XT Series NVR Notices The information in this documentation is subject to change without notice and does not represent any commitment on behalf of HIKVISION. HIKVISION disclaims any liability
22" Touchscreen LED Monitor USER'S GUIDE
 22" Touchscreen LED Monitor USER'S GUIDE Content Operation Instructions...1 Unpacking Instructions...2 Safety Precautions...2 Front View of the Product...3 Rear View of the Product...4 Quick Installation...5
4CH Digital Video Recorder. User s Manual. This user s manual is subject to change without any previous notice by function upgrade or addition.
 4CH Digital Video Recorder User s Manual This user s manual is subject to change without any previous notice by function upgrade or addition. Version_1.2 May, 2005 SAFETY PRECAUTIONS CAUTION RISK OF ELECTRIC
EasyNet-HD Digital Video Recorder. Compact Series 4/8/16ch
 EasyNet-HD Digital Video Recorder Compact Series 4/8/16ch Thank you for using our product. 1. This is user's manual for EasyNet-HD Compact Series DVR Models 2. This manual contains product specification
D52. 3MP Indoor Dome with Fixed lens Hardware User s Manual. (PoE) Ver. 2012/12/12
 Ver. 2012/12/12") D52 3MP Indoor Dome with Fixed lens Hardware User s Manual (PoE) Ver. 2012/12/12 Table of Contents 0. Precautions 3 1. Introduction 4 Package Contents... 4 Features and Benefits... 5 Safety Instructions...
D52 3MP Indoor Dome with Fixed lens Hardware User s Manual (PoE) Ver. 2012/12/12 Table of Contents 0. Precautions 3 1. Introduction 4 Package Contents... 4 Features and Benefits... 5 Safety Instructions...
The Diverse Multimedia & Surveillance System Via Dico2000 with PC DICO Operation Manual
 DICO 2000 Operation Manual Main Screen Overview IP Address & Communication Status Disk Status Screen Mode Warning Status Video Recording Status RUN Setup Search Exit SETUP The beginning ID and Password
TFT LCD MONITOR USER MANUAL IP Series (HDVS) L104IP, L121IP, L152IP, L156IP, L172IP, L192IP, L215IP, L240IP, L270IP, L320IP, L420IP, L460IP.
 L104IP, L121IP, L152IP, L156IP, L172IP, L192IP, L215IP, L240IP, L270IP, L320IP, L420IP, L460IP.") TFT LCD MONITOR USER MANUAL IP Series (HDVS) 10.4 46.0 L104IP, L121IP, L152IP, L156IP, L172IP, L192IP, L215IP, L240IP, L270IP, L320IP, L420IP, L460IP. V 1.4 1. Warning...3 2. Safety Precautions...4 3.
TFT LCD MONITOR USER MANUAL IP Series (HDVS) 10.4 46.0 L104IP, L121IP, L152IP, L156IP, L172IP, L192IP, L215IP, L240IP, L270IP, L320IP, L420IP, L460IP. V 1.4 1. Warning...3 2. Safety Precautions...4 3.
Magic U Series 4CH Octa-brid DVR System, 4K Output, 2 HDD slots, esata, 4CH Audio
 Magic U DVR detects Analog 960H HD-TVI A-HD EX-SDI HD-SDI cameras automatically Records up to 4 IP cameras REAL-TIME Live Programmable Multi-CH HD Spot Out 4K Video output Touch Interface iphone Android
HIGH DEFINITION SECURITY CAMERA SYSTEM. For latest Smartphones and Tablets compatibility list and free App download check
 PEACE OF MIND HIGH DEFINITION FULL-HD SERIES 8 HD CHANNELS 8 HD 2 TB HDD CAMERAS 1080p RESOLUTION 155/100 FT NIGHT VISION INDOOR/OUTDOOR STRATUS CONNECTIVITY App Downloads Remote Connectivity For latest
VERINT EDGEVR 200 INTELLIGENT DIGITAL VIDEO RECORDER (Rev A)
") VERINT EDGEVR 200 INTELLIGENT DIGITAL VIDEO RECORDER (Rev A) TECHNICAL SPECIFICATIONS SECURITY SYSTEM DIVISION 28 ELECTRONIC SAFETY AND SECURITY LEVEL 1 28 20 00 ELECTRONIC SURVEILLANCE LEVEL 2 28 23 00
VERINT EDGEVR 200 INTELLIGENT DIGITAL VIDEO RECORDER (Rev A) TECHNICAL SPECIFICATIONS SECURITY SYSTEM DIVISION 28 ELECTRONIC SAFETY AND SECURITY LEVEL 1 28 20 00 ELECTRONIC SURVEILLANCE LEVEL 2 28 23 00
ASH - EOC-01. Ethernet Over Coax Adapter User Guide
 ASH - EOC-01 Ethernet Over Coax Adapter User Guide ASH - EOC-01 User s Guide 1 Table of Contents Warning and Safety Information 3 Product Overview 8 Package Contents and Accessories 8 Introduction 9 Indicators
HIGH DEFINITION PEACE OF MIND
 HIGH DEFINITION PEACE OF MIND INCLUDES 4 HD CHANNELS 4 HD CAMERAS 2 TB STORAGE 1080p RESOLUTION 1080p HD VIEWING AND RECORDING POWERFUL DIGITAL ZOOM SMART SEARCH & PLAYBACK REMOTE CONNECTIVITY ON ANY DEVICE
Total MPEG4/JPEG DVR Solution Provider Intelligent Multiplex DVR!
 Total MPEG4/JPEG DVR Solution Provider Intelligent Multiplex DVR! Best Digital Video Networking Solutions for Complete Security Application ANX-16480 / 8240 / 4120D MPEG4 max. 480 / 240 / 120fps 8/ 8/
TFT LCD MONITOR USER MANUAL HMDE Series 104AV-HMDE 121AV-HMDE 151/152AV-HMDE 156AV-HMDE, 171/172AV-HMDE 185AV-HMDE 191/192AV-HMDE 215AV-HMDE
 TFT LCD MONITOR USER MANUAL HMDE Series 104AV-HMDE 121AV-HMDE 151/152AV-HMDE 156AV-HMDE, 171/172AV-HMDE 185AV-HMDE 191/192AV-HMDE 215AV-HMDE 220AV-HMDE 236AV-HMDE 240AV-HMDE 270AV-HMDE 320AV-HMDE 420AV-HMDE
Model 1476-C SuperQuad HR
 Model 1476-C SuperQuad HR Installation and Operating Instructions Table of Contents Page Table of Content... 2 System Description... 3 Features... 3 Installation... 4 Internal Setups... 4 Connections...
8 CH MJPEG DVR USER MANUAL
 8 CH MJPEG DVR USER MANUAL Contents 1. SAFETY PRECAUTIONS... 3 2. FEATURES... 4 3. PACKING LIST... 5 4. NAME and FUNCTION of EACH PART... 6 4.1 FRONT PANEL BUTTONS and CONTROLS... 6 4.2 REAR PANEL BUTTONS
PLL2710W LED LCD Monitor
 PLL2710W LED LCD Monitor USER'S GUIDE www.planar.com Content Operation Instructions...1 Safety Precautions...2 Package Overview...3 First Setup...4 Front View of the Product...5 Rear View of the Product...6
USER MANUAL. 27" 2K QHD LED Monitor L27HAS2K
 USER MANUAL 27" 2K QHD LED Monitor L27HAS2K TABLE OF CONTENTS 1 Getting Started 2 Control Panel/ Back Panel 3 On Screen Display 4 Technical Specs 5 Troubleshooting 6 Safety Info & FCC warning 1 GETTING
MPEG4 Mobile DVR User Manual
 MPEG4 Mobile DVR User Manual 1 MPEG4 Embedded User Manual A. Installation Environment Installation Guideline In order to ensure the safety with the DVR product and maximize product performance, keep DVR
TCM H.264 Megapixel Outdoor IP IR D/N PoE Bullet Camera Hardware User s Manual. Ver. 2011/11/30
 TCM-1111 H.264 Megapixel Outdoor IP IR D/N PoE Bullet Camera Hardware User s Manual Ver. 2011/11/30 Table of Contents 0. Precautions 3 1. Introduction 4 Package Contents... 4 Features and Benefits... 5
DS-9600NI-XT NVR Series
 DS-9600NI-XT NVR Series Introduction: DS-9600NI-XT series NVR (Network Video Recorder) is a new generation recorder developed by Hikvision independently. Combined with multiple advanced technologies, such
Hybrid Video Recorder SISTORE MX 3G
 Hybrid Video Recorder SISTORE MX 3G V2.90 SP2_M1 SISTORE MX1608 2000/520 SISTORE MX1616 4000/1200 SISTORE MX3232 4000/1200 SISTORE MX is a hybrid recording and video monitoring system. It provides reliable
User Manual V2.2 DVR. Notice: This content is subject to be change without notice. User Manual 1
 V2.2 User Manual DVR Notice: This content is subject to be change without notice. User Manual 1 WARNING TO REDUCE THE RISK OF FIRE OR ELECTRIC SHOCK, DO NOT EXPOSE THIS APPLIANCE TO RAIN OR MOIS- TURE.
TCM H.264 Megapixel IP Cube Camera w/pir Hardware User s Manual. (PoE) Ver. 2010/4/9
 Ver. 2010/4/9") TCM-4201 H.264 Megapixel IP Cube Camera w/pir Hardware User s Manual (PoE) Ver. 2010/4/9 Table of Contents 0. Precautions 3 1. Introduction 4 Package Contents... 4 Features and Benefits... 5 Safety Instructions...
TCM-4201 H.264 Megapixel IP Cube Camera w/pir Hardware User s Manual (PoE) Ver. 2010/4/9 Table of Contents 0. Precautions 3 1. Introduction 4 Package Contents... 4 Features and Benefits... 5 Safety Instructions...
PXL2760MW LED LCD Monitor
 PXL2760MW LED LCD Monitor USER'S GUIDE www.planar.com Content Operation Instructions...1 Safety Precautions...2 Package Overview...3 First Setup...4 Front View of the Product...5 Rear View of the Product...6
Digital Video Recorder. User s Manual UVST MAGIC-U 04/08/16M/32M UVST MAGIC-4K 04/08/16
 Digital Video Recorder User s Manual UVST MAGIC-U 04/08/16M/32M UVST MAGIC-4K 04/08/16 1 Thank you for using our product. 1. This is user's manual for Analog / HD-SDI / EX-SDI / TVI / AHD Hybrid DVR(Digital
CMS MANUAL DIGITAL VIDEO RECORDER CMS. Operation Manual 3CTC-016-5EN8M. For the safe use of the product, please make sure to read Safety Precautions.
 DIGITAL VIDEO RECORDER CMS Operation Manual 3CTC-016-5EN8M For the safe use of the product, please make sure to read Safety Precautions. 1 Copyrights All the contents of this manual are protected under
User s Manual. Network Board. Model No. WJ-HDB502
 Network Board User s Manual Model No. WJ-HDB502 Before attempting to connect or operate this product, please read these instructions carefully and save this manual for future use. CONTENTS Introduction...
SmartBox. User Manual. Turn your TV into a SmartTV! Plug n play. Wireless Dual Band
 SmartBox User Manual Turn your TV into a SmartTV! Wireless Dual Band Plug n play TV Remote Guide 5 4 1. ON / Stand by 2. Select package 1 6 2 3 7 3. 4. Favourite channels Electronic Program Guide (EPG