Application Note M7L VideoPad-AV Installation Setup (software 9.1 onwards)
|
|
|
- Randall Allison
- 6 years ago
- Views:
Transcription
1 Installation Guidelines The VideoPad-AV should be installed within a double UK electrical box at least 35mm deep. The electrical box must only have screw lugs fitted on the left and right sides. The VideoPad-AV is not designed for installation in humid environments such as Bathrooms and Pools and should not be fitted in these environments. The lighting control feature of the VideoPad-AV is not intended to be the only lighting control in a room. The original manufacturer s controller should also be fitted for use in an emergency. Important Note Because of the increased current consumption of the VideoPad-AV it is recommended that a High Quality Screened (STP or FTP) CAT5 cable is used. In addition to this, make sure all of the cores are connected as shown below. The front plate is secured in place by strong magnets. Care should be taken when fitting it to avoid knocking the LCD Screen, which is Extremely Delicate! External blink emitter connection (for remote lighting (not Rako)/ STBs / AV Processors / DVDs Programmable outputs: 1: Output 1 2: Output 2 3: Reserved (Future Use) 4: Reserved (Future Use) 5: Ground CAT5 connection to CPU: When using screened cable carefully twist the drain wire and white/orange wire together and cover the pair with a suitable insulation sleeve. white/orange orange white/green blue white/blue green white/brown brown 7 March Page 1 of 9
 Sky Plus Lutron Graffik Eye Lexicon DC2 Philips (eg: DVD728) Rako lighting* Lexicon MC1 Primare V25 Rako curtains** Lexicon MC8/MC12 Sony (eg: DVP-NS730) Rako screen** Onkyo")
 ** Using RaCUB & RoomBox6 Applications The VideoPad-AV is primarily designed for use in AV/Home Cinema Rooms where a local AV Processor/(Amplifier) is")

2 3 rd Party Product Support The VideoPad-AV supports the following products:- AV Amplifier DVD Player STB Other Denon (eg: AVR3802) Denon (eg: DVD-2900) Sky ilight lighting Harman Kardon (eg: AVR5500) Pioneer (eg: DV-656a) Sky Plus Lutron Graffik Eye Lexicon DC2 Philips (eg: DVD728) Rako lighting* Lexicon MC1 Primare V25 Rako curtains** Lexicon MC8/MC12 Sony (eg: DVP-NS730) Rako screen** Onkyo (eg: TX-DS696) Yamaha (eg: DVD- S540) Pioneer (eg: VS-AX10) Primare SP31.7/SPA20 * RoomBox6 only Yamaha (eg: RX-V1200RDS) ** Using RaCUB & RoomBox6 Applications The VideoPad-AV is primarily designed for use in AV/Home Cinema Rooms where a local AV Processor/(Amplifier) is connected to the loudspeakers. It facilitates the integration of an MRS, EVENT! or RoomBox6 installation with the AV/Home Cinema Room. Note: Use of the VideoPad-AV with a zone splitter is not recommended. The following diagram assumes that Zone 1 on the multiroom controller is the Home Cinema room: CAT5 Data cable to from CPU to VideoPad-AV Screened stereo audio cable from CPU to local AV Processor/Amp Local AV Processor/Amplifier (rear view) Blink Emitter mounted on front of local AV Processor/Amplifier. Note: Observe Polarity when wiring blink emitter (see Page 1). Usually the + is pin 1. Blink emitter will not function if wired incorrectly. 7 March Page 2 of 9
3 How the VideoPad-AV works with AV Processors/Receivers From the clients perspective the VideoPad-AV functions in exactly the same way as any other VideoPad room on a Living Control system. When a multiroom source component is selected using the VideoPad-AV it transmits a discrete IR command which switches the AV Processor in the room from Standby to On. During this short stage a wait screen is Displayed on the VideoPad-AV. The VideoPad-AV then sends an IR command to select the appropriate input (CD by default), and subsequent touches of the volume up, volume down, and mute icons on the VideoPad-AV adjust the local AV Processor rather than the multiroom CPU. Finally, when the zone is turned off, the VideoPad-AV returns the AV Processor in to Standby mode. Note: For compatibility with a wider range of applications, Living Control IR commands sent to the VideoPad (eg: source selection, volume up/down etc.) do not trigger the discrete IR outputs from the VideoPad-AV. If this is required it is recommended that the sequence of commands are compiled as a macro of codes within the IR handset. When using a single Pronto, Pronto Pro, or RC5xxx series programmable remote throughout the house this can be done by using two separate Labelled Panels in the Home page (eg: Home Cinema and Multiroom HiFi ) ; one with the volume and source commands for the AV Room, the other for the rest of the house. Connecting and Setting-up the VideoPad-AV A suitable screened stereo audio cable should be run from the fixed level output connections from the 8 Pin DIN zone output on the MRS, EVENT! or RoomBox CPU to the CD input on the AV Processor (see Page 2 for compatible Processors/Amps). The VideoPad-AV is fitted with a terminal block (see page 1) for the connection of a blink emitter for control of the AV processor. A suitable cable (eg: 2 cores of a CAT5 cable) should be run between the VideoPad-AV and the AV Processor location, where a blink emitter can be connected. As blink emitters are polarised it is important to make sure that the correct polarity is used (the white stripe on a blink emitter cable is usually + (pin 1 on the IR connection on the back of the VideoPad-AV). In addition to the terminal block on the rear of the PCB, the VideoPad-AV is also equipped with an IR transmitter behind the IR receiver window. This can be used for short-range IR purposes but is not recommended in most cases as it is designed for a retro-fit solution. Where the VideoPad is retro-fitted in place of another control pad (eg: where it is not possible to install a second cable for the AV Processor IR control) it can be set to send the IR commands for the AV Processor to the CPU where it is repeated through the Global IR output(s) on the CPU (EVENT! and Roombox6 only). However, bear in mind that this may affect other components in the system with similar IR codes (eg: if two of the same brand AV processor were used they would both be controlled at the same time). 7 March Page 3 of 9
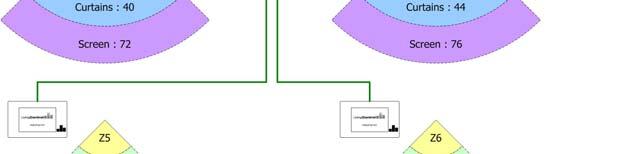
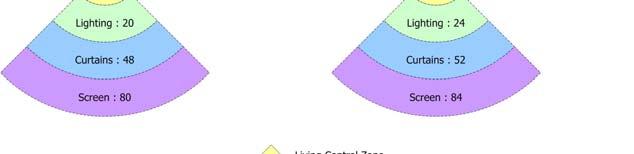
4 How the VideoPad-AV works with IR-based lighting When the VideoPad-AV is used with IR controlled lighting systems the infrared commands are sent from the VideoPad-AV through the front-mounted IR emitter (behind the Living Control logo) and the external IR connection on the rear of the pad. These commands are sent during Room EVENT!s (timers), Source Actions and when the in-built lighting menu is used. Note that the IR emitter at the front of the VideoPad-AV is low-power and only designed for line-of-sight control, and it is generally preferable to hard-wire an external blink emitter. Under no circumstances should and emitter or it s cable be wired in the same locality as mains-voltage wiring. How the VideoPad-AV works with RF-based lighting and relay modules (RAKO) A more flexible option for lighting and curtain control with the VideoPad-AV is through RF-Control in conjunction with the RAV-LC module from Rako Controls. This option is only available with the RoomBox6 CPU, which must have Software version 2.1 or above fitted (enclosed with the VideoPad-AV). To enable multiple instances of Rako RF-controlled products in a room the room numbers for lighting, curtains and screens need to be independently set. The diagram on page xx shows the settings that correspond to each zone. Additional features Dropdown screens In addition to the convenience of Multiroom/AV Integration, the VideoPad-AV also has dropdown screens to enable quick access to control of Set Top Boxes, DVD Players, Local AV inputs and Lighting. These are all available by pressing the Menu button from the Off or Playing screen: The contents of the dropdown screens are automatically created by the VideoPad-AV when it is configured during the setup procedure. For example, if there is no lighting controller in the room or Set Top Box, the VideoPad-AV will not display these icons. 7 March Page 4 of 9
5 The additional screens and their functions are as follows:- Lights Quick access to Scenes 1 4 on supported lighting controllers Curtains Open/Closure of curtains in the zone AV Amp Top row of icons: Quick access to surround effects (not all effects are available on all processors) Bottom row of icons: Direct source selection of Video inputs on AV Processor Digital TV Direct numeric selection of channels (on supported STBs) Quick access to main menu functions (eg: TV Guide) Navigation buttons with select key DVD Quick access to transport functions on DVD Player Direct access to main menu functions (eg: Menus and Audio) Navigation buttons with enter key 7 March Page 5 of 9
6 Additional Features Action settings When a specific source is selected or the room is switched off, the VideoPad-AV can be programmed to change the lighting scene in the room or change the state of the programmable outputs. For example, when DVD is selected the VideoPad-AV can Dim the lights and send a signal to a motorised screen to lower. When the room is switched off the VideoPad-AV can send a signal to the motorised screen to raise. The programmable outputs are CMOS which can be Set High, Set Low, Pulse or Toggle. They are designed for connection to external devices that require a trigger input such as programmable controllers. They should not be directly connected to a relay without suitable relay driver circuitry. The programmable outputs on the VideoPad-AV are extremely sensitive. Use static handling precautions when fitting the connector or using them.. Final Setup & Programming Follow the procedures in the installation manual and cable termination guide to ensure that the cable has been terminated and tested correctly. 1. Switch on the CPU and plug in the RJ45 connector for the VideoPad-AV. The VideoPad-AV will display a boot screen indicating the software version number and zone setting. After a short while the VideoPad-AV will display the Room Off Screen. 2. Touch and hold the Peak-level meter section of the Living Control logo for 6 seconds. Do you wish to change the VideoPad-AV Setup? Will appear. Touch Y to continue or N to cancel 7 March Page 6 of 9
7 3. The VideoPad-AV Main Setup screen will appear. Set the zone number by pressing the and + buttons. Check that the cable is plugged in to the same numbered RJ45 socket on the CPU Press the button next to AV to open the AV Setup page, then use the < and > buttons to choose the type of AV Processor being used with the VideoPad-AV. Choose None if there is not AV Processor being used. Press the OK button to save the Processor settings and return to the main setup page. Press the button next to DVD to open the DVD Setup page, then use the < and > buttons to choose the type of DVD player being used used with the VideoPad-AV. Choose None if there is no DVD Player being used. Press the OK button to save the DVD settings and return to the main setup page 4. IR Settings Press the button next to IR to open the IR Setup page. The button next to Receive IR enables/disables the IR receiver on the VideoPad-AV Note that the IR Receiver should be disabled in areas where IR Interference is likely, e.g.: Opposite Gas Plasma Screens, Under compact fluorescent lights, in direct line of site of Quartz Halogen bulbs (Low Voltage Lighting) The IR control codes generated by the VideoPad-AV to control AV Devices & Lighting are sent from an IR transmitter mounted behind the front window and the external blink emitter connection on the PCB. In addition to this you can optionally enable these commands to be routed through to the Global outputs on the EVENT! and RoomBox 6 CPUs (e.g.: when the STB or DVD player are located remotely with the CPU rather than in the AV Room). To enable/disable this feature press the button next to IR control sent through Global IR output on CPU. 5. Press the OK button to save the IR settings and return to the main setup page. Press the button next to Lights to open the Lights Setup page, then use the < and > buttons to choose the type of Lighting Controller being used with the VideoPad-AV. Choose None if there is no Lighting Controller being used. Press the OK button to save the Lighting settings and return to the main setup page. 6. If a zone splitter is being used on the zone make sure that Z/Split is set to Y 7. Choose More from the main setup screen to setup Actions, Set Top Box, Display Devices, Motorised Screen Control and Curtains 7 March Page 7 of 9
8 8. Setting the Actions Settings Press the button next to Actions to open the Actions Setup page. The list of the multiroom sources will appear. Press the Clear All button to delete all the Action Settings associated with sources and off functions. (continued on next page ) Actions Settings (continued) Touch the name of the source to have an action setting or source input on the AV Processor other than CD associated with it. Set Lo: The output is pulled low when the source is selected. Pulse: The output is momentarily pulled high when the source is selected. Toggle: The output toggles between high and low each time the source is selected. AV Input: The input that the VideoPad-AV will select on the AV Processor for this source (Default sets CD input for all sources and Off when a room is switched off.) Xantech: Choose the RC68+ code you require. Refer to Application Note P3: Macronizer for more details. Press the OK button to save the Action settings and return to the main Actions Setup page. When you have set the actions for all the sources required, press OK on the main Actions Setup page to return to the main setup page. 8. Leaving the Setup Page Press the OK button to save the settings and return to the standard VideoPad Off screen. For information regarding day-to-day operation of the VideoPad-AV, refer to the user Manual provided with the Living Control CPU. 7 March Page 8 of 9


9 7 March Page 9 of 9
KAT5.tv AV Distribution System. KAT5 AVRX User Guide
 KAT5 AVRX Mk2 AV Receiver User Guide Version 1.0 1 st August 2005 Overview The KAT5 AVRX is a device that receives electronically balanced AV signals over a CAT5 Structured Wiring Scheme Used with the
Video SystemVideo System
 PublishedPublished: May 4, 2005 Video SystemVideo System Video System Component Location ItemItem Part NumberPart Number 1 - Television tuner module 2 - Rear seat entertainment control module 3 - DVD (digital
IPTV Features Guide - Version 1.1, Released April 2012 More information on our website 2
 IPTV Feature Guide Table of Contents Internet Protocol Television (IPTV) Introduction... 3 IPTV Set Top Box (STB) Self Installation Guide... 3 Remote Control Functions... 4 Basic Operation Tips... 5 Programming
User Manual TL-TP70-HDIR 70m Extender with ARC and IR All Rights Reserved Version: TL-TP70-HDIR_180723
 User Manual TL-TP70-HDIR 70m Extender with ARC and IR All Rights Reserved Version: TL-TP70-HDIR_180723 Preface Read this user manual carefully before using this product. Pictures shown in this manual is
MRF-300/RFX150 INSTALLATION MANUAL
 MRF-300/RFX150 INSTALLATION MANUAL TM Multi-Zone RF Base Station for the MX-3000, the Aurora, TM TM TM the Aeros, the Omega and the Osiris remote controls. MRF-300 Installation Manual 2005 Universal Remote
Converts any TV to Digital. MFR-300 User Guide
 Converts any TV to Digital MFR-300 User Guide Introduction Thank you for choosing this TVonics Freeview box. Record the serial number in the space provided below (the serial number can be found on the
OPERATIONAL MANUAL EMZS CH Speaker Zone Selector. Version 1.6
 OPERATIONAL MANUAL EMZS-8012 12CH Speaker Zone Selector Version 1.6 1 Product Overview The EMZS-8012 is a 1U rack-mounting unit, provide 12 channel direct zone switching for single source public address
ZR-4 SERIES 2 MULTIZONE RECEIVER KIT
 NILES AUDIO CORPORATION ZR-4 SERIES 2 MULTIZONE RECEIVER KIT SYSTEM DESIGN GUIDE INCLUDES: ZR-4 SERIES 2 OVERVIEW ZR-4 SERIES 2 SYSTEM APPLICATIONS ZR-4 SERIES 2 MULTIZONE RECEIVER KITS APPLICATION NOTES
MRF-250 INSTALLATION MANUAL
 MRF-250 INSTALLATION MANUAL Multi-Room No-Pointing RF Control of Audio/Video Components MRF-250 Installation Manual 2004 Universal Remote Control, Inc. The information in this manual is copyright protected.
DX-10 tm Digital Interface User s Guide
 DX-10 tm Digital Interface User s Guide GPIO Communications Revision B Copyright Component Engineering, All Rights Reserved Table of Contents Foreword... 2 Introduction... 3 What s in the Box... 3 What
Re:connect M 203. RS232 Interface Revox. Dominating Entertainment. Revox of Switzerland. E 2.03
 of Re:connect M 203 RS232 Interface Revox Dominating Entertainment. Revox of Switzerland. E 2.03 Attention! After updating the firmware to version 2.00 or higher, we recommend completely resetting the
DM1624, DM1612, DM812
 Installation Guide Hardware and Software DM Series Digital Processors models DM1624, DM1612, DM812 LECTROSONICS, INC. 1 Installation Specific Information Only This guide covers only installation related
AVS50 USER GUIDE. 2.4GHz Audio/Video Sender System - AVS50
 2.4GHz Audio / Video Sender System AVS50 USER GUIDE 2.4GHz Audio/Video Sender System CONTENTS 1. Introduction... 2 2. Conformity of Use... 3 3. Controls and Connections... 4-5 4. Product Contents... 6
of of Re:connect M 203 Pioneer Interface Dominating Entertainment. Revox of Switzerland. E 2.03
 of of M 203 Pioneer Interface Dominating Entertainment. Revox of Switzerland. E 2.03 Attention Software Update After updating the M203 firmware to version 2.00 or higher, we recommend completely resetting
MRF-350 Installation Manual
 MRF-350 Installation Manual Optimizing Narrow Band Reception with the RFX-250 and MSC System Remotes COMPLETE CONTROL Universal Remote Control MRF-350 Installation Manual 2006 Universal Remote Control,
WDP02 Wireless FHD Kit User Manual
 WDP02 Wireless FHD Kit User Manual Copyright Copyright 2015 by BenQ Corporation. All rights reserved. No part of this publication may be reproduced, transmitted, transcribed, stored in a retrieval system
Data sheet. USB V2.0 Interactive panel extender. Product: SDS-1001-H CAT 6 extender
 Flexible and comprehensive wall plate solution for interactive panels using Cat 6-8 STP/FTP cable Supports Uses easy to install, inexpensive CAT cable Outputs reach up to 30m Support up to 1.65 Gbps HDCP/EDID/DDC
VGA & RS-232 & Audio CAT5 Extender with RGB Delay Control Quick Installation Guide
 VGA & RS-232 & Audio CAT5 Extender with RGB Delay Control Quick Installation Guide Introducing the VGA & RS-232 & Audio CAT5 Extender with RGB Delay Control The VGA & RS-232 & Audio CAT5e Extender with
Goodmans Helpline Phone Number
 Goodmans Helpline Phone Number 0870 873 0080 contents Introduction 4 Connecting up 5 Overview diagrams 6 Getting started 8 Using the main menu 10 Troubleshooting 15 Technical Specifications 16 3 introduction
Contents: 1 LANsmart Pro Main Unit 4 Remote Unit: ID1, ID2, ID3, ID4
 LANsmart Pro user manual Introduction LANsmart Pro is a hand-held, multifunction Cable Map Tester and Cable Length Meter. It has an integrated Analog and Digital Tone Generator, Port Finder, and Quick
Residential Case Study ELECTRIC INTERIORS. MARLBOROUGH
 Residential Case Study ELECTRIC INTERIORS. MARLBOROUGH CONTEMPORARY HOME FEATURES AN INVISIBLE HOME CINEMA, AND MORE Residential Installation Location: Swindon, UK The client s brief for this residential
HDBaseT RECEIVER B-520-RX-230-IR INSTALLATION MANUAL
 HDBaseT RECEIVER B-520-RX-230-IR INSTALLATION MANUAL IMPORTANT SAFETY INSTRUCTIONS To reduce the risk of fire or electric shock, read and follow all instructions and warnings in this manual. Keep this
HDBaseT RECEIVER B-540-RX-330-IR INSTALLATION MANUAL
 HDBaseT RECEIVER B-540-RX-330-IR INSTALLATION MANUAL IMPORTANT SAFETY INSTRUCTIONS To reduce the risk of fire or electric shock, read and follow all instructions and warnings in this manual. Keep this
PI MANUFACTURING Powered by Infinite Solutions
 PI MANUFACTURING Mfg Number: PD36575 Part Number: HDMI-VWALL-KIT Features: Takes one HDMI source and divides it into 4 displays in a 2x2 configuration to make a large video wall 2x2 HDMI Video Wall Controller
PLEASE READ THIS PRODUCT MANUAL CAREFULLY BEFORE USING THIS PRODUCT.
 Features The AVG-HD400 is an HDBT 2.0 transceiver set which contains a transmitter and a receiver. Compliant with HDMI 1.4 & HDCP 2.2, it is able to transmit high-definition signals up to 4Kx2K@60Hz. The
Kramer Electronics, Ltd. USER MANUAL. Models: VS-162AV, 16x16 Audio-Video Matrix Switcher VS-162AVRCA, 16x16 Audio-Video Matrix Switcher
 Kramer Electronics, Ltd. USER MANUAL Models: VS-162AV, 16x16 Audio-Video Matrix Switcher VS-162AVRCA, 16x16 Audio-Video Matrix Switcher Contents Contents 1 Introduction 1 2 Getting Started 1 3 Overview
M203 LG. Multiroom Planer V2.00. Introduction. New features from software V2.00
 of M203 LG D 2.06 Attention! After updating the M203 firmware to version 2.00 or higher, we recommend completely resetting the M203 interface by pressing the Disable softkey on setup page #2 for several
HDBaseT Extender Set 100m User Guide
 HDBaseT Extender Set 100m User Guide Model CM-BT10-TXRX100 Last modified: 09/29/16 Doc ID - 620 Rev 04 Copyright Trademarks and patents Manufacturer Contact information 29SEP16 Clare Controls, LLC. All
HD1-LX HDMI & IR Extender
 . HD1-LX HDMI & IR Extender Quick Reference & Setup Guide Magenta Research 128 Litchfield Road, New Milford, CT 06776 USA (860) 210-0546 FAX (860) 210-1758 www.magenta-research.com MAGENTA HD1-LX HDMI
Stereo Box Pre Box Amp Box Amp Box Mono Switch Box. Tuner Box Dock Box F / V Phono Box MM Record Box USB Phono Box II
 Overview Box Program Stereo Box Pre Box Amp Box Amp Box Mono Switch Box Tuner Box Dock Box F / V Phono Box MM Record Box USB Phono Box II Phono Box II USB Phono Box SE II Tube Box II Tube Box SE II Head
FEATURES GUIDE. One Network Experience
 TM One Network Experience FEATURES GUIDE OPS Voice Features Guide Revision: September, 2016 Technical Support (24/7/365) - (334) 705-1605 www.opelikapower.com Table of Contents Internet Protocol Television
VGA AUDIO SWITCHER S MANUAL
 VGA AUDIO SWITCHER S MANUAL Milestone s VGA Audio Switcher is a unit whereby multiple (2/4/8/16) VGA + Audio can be switched to two (2) or multiple (simultaneous) VGA + Audio output. The switchers are
of Loewe E 2.10_m1 1
 of Loewe E 2.10_m1 1 Attention! After updating the M203 firmware to version 2.00 or higher, we recommend completely resetting the M203 interface by pressing the Disable softkey on setup page #2 for several
Contents. Adjust picture and sound settings, 32 How to make settings for picture and how to adjust bass, treble, etc. How to use game mode.
 BeoSystem 3 Contents Menu overview, 3 See an overview of on-screen menus. Digital tuner menu overview, 4 See an overview of the digital tuner menu. Navigate in menus, 5 See how to use the different remote
ADE-8001 ADE-8002 ADE-8011 ADE-8201 ADE-8202 ADE-8204 ADE-8208
 LevelOne DVI Broadcaster Series ADE-8001 ADE-8002 ADE-8011 ADE-8201 ADE-8202 ADE-8204 ADE-8208 User Manual V 2.1 Introduction Thank you for purchasing LevelOne DVI broadcaster series products. This DVI
User Manual PS-684. HDBaseT Extender Kit 70m. All Rights Reserved. Version: UHBT70P_2016V1.2
 User Manual PS-684 All Rights Reserved Version: UHBT70P_2016V1.2 Preface Read this user manual carefully before using this product. Pictures shown in this manual is for reference only, different model
switching, distribution, interfacing and control products for computer graphic, multi-media and audio visual systems integration
 switching, distribution, interfacing and control products for computer graphic, multi-media and audio visual systems integration Contact details Procon Technology 3 Avebury Court Hemel Hempstead Hertfordshire
Overview. Shipped in the Venue Vizion Package: Simplified Integration Process. Installation consists of 6 easy steps:
 Overview Shipped in the Venue Vizion Package: Four two-channel QMOD Encoder-Modulators Each unit can accept up to 2 inputs, providing up to 8 channels in the system. One ICE-HE-DXL Display Control Center
REMOTE DISPLAY WIRELESS DECODER MK II
 REMOTE DISPLAY WIRELESS DECODER MK II INSTALLATION MANUAL Part No. LED-DEC 1. Contents 1. Contents... 1 2. Equipment List... 2 3. Overview... 2 Introduction... 2 Location Selection **Important **... 2
Integration Note. Any feature not specifically noted as supported should be assumed to be unsupported.
 Integration Note Manufacturer: Model Number(s): Crestron Processor Version: Driver Developer: Sky (UK) Sky+, Sky+ HD, Sky Multi-room Tested on 3 Series Processors, support for other versions not guaranteed
HDBaseT RECEIVER B-520-RX-330-IR INSTALLATION MANUAL
 HDBaseT RECEIVER B-520-RX-330- INSTALLATION MANUAL IMPORTANT SAFETY INSTRUCTIONS To reduce the risk of fire or electric shock, read and follow all instructions and warnings in this manual. Keep this manual
Installation Manual. Multi-Room Distribution Hub.
 Installation Manual LN-2400DH Multi-Room Distribution Hub 100310 KIT CONTENTS Multi-Room Distribution Hub Qty: 1 Pc Part Code: LN-2400DH Computer Network Patch Cables Qty: 8 Pcs Part Code: LN-CAT5-0.3BL
Introduction. Introduction
 Introduction Introduction Note: In this user guide Pronto is used for both ProntoPro and Pronto remote controls. RFX6000 is compatible with TSU3000 and TSU6000. About the RFX6000 Most remote control systems
Multi Room Audio System
 POWER MUTE ZONES 1 2 3 4 5 6 7 8 AUDIO R AUDIO L DC 24V INPUT POWER DIGITAL AUDIO OUTPUT Multi Room Audio System Installation Instructions 560011 Distribution Unit 560125D Desktop Amplifier 560125R Remote
AV-825 HDMI with IR CAT6 Extender Kit Installation Guide
 AV-825 HDMI with IR CAT6 Extender Kit Installation Guide (April 28, 2016) 1 Package Contents 1 x AV-825T Transmitter, 1 x AV-825R Receiver, 1 x Wideband IR Tx cable, 1 x Wideband IR Rx cable, 1 x DC 5V
HDBaseT EXTENDER B-540-EXT-230-RS INSTALLATION MANUAL
 EXTENDER B-540-EXT-230-RS INSTALLATI MANUAL IMPORTANT SAFETY INSTRUCTIS To reduce the risk of fire or electric shock, read and follow all instructions and warnings in this manual. Keep this manual for
Instructions CCTV. ule. Even audio! Instructions - Instructions - Instructions. Send 2 Video Signals Down 1x Co-ax Cable...
 CCTV TM ule Instructions Send 2 Video Signals Down 1x Co-ax Cable......with a CCTV TM ule Even audio! Video In 2 Video In 1 1x RG59 OUT 2 Video signals down 1 co-ax. MULE2 CCTV Up to 2 videos down co-ax*
INSTALLATION AND OPERATION INSTRUCTIONS EVOLUTION VIDEO DISTRIBUTION SYSTEM
 INSTALLATION AND OPERATION INSTRUCTIONS EVOLUTION VIDEO DISTRIBUTION SYSTEM ATTENTION: READ THE ENTIRE INSTRUCTION SHEET BEFORE STARTING THE INSTALLATION PROCESS. WARNING! Do not begin to install your
HDMI 1 HDMI 2 HDMI 3 HDMI
 Mode HDMI 1 HDMI 2 HDMI 3 HDMI 4 Format Menu Up Enter IR Dual Switcher Power Embed L/R In HDMI 1 HDMI 2 HDMI 3 HDMI 4 VGA YPbPr AV Down Esc MFP72 User Manual Thank you for purchasing this product. For
INSTRUCTION MANUAL. 19 HD Widescreen Water Resistant Television VSPA19LCD-AE1B VSPA19LCD-AE1M VSPA19LCD-AE1W. Model No. FINGER TOUCH TECHNOLOGY RATED
 INSTRUCTION MANUAL 19 HD Widescreen Water Resistant Television VSPA19LCD-AE1B Model No. VSPA19LCD-AE1M VSPA19LCD-AE1W FINGER TOUCH TECHNOLOGY IMPORTANT: Please read these instructions before installing
Integrator s Guide Concord
 Integrator s Guide Concord HD Component Video / Composite Video / Analog Audio Matrix Switch with Cat5 outputs 2 3 Table of Contents Table of Contents... 3 Introduction... 4 Features:... 4 Installation...
VGA, Audio & RS-232 Serial with IR Pass-Thru over Single CAT5 /RJ45 Extender Kit
 VGA, Audio & RS-232 Serial with IR Pass-Thru over Single CAT5 /RJ45 Extender Kit User Manual (VAS-E) [Must be used with Solid CAT5e or CAT6 Cable] All information is subject to change without notice. All
INSTRUCTIONS FOR USE Pro-Ject Tuner Box S
 INSTRUCTIONS FOR USE Pro-Ject Tuner Box S Dear music lover, thank you for purchasing a Pro-Ject Audio Systems FM-tuner. In order to achieve maximum performance and reliability you should study these instructions
HDM-4X2. Installation Manual. HDMI Matrix Switcher. HLE-1 RX HDMI Extender with HDBaseT-Lite. HDMI Out. IR In. Receiver.
 HDM-4X2 HDMI Matrix Switcher Installation Manual HDBaseT IR Out HLE-1 RX HDMI Extender with HDBaseT-Lite Receiver IR In HDMI Out Power HDMI HDBT Table of Contents Introduction... 3 Safety Information...
INSTRUCTIONS FOR USE Pro-Ject Receiver Box S
 INSTRUCTIONS FOR USE Pro-Ject Receiver Box S Dear music lover, thank you for purchasing a PRO-JECT AUDIO receiver. In order to achieve maximum performance and reliability you should study these instructions
SY-HDBT-100 Extender Set
 Installation Guide SY-HDBT-100 Extender Set with HDMI, IR, RS232 and Ethernet over 100m of cat6 Cable HDBaseT HDMI Extenders SY Electronics Ltd, Unit 7, Worrall Street, Salford, Greater Manchester, M5
Media Center Remote Control and. Receiver/Transceiver. User Guide
 Media Center Remote Control and Receiver/Transceiver User Guide (RC125, IR605/A, IR606) INDEX 1. Introduction 2 2. Appearance. 2 3. Features.. 3 4. Package Contents 3 5. System Requirements... 3 6. Installation
1x12 VGA & Audio over CAT5 Splitter
 SP-9112 1x12 VGA & Audio over CAT5 Splitter User Manual rev: 160322 Made in Taiwan Safety and Notice The SP-9112 1x12 VGA & Audio over CAT5 Splitter has been tested for conformance to safety regulations
VOLVO S60 XC60 Video GPS Interface
 VOLVO S60 XC60 Video Interface For VOLVO S60 XC60 5inch monitor Main Features: 1. It is suitable for VOLVO 2011 up version 5 inch monitor 2. With 2AV input, RGBS input, Rear camera input, LVDS input 3.
DTA INSTALLATION PROCESS & USER GUIDE FOR SPECTRUM BUSINESS CUSTOMERS
 DTA INSTALLATION PROCESS & USER GUIDE FOR SPECTRUM BUSINESS CUSTOMERS This guide is intended for owners or managers and front desk personnel. This guide is not intended for guests. Customer Care 1-800-314-7195
Multi Room Audio Matrix Switcher
 Multi Room Audio Matrix Switcher User s Guide 560884 ZONES 1 2 3 4 5 6 7 8 Copyright Clipsal Integrated Systems Pty Ltd 2005. All rights reserved. This material is copyright under Australian and international
HD-1603 Single Input MPEG-4 DVB-T HD Encoder/Modulator User Guide and Install Manual
 ZyCastR digi-mod HD Range digi-mod HD-1603 www.digi-modbyzycast.com HD-1603 Single Input MPEG-4 DVB-T HD Encoder/Modulator User Guide and Install Manual Table of Contents www.digi-modbyzycast.com Safety
Contents. Adaptive Sound Technology, 25 How to set up loudspeakers and optimise the sound experience with Adaptive Sound Technology.
 BeoSystem 3 Contents Menu overview, 3 See an overview of on-screen menus. Navigate in menus, 4 See how to use the different remote controls for menu operation. First-time setup, 5 Which menus appear when
IP Roombox. Hotel Room Management
 Hotel Room Management Hotel solutions Versatile room management system You need a simple solution which allows you to control all the hotel room electrical applications? Hager offers you a unique combination
Video Interface connection:
 Mercedes Benz NTG4.5 Video interface For 2010 Benz ML, GLK, C, E class with Round connector Main Features: 1. It is suitable for 2010 up version Round connector LVDS ML. GLK, C, E Class 5 inch, and 7 inch
DVB-LR10. Compatible with Land Rover touch-screen navigation systems version 2
 dvblogic DVB-T Tuner Compatible with Land Rover touch-screen navigation systems version 2 Product features full plug and play vehicle-specific dual DVB-T Tuner with two active DVB-T glass-mount antennas
HD1-DX HDMI Extender
 . HD1-DX HDMI Extender Quick Reference & Setup Guide Magenta Research 128 Litchfield Road, New Milford, CT 06776 USA (860) 210-0546 FAX (860) 210-1758 www.magenta-research.com MAGENTA HD1-DX HDMI EXTENDER
CONSONANCE PREAMPLIFIER OWNER S MANUAL
 CONSONANCE PREAMPLIFIER OWNER S MANUAL TABLE OF CONTENTS Introduction Initial Inspection Features Installation Input Impedance Adjustments Preamplifier Internal View Impedance Adjustment Diagram Overall
Receiver Integration Note
 ELAN Home Systems Life Just Got Better Receiver Integration Note Manufacturer: Model Number(s): Controller Core Module: Denon Document Revision Date: 1/30/2012 OVERVIEW AND SUPPORTED FEATURES AVR-1912,
INSTRUCTIONS FOR USE Pro-Ject Tuner Box S2
 INSTRUCTIONS FOR USE Pro-Ject Tuner Box S2 Dear music lover, thank you for purchasing a Pro-Ject Audio Systems FM-tuner. In order to achieve maximum performance and reliability you should study these instructions
QUICK GUIDE. insert the batteries into your handset. either connect the aerial straight to your TV... 55HB6T72U
 QUICK GUIDE 55HB6T72U 542/5109 Please read this quick guide fully before installing or operating because it contains important setup information and keep for future reference. For any help concerning set
A0325. ARIA Audio Streaming Source Receiver with a built in Bluetooth 4.2 Module. ARIA Audio
 A0325 ARIA Audio Streaming Source Receiver with a built in Bluetooth 4.2 Module ARIA Audio by 2017 Model A0325 Channel Vision s ARIA Audio Streaming Receiver is equipped with a Blue tooth 4.2 module, users
CH-2538TXWPKD 4K UHD HDMI/VGA over HDBaseT Wallplate Transmitter. CH-2527RX 4K UHD HDMI over HDBaseT Receiver. Operation Manual
 CH-2538TXWPKD 4K UHD HDMI/VGA over HDBaseT Wallplate Transmitter CH-2527RX 4K UHD HDMI over HDBaseT Receiver Operation Manual DISCLAIMERS The information in this manual has been carefully checked and
Integration Note. Manufacturer: OVERVIEW AND SUPPORTED FEATURES
 Manufacturer: Model Number(s): Minimum Core Module Version: Document Revision Date: Denon Integration Note AVR-2805, 3805, 1613, 1713, 1912CI, 1913, 2112CI, 2113CI, 2310CI, 2311CI, 2312CI, 2313CI, 2808CI,
KV-901T & AV-901R. Quick Guide
 KV-901T & AV-901R Quick Guide This quick guide provides basic information only, for a complete version of user s manual please down load at: http://www.avextender.com/comm/upfile/p_110913_ 04468.pdf Copyright
This symbol indicates that there are important operating and maintenance instructions in the literature accompanying this unit.
 BeoSystem 1 Guide CAUTION: To reduce the risk of electric shock, do not remove cover (or back). No User-serviceable parts inside. Refer servicing to qualified service personnel. WARNING: To prevent fire
Combo Board.
 Combo Board www.matrixtsl.com EB083 Contents About This Document 2 General Information 3 Board Layout 4 Testing This Product 5 Circuit Diagram 6 Liquid Crystal Display 7 Sensors 9 Circuit Diagram 10 About
LinTronic. TableTop series. Hardware version 6. Updated
 Updated 151120 TableTop series Hardware version 6 We keep expanding Hardware 6 Introduced 2011 Hardware 5 Introduced 2006 Hardware 4 Introduced 2003 32KByte 128KByte 256KByte What's new? Feature Hardware
User Manual TP70L. HDBaseT Extender. All Rights Reserved. Version: TP70L2016V1.1
 User Manual TP70L HDBaseT Extender All Rights Reserved Version: TP70L2016V1.1 Preface Read this user manual carefully before using this product. Pictures shown in this manual is for reference only, different
UTP TRANSMITTER & RECEIVER SUT-80/SUR-10 USER S MANUAL ENGLISH
 UTP TRANSMITTER & RECEIVER SUT-80/SUR-10 USER S MANUAL Thank you for choosing this Samsung UTP TRANSMITTER & RECEIVER product. Before attempting to connect or operate this product, please read the instructions
Integrator s Guide Avalon
 Integrator s Guide Avalon HD Component Video / Digital Audio Matrix Switch 2 Table of Contents Table of Contents... 2 Introduction... 3 Features:... 3 Installation... 4 Unpacking... 4 Front Panel Protective
SceneStyle2 User Guide
 SceneStyle2 User Guide Mode Lighting (UK) Limited. The Maltings, 63 High Street, Ware, Hertfordshire, SG12 9AD, UNITED KINGDOM. Telephone: +44 (0) 1920 462121 Facsimile: +44 (0) 1920 466881 e-mail: website:
AUDI WITH MMI A4/A5/A6/A8/Q7. -. Product Code : A4L
 AUDI WITH MMI A4/A5/A6/A8/Q7 -. MODEL: QVL-A4L-V6 -. Product Code : A4L-0904-223 -Precaution - You must keep the car key taken off from the car while you work this and finally, connect power of the interface.
Manual #: UMA1074 Rev. 2 October, Hall Research Technologies, Inc 1163 Warner Ave. Tustin, CA 92780
 Component Video / VGA Over UTP Video Transmission Systems Manual #: UMA1074 Rev. 2 October, 2007 Hall Research Technologies, Inc 1163 Warner Ave. Tustin, CA 92780 Table of Contents 1.0 GENERAL DESCRIPTION...
AVE-301T AVE-301R AVE-304T AVE-308T AVE-316T
 VGA and Audio CAT-5 AV Extender AVE-301T AVE-301R AVE-304T AVE-308T AVE-316T User Manual V1.2 www.databay.com.tw www.green-box.com.tw Contents 1. Product Introduction...4 2. Product Features...5 3. System
VGA & Audio over CAT5 Distribution Series
 CATS-VGA-12B/CATS-VGA-16B CATS-VGA-RX1/CATS-VGA-RX1D VGA & Audio over CAT5 Distribution Series User Manual CATS-VGA-12B CATS-VGA-RX1 CATS-VGA-16B CATS-VGA-RX1D Safety and Notice The VGA & Audio over CAT5
Contents. Loudspeaker setup surround sound, 3 Find out how to turn your television into a surround sound system.
 Contents 2 Loudspeaker setup surround sound, 3 Find out how to turn your television into a surround sound system. Connect a set-top box or decoder, 7 Find out how to connect a set-top box or decoder to
Instruction for Use 20HF 23HF 30HF 42HF
 Instruction for Use 20HF 23HF 30HF 42HF Care of the screen Do not touch, push, rub or strike the screen with anything hard as this may scratch or damage the screen permanently. Do not rub with chemically
EGE-H60X HDMI Extender over single 50m/164ft UTP Cables with IR Control
 CONTENTS 1. Introduction... 1 2. Package Contents... 1 3. Features... 2 4. Specifications... 2 5. Panel Descriptions... 3 5.1 Transmitting... 3 5.2 Receiver Unit... 4 5.3 Rx Equalizer Distance Adjust...
MRF-260 Installation Manual
 MRF-260 Installation Manual Optimizing Narrow Band Reception with Complete Control Remotes COMPLETE CONTROL Universal Remote Control MRF-260 Installation Manual 2007 Universal Remote Control, Inc. The
VMA ACTIVE MATRIX TFT COLOR LCD MONITOR OWNER S MANUAL INSTALLATION GUIDE
 VMA6491 6.4 ACTIVE MATRIX TFT COLOR LCD MONITOR OWNER S MANUAL INSTALLATION GUIDE OWNER S MANUAL WARNING! THE CLARION VMA6491 LCD MONITOR IS DESIGNED FOR REAR SEAT PASSENGER VIEWING ONLY. THIS PRODUCT
Switcher Connections
 Switcher Connections SWITCHER CONNECTIONS 1 2 3 4 5 6 7 8 10 11 12 13 14 9 1 Power In 2 Out-1 HDBase-T 3 HDMI In 1-4 4 Out-2 HDMI 5 RS232 6 USB 7 IR Sensor 8 Power Button 9 Indicator Lights 10 Select (Out-1)
Instructions for use
 0 0 Instructions for use M-LINK A STEP INTO THE FUTURE OF HOME CINEMA Congratulations and thanks for buying Philips product! Your TV set has the added value of the unique M-Link feature a new standard
SY-HDBT-SLIM-100S Extender Set
 Installation Guide SY-HDBT-SLIM-100S Extender Set with HDMI, Ethernet, IR, RS232 and Power over 100m of cat6 Cable HDBaseT HDMI Extenders SY Electronics Ltd, Unit 7, Worrall Street, Salford, Greater Manchester,
Be sure to run the vehicle engine while using this unit to avoid battery exhaustion.
 CAUTION: TO REDUCE THE RISK OF ELECTRIC SHOCK DO NOT REMOVE COVER (OR BACK) NO USER-SERVICEABLE PARTS INSIDE REFER SERVICING TO QUALIFIED SERVICE PERSONNE; Please Read all of these instructions regarding
User Manual TPHD-BYE. HDBaseT Extender Set 70m. All Rights Reserved. Version: TPHD-BYE_2014V1.0
 User Manual TPHD-BYE HDBaseT Extender Set 70m All Rights Reserved Version: TPHD-BYE_2014V1.0 www.ptn-electronics.com Preface Read this user manual carefully before using this product. Pictures shown in
Edition 1, August 2011 Copyright 2011 Smart-e (UK) Ltd.
 Ltd.") Notice The information contained in this document is subject to change without notice. Smart-e makes no warranty of any kind with regard to this material, including but not limited to, implied warranties
Notice The information contained in this document is subject to change without notice. Smart-e makes no warranty of any kind with regard to this material, including but not limited to, implied warranties
Wireless 1080P HDMI Video Kit - Mid-Range
 Wireless 1080P HDMI Video Kit - Mid-Range Installation Guide Introduction The Wireless 1080P HDMI Video Kit - Mid-Range transmits HDMI A/V signals up to 165ft (line-of-sight) wirelessly and supports high-definition
EXT-HBT70-SET_2016V1.2
 USER MANUAL EXT-HBT70-SET HDBaseT Extender Set 70m All Rights Reserved Version: EXT-HBT70-SET_2016V1.2 Preface Read this user manual carefully before using this product. Pictures shown in this manual is
ABO-CENTER v/henriksens ELEKTRONIK
 LOCAL CONTROL SYSTEM Master Control Link Handbook THIS MANUAL IS DESIGNED AS AN AID FOR AUTHORIZED CUSTOM INSTALLERS NOTE: BUILDING AND ELECTRICAL CODES VARY FROM LOCALITY TO LOCALITY, MAKE SURE THAT THE