Video Roles. Producer. Director. Screenwriter (scriptwriter) Videographer (camera person)
|
|
|
- Sheila Daniel
- 5 years ago
- Views:
Transcription
1
2 Topics Covered Overview What is Videography? Videography Roles Writing and Speaking Skills for Video Storyboarding Scripting Camera Basics Filming & Filming Techniques 3,2,1..Action! Video
3 Video Roles Producer Director Screenwriter (scriptwriter) Videographer (camera person) Keeps the video production on schedule. Directs on-air talent, works with Videographer. Writes the script, copy, narration or voice-over for film. Photographs the scenes and works with the Director.
4 Video Roles Graphic Artist Wardrobe (and Makeup) Editor Reporter/Interviewer Narrator/Presenter Designs and creates visuals to enhance and support the message. Helps dress actors in Director approved costumes and applies makeup. Puts scenes together to most effectively convey the video s message. Works with director, writers and interviewers to produce the best possible responses to the Director.
5 Writing Skills for Video Write clearly and simply Use Conversational tone Keep sentences short. First and second person ( I/You can make a difference.) Use action verbs & present tense ( join, come, write, buy ) Use comparisons & metaphors (indirect comparison) Narrated copy; 60-sec spot = words
6 Speaking Skills for Video Use a strong, confident, voice. Enunciate, speak clearly. Use appropriate facial expressions. Eye contact extremely important and powerful. Use of hand gestures only if appropriate. Microphone placement Watch network newscaster- note pitch, speed, facial expressions, gestures.
7 Writing & Speaking Activity Write out the following words: You should do for your country as you would want your country to do for you. To the person on your left speak these words (in this order) in your best Narrator or Reporter voice. Rewrite the above words into a more emphatic, emotional, and powerful message.
8 Writing & Speaking Activity What is your new message? To the person on your left speak your new message in your best Narrator or Reporter voice. Explain the difference you felt between the two messages.
9 Writing & Speaking Activity And so, my fellow Americans: ask not what your country can do for you - ask what you can do for your country. Inaugural Address by John F. Kennedy - January 20 th, 1961
10 Before Scripting & Storyboarding At this point, your group should have a concept of what your video will look like. Video length how long do you want the video to run? Purpose educational, entertainment, family? Audience who are they? Age? Topic? Location Props Needed Equipment-
11 Storyboard Activity A Better Mousetrap
12 Storyboarding A visual reference and layout of your script. Mockup with drawings and descriptions of what is seen, heard and the transitions between those items. Helps to visualize the action described in your script. Helps to keep you organized as you tape by dictating what video to shoot and what audio and graphics to produce. Basic script only other details will be added later. Be specific in your storyboard Details make a good video! Watching other videos is a great resource for ideas.

13 Example Storyboard Template
14 Scripting for Video A written outline of what the video s main idea are, matched with how to show or explain those ideas. Has a beginning, middle, and a conclusion. Who are you writing for? Your audience supports your video. Characters, images and sounds also convey ideas. Audio is half of the video. Video Script templates show video (what you see) in the left column and audio (what you hear) in the right. Videography Role Screenwriter (scriptwriter)

15 Example Video Scripting Template
16 Camera Basics Before you start to film, become familiar with the operation of your video camera so you can use it with smooth actions. Most video cameras come equipped with the same components. More standardized over the years. Use the users guide to explain any unknown buttons or different features.
17 Camera Basics - Activity Explanation of most used and general camera components. Have participants point to and explain other camera components. DV tape insert and removal.
18 Filming Planning your storyboard is your guide. Shoot only the footage that you will need (to get your point across). Unanticipated shots will always come up. Match action from wide shot to close-up or medium shot, people and props must be the same. Cutaways a shot very different than what was in the previous scene. Ending a Scene pause button (be aware of choppy and clipped sound).
19 Filming Techniques Telephoto (zoom) dramatic effect if used properly. Use sparingly and slowly. Don t overdo it! Scenes can be lost from improper zooming. Holding the Camera always with two hands! Wide Angles Pro - more stuff in your pictures. Con can lose shots because of lens mounting time. Tripods used for steady shots, especially with high zoom (close-ups). Think outside of the box experiment and try new ideas.
20 Filming Activity Camera Round Robin
21 3,2,1..Action! Video 00:06:47:00
22 Wrap-up How could the information in this workshop work for you?
23 Video Tips Preparing the Video Session Check you camera to be sure it s working properly. Check that the microphone is working properly. Make sure the battery is fully charged Make sure there is a new video tape loaded and the save switch has not been moved to save. Do not video on battery power. Use the AC adapter even if the battery is charged. Remove the lens cap! Be aware of available lighting and set the White Balance before videoing. Do not setup the camera facing a window or strong light source. Be sure the camera is secure and level on the tripod. If using a remote to operate the camera, be sure the remote batteries are charged and be familiar with how to operate the remote. Set up props, or any papers or notes. Establish your shot and scene. Make sure you are close enough. Take a short second test run to check for video quality, sound levels, and the need to change props, or any furniture or seating. Assisting the Subject Discuss with your subject a brief outline on how you will be filming for example, the length of clips, or when breaks will be done. Ask is there are any areas that you CANNOT discuss on film. Make sure they are comfortable. Keep your video clips short. It s better to have five 10-minute clips or ten 5-minute clips than one 50-minute clip. Discuss having breaks. A 5-minute break may be needed if your subject is elderly or needs to stand up and stretch. Consider continuing a video to another day instead of doing the whole thing in one sitting. Decide ahead of time whether to zoom fast or slowly. Don t mix during a shot. Slow zooming is preferred. During the Video Session Use a strong, confident voice. Relax! Keep your facial expressions appropriate to your words. Stand or sit straight; use direct eye contact. Keep your sentences or questions short. Use hand gestures if appropriate. Hold or connect hand-held microphones about four inches away from your mouth. Be aware if your subjects body movements. Stop the video and take breaks if needed. Try to keep the scenes short. It s much easier to edit and breaks can be added in. Telephoto (zoom) gives dramatic effects, but too much ruins a video. During fast zoom, the picture becomes unfocused. More zoom=less camera stability. Try not to move the camera erratically. Use slow, even movement. HOLD THE CAMERA with two hands - even when on a tripod for the control. Hold closing shots for about five seconds. After the Video Session Thank the subject for the opportunity to do the video. Ask if they have any questions you may answer. Return the room to its original layout if anything was moved. Be sure to pick up all of your equipment, papers, and props. Miscellaneous Use quality MiniDV tapes with 1-hour of recording time. Do not constantly load and unload the cassette tape without running it. Do not leave the cassette in a car, especially on the dashboard or under the rear window. Store tapes in the upright position. Remove batteries prior to equipment storage.

24 Videography Workshop Handbook
 and the US Army Family and")
25 Acknowledgements This videography workshop handbook was created to support youth videography programs within the Army and Extension. This document was prepared as part of a cooperative agreement between Families, 4-H and Nutrition, Cooperative State Research, Education and Extension Service (CSREES) and the US Army Family and Morale, Welfare & Recreation Command (FMWRC) Child and Youth Services (CYS). Material Sources: Speak Out for Military Kids (SOMK) Operation: Military Kids, 4-H/Army Youth Development Project Pinnacle Studio 8 Documentation and Website Videography Workshop, FTS Training Fall 2006, Sheila Brandenburg, FTS Fort Meade and Renee Podolec, Youth Program Manager, IMCOM Northeast Region Contributing Authors: Chris Zuhars, Technology Specialist, 4-H/Army Youth Development Project, Family and Morale, Welfare & Recreation Command Cindy Ray, Technology Specialist, 4-H/Army Youth Development Project, IMCOM Northeast Region Materials developed and adapted by: Steve Truby, Technology Specialist, 4-H/Army Youth Development Project, IMCOM West Region Mark Otto, Technology Coordinator, 4-H/Army Youth Development Project, Family and Morale, Welfare & Recreation Command
26 Table of Contents Page Instructor s Guide Skills Guide Introduction Overview of skills What is Videography? Instruction 1 Scripting and Storyboarding Instruction 2 Camera Basics/Filming Instruction 3 Editing Video & Software Basics Instruction 4 Editing Sound Instruction 5 Final Cut Videography Overview Videography Roles Videography Individual Skill Areas Writing Skills for Video Speaking Skills for Video Scripting and Storyboarding Camera Basics Camera Technique & Tips Filming Filming Techniques & Tips Editing Overview Pinnacle Studio 8 Software Basics The Video Capture Screen The Diskometer Edit Mode The Movie Window The 5 Audio Tools Capturing Video Audio Final Cut Make Movie Mode Codecs Compression formats Appendix A Sample Script Template Appendix B Blank Script Template Appendix C Sample Video Storyboard Template Appendix D Sample Video Storyboard Template Appendix E Blank Video Storyboard Template i
27 Instructor s Guide Introduction Total 30 minutes o Presentation - 20 minutes Overview of all skills sessions What is videography overview Instructor explains Videography Roles o Activity Small groups - 10 minutes. Participants break into groups of approximately 5 people, and are assigned a role. Groups choose a theme and tell large group. (These teams will be together throughout the first 1 ½ days the workshop) Roles: Director Scriptwriter/Wardrobe Videographer Talent Editor/Props Themes: Parts of a... (fill in the blank) A Sports Instruction Video A Game Show Soap Opera 6 Pillars of Character Interview with a Famous Figure (ex. George Washington, Genghis Khan) High Fashion on the Farm A Dance Instruction Video A Reality Show A Mad Scientist Talk Show Instructional Video How to Play a Musical Instrument Instruction 1 Scripting and Storyboarding Total 30 minutes o Activity Storyboard Bingo 10 Minutes. Each small group gets an envelope containing pieces of a storyboard. When smaller groups have assembled their storyboards, they work with other small groups to put together one of three larger storyboards. o Presentation 20 minutes Writing Skills for Video Speaking Skills for Video Scripting Storyboarding Skill Session 1 - Scripting & Storyboarding Total 90 minutes o Group participants script and storyboard their teams theme. Instruction 2 Camera Basics/Filming Total 60 minutes o Explain how to use the camera, camera technique - 10 minutes o o Activity Camera Scavenger Hunt Hand out form where participants identify parts and pieces of the camera 10 minutes Presentation 20 minutes Filming Overview Planning Filming Techniques Lighting Take Additional Shots Filming Tips Microphones - 1 -
28 Instructor s Guide o Activity Camera Round-Robin 20 minutes. Each participant is given a number from 1-5. The first round uses the following starting sequence: #3 asks the questions (interviewer); # s 2, 1, & 5 answer the questions (the talent); and #4 videotapes the responses (videographer). Questions are based on the teams themes. After 2-3 minutes of interviewing, the camera is passed to participant #2, who becomes the videographer; #1 becomes the interviewer; and # s 5, 4 & 3 answer the questions. This continues until all participants have had the chance to experience all 3 roles Skill Session 2 Filming Total 90 minutes o Film the chosen video theme according to layout of the scripting and storyboard scenes Instruction 3 Editing Video & Software Basics Total 60 minutes o Editing Overview 5 minutes o Presentation 15 minutes Software Basics/Navigation Pinnacle Studio 8.0 show functionality and tour of Pinnacle. (use overhead projector/laptop) o Presentation 15 minutes Capturing video Choosing images Timeline Title Saving o Activity Editing Video Practice 25 minutes. Participants download one of the clips they filmed during the Camera Round-Robin activity. In roundrobin fashion, they choose images, insert them into the timeline, add a title and save. This lets each participant experience how to use the software. If time allows, teams can work on a second clip. Skill Session 3 - Editing Video Total 60 minutes o In skill session groups, team participants edit their themes. Instruction 4 Editing Sound Total 30 minutes o Presentation 15 minutes Tweaking Sound Adding Voice-over Adding Music o Activity Editing Sound Practice 15 minutes. Participants tweak sound, add voice-over and music to the clips they edited in the Editing Video Practice. Skill Session 4 Editing Sound Total 60 minutes o In skill session groups, team participants and add sound to their themes. Instruction 5 - Final Cut Total 30 minutes o Presentation 10 minutes Evaluate your video Consider the audience Re-edit if necessary Importance of a MASTER copy - 2 -
29 Instructor s Guide Overview of the codec and mediums Details on the difference between the mediums and considerations as to why you choose audience, space, sizes for websites What is rendering and compiling? o o Activity Codec & Medium Scenario Activity 13 minutes. Participant groups are given scenarios to choose the correct codec and medium. Each group may talk a little about one of the scenarios, what they chose and why. Question: Is there a reason they would want to have a different version of medium for pod cast, web, , etc? Skill Session 5 Final cut Total 60 minutes o In skill session groups, participants evaluate their team theme, film, re-edit if necessary, render and compile.. Tasks Hand out supporting materials for all Skill Sessions Hand out video camera s at end of Scripting and Storyboarding Skill Session to use for hands-on Camera Basics. Open floor to specific questions Q & A would be best if done after each Skill Instruction. Retrieve all video cameras at the end of Skill Session 3. Materials video cameras laptops, cables, power supplies, microphones Extra copies of blank scripting and storyboarding handouts (templates) Handout of the Description of Video Production Roles Handouts: o o o o o Sample Script Template Blank Script Template Sample Video Storyboard Camping Sample Video Storyboard Wedding (2 pages) Blank Video Storyboard One Blank Tape for each camera Laptop with Pinnacle Studio 8 for overhead real-time presentation of software Projector and/or Ethernet cables for overhead slide presentation - 3 -
30 Skills Guide Videography Overview What is Videography? [Instructor - ask group to raise hands picks one to give definition. If no one volunteers move on giving definition]. Basically, videography is the recording of a performance by means of video camera and videotape. To make a good video, you need to learn several skills During this workshop, participants will learn as many of these skills as possible, primarily Scripting and Storyboarding, Filming, Editing, Adding Audio, Text, Titles, Menus, and Producing a Final Cut. You will also learn and participate in several Video Production roles - the following roles or jobs are part of most video production projects. Depending on the size of a video production or the number of available persons on a production team, multiple roles may be accomplished by one person, or some roles may not be necessary, depending on your video theme. Videography Roles Producer the person who gives overall leadership to the content, message, audience, and objectives of the production, such as setting up shoot days for taping on location and making sure all the production tasks are assigned and completed. The producer also is responsible for the budget and timeline. It s his or her responsibility to see that the production is done on schedule and within a predetermined budget. Director the person who gives overall leadership to the location video shooting. The director directs the on-air talent and instructs the camera operator (videographer) about the type of shots to get and when to roll tape. The director calls out that most famous of movie-making lines, Action! He or she also works with the videographer to produce the storyboard. Screenwriter (Scriptwriter) the person who writes the script, copy, narration or voice-over for a film, commercial, television show, or video. Graphic Artist the person who designs and creates visuals to enhance and support the message. Videographer the person who operates the video camera. The videographer also works with the producer and director to create the best possible shots; lights and films the shots the director requires; and works with the director to produce the storyboard (also called the shot list ). Editor the person who primarily does the editing, digitizing, re-editing, and compressing of the video. The editor must be proficient with software used to assemble the raw footage, and put scenes together to most effectively convey the video s message to its audience. Wardrobe (and Makeup) helps dress actors in costumes approved by the director and adds makeup to all the actors. Reporter/Interviewer/Narrator/Presenter works with the director, writers, and interviewees to produce the best possible responses for the director, and raise questions for the writers. Also known as on-air talent. [Instructor Ask, Do you know of any I did not mention? Composer, Art Director, 1 st AD, Prop person. Also mention that participants need to think about their personal strengths and each other's strengths. Ask, What are your interests? What roles will your story need? You may choose to combine some of the roles or perhaps you have a special role that is not listed.] - 4 -
31 Skills Guide Writing Skills for Video Most rules of good writing apply to video scriptwriting. The information written for a narrator to read on tape is called copy. The copy may be read from off-camera [Instructor explain off-camera], so viewers see some other pictures while they hear the narrator. It may also be memorized or read (using cue cards or a cueing device such as a TelePrompTer) so viewers see the actual talent oncamera [Instructor explain on-camera] as he or she talks. A few tips for adapting writing for video follow. (Note: The same rules apply if you are adapting activities for audiocassette recordings or radio productions.) Write clearly and simply. Write in a conversational tone, so viewers feel as though they re sitting with you while you tell them a story. Keep sentences short. Use first and second person (For example, You can make a difference ). Use action verbs such as join, come, write, and buy. Use words that clearly communicate and conjure up powerful emotional images. Use comparisons and metaphors. [Instructor explain metaphor - indirect comparison between two or more seemingly unrelated subjects that typically uses "is a" to join the first subjects, example: Life is a dream. If I were to say, Sweet as sugar, would that be a comparison or metaphor?] Edit your copy. Take out unnecessary words and change verbs to communicate action and present tense. If you decide to use a narrator: o Use a stopwatch to time yourself or your narrator reading the copy. o Limit the number of words so the narrator can easily read the copy within the number of seconds you need to fill. For example, the script for a 60-second spot or commercial should be no more than words. o If the narrator cannot read the copy clearly within the amount of time you want, eliminate words, phrases, or sentences. Test your script: o Read the script aloud and rehearse it before you do any filming. o Listen to be sure it s clear and easy to understand. o Read it aloud to someone else and ask if he or she can understand your message. o Make any changes you need to keep the message clear, simple, understandable, and as powerful as possible
32 Skills Guide Speaking Skills for Video Most of the rules of good speaking and presentation skills apply to video as well. Here are a few tips to help you become a better on-camera presenter, or talent. A strong confident voice makes your message more believable. So - Speak up! How do you make your voice sound strong and confident? o Relax, breathe deep, lower your voice and project from your diaphragm. o Vary your pitch, volume and pacing to hold viewers interest. o Try to sound like yourself! Imagine that you are speaking to a friend rather than to a microphone. o Try to avoid sounding like you are reading from a book, monotonous or singsongy. o Enunciate, and speak very clearly. o Find a comfortable, medium speed. Do not talk too fast or too slow. o Exaggerate your delivery and put strong emphasis on key words. Be dramatic. Keep your facial expressions appropriate to your words. That is, do not smile or smirk if the message is serious. Smile and look joyful if the message is positive or heartwarming. Watch a network newscaster or reporter and pay attention to his/her pitch, speed, facial expressions, and gestures. What did you notice? Stand up straight, look people in the eye and do not fidget. Eye contact is extremely important and powerful. If you want to look directly at your video audience, look at the camera lens as if it were the familiar eyes of your best friend. Do not let your eye stray away from the camera lens while it s recording. Wandering eyes make you look shifty and insecure. Practice by saying your script as you look at an eye-level mark on the wall. As with most things in life, the more you practice, the better you become. Use hand gestures only if appropriate. Effective hand gestures come from being relaxed and spontaneous. (Playing with your hair, scratching and rubbing your knuckles are not effective hand gestures!) If you are using a hand-held microphone, hold it about four inches away from your mouth. Just do it! Almost everyone is nervous about speaking in front of groups (and cameras)! The more you do it, the better and the easier it gets. Really
33 SCRIPTING & STORYBOARDING: 3, 2, 1... Action! Skills Guide Videography - Individual Skill Areas Scripting starts with a written outline of what the video s main ideas are, matched with how to show or explain those ideas. It is developed like a story: There is a beginning, middle, and a conclusion or summary. But first you need an audience. Who are you writing for? Considering your audience is like putting a foundation on a house. Your audience supports your video. There are also characters and images/sounds that convey these ideas. When storyboarding and scripting a video, you usually think about just the visual aspect (I want to show this, and then I want to show that). But remember audio is half the video what are people hearing at the same time? While you are showing examples, demonstrations and photos, is there narration? Does the length of narration part equal the length of the visual part? [Instructor introduce the Video Script Templates see samples Appendix A & B. Also use slides of Appendix A and B. o Video Script Templates are sheets of paper divided vertically into 2 columns. The left column is video (what you see) and the right column is audio (what you hear). Storyboarding is a visual reference and layout of your script. It is a mockup with drawings and descriptions of what is seen, heard and the transitions between those items. It helps you visualize the action described in your script. The storyboard helps keep you organized as you tape by dictating what video to shoot and what audio and graphics to produce. [Instructor introduce the Video Storyboard Templates] see samples Appendix C, D, E. o Video Storyboard Templates: o Put rough sketches in the boxes to represent how each different camera shot will look on the screen. o Notes describing the shots and transitions can go between the boxes. o Write the audio for each shot on the lines below. When starting out with storyboarding - Don t worry about effects like transitions/ wipes/ fades. Just get the basic script and ideas down. Later you can add the details like effects, graphics and transitions. Be specific in your storyboard. The details make a good video. While developing your storyboard, you can arrange shots and get a feel for how the video flows. You are given the opportunity to fine-tune the visual and audible components. Side Note: One of the best resources for ideas is to watch other videos: Does the director hold a shot for very long, or is it broken up with different angles? If someone is speaking to the camera, do you watch him or her for 5 minutes straight, or are you shown cutaway video of what the person is talking about? Does the director show a photo or a camera angle for 10 seconds or for 3? You d be surprised how long 3, 5, 7 or 10 seconds are when looking at a still shot. Count them yourself you ll notice that a director doesn t usually stay on a shot more than 3 or 4 seconds
34 Skills Guide Camera Basics Most video cameras come equipped with the same components. They have become more standardized over the years, so your video camera should have most of the features listed below. Two hands-on camcorder activities will help you locate, identify, and use the majority of these components. The following components or features can be found on the Canon ZR70MC video camera. LCD Screen LCD panel OPEN button AV IN/OUT terminal Phone terminal Backup battery cover Digital Effects Button (including a separate on/off) One button two functions Self-Timer button Data Code Button Program Selector switch One button three functions Card Mix Button Slide Show button Stitch assist button One button three functions AE Shift button Stop button Index screen button One button two functions Focus button Playback button One button three functions Rec Search + button Fast Forward button Card + Button Terminal Cover (2) USB terminal Diopter adjustment lever Viewfinder protect cover Photo button Advanced accessory shoe Zoom lever Built-in speaker Tape/Card switch Memory card slot Card access indicator Charge indicator Selector dial DC IN terminal Menu button Battery attachment unit Battery and Battery release Button Assist lamp Remote sensor Stereo microphone S-video IN/OUT terminal DV IN/OUT terminal Open/Eject switch Tripod socket MIC terminal Grip belt Strap mount Cassette compartment cover Cassette compartment Power Switch Start/Stop button Strap mount Viewfinder - 8 -
35 Skills Guide CAMERA TECHNIQUES AND TIPS: When to use telephoto (zoom) Using the telephoto lens can give a dramatic effect to your videos, but it also takes a considerable amount of practice to use it efficiently. Some things to consider about using telephoto are: If you zoom to telephoto, the picture will not be in focus. Use telephoto sparingly and slowly moving too quickly into a zoom may cause you to lose your subject from the field of view. This could cause the whole scene to be lost if you can t reverse out and save it. The more you use the telephoto, the more your camera is susceptible to movement. In other words, the closer your subject, the harder it is to keep the camera steady. [Instructor Try this film a subject without using the telephoto. Then film the same subject using the telephoto and notice how the closer you get to maximum zoom, the harder it is to keep the camera steady.] If you really want to get close to your subject, use a tripod to steady the camera. Holding the Camera the correct way to grip the camera is to slide your right hand under the grip belt and adjust the belt with your left hand. Adjust the belt so that you can reach the zoom lever and photo button with your index finger, and the start/stop button with your thumb. This may take some getting used to. Be persistent! Wide Angles Wide-angle filming is done with a special attachment to the camera lens called the Wide Attachment or Wide-Angle lens. It allows you to capture more width of field than the normal lens. More width means more stuff in your pictures. Good choices for wide-angle filming are large groups of people as in crowds, graduations, or weddings; or scenery and landscape scenes of mountain ranges, lakes, large buildings perhaps the White House or Lincoln Memorial. The beauty of the wide-angle is that you can stand much closer to your subject and make its image larger. The downside of using the wide-angle, or any other additional lens or filter, for that matter, is that it takes time to mount. Sometimes a shot can be lost in your efforts to improve it. Most professionals carry multiple cameras configured with different lenses. If a shot becomes available, they simply grab the right camera and shoot. Think outside of the box - Experiment with some of the tips and techniques given here and then try breaking the rules to see what you can learn from the experience. For example, someone decided awhile back that shaky camera movement is in, so now you see it all the time on national television advertisements and programs. Think outside of the box and see what you come up with. Don t overdue it! - The biggest mistakes people make when using camcorders are overusing the zoom function and moving the camera erratically. Now that you know some of the basics of camera basics, go out and play with your camera! It s the best way to learn. Film scenes in a variety of situations and then play back and critique your results. And Have Fun! - 9 -
36 Skills Guide FILMING: Overview - Before the cameras roll, you should already have a pretty good idea of what your final video will look like based on the scripting and storyboarding. This is the grunt work of producing the video. Naturally, there are some unknowns that you will only capture when shooting the video, unanticipated shots will always come up, for instance interviews with different people, additional angle shots you think would add to your video, and shots you weren t able to get the first time around, but feel you might need for your video. Planning - Think through your goals and what you d like to have on tape. Use your storyboard as your guide and shoot only what you need. [Instructor ask, What s one good reason for this? Answer Much less editing!] A sit-down interview multiple angles of a building and its doorways a wide-angle shot of someone running down a hill, then a close-up of the person s facial expression. Again, a good storyboard will take care of this list for you. [Instructor review sample scripting and storyboard templates]. FILMING TECHNIQUES AND TIPS: Film only as much of each scene as you really need to get your point across no more, no less. Match action - between shots or scenes. This means if you are filming a wide shot of a scene and then you shoot a close-up or medium shot of the same scene, the positioning of people or props must be the same. For example, if you are filming a wide shot of a group of people and the next scene you want to shoot is a close-up of one of those people, be sure that the person s body positioning is exactly the same for the close-up as it was in the wide shot. [Instructor question] Have you ever noticed mismatched shots in television programs or movies? Just for fun, watch carefully when viewing television programs to see if the director or continuity person made sure the action from one scene to the next is carefully matched. For example, you might see an actor s arm on the table in one shot, and then in the next shot it s in his or her lap. This looks quite humorous in dialogue sequences where there are several cuts back and forth between angles. Cutaways - another option for adding visual appeal and interest to your tape. A cutaway is a shot very different than what was in the previous scene. For example, in one scene the viewer sees a young person oncamera talking about his or her father. In the next scene, the viewer sees a close-up of the father and hears the voice of the young person talking about him. (To accomplish this, the young person would need to stay off camera but very close to the microphone.) Ending a Scene - press the pause button on the camera to end a scene. Remember, the sound or background noise will cut off every time you press the pause button. If you are in a noisy environment for one scene and then a quiet environment for the next, your tape will sound abrupt at those points. [Instructor you may need to explain abrupt ] If you have music in one scene and pause the camera while you move into another scene (with or without music), the sound will be choppy and clipped. If you want to have music playing in a scene, have someone slowly fade the music out as part of the scene before you pause the camera to end the scene. It will sound more natural and appealing
37 Skills Guide Lighting - The single most important thing you can do to improve the look of your videos is to improve your lighting. Different lighting produces different effects on film. A video filmed in poor light looks dark and grainy. Pay attention to the light source and make sure the scene is well lit. Use as much natural light as possible. Is it from overhead? Lamp? Sun? Try to place your subject so the light falls evenly across it. Never film into the sunlight unless you are trying to make a dark silhouette of your subject. Film so your back or side is to the light source and your subject is facing the light. Use a lamp or other filter to shed more light on your subject, if possible. Take Additional Shots - While you are out shooting, get some extra shots and angles to use later in editing in case you decide you need more footage. Too much video is always better than not enough. Don t add these extra shots to your storyboard or you will lose the story theme. Filming with a Tripod - When using a tripod, keep the camera as steady as possible and turn your whole body with the camera when you want to pan or move the camera left or right. Some photographers find it best to hold the camera with two hands and plant their feet firmly, shoulder-width apart. Other photographers hold the camera with their left hand and gently use the tripod s extendable pan-and-tilt handle to move with the scene. Setting up the shot first while the camera is in pause mode or not recording is a good practice, as well. Most video cameras will only remain in pause mode for a couple of minutes before automatically reverting to nonrecording mode. When you re ready to shoot, a simple click to record is all that s needed. The grip belt should not be used on a tripod mount, because it could cause you to move the camera even more. Avoid excessive panning - Limit panning (left and right), tilting (up and down), and zooming in and out of a shot. It is better to lock the camera in one place, let the action happen in the frame, stop the camera, re-adjust the shot and start shooting again. External microphone - Use an external microphone whenever possible! A camera s built-in microphone is only good for getting natural sound. But if you are doing an interview, you will definitely need to attach a microphone to the speaker. Nothing is more annoying than to listen to a narrator in a busy hallway or large, echo-y room

38 Skills Guide The rule of thirds - Frame your shots with the rule of thirds. The natural tendency is to put a speaker s eyes or a horizon in the middle half of the frame. This causes too much head-room and an overall awkward-looking shot. It s better to frame the speaker s eyes along an imaginary top-third line of the frame, leaving marginal space for the head and top of the frame. Too much headroom eyes are aligned in the middle of the frame. Proper headroom eyes are aligned in an imaginary top-third of the frame. The rule of thirds is perhaps the best-known principle of photographic composition. It is the basis for well-balanced and interesting shots. The rule of thirds comes naturally to some photographers. For others, it becomes second nature with practice. The basic principle behind the rule of thirds is to imagine breaking an image down into thirds (both horizontally and vertically) so that you have 9 parts. Identify four important parts of the frame where you should consider placing points of interest. The theory is that if you place points of interest in the intersections or along the lines, your photo becomes more balanced and will enable a viewer to interact with the image more naturally. Note the point of interest in the bee picture is the eyes which are at an intersection point. People s eyes usually go to one of the intersection points most naturally rather than the center of the shot. Using the rule of thirds works with this natural way of viewing an image. In learning how to use the rule, the most important questions to ask are: What are the points of interest in this shot? And, Where am I intentionally placing them? Hold that pose! Often, a person who finishes talking on-camera will look away for approval ( Was that OK? ) or to see if filming is done. This looks awkward, so have the speaker keep looking at the camera until you call cut. Padding - Add some padding at the start of the action and at the end about 5 seconds after start of recording and the same at the end. This provides room for editing the shot or accommodating a transition. If a person is speaking on-camera, start recording, wait about 5 seconds, then cue him or her to begin. When talking is finished, keep recording for about 5 seconds, stop the camera, and then call cut
39 Skills Guide EDITING OVERVIEW: Editing is the art of assembling scenes to create a meaningful story or message on film or video. When editing, you can arrange the scenes in any order you want, with creative transitions and special effects. Unlike film editing, there is no splicing or touching the tape in the video editing process, which is completely electronic. Use these simple steps to get that great video going! And stay focused! Don t jump to adding audio before you have your scenes in the right order and your transitions completed. Start by capturing the video electronically with video editing software. The capture procedure transfers the raw footage video from the camera to the computer. Then drag the scenes and shots in order onto the timeline. Since you already have your storyboard, use it as your guide for laying out your video. Trimming video clips - This is a fundamental editing operation. Trimming adjusts the in and out points of a clip to remove unwanted footage. No data is lost by trimming, so the original Album scene is not altered. You can always reset clips back to their original state or select different trim points. There are two ways to trim in Studio: o o Directly in the timeline Using the clip properties tool How to trim a clip The easiest way to trim a clip is to have only one clip in the timeline to work with. Next, expand the timeline using the mouse. [Instructor: How do you expand the timeline? ] (put the mouse over the Timeline and drag it to the right). Do not put the mouse directly over the edit line. You can expand the clip to it s maximum expansion size. [Instructor: Ask, How do you know when a clip is expanded to maximum size? ] (each tick mark represents a single frame) Next, put your mouse over the right edge of the clip and drag the left watch the Player at the same time, because it will show you the last frame in the trimmed clip. Reduce the clip as much as you like. Clip edges can be dragged both left and right. When you release the mouse button, the clip will be trimmed. Add transitions transitions bring dramatic effects to your videos. They re animated! So, the video starts to portray feelings, emotions, sadness, happiness all by choosing a transition between scenes that emphasizes intent. Some effects are exotic, some are sophisticated, the point being that they are used to ease or emphasize the passage of one clip to another. How to use transitions It couldn t be any easier they are stored in the Album. Find the transitions section in the album, drag one from the Album to the Movie Window, and drop it beside the video clip or still image. Studio s default transition duration is 2 seconds. So, the second clip will start to run 2 seconds before the 1 st clip finishes. In the beginning of the transition you will only see the first clip. Gradually the 2 nd clip appears, and after 2 seconds, the 2 nd clip is fully displayed. Add audio the process of adding background music, or audio tracks to your video. Audio, music, sound, and voice-overs are discussed in more detail in the following pages
40 Skills Guide Add graphics/text when you add text and graphics to your video, you can give your audience the chance to read or view items like credits, dates, jokes in balloons, express emphasis by putting large letters across a frame of video. Depending on what your intent is, you can make it more emphatic with text and graphics. Studio provides pre-designed menus, and CD covers, holiday wishes, birthday wishes, and so on. In the real world of video production, editing is a complex process with unlimited creative possibilities. The process of video editing allows you to add elements like computer graphics and music. It s accomplished through multiple tape machines, computers, and an operator or editor who pushes buttons. A little basic knowledge will turn your raw footage into an interesting and exciting film. With clever editing, you can build emotions into your video and captivate your audience. Now that you know these important concepts, the next step is to become familiar with Video Editing Software. The software you will be using in this handbook is called Pinnacle Studio 8. Pinnacle is commercial style software, but written for the beginner. Let s have a look at Pinnacle Studio

] [Instructor Note: When you are capturing video from DV or MicroMV, the DV")
41 Skills Guide Software Basics Pinnacle Studio 8 When you first open Studio 8, you will see a screen that looks similar to the one on the right. [Instructor: Creating movies with Studio is a three-step process:] Capture/ Edit/ Make Movie Click the Capture button. Album Player This brings you to the Video Capture Screen. This is where you will import your video onto the hard drive. [Instructor: This is the capture screen for DV or MicroMV equipment connected to a 1394 port (fire wire)] [Instructor Note: When you are capturing video from DV or MicroMV, the DV set-up lets you control the tape transport of the camcorder or VCR using an on-screen control the Camcorder Controller] Camcorder Controller Diskometer
42 Skills Guide The Diskometer Video files can be very large. As you learned during your skill sessions, Don t shoot any video you don t think you ll need. If you follow that simple rule, you will save time moving your file into Studio, keep editing to a minimum, and save lots of time rendering your video. The diskometer does two things: 1. Displays the amount of space available on the capture drive, 2. Gives the approximate duration of video that can be accommodated. Capture quality settings can be selected by using one of the 3 preset buttons displayed here

43 Skills Guide EDIT MODE - The Album contains the source materials for your video production. It s divided into 6 tabbed sections. [Instructor show these on the overhead if possible] o Video Scenes from your captured raw footage o Transitions - fades, dissolves, push ups, slide downs o Titles editable titles you can also be used as overlays or full screen graphics, as well as used as overlays or full screen images. o Frame Grabs your collection of still images and grabbed video frames, can be used as overlays or full screen images. o Sound Effects Studio s collection of.wav and.mp3 audio files. o Disc Menu chapter menus. These can be used in DVD authoring. The Player the player displays a preview of your edited movie or shows what is selected in the Album. Preview window Point of Focus. Displays moving video during playback, still images, titles, and player views mentioned above. Standard playback controls control the player. Standard button fronts. Jog buttons step movie forward and backward by single frames. Player Scrubber The player scrubber quickly traverses forward and backwards through your captured video or through your edited movie. As you move the scrubber, the preview window shows the current frame. Counter displays your current position in hours, minutes, seconds, frames. Can be manually edited. Edit Mode Window
44 Skills Guide THE MOVIE WINDOW Split Clip button the razorblade is used to split the currently-selected clip or currently-edited scene in the Album. Delete Clip button Deletes currently-selected content in any of the Movie Window views. Timeline view shows the position and duration of clips relative to the Timescale. Displays 5 tracks for placement of video, audio, title overlays and graphics, sound effects or voice-overs, and background music. A 6 th track for menus is above the video track. Tracks can be independently locked to avoid being edited with others. Movie Window views timeline, storyboard, and text views. Clip placement feedback gives you several types of feedback on clips in timeline view. The Status line - Placement symbols - The toolboxes video & audio. They provide convenient point-and-click interface to the operations of adding clips to your movie or adjusting existing clips. Only available in Edit Mode. The title editor can combine text, images and other graphic resources to make titles and disc menus. Movie Maker Window (not all controls are shown) Tape AVI MPEG Stream Share Disc Timeline View Toolboxes Status Window Diskometer Time line scrubber Player Movie Window views Split clip button Delete clip button
 and type in descriptive names.")

45 Skills Guide - The 5 Audio Tools - Clip Properties here you can trim the audio clip (adjust start and end times) and type in descriptive names. Volume and fades this tool allows you to control all three audio tracks using the master audio level control. Level controls can mute any or all of the tracks and add real-time volume fades to any of the tracks
46 Skills Guide Voice-overs here you can add narration or commentary as you preview your edited video. Recording voice-overs is very easy. Connect a microphone to the input jack of the PC sound board, open the voiceover tool from the audio toolbox, click Record and speak into the microphone. You cannot record voice-over unless you have at least one video clip in the Movie Window. CD Audio add background music from an audio CD. Adding music from CD s may be a direct violation of copyright law. Make sure you are aware of the legalities before you add any CD track. Downloading music from the World Wide Web and using it in your video would only be acceptable if that music is guaranteed to be royalty free. Choose your download site with this in mind

47 Skills Guide SmartSound Tool (Music/Audio from Studio) lets you create background music in the style of your choice. All these types of audio are added to your production as audio clips. These clips can be moved around, trimmed, and edited in much the same manner as video clips
48 Skills Guide CAPTURING VIDEO Brief explanation of Capture quality DV: Full quality DV capture Uses about 200 MB of disk space per minute of video, example: 2minutes = 400 MB Advantage clips won t have to be recaptured at full resolution when outputting your finished movie. MPEG: Less space than DV but more time. 3 presets of quality are available: High, Medium, Low + Custom Use the lowest quality that meets the requirements of all movie equipment you will be using. Finished movie outputs: Low outputting to VCD; Medium - S-VCD; High DVD. Preview: Decreases disk space use by lowering video quality only during editing Studio recaptures preview-quality clips at full quality. Capturing your video Now you re ready to move the video from the camera into Studio 8. Switch the camera to VCR (or VTR) mode. Capture Video steps 1. Since you will be saving DVD, you want to capture MPEG, High movie output. 2. Click the desired capture setting on the Diskometer 3. Click the Start Capture button on the Diskometer (capture video dialog box is displayed) 4. Type a name for your source video a. Use a naming convention if you are making multiple DV captures in preview quality from the same tape 5. Click the Start Capture button in the Capture Video dialog box button changes to Stop Capture. Two things happen as the Capture begins. a. The Player displays the incoming digitized video being saved to the hard drive, b. Studio performs automatic scene detection 6. Click Stop Capture button to end capture at point you select. Throughout the capturing process, the software will automatically detect the natural breaks in the video. This is called Scene Detection. There are 4 different ways scenes can be detected. o o Automatic based on time/date only available when capturing from a DV source. New scene starts when discontinuity is found in time stamp data on the tape during capture. Automatic based on video content new scene started whenever large changes in images occur. Dependent on stable light source. Example: A strobe light would produce a scene each time it flashed. o Create a new scene every xxx seconds where you choose the second interval. [Instructor why would this be a useful feature?] Manually hit the space bar to create a new scene you can decide where the scene breaks should be

 before shooting or find another area for your scene.")
49 AUDIO: 3, 2, 1... Action! Skills Guide In most filming situations, the audio (sound) is just as important as the video (picture). However, if the sound is not good, this frequently means that the film is unusable. If you really want the sound on your video to be good, you need to pay attention to not only what s going on around the scene you re shooting, but also where the microphone is in relation to your subject. One way to do that is to be sure to eliminate distracting noises (such as blowers, voices, and equipment) before shooting or find another area for your scene. Camcorder Microphone Most camcorders have built-in microphones that work fine for recording room or ambient sound. Recording subjects no more than 9-12 feet away from the camera and if the room is very quiet would also be acceptable audio in the video. Any scenario that deviates too far from those constraints would require the addition of an external microphone. [Instructor ask for an example of where camcorder microphones would be ok to use.] External Microphones You can greatly improve your audio quality by using an external microphone whenever possible, and particularly when doing interviews. You can buy or lease hand-held (like news reporters use) or lavaliere (clip-on) microphones from stores that sell video equipment. For the purpose of this instruction you will be using lavaliere microphones. These are small, attachable microphones, and where you attach them also has a bearing on how good your audio will be. [Instructor may need to explain with examples where to place microphone, i.e., be sure collar material, jackets, or clothing does not rub on the microphone when the subject moves.] Raw Soundtrack The raw soundtrack is brought along with the video during Capture Mode. It will appear in the Movie Window Timeline view on the Main Audio track below the Video track. Add-on Audio Studio has a starter set of effects in.wav format already installed. These can be used as add-on s to enhance and bring different moods to your video. In addition,.mp3 files can also be dropped onto the Timeline from the Album, or CD audio tracks can be imported. [Instructor this is a good place to discuss the ethics involved in ripping music from a CD, and the process for requesting permission to use copyrighted materials.] Audio Toolbox In Pinnacle, this can be found by clicking the toolbar in the Movie Window, and then click the Audio Toolbox button. Five (5) tools (shown on following pages) can be used either to operate on or create audio clips. Clip properties Volume and fades Voice-overs CD audio Automatic background music Timeline and Audio Tracks - the timeline in Pinnacle has 3 tracks for audio: original audio (synchronous audio) captured with your video clips voice-overs and sound effects sound effects brought into your production CD tracks and SmartSound background music additional add in music Even though the three audio tracks have their specialized roles, these tracks mainly control on which track new audio clips appear. So, anytime a new video clip is added to your production, the raw soundtrack will always appear on the original audio track, new voice-overs always will appear on the sound-effect/voice-over track and so on. Once the audio clip has been created you can move it to a different audio track. [Instructor: ask, What would be the advantage to switching audio tracks? (below).] Switching audio tracks Switching between audio tracks gives you added flexibility to use two sound effects simultaneously you could have two audio clips on two different tracks

50 FINAL CUT 3, 2, 1... Action! Skills Guide The final cut of your video will be where you take your last look at what you ve edited, re-evaluate it, fine tune the details, and re-edit it if necessary. Some things to consider as you re-evaluate: First and most importantly, ensure you have a Master Final copy and be sure you keep it in a safe place. Does it follow the storyboard the way it was laid out? Does it tell your story, meet your goals and portray the intent you want to get across to your audience? Who is your audience? (Try looking at your video through the eyes of your audience. Once you ve taken the time to re-evaluate your video and you feel it is complete, the next step is to decide which display medium to render your video to. In order to do that, you will need to become familiar with the different mediums. Which medium do you need? DVD? Webpage? IPOD? VCR tape? AVI File? Again, Who s your audience? A younger crowd? Wedding? Family video? Grandparents? How can you best reach them? ? Website? Snail mail? Text? What technology is their technology? CD? DVD? VCR Tape? Computer file? Streaming Video? (Quick Time Video or RealPlayer), Digital Audio Player (IPOD)? These are all things to be considered before compiling and rendering your video. Some words on IPODS a portable media player that started as a digital audio player, now in its 5 th generation which is video-capable. Information can be stored on a hard drive or flash memory. Apple s itunes transfers music, photos, videos, games, and calendars to the models that support those types of media. IPOD s are quite popular with 100 million world wide. Make Movie Mode Once you have decided which medium to render your production into, the Make Movie Mode is where the final phase of your video production takes place. You can output and share your video movies to several media types and in a variety of formats. You can output your movie to Videotape, DVD, VCD or S-VCD (Videotapes, Digital Movies, and Discs), or you can save your movie as AVI, MPEG, Windows Media or Real Video files, or share to the Internet. The Make Movie screen reflects the hardware available on your system in the Diskometer display. Each time you select a different medium, the Diskometer will recalculate the required and available space. Compiling is the process of assembling and organizing videos into a form that would be useful to someone else. Rendering is the process of compressing your video, audio, images, titles, text and transitions into one video file. Because of the amount of information to be compressed, rendering is a time consuming process. Once the video has been rendered, it cannot be changed. Once it s done, it s DONE!
51 Skills Guide CODECS What are Codecs? o It s a software that packs and unpacks the image data. o Stand for Compressor / decompressor o Can be implemented in either software or hardware - [Instructor Can anyone tell me what that means? What s an example of the hardware and what s an example of the software?] Overview of Compression formats - Video compression reduces the quantity of data used to represent video images. Video compression, like data compression, is a tradeoff between disk space, video quality and the cost of hardware required to decompress the video in a reasonable time. For example, DVDs use a video coding standard called MPEG-2 that can compress approximately 2 hours of video data by 15 to 30 times while still producing a picture quality that is generally considered high quality for standard-definition video. Audio Compression - is a form of data compression that reduces the size of audio files. Audio compression algorithms are implemented in computer software as audio codecs. Generic data compression algorithms are impractical because compression ratios are low (around 50-60% of original size) and they do not work in real time. Specific audio "lossless" and "lossy" algorithms provide far greater compression ratios and are used in mainstream consumer audio devices. [Instructor ask Can anyone tell me what the definition of lossless and lossy data compression is?] Lossless data compression is a class of data compression algorithms that allows the exact original data to be reconstructed from the compressed data. Lossless data compression is used in many applications. For example, it is used in the popular ZIP file format and in the Unix tool gzip. It is also often used as a component within lossy data compression technologies. Lossless compression is used when it is important that the original and the decompressed data be identical, or when no assumption can be made on whether certain deviation is uncritical. Lossy data compression does not allow the exact original data to be reconstructed from the compressed data. Typical examples are executable programs and source code. Some image file formats, like PNG or GIF, use only lossless compression, while others like TIFF and MNG may use either lossless or lossy methods. Image Compression data compression on digital images. The best image quality at a given bit-rate (or compression rate) is the main goal of image compression. The quality of a compression method is often measured by the Peak signal-to-noise ratio. It measures the amount of noise introduced through a lossy compression of the image. Scalability (a quality reduction achieved by manipulation of the bitstream or file (without decompression and recompression)), Region of interest coding (where certain parts of the image are encoded with higher quality than others), and Meta information (where compressed data can contain information about an image like author or copyright information, statistics or even color and texture) are also important properties of image compression schemes. Media Container a computer file format that can contain various types of data, compressed by means of standardized audio/video codecs. Simpler container formats can contain different types of audio codecs. More advanced container formats can support multiple audio and video streams, as well as multiple audio and video streams
52 Skills Guide Compression formats - ISO/IEC ITU-T Others Video compression formats MJPEG MPEG-1 MPEG-2 MPEG-4 ASP MPEG-4/AVC ISO/IEC MPEG H.261 H.262 H.263 H.264 ITU-T AVS Bink Dirac Indeo MJPEG RealVideo Theora VC-1 VP6 VP7 WMV Others Audio compression format Image compression formats Media container formats MPEG-1 Layer III (MP3) MPEG-1 Layer II MPEG-1 Layer I AAC HE-AAC ISO/IEC/ITU-T JPEG JPEG 2000 lossless JPEG JBIG JBIG2 PNG WBMP General G.711 G.722 G G G.723 G G.726 G.728 G.729 G G.729a 3GP ASF AVI DMF DPX FLV Matroska MP4 MXF NUT Ogg Ogg Media QuickTime RealMedia VOB AC3 Apple Lossless ATRAC FLAC ilbc Monkey's Audio µ- law Musepack Nellymoser RealAudio SHN Speex Vorbis WavPack WMA TAK Others APNG ICER MNG BMP GIF ILBM PCX TGA TIFF HD Photo Audio only AIFF AU WAV
53 Appendix A Sample Script Template [Some Title] Video Fade into medium shot of Stephanie in front of the Ft. Bragg basic training obstacle course. She walks over to a group of teens preparing to start the obstacle course Audio STEPHANIE ON-CAMERA: Hello and welcome to our show Teens Tell All About Deployment. I m Stephanie and today I ll be taking you on a video tour of the Ft. Bragg basic training obstacle course. This course is designed to test Soldiers physical fitness before they are sent into the field. As part of a program designed to help youth understand deployment, a group of teens participated in the Ft. Bragg obstacle course. Shot of the obstacle course with teens involved in each station. Close-up of Mark who is being interviewed by Stephanie STEPHANIE VOICE-OVER (MUST SPEAK LOUDLY DIRECTLY INTO THE MICROPHONE TO BE HEARD OVER BACKGROUND NOISE.) This is an exciting and stressful time for the teens as they try to complete the course in the allotted amount of time. None want to let their teammates down by finishing late. Mark: (Mark explains in his own words his feelings about the obstacle course and its difficulty. He also talks about how much he s learned about what his deployed father had to go through before he left. He will try to make his answer about 30 seconds long). Stephanie on-camera at the finish line of the course. STEPHANIE ON-CAMERA: You know it sounds like a lot of other teens feel the same way. Most who have participated in this program have talked about how much they ve learned about what their fathers and mothers do. Everyone agrees that they are very proud of what their parents are doing to serve this country. Obstacle course team finishes and everyone cheers
54 Appendix B Blank Script Template Title [ ] Video Fade into medium shot of Stephanie in front of the Ft. Bragg basic training obstacle course. She walks over to a group of teens preparing to start the obstacle course Audio STEPHANIE ON-CAMERA: Hello and welcome to our show Teens Tell All About Deployment. I m Stephanie and today I ll be taking you on a video tour of the Ft. Bragg basic training obstacle course. This course is designed to test Soldiers physical fitness before they are sent into the field. As part of a program designed to help youth understand deployment, a group of teens participated in the Ft. Bragg obstacle course. Shot of the obstacle course with teens involved in each station. Close up of Mark who is being interviewed by Stephanie STEPHANIE VOICE-OVER (MUST SPEAK LOUDLY DIRECTLY INTO THE MICROPHONE TO BE HEARD OVER BACKGROUND NOISE.) This is an exciting and stressful time for the teens as they try to complete the course in the allotted amount of time. None want to let their teammates down by finishing late. Mark: (Mark explains in his own words his feelings about the obstacle course and its difficulty. He also talks about how much he s learned about what his deployed father had to go through before he left. He will try to make his answer about 30 seconds long). Stephanie on-camera at the finish line of the course. STEPHANIE ON-CAMERA: You know it sounds like a lot of other teens feel the same way. Most who have participated in this program have talked about how much they ve learned about what their fathers and mothers do. Everyone agrees that they are very proud of what their parents are doing to serve this country. Obstacle course team finishes and everyone cheers

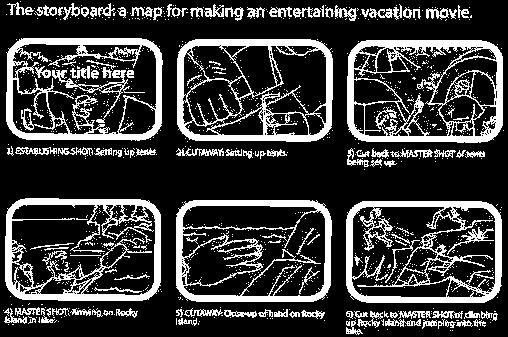
55 Appendix C Sample Video Storyboard Template 1 The storyboard: a map for making an entertaining vacation movie

56 Appendix D Sample Video Storyboard Template 2 The storyboard: a map for creating a wedding video full of memories
.")
57 Appendix D Sample Video Storyboard Template 2 The storyboard: a map for creating a wedding video full of memories (cont d)
58 Appendix E Blank Video Storyboard Template The Storyboard: Page:
59 Note Page Notes
60 3,2,1.. Action! Videography Workshop Technical Equipment List (Feel free to edit) Computers: Two (2) Ver. 3 MTL Labs includes (but is not limited to): o 20 laptops o 2 video cameras Other Video Camera s: Borrowed 10 video camera s one per video team Video/Audio (in addition to the equipment mentioned above): 4 headsets with boom microphones (for recording VOs, included in MTL kits) 250 GB External Hard Drive (borrowed) better to have two 250GB or at least one-500gb to capture and store video files for backups and rendering. Lavalier microphones need one per video team- see next page for purchasing information Tripods need one per video team see next page for purchasing information MiniDV video cassettes needed about two per video team 25-pack of blank DVDs need two per state team CR1616 batteries for video camera firmware and internal settings check model and type for camera s being used. Printers/Accessories: Printers from Mobile Tech Labs Additional cartridges lots of black Reams of paper bring many perhaps a full box Software: Pinnacle Studio 10 or higher included on the Mobile Tech Lab computers Audacity never used Windows Movie Maker, version 2.1 installed in Windows XP SP2 which the Mobile Tech Labs use as their operating system. (NOTE: Windows Movie Maker is NOT available for Windows 2000 operating system. Windows Vista users: All Windows Vista versions require pixel shader hardware support. Some systems might not be able to run the newer version. Therefore, Microsoft has also released an updated older version 2.6 for Windows Vista on the Microsoft Download Center. This version requires Windows Vista and allows the use of Windows Movie Maker on systems where the Windows Vista version cannot be run. Just-In-case items: 24-port Ethernet hub never used, not needed because wireless was available 4-port WiFi router never used, not needed because wireless was available Ethernet cables one for each computer for connectivity to printer, either through router/hub or wireless configuration. LR44 batteries for lavalier Mics check to be sure batteries are working and bring extra. Scanners if necessary- part of Mobile Tech Lab

61 3,2,1.. Action! Videography Workshop Technical Equipment List

62 3,2,1.. Action! Videography Workshop Technical Equipment List
Glossary Unit 1: Introduction to Video
 1. ASF advanced streaming format open file format for streaming multimedia files containing text, graphics, sound, video and animation for windows platform 10. Pre-production the process of preparing all
Apply(produc&on(methods(to(plan(and( create(advanced(digital(media(video( projects.
 Objec&ve(206 Apply(produc&on(methods(to(plan(and( create(advanced(digital(media(video( projects. Course'Weight':'20% 1 Objec&ve(206(,(Video Objectives are broken down into three sub-objectives : pre-production,
VIDEO JUDGE SYSTEM SETUP & CAPTURE
 VIDEO JUDGE SYSTEM SETUP & CAPTURE TABLE OF CONTENTS GENERAL OVERVIEW... 1 ABOUT THE COMPETITIONS... 1 PRIOR TO THE EVENT... 2 EQUIPMENT LIST... 2 ARRIVAL AT THE VENUE... 3 EQUIPMENT SETUP... 4 Camera
Classroom Setup... 2 PC... 2 Document Camera... 3 DVD... 4 Auxiliary... 5
 Classroom Setup... 2 PC... 2 Document Camera... 3 DVD... 4 Auxiliary... 5 Lecture Capture Setup... 6 Pause and Resume... 6 Considerations... 6 Video Conferencing Setup... 7 Camera Control... 8 Preview
Video Information Glossary of Terms
 Video Information Glossary of Terms With this concise and conversational guide, you can make sense of an astonishing number of video industry acronyms, buzz words, and essential terminology. Not only will
A practical guide to creating learning videos
 A practical guide to creating learning videos Video is very much the medium of the moment. Not only do we spend many hours each day watching it on our TVs, it has become an integral part of the online
University of Utah Marriott Library Audio Visual Systems User s Guide
 University of Utah Marriott Library Audio Visual Systems User s Guide 1 3. System Overview 4. System Overview Continued 5. Touch Panel Power Save Mode 6. Main Page 7. Source Selection 8. Niles Control
Halsey 106. For assistance and additional equipment, contact Halsey Instructional Technology Services Halsey 259, extension 4979
 The Illustrated manual for Halsey 106 Contents The master power switch...1 Screen...3 Turning on the projectors...4 Turning off the projectors...5 Microphones... 6 projectors... 9 Installed Computers...
2017 MICHIGAN SKILLS USA CHAMPIONSHIPS TASK AND MATERIALS LIST. SKILL OR LEADERSHIP AREA: Television Video Production
 2017 MICHIGAN SKILLS USA CHAMPIONSHIPS TASK AND MATERIALS LIST CONTEST LOCATION: JW Marriott 235 Louis Campau St. NW Grand Rapids, MI 49503 (616) 242-1500 http://ilovethejw.com/ SKILL OR LEADERSHIP AREA:
Portable Studio. Battle Creek Area Community Television 70 West Michigan Ave., Suite 112 Battle Creek, MI (269)
") Portable Studio Battle Creek Area Community Television 70 West Michigan Ave., Suite 112 Battle Creek, MI 49017 (269) 968-3633 http://accessvision.tv 1. Choose Your Positions If possible, do a site survey
Portable Studio Battle Creek Area Community Television 70 West Michigan Ave., Suite 112 Battle Creek, MI 49017 (269) 968-3633 http://accessvision.tv 1. Choose Your Positions If possible, do a site survey
Digital Filmmaking For Kids
 Digital Filmmaking For Kids Digital Filmmaking For Kids by Nick Willoughby Digital Filmmaking For Kids For Dummies Published by: John Wiley & Sons, Inc., 111 River Street, Hoboken, NJ 07030 5774, www.wiley.com
APPLICATION NOTES News Cut-ins
 News Cut-ins Major Benefit of ParkerVision s PVTV NEWS ability to perform clean, professional news cut-ins at times when there is a minimum of staff available. With just a little planning and forethought,
Video Storytelling Narratives for Impact. February 8, 2017 Washington, DC
 Video Storytelling Narratives for Impact February 8, 2017 Washington, DC Types of Video Promotional Video A promotional video is a marketing tool. It shows what an organization is doing while eliciting
The Illustrated manual for. Halsey 107 & 109
 The Illustrated manual for Halsey 107 & 109 Contents The control panel... 1 Microphones... 3 Screens...6 Lights...7 Computers... 8 Connecting a laptop or roll-around computer... 10 Videocassette recorder
HOW TO USE THE POLYCOM REMOTE CONTROL... 2 MAKING A CALL FROM THE ADDRESS BOOK... 3 ANSWERING A CALL... 4 HANGING UP A CALL... 4 REDIALING A CALL...
 HOW TO USE THE POLYCOM REMOTE CONTROL... 2 MAKING A CALL FROM THE ADDRESS BOOK... 3 ANSWERING A CALL... 4 HANGING UP A CALL... 4 REDIALING A CALL... 4 CAMERA CONTROLS... 5 AUDIO CONTROLS... 5 VIDEO INPUT...
Quick Help Teaching Room Technology Support
 Quick Help Teaching Room Technology Support Technical assistance is available. If you require assistance, please call Ext 6066 Quick Help Technology Overview INDEX INDEX Touch Screen Is not active 3 Technology
Preface... Specification...14
 Contents for V680L Operating Manual Preface......3 Important safety tips...3 Accessories of product...4 Icons of product...5 Installation support...7 Description for operating steps... 8 Description for
SCENEMASTER 3F QUICK OPERATION
 SETTING PRESET MODE SCENEMASTER 3F QUICK OPERATION 1. Hold [RECORD], and press [CHNS] (above the Channels Master) to set Scenes, Dual, or Wide mode. WIDE MODE OPERATION In Wide mode, both CHANNELS and
FACILITIES SUPPORT SERVICES
 Facilities Directorate FACILITIES SUPPORT SERVICES Mechanical Engineering LT B & Dental LT INTERACTIVE LECTURE THEATRE USER OPERATION GUIDE CONTENTS INTRODUCTION... 2 Main Teaching System:... 2 Collaborative
Video Conferencing. Host Orientation Guide
 Video Conferencing Host Orientation Guide Join your video conference (VC) session 1. Turn on the LG television using the LG remote. The green power button, located in the top centre of the remote, will
LAVALLEY LAW LIBRARY MEDIA SERVICES INSTRUCTIONAL MEDIA OPERATIONS MANUAL
 LAVALLEY LAW LIBRARY MEDIA SERVICES INSTRUCTIONAL MEDIA OPERATIONS MANUAL OCTOBER 27, 2007 Page 1 of 29 TABLE OF CONTENTS TABLE OF CONTENTS 03 INTRODUCTON TO MEDIA SERVICES OPERATIONS 04 AUDITORIUM OPERATIONS
TOOLKIT GUIDE 3.0 TAKING YOUR IDEA TO THE SCREEN
 TOOLKIT GUIDE 3.0 TAKING YOUR IDEA TO THE SCREEN Contents Introduction 2 Pre-Production: Planning And Preparation 3 BRAINSTORMING... 3 ORGANISING... 3 STORY DEVELOPMENT... 3 USING STORYBOARDS... 3 USING
Videography Tips. What We Want: When shooting a video, DON T do these:
 Videography Tips Half the battle of starting any new project is knowing where to begin. Here are some helpful tips for shooting better videos, interviews and recording great audio, along with a video production
Activity 1A: The Power of Sound
 Activity 1A: The Power of Sound Students listen to recorded sounds and discuss how sounds can evoke particular images and feelings and how they can help tell a story. Students complete a Sound Scavenger
Equipment, Systems, and Network
 7 Equipment, Systems, and Network Focus Watching a technician who s trying to get your videoconferencing gear to work properly is much less stressful than watching an airline mechanic trying to fix the
production 3. MASTER THE CAMERA To access our full set of Into Film mini filmmaking guides visit intofilm.org mini filmmaking guides
 mini filmmaking guides production 3. To access our full set of Into Film mini filmmaking guides visit intofilm.org DEVELOPMENT (3 guides) PRE-PRODUCTION (4 guides) PRODUCTION (5 guides) 1. LIGHT A FILM
Part names (continued) Remote control
 Remote control") Introduction Part names (continued) Remote control (1) STANDBY ( 25) (1) (2) ON ( 25) (3) (3) ID - 1 / 2 / 3 / 4 s ( 18) (4) (4) COMPUTER 1 ( 27) (7) (5) COMPUTER 2 * (8) (6) COMPUTER 3 * (10) (13) (7)
Introduction Part names (continued) Remote control (1) STANDBY ( 25) (1) (2) ON ( 25) (3) (3) ID - 1 / 2 / 3 / 4 s ( 18) (4) (4) COMPUTER 1 ( 27) (7) (5) COMPUTER 2 * (8) (6) COMPUTER 3 * (10) (13) (7)
Sample SESSION 4 FILM THE COMMERCIAL. consists of 6 sessions, which are divided into
 Learn more about TechnoCommercial SESSION 4 FILM THE COMMERCIAL In this session, students form production teams and work together to film the video footage for a commercial. To begin, they select a product
Actor (3 to 4 students)
") s and Rubric Making Videos Actor (3 to 4 students) Name of Actor(s) 4 3 2 1 0 Actors Extra eft was made to bring character to life; stayed on task at all times; strong projection Good eft was made; on
s and Rubric Making Videos Actor (3 to 4 students) Name of Actor(s) 4 3 2 1 0 Actors Extra eft was made to bring character to life; stayed on task at all times; strong projection Good eft was made; on
Television Production
 Teacher Assessment Blueprint Television Production Test Code: 5186 / Version: 01 Copyright 2013 NOCTI. All Rights Reserved. General Assessment Information Blueprint Contents General Assessment Information
NSU Distance Delivery Teleconference Operations Polycom 2005
 NSU Distance Delivery Teleconference Operations Polycom 2005 Polycom Teleconference & Crestron Control Presentation Room Operations E-learning Studio Mode Classroom Presentation Mode DDN Remote Site Capability
Physics 105. Spring Handbook of Instructions. M.J. Madsen Wabash College, Crawfordsville, Indiana
 Physics 105 Handbook of Instructions Spring 2010 M.J. Madsen Wabash College, Crawfordsville, Indiana 1 During the Middle Ages there were all kinds of crazy ideas, such as that a piece of rhinoceros horn
GEC ITS Teaching and Learning Classroom Hotline Multimedia Classroom
 ITS Teaching and Learning Classroom Hotline Multimedia Classroom GEC 1005 This document is a publication of ITS Teaching and Learning Classroom Hotline at the University of North Carolina. It may be copied
Lesson Plan. Lesson Duration: Approximately five 90-minute class periods. [Lesson length is subjective and will vary from instructor to instructor]
![Lesson Plan. Lesson Duration: Approximately five 90-minute class periods. [Lesson length is subjective and will vary from instructor to instructor]](/thumbs/77/75307042.jpg "Lesson Plan. Lesson Duration: Approximately five 90-minute class periods. [Lesson length is subjective and will vary from instructor to instructor]") Lesson Plan Course Title: Session Title: Audio/Video Production Producing a News Package Lesson Duration: Approximately five 90-minute class periods. [Lesson length is subjective and will vary from instructor
Lesson Plan Course Title: Session Title: Audio/Video Production Producing a News Package Lesson Duration: Approximately five 90-minute class periods. [Lesson length is subjective and will vary from instructor
Students will be able to properly manage classroom equipment and follow safety procedures.
 1 TV Production 1, SEM 1 DOE: 8201010 Course Review Unit 1: Classroom Procedures and Lab Safety Students will be able to properly manage classroom equipment and follow safety procedures. 04.01 Follow classroom
Television Broadcasting
 PRECISION EXAMS Television Broadcasting EXAM INFORMATION Items 46 Points 55 Prerequisites NONE Grade Level 10-12 Course Length ONE SEMESTER DESCRIPTION This course is designed to provide students with
Audio Video Broadcasting at Bethlehem Lutheran Church
 Audio Video Broadcasting at Bethlehem Lutheran Church Overview The A/V setup at Bethlehem progressed from an audio only recording and archiving activity to a multicamera livestream setup. By examining
Junior Research Lindsey / AP English 3 / News Magazine Video
 News Magazine Video Your group has chosen to write, film, and produce a 10-15 minute news magazine video that demonstrates what all of you have learned this semester about your Junior Research Question.
Students will be able to properly manage classroom equipment and follow safety procedures.
 1 TV Production 3, SEM 1 DOE: 8201030 Course Review Unit 1: Classroom Procedures and Lab Safety Students will be able to properly manage classroom equipment and follow safety procedures. 04.01 Follow classroom
A Digital Talking Storybook
 Using ICT Levels 1, 2, 3, 4 & 5 A Digital Talking Storybook Desirable Features: Presenting Music and Sound Assessment Focus Film and Animation Express Evaluate Exhibit Pupil Notes Level 1 Level 2 Level
Video Conferencing. Participant Orientation Guide
 Video Conferencing Participant Orientation Guide Join your video conference (VC) session 1. Turn on the LG television using the LG remote. The green power button, located in the top centre of the remote,
Assembling and Mounting the Presentation Display, Speakers, Speaker Screens, and Table Door
 CHAPTER 8 Assembling and Mounting the Presentation Display, Speakers, Speaker Screens, and Table Door July 13, 2012, This document provides you with the procedures you perform to assemble and mount the
Technical Communication: Videos
 Technical Communication: Videos EECS467 Autonomous Robotics Lab, W14 Edwin Olson What kind of videos? Short (about 3 minutes) Technical Explain and demonstrate a method (or) Make a claim and defend it
Entry Level Assessment Blueprint Television Production
 Entry Level Assessment Blueprint Television Production Test Code: 3427 / Version: 01 Specific Competencies and Skills Tested in this Assessment: Safety Demonstrate safe handling of lighting instruments
Simulation Lab MediaSite Training Workshop
 Simulation Lab MediaSite Training Workshop User Guide This guide describes Simulation Lab procedures for requesting, recording and playback. Douglas College March 2017 For technical support contact Help
Electronic Equipment Manual For 101, 102, 301 & 302 Azrieli Theatre For further information, please visit our website at:
 Electronic Equipment Manual For 101, 102, 301 & 302 Azrieli Theatre For further information, please visit our website at: http://www.carleton.ca/ims/ 2 TABLE OF CONTENTS: Topic Page # Logging onto the
Claymation Workshop Kit Materials
 Kit Materials [ 1 ] Full day workshop While participants can make claymations on any topic, providing a specific topic helps focus effort and save time. This full-day agenda is based on animating idioms
Ready. Set. Go make your show. Your guide to creating your first video program with
 Ready. Set. Go make your show. Your guide to creating your first video program with TriCaster Mini Go Make Your Show Guide 01 Table of Contents Part 1: Ready. 1) Power, Monitoring and Control 04 2) Bringing
What is a Visual Presenter? Flexible operation, ready in seconds. Perfect images. Progressive Scan vs. PAL/ NTSC Video
 Visual Presenter and your presentation comes alive! The new standard for: Presentations Meetings and seminars Classroom & education Product presentations Video conferencing Medical care Courtrooms & Legal
Overview. Project Shutdown Schedule
 Overview This handbook and the accompanying databases were created by the WGBH Media Library and Archives and are offered to the production community to assist you as you move through the different phases
Understanding Machinima p. 1 Machinima: A Marriage of Mediums p. 1 Filmmaking p. 2 Animation p. 2 3D Game Development Technology p.
 Introduction p. xxi Understanding Machinima p. 1 Machinima: A Marriage of Mediums p. 1 Filmmaking p. 2 Animation p. 2 3D Game Development Technology p. 2 Putting It All Together (Filmmaking + Animation
About Final Cut Pro Includes installation instructions and information on new features
 apple About Final Cut Pro 1.2.5 Includes installation instructions and information on new features This document includes installation instructions and describes features and enhancements of Final Cut
2. Materials Development. 1) Desktop Video Production
 Desktop Video Production") 2. Materials Development 1) Desktop Video Production Dr. Merza Abbas Acting Deputy Director Chairman of Graduate Studies Centre for Instructional Technology and Multimedia University of Science, Malaysia
2. Materials Development 1) Desktop Video Production Dr. Merza Abbas Acting Deputy Director Chairman of Graduate Studies Centre for Instructional Technology and Multimedia University of Science, Malaysia
TELEVISION. Entertainment Plans. Interactive Guide and DVR (Digital Video Recorder) Manual ARVIG arvig.net
 Manual ARVIG arvig.net") TELEVISION Entertainment Plans Interactive Guide and DVR (Digital Video Recorder) Manual 888.99.ARVIG arvig.net . TABLE OF CONTENTS Interactive Guide Remote Control... 3 Changing the Channel... 4 Picture-In-Picture
TELEVISION Entertainment Plans Interactive Guide and DVR (Digital Video Recorder) Manual 888.99.ARVIG arvig.net . TABLE OF CONTENTS Interactive Guide Remote Control... 3 Changing the Channel... 4 Picture-In-Picture
Zoom Pro Classroom Facilitator and User Guide
 Zoom Pro Classroom Facilitator and User Guide Version 1 08/21/2017 Tom M c Kellips, DM 1 Table of Contents Introduction...3 Technical Support...3 Starting a video conference...3 Sharing a screen...4 Recording...4
Sequential Storyboards introduces the storyboard as visual narrative that captures key ideas as a sequence of frames unfolding over time
 Section 4 Snapshots in Time: The Visual Narrative What makes interaction design unique is that it imagines a person s behavior as they interact with a system over time. Storyboards capture this element
CI-218 / CI-303 / CI430
 CI-218 / CI-303 / CI430 Network Camera User Manual English AREC Inc. All Rights Reserved 2017. l www.arec.com All information contained in this document is Proprietary Table of Contents 1. Overview 1.1
Operating Guide. ViewClix offers a revolutionary experience for seniors and their families and friends.
 ViewClix Mini TM Operating Guide ViewClix offers a revolutionary experience for seniors and their families and friends. To make using ViewClix an easy and fun experience for you and your loved ones, we
Brandlive Production Playbook
 There are a number of important components to consider when planning a live broadcast. Deciding on a theme, selecting presenters, curating content, and assigning skilled moderators make up some of the
* Apple and Macintosh are registered trademarks of Apple Computer, Inc. * Mac OS is a trademark of Apple Computer, Inc.
 Owner s Manual Thank you for your purchase of the PR-80 Realtime Video Presenter. 201b Before using this unit, carefully read the sections entitled: USING THE UNIT SAFELY (DV-7DL PRO Owner s Manual P.4),
Active Minds Bonus Chapter
 Active Minds Bonus Chapter Lights! Camera! ACTION! This creative project puts your children into the director s chair as they work together or on their own to create cinematic magic. intact. Want more
U S E R G U I D E HD1000
 U S E R G U I D E HD1000 1 W e l c o m e t o R o k u! In This Guide... Bring your HDTV to life with Roku. For the first time, you ll enjoy viewing your favorite digital photos in high-definition on your
INTERNATIONAL STANDARDS FOR SCHOLASTIC BROADCAST JOURNALISM
 INTERNATIONAL STANDARDS FOR SCHOLASTIC BROADCAST JOURNALISM CATEGORIES 1. Reporting 2. Writing and Narration 3. Shooting Video and Audio 4. Editing Video and Audio 5. Producing 6. Camera Presence Copyright
Condensed tips based on Brad Bird on How to Compose Shots and Storyboarding the Simpson s Way
 Storyboard Week 3 Condensed tips based on Brad Bird on How to Compose Shots and Storyboarding the Simpson s Way 1. Adjust down on the action. Avoid empty space above heads Lower the horizon 2. Make the
The process of animating a storyboard into a moving sequence. Aperture A measure of the width of the opening allowing light to enter the camera.
 EXPLORE FILMMAKING NATIONAL FILM AND TELEVISION SCHOOL Glossary 180 Degree Rule One of the key features of the continuity system to which most mainstream film and television has tended to adhere. A screen
COLOR TFT LCD MONITOR WITH MULTI-TOUCH FUNCTION Manual
 COLOR TFT LCD MONITOR WITH MULTI-TOUCH FUNCTION Manual DEAR CUSTOMERS Thank you for choosing our TFT LCD (liquid crystal display) monitor. This product employs integrate circuits, low power consumption,
FILM CREW WHO S WHO. Job Position Descriptions and Important Skills
 FILM CREW WHO S WHO Job Position Descriptions and Important Skills OVERVIEW According to a study conducted by stephenfollows.com, the average film employs 588 crew members based on the 50 highest grossing
Network Disk Recorder WJ-ND200
 Network Disk Recorder WJ-ND200 Network Disk Recorder Operating Instructions Model No. WJ-ND200 ERROR MIRROR TIMER HDD1 REC LINK /ACT OPERATE HDD2 ALARM SUSPEND ALARM BUZZER STOP Before attempting to connect
AVTuner PVR Quick Installation Guide
 AVTuner PVR Quick Installation Guide Introducing the AVTuner PVR The AVTuner PVR allows you to watch, record, pause live TV and capture high resolution video on your computer. Features and Benefits Up
DH7-DK QUICKSTART GUIDE. DH7 4K Support HDMI On-Camera Field Monitor Deluxe Kit
 DH7-DK QUICKSTART GUIDE DH7 4K Support HDMI On-Camera Field Monitor Deluxe Kit What s Included 1 x DH7 Monitor 1 x AC Adapter 1 x Camera Shoe Mount 1 x Screen Cleaning Wipe 1 x Screen Protection Film 1
Bristol Village Sight and Sound Operation Manual This manual is the property of the Bristol Village Ohio Sight and Sound Committee.
 Bristol Village Sight and Sound Operation Manual This manual is the property of the Bristol Village Ohio Sight and Sound Committee. This version was created Saturday, September 22, 2012 by Len Nasman.
The Switcher: TriCaster 855 Extreme
 The Switcher: TriCaster 855 Extreme OVERVIEW The typical studio production is composed of content from various sources: CAMERAS: Moving images from studio cameras normally three. AUDIO from studio mics
User s Guide Contents
 User s Guide Contents Chapter 1 Introduction Video Conferencing on your PC Image and Video Capture Chapter 2 Setting Up your PC for Video Conferencing Overview How to Setup AVerMedia AVerTV Studio for
COLOR TFT LCD MONITOR. Manual
 COLOR TFT LCD MONITOR Manual Safety defended: Properly maintains your system to be possible to guarantee its service life and to reduce the damage risk. It should avoid the damp and exceeding temperature
VIDEO PRODUCT DEVELOPMENT
 VIDEO PRODUCT DEVELOPMENT PURPOSE To evaluate each contestant s preparation for employment and to recognize outstanding students for excellence and professionalism in the field of television/video production.
Troubleshooting the CTS 1100
 CHAPTER 7 Troubleshooting the CTS 1100 Revised: November 2011, Contents You may want to periodically test system components using the hardware and software tests available in the Cisco TelePresence System
Entry Level Assessment Blueprint Audio-Visual Communications Technology
 Entry Level Assessment Blueprint Audio-Visual Communications Technology Test Code: 3005 / Version: 01 Specific Competencies and Skills Tested in this Assessment: Photography Operate an SLR (single lens
Using the Equipment in the Presentation Room (TLC 326)
") Using the Equipment in the Presentation Room (TLC 326) The equipment features in this room present many creative possibilities. Although extensive technical skills are not necessary, we recommend familiarizing
Using the Equipment in the Presentation Room (TLC 326) The equipment features in this room present many creative possibilities. Although extensive technical skills are not necessary, we recommend familiarizing
Receiver Description and Installation
 Receiver Front Panel Smart Card Door Behind this door is a slot for a future smart card. No smart card is included with this receiver. Arrow Buttons Use the ARROW buttons to change channels on the nearby
Using the Remote Control
 note If a button is pressed longer than 30 seconds, the remote control stops operating to conserve power. When you release the button, normal operation resumes. Using the Remote Control Follow these tips
LAUNCH VID THEORY EXIT VIDEO THEORY KEVAN F. DRINKWALTER
 LAUNCH VIDEO WELCOME TO... VIDEO (Theory). This course will focus on the planning and production of your self promotion video. With the world gone digital it is important to have a digital presence. HOW
Pictures To Exe Version 5.0 A USER GUIDE. By Lin Evans And Jeff Evans (Appendix F By Ray Waddington)
") Pictures To Exe Version 5.0 A USER GUIDE By Lin Evans And Jeff Evans (Appendix F By Ray Waddington) Contents 1. INTRODUCTION... 7 2. SCOPE... 8 3. BASIC OPERATION... 8 3.1 General... 8 3.2 Main Window
Pictures To Exe Version 5.0 A USER GUIDE By Lin Evans And Jeff Evans (Appendix F By Ray Waddington) Contents 1. INTRODUCTION... 7 2. SCOPE... 8 3. BASIC OPERATION... 8 3.1 General... 8 3.2 Main Window
DX80 Touchscreen User Guide
 DX80 Touchscreen User Guide 07Mar2018 Page 1 of 16 Table of Contents Table of Contents GENERAL USE.... 5 Site to Site Calls.... 6 Connecting to an MBT Site.... 6 Add a Site to Favorites.... 6 Connecting
imovie Workflow Digital Story Telling
 imovie Workflow for Digital Storytelling Kit Laybourne mediachops.com page 1 imovie Workflow Digital Story Telling This document tracks, step-by-step, the workflow for building a slide show of the kind
Dejero LIVE+ 20/20 Transmitter
 Dejero LIVE+ 20/20 Transmitter This Dejero kit will allow you to broadcast live from the field, using an NX5 camera kit. Please follow the following steps in order!! 1. Preliminary Check: To set up the
editing The Basics Objectives: online unit 5 Section 1.1
 Welcome to PVTV LEARNING, from ParkerVision. This curriculum represents the most advanced and effective way to teach high school and college students the science of modern television broadcast. Until now,
Audacity Tips and Tricks for Podcasters
 Audacity Tips and Tricks for Podcasters Common Challenges in Podcast Recording Pops and Clicks Sometimes audio recordings contain pops or clicks caused by a too hard p, t, or k sound, by just a little
Formatting Dissertations or Theses for UMass Amherst with MacWord 2008
 January 2015 Formatting Dissertations or Theses for UMass Amherst with MacWord 2008 Getting started make your life easy (or easier at least) 1. Read the Graduate School s Guidelines and follow their rules.
Meetinghouse Webcast Setup Guide for the Europe Area Sending Site
 Meetinghouse Webcast Setup Guide for the Europe Area Sending Site Rev 03 15 Nov 2009 Introduction This guide provides helpful information and details for successfully setting up a webcast in the Europe
Syllabus Snapshot. by Amazing Brains. Exam Body: CCEA Level: GCSE Subject: Moving Image Arts
 Syllabus Snapshot by Amazing Brains Exam Body: CCEA Level: GCSE Subject: Moving Image Arts 2 Specification at a Glance The table below summarises the structure of this GCSE course: Assessment Weighting
Hi! Let s get started.
 Hi! Let s get started. What s in the Box Roku player Remote control 2 x AAA batteries for remote A/V cable RCA to 3.5mm Power adapter Get to know your roku A B Front view C D G Back view E F A B C D E
Thinking About Television and Movies
 LESSON PLAN Level: Grades 1 to 6 About the Author: This lesson has been adapted from the activity guide for the video Live TV, produced by the National Film Board of Canada. Thinking About Television and
Think Speak Act, LLC
 Think Speak Act, LLC media production services Media Production Planning Guide 301-937-3111 fax 301-937-4112 www.thinkspeakact.com e-mail: info@thinkspeakact.com P.O. Box 540, Beltsville, MD 20704 In order
MICROSOFT WORD FEATURES FOR ARTS POSTGRADUATES
 MICROSOFT WORD FEATURES FOR ARTS POSTGRADUATES...2 Page Setup...3 Styles...4 Using Inbuilt Styles...4 Modifying a Style...5 Creating a Style...5 Section Breaks...6 Insert a section break...6 Delete a section
How would you go about creating the presentation?
 ETEC-674, Wk-5, Graham, Presentations, Focus Questions, & Responses 1)You have been asked to create a podcast. Which of the above tools (or name another) you would use? Briefly explain the procedure you
NZQA registered unit standard version 1 Page 1 of 6. Prepare and write a news story for broadcast on television
 Page 1 of 6 Title Prepare and write a news story for broadcast on television Level 5 Credits 5 Purpose This unit standard is intended for people studying journalism in an off-job situation. People credited
TELEVISION PRODUCTION II
 TELEVISION PRODUCTION II Program Overview: The TV Production classes at Grosse Pointe North and South High Schools provide a studio setting for those students with a serious interest in pursuing a career
The Illustrated manual for. Clow 103
 The Illustrated manual for Clow 10 Contents Lights...1 Turning on the system... Microphones... 4 Turning the video projector on and off... 6 The screen... 7 VHS videocassette recorder...8 Computer... 10
User Guide MD755. Programmable Motion Sensor for BrightSign Solid State Digital Sign Controllers. Overview
 650 N Main Street Leominster, MA 01453 1-978-534-0400 User Guide MD755 Programmable Motion Sensor for BrightSign Solid State Digital Sign Controllers Overview The MD-755 offers unique motion triggering
DVR-431 USB Wireless Receiver User Manual
 DVR-431 USB Wireless Receiver User Manual Thank you for using our wireless USB receiver, please read the following content carefully before using, it will help you make better use of this product. Introduction