Music Publisher 8 manual Page 1. Braeburn Software. Manual Release 8.10; August 2011
|
|
|
- Ethelbert Martin
- 6 years ago
- Views:
Transcription
1 Music Publisher 8 manual Page 1 Braeburn Software Music Publisher 8 Manual Release 8.10; August 2011 Hawthorn Bank Scott s Place Selkirk TD7 4DP UK Tel , overseas support@braeburn.co.uk
2 Page 2 Music Publisher 8 manual Contents 1. What is Music Publisher? For those who don t read manuals Some musical terms Getting help The opening screen The music input screen Music mode basic principles Music mode defining your systems Entering music Moving around your score Adding text Altering existing music Adding lines, slurs and phrase marks Adding musical symbols Other objects Objects special attributes Special on-screen information Special staves - percussion instruments Special staves TAB notation Importing and searching Files saving and merging Making picture files for word-processing Exporting your music to other packages Layout and formatting Neatening and tidying your music Options and Information The Tools menu Simple page numbering Headers and footers Printing Sound output and playback...168
3 Music Publisher 8 manual Page Bar (measure) numbering Part extraction Quarter tones Customising your screen Using a MIDI keyboard to enter music Scanning in your music Appendix A: The System Construction Wizard Appendix B: 'Group' Instruments Appendix C: Note attributes Appendix D: Clef types Appendix E: Verbal Tempo marks Appendix F: Using the Mouse and Keyboard effectively Appendix G: Keyboard Shortcuts Appendix H: Text mode special characters Appendix I: British and American musical terms Appendix J: General Midi instrument names Appendix K: MIDI Percussion instrument names Appendix L: Temperaments Appendix M: Versions and file formats Appendix N: Some industry standards on Stave sizes Appendix O: Removing Music Publisher from your system Appendix Z: 100 Really Useful Tips...265
4 Page 4 Music Publisher 8 manual 1. WHAT IS MUSIC PUBLISHER? Description As the name implies, Music Publisher is a product to assist in your music publishing and writing, and of course Music Publisher 8 is the 8th version of this software. Whether you are a simple amateur writing or arranging your own music, or a professional needing top-quality copy, Music Publisher is for you. Think of it as a musical Word-processor or Music Desk-Top Publishing system. The program is the latest (as of 2011) in a line of products: Title Date Operating Systems * NoteWorthy 1992 DOS NoteWorthy DOS Music Publisher 1998 Windows 3 Music Publisher Windows 95, 98 Music Publisher Windows 9x, ME, XP Music Publisher Windows 9x, ME, XP, Vista Music Publisher Windows 9x, ME, XP, Vista Music Publisher Windowx 9x, ME, XP, Vista, Win 7 Table 1 - Versions of Music Publisher The relationships between which versions will read which files is given in Appendix M: Versions and file formats on page 262. The program has undergone improvements and enhancements driven by you, the customer: all suggestions for improvements and future developments are taken very seriously and often find a place in the next release. * This is not a complete list. Other systems such as Windows Server and Windows 2000 are platforms for Music Publisher 8 and other versions as appropriate This program was not related to an American program called Noteworthy Composer which came out a year after NoteWorthy. The confusion over the names was the reason for a complete change of name to Music Publisher.
5 Music Publisher 8 manual Page 5 In the same way as a word-processor creates documents for you and allows you to put whatever text you wish wherever you wish, so Music Publisher does the same with music. A word-processor does not argue with you about what is right and wrong. Neither does Music Publisher. If you put five crotchets (quarter-notes) in a 4/4 bar it will not object: in fact you may want to do just that for special effects. However you can ask Music Publisher to report on problems, but it won t do it automatically. While the program has the ability to play back what you put on the page, this is never an overriding feature: if you have an effect which you need to see on the printed page, then you can put it there. On play-back the program will try to render your intentions, but if it gets it wrong because it does not understand then there are ways you can doctor the resulting sound. But if you don t want to bother then don t: the primary purpose of the program is to publish music. Technical Requirements The program requires Windows 95, 98, NT, ME, XP, Vista, Windows 7 or later running with a mouse or other pointing device. If your mouse has a wheel and/or third button then this can be utilised by the program. While the program has Vista-like dialog boxes these will be seen in all versions of the program. 50Mb of free disk space for the program and help files. In addition saved music files take around 30-40Kb per printed page, depending on complexity. So each Gb of free disk space could store approximately 30,000 pages of music in Music Publisher format. While the program will run on basic screen resolutions (640x480), some of the menus will not fit into this space and so it is much more convenient to have 800x600 or higher. CD-Rom or DVD drive for installation of the software. For sound output you need a sound card which can interpret and play Midi files. This means any modern sound card, and the software to play the Midi files is normally installed when you install the sound card software (or at the shop, if you bought it pre-installed). See the section Quality of sound on page 179. Free upgrades Past experience has shown that over its lifetime the program will have bugs fixed and some additional features and conveniences added and every registered user can download the very latest version from this page of our website:
6 Page 6 Music Publisher 8 manual The released versions of the program are numbered from 8.01, and for finer divisions the menu Help About will quote internal versions. The first release was , ie 8.01a; first release, and for instance would be 8.01b; 3rd release. It is our policy that bugs which are reported will be fixed speedily and the new version be made available on our web site as soon as possible. However you should remember that problems with hardware, drivers or even Windows itself can result in them being quoted on Music Publisher s O Drat! screen and may not be due to our software at all. However, please do report bugs you find but remember that to fix a bug we usually need to replicate it, so if at all possible and relevant attach your score to an (send to support@braeburn.co.uk) and indicate what operation(s) cause the problem.

7 Music Publisher 8 manual Page 7 2. FOR THOSE WHO DON T READ MANUALS Getting started quickly 1 Insert the distribution CD in the CD drive. The program should be easy to install, and other software and information may be offered on the installation CD. If nothing happens when you insert the CD then do Start Run and type X:INSTALLER where X: is the drive letter of your CD-Rom or DVD drive 2 Run the program by clicking the icon, and as invited at the beginning of the run, press Alt+F1 to run the tutorial. Running the tutorial Fig 1 - the Tutorial screen in action The tutorial is intended to be self-explanatory, but a few notes are in order: 1. You can make more space for reading the tutorial by dragging the top of the tutorial area up (or down, for more music space).
8 Page 8 Music Publisher 8 manual 2. The tutorial allows you to type and experiment with the system and in no way constrains your answers. Basically it is an extension of the help system without the problem of bothering to switch windows. To close the tutorial, press Alt+F1 again, click the X button above the tutorial, or choose Close Tutorial from the Help menu. If you re-open the tutorial then the same position will be displayed for you to work from. 3. For a version of the tutorial using American musical terms, first switch languages then open the tutorial. See page 141 for information about changing the Language. Errata and additions to this manual To obtain an errata list, and other late-breaking items which were not known as this manual went to print, do the following: When the program is installed, select Help Additions to the Printed Manual and then select Print if required. Upgrading from a previous version of Music Publisher If you are upgrading you will find much that is familiar, but you might like to look in the Help Upgrading from a previous version where you can see a list of differences. You should read this carefully, and maybe print it for future reference.
9 Music Publisher 8 manual Page 9 3. SOME MUSICAL TERMS The following musical and other terms are used in this manual: The complete document is called the score. The file on the disk which contains the music is also called the score. One page of the score is rather surprisingly referred to as a page. An important technical musical term not known by a large number of musicians: a set of staves joined together into a set which is played simultaneously is called a system. Thus a Piano Score consists (usually) of 2-stave systems, while a string quartet usually uses four staves in each system. A single line within a system is called a stave. American readers normally call this a staff (plural staves). This manual will sometimes use the British terms only, so see the list of equivalents in Appendix I: British and American musical terms on page 249. Conventions used in this manual In many parts of the manual it is necessary to refer to options which are to be selected. Some of these are on drop-down menus, some may be pages of a large dialogue form (like the Options menu) and some may be buttons or other boxes. In this manual the options to be chosen, by whatever method, are indicated as separated by a vertical bar ( ). For instance, selecting the Run Tutorial command from the Help menu would be referred to as selecting Help Run Tutorial.

10 Page 10 Music Publisher 8 manual 4. GETTING HELP Because of its nature Music Publisher is a complicated program. So to help you get the best out of it there are a number of ways in which the system can help. Windows Help Tooltips Music Publisher 8 is quite different from other software in that the help system is actually intended to help you(!) It s our belief that Help systems are there to give answers while you are working, but manuals (like this one) are to be read in bed at night, and give rise to comments such as I didn t know it could do that! I ll try it tomorrow! To satisfy this belief the built-in help system consists almost entirely of over 300 (mainly) short answers to simple questions. The sort of questions you come across when working. The help file is strongly indexed. This means that you should use the Help Search command (F1) to find what you are looking for. Here is a typical situation: You are sat at your computer faced with a pair of staves where there is not enough room between them to fit lyrics in comfortably, and you have forgotten how to move them apart to make more room. So you choose Help Search and type in a relevant keyword. I would suggest either moving or staves. In either case you should find a list of questions and among these you will find How do I move staves up and down. Click Display and the first line of the answer is Drag them up and down with Ctrl+left button. There is a picture and more explanation amounting to three further paragraphs but the answer is direct and simple. Besides the help system there are other ways in which the program helps you: In common with most Windows software when the mouse is paused most of the controls (eg buttons) will provide some help in a little yellow Tooltip. The Explain button Fig 2 Showing a tooltip On a number of dialogues and other boxes, you will find a button marked Explain. When you click this the mouse will change to a question and pointer format. Now click another control on the form - the program will then offer you more extended details about what that particular control does.

 is the next level.")
11 Music Publisher 8 manual Page 11 Fig 3 - Explain has been pressed and the user is about to click on Octave Down Fig 4 The user has just clicked Octave Down User levels In order to assist the beginner with as complex a program as this, the concept of user levels is introduced. There are four levels, numbered 1 to 4. At Level 1 (Beginner) the user is constantly monitored with a popup tooltip to give extra help. Only the very basic functions of entering music and editing it are available at this level. In particular text, line, curve etc modes are not allowed. This level is really just for running the tutorial. Level 2 (Standard) is the next level. All program functions are available, and only the lesser used functions such as drawing curves or lines give the popup tips. At this level and above, Templates (see page 33) are offered the user when File New is selected. At level 2 you may tire of certain warnings because they come up often. In this case you can disable these particular warnings if they annoy you see Cancellation of certain warnings below.
.")
12 Page 12 Music Publisher 8 manual For the user who uses the program regularly and who finds even the remaining popup tips intrusive, Level 3 (Advanced) is available, where no popup tips are given and very few warnings. Well after all, you ve got an Undo facility! (page 62). And finally Level 4 (No tooltips) is the same as level 3 but omits all the tooltips for those who find this last vestige of assistance annoying. Moving between the levels required is simply a matter of selecting the level from the User menu. Note that the Level 1 user is automatically moved to Level 2 once the tutorial has been run, but the move to Levels 3 or 4 has to be requested on this menu (or on the Options Desktop screen) to take effect. Cancellation of certain warnings At level 1 and 2, you are warned and asked to confirm some operations. As you progress this can be an irritation, but you may not want to move to Level 3, Advanced. So when a warning is shown, it may be possible to avoid seeing it again by ticking (checking) the relevant box. Fig 5 - showing the "no future warnings" button Should you wish to reinstate warnings, then there is a button to press on the Options Desktop page. See Fig 133 on page 136.

13 Music Publisher 8 manual Page THE OPENING SCREEN There are a limited number of options available without having a document loaded. These are concerned with defining global defaults and loading documents. Fig 6 The opening screen. The File Menu The options to Load an existing score and create a New score are to be found here. See page 94. Also there is a good collection of sample scores which illustrate what is possible with Music Publisher 8. Import if you are running the Scanning Edition. Text search is a useful feature. If you cannot remember what you called a particular score then you can have Music Publisher search for any text you remember which was in the score, for instance the work's title. See Tools Find text on page 158 for details. The Fonts Menu Here you can define and edit your favourite fonts for use in your documents. See Saving and using your favourite fonts on page 55 The Options Menu Selecting this option leads to a tabbed dialog which contains many program options. See The Options on page 136.

14 Page 14 Music Publisher 8 manual The User Menu Select your level of confidence. See User levels on page 11. The Help Menu Here you can find the options to obtain and search the help system, run the tutorial, read the Tip of the Day and the traditional About dialog where you can find the program version numbers and other information: Fig 7 The About box
 The menus When open or create a score, you will find that there are far more menu options available and that fewer of the toolbar options are \"greyed out\".")
15 Music Publisher 8 manual Page THE MUSIC INPUT SCREEN This section describes the layout of the visible screen once you are working on a score. Fig 8 - The editing screen (0.3 staves) The menus When open or create a score, you will find that there are far more menu options available and that fewer of the toolbar options are "greyed out". Sometimes menu functions are duplicated on different menus so that you can find them more quickly. For instance you can find the command to add a new system on the Add menu as the New System command, (we write Add New System in this manual) and it is also there as System Add system. Either can be used, or indeed the Ctrl+N shortcut. File This contains the obvious Exit, Close, Save, Save As commands, (see page 94) as well as the Print, Print preview (page 163) and Exit commands, all of which are traditionally found on a program's File menu. In addition are commands to Merge Files, Save part of score and various Export commands which are amplified later in this manual (pages 94 and Chapter 22 on page 115 ). Set Here you can set various defaults such as the note length and stem direction.
16 Page 16 Music Publisher 8 manual Add Page Commands found here are for adding new systems, or clefs, time signatures and key signatures, tempo markings as well as Page Numbering (see page Chapter 28 Simple page numbering on page 159) and instrument change command (page 91). Here are found commands to define the page and stave size, headers and footers, and to refresh (redraw) the page. System This section covers adding a new system, (duplicated from the Add menu) changing the width of systems, and justifying and compressing the music on the current system as well as access to the System Construction Wizard (see page 221). Stave Deleting, Inserting and controlling the allocation of staves to systems (binding) are covered here. Goto Tools For moving to the top, end, and any given position in the score. See page 50. Transposition, undo, playback and other operations are found here - see page 147. Fonts Editing and defining your favourite fonts is found here - see page Saving and using your favourite fonts on page 56 Options Selecting this menu item leads to a dialogue box with a large number of options which the user can set and adjust. There are more details on this starting on page 136. User Help Here you can set your competence as a user. This cuts down on the help you will be provided with, as Help can be annoying when you become more competent. See page 11. Access the Tutorial, the Help System, the Tip of the Day, and the usual About dialog finds its traditional place here. The toolbars There are two toolbars, the one across the top has a number of button shortcuts on it which can save you time if you like using the mouse. The function of each is found with its tooltip or the Explain button (see page 10). (Note: if you have selected User level 4 then these tooltips will not appear).

17 Music Publisher 8 manual Page 17 Many of the buttons are greyed out and will not work at times. For instance the Go to Next Page button will be greyed out if the current page you are working on is the last in the score. The second toolbar is at the left side and contains the various drawing tools for entering text, lines, symbols, etc. This is new for Music Publisher 8 and if you are short of room at the left of the screen then you can revert to the previous appearance (tool buttons on the top toolbar) by right-clicking the toolbar and selecting Hide side toolbar. To restore, right-click the top toolbar and select Restore side toolbar. Fig 9 - removing and restoring the side toolbar Altogether there are over 30 buttons on the main toolbar. If you work with your video monitor set at low resolutions, or with Music Publisher in a small Window then you will not be able to fit all these buttons on one row, and they will flow over to 2 rows. This is inconvenient as it takes up more space so you can reduce the number of buttons on the toolbar see Smaller monitor screens on page 204. The contents of the toolbar will change as you work, depending on what you are doing. The plate We borrow the term plate from the old method of music engraving to describe the area where the music is formed. It is basically the paper without the margins, and this is what you see on the computer screen and what you work on. To see the appearance of the full page select Page Preview or press alt+f5. The plate area available therefore depends on the paper size and the margins: larger margins mean a smaller plate; smaller margins mean a larger plate. However in Music Publisher the plate area as shown also depends on the stave size. This is an important reference size used in the industry and is defined as the distance between the top and bottom lines of a 5-line stave. The program is designed so that the vertical height of a stave on the screen is kept constant: if you have a smaller stave size then you will find the plate becomes (apparently) larger, and if you have large staves you can get fewer of them on the same page, so the plate appears smaller. Compare Fig 8 showing staves of 0.3" height, with the same music on Fig 10 where 0.4" staves were set. Of course on a printout the stave size will be exactly what you have chosen. (The values of 0.4" and 0.3" are chosen to illustrate these pictures. A table of typical stave sizes is given in an Appendix on page 263.
: Fig 11 shows the relationship of the plate to the actual printed page.")

18 Page 18 Music Publisher 8 manual Fig 10 - the editing screen for 0.4" staves compare Fig 8 Remember that the plate is the usable area. This implies that you can put music or text etc to the very edge of the white area (the plate): Fig 11 shows the relationship of the plate to the actual printed page. This is the view of the music of Fig 8 given in the File Preview command: it shows in red the limits of the margins, and the central section is the plate. Fig 11: File Preview, showing the page layout The details of setting plate, margin, stave size and page size see Chapter 24 on Layout and formatting, page 121, and if you need to you can see the way your music will look with a preview - see The print preview, (page 163) and Fig 11 above.
19 Music Publisher 8 manual Page 19 The status areas At the foot of the screen you will see a status bar: Fig 12- the bottom of the screen The page tabs indicate the current page number (4 in this case), system number (4) and stave number (55) and the number of objects on this stave (73), together with the count of the pages, systems and staves. The two arrows at the end of list of pages 1 to 5 indicate that there are more pages than that in the document, and if clicked these will bring the page tabs into sight. An object is the basic unit which Music Publisher works with. See Objects belong to staves on page 22. There is a limit of 250 objects per stave: this is plenty - staves which are lightly scored might contain 40 or 50 objects; complex staves rarely exceed 150 objects. See page 134 for a comprehensive list of what constitutes an object.
20 Page 20 Music Publisher 8 manual 7. MUSIC MODE BASIC PRINCIPLES The use of the keyboard and mouse When using a word-processor it would be very slow to select letters or words from a menu or list. So of course the words are typed in from the keyboard, while the mouse and menu options are reserved for formatting, selecting options and copying blocks etc. So it is with Music Publisher. The notes and barlines (and one or two other things) must be typed in from the keyboard (unless you are running the Scanning Edition which enables you to take input from your scanner). Experience has proved that typing music in this way is much the fastest way of entering it. Objects other than notes and barlines which are not placed quite so often, such as clefs, key signatures and time signatures can be entered either from the keyboard, or from the Add menu. For a complete list of keystrokes see Error! Reference source not found. on page Error! Bookmark not defined.. Other occasional musical symbols such as fermata or fortissimo signs can only be placed by use of the mouse. There is a choice of around 200 free-floating symbols. See Adding musical symbols on page 83. Cycling through possibilities While there are only a limited number of note names in music (A to G), there are a great number of variations as to what these should look like, whether small or large, long or short and so forth. Consequently the program has a consistent cycling interface which may be explained by an example. If the key A is pressed in the Music mode, then a crotchet (quarter note) A appears on the stave. However at this point it is still only provisional, and so appears in grey. Since it is provisional, pressing A again does not add another note but rather changes the current A into a quaver (8th note). Press again and it shortens to a semiquaver (16th note), and so on. Press Shift+A (uppercase A) and the note lengthens in the same way. Suppose you now have the required note length. If you press the full-stop (period) key then the note becomes dotted. Press it again and the note becomes doubledotted. Again for triple-dotting. Yet again and the dots are removed.* All this takes place while the note is still grey to place it in the music you have to complete it (see below). * If you use double- and triple-dotting infrequently you can remove these from the cycle. See the Options Music menu section, page 139 and further information on note attributes on page 40ff. The double-dotting will still be available on the note properties menu.
21 Music Publisher 8 manual Page 21 This cycling behaviour is commonly used in Music Publisher, and offers a convenient interface without too many menus. The full list of keys available in Music Mode, and what they do, is given in Appendix G: Keyboard Shortcuts, page Error! Bookmark not defined.. There is also an option on the Help menu which takes you directly to the Keyboard Shortcuts in the Help system so that you can print these easily, and registered users receive a double-sided laminated card showing keyboard shortcuts. The completion keys Once you have your note in the right length, and with the right number of dots and all its other attributes to your requirement, you need to complete it. There are a number of ways of doing this: Press spacebar. In addition to completing the object this moves the cursor forward a suitable distance so that the next note or object can be placed. For more information about this distance see under Controlling the spacing of the music, page 121. Press Enter. This completes the object and leaves the cursor where it is. This is most useful for entering chords on one stem, as notes can be placed on top of each other to form a chord. For instance a C major triad can be entered with the keystrokes C <Enter> E <Enter > G <Enter> Press Tab, which acts rather like the space bar, but instead moves forwards to a previous object s position in the same system. It is particularly useful if entering parts (see below). Pressing PgDn or PgUp will also complete the object, and in this case the cursor is moved to the next or previous stave. Again useful for entering parts. You may hear a note at this stage: See Audio Feedback on page 177. The use of the Tab key To illustrate this, consider the following example where a hymn tune is being created: Fig 13 - lining up with the tab key
22 Page 22 Music Publisher 8 manual The soprano part has been entered with the note stems upwards. Now to enter the alto part the cursor was returned to the beginning of the stave, stem down selected, and by completing each note with the Tab key the cursor moves to the next soprano note so that the alto part will be placed perfectly under the soprano line. The same method would be used on the tenor and bass parts because the Tab key moves to the next notes in the same system, not just stave. Aligning notes If your notes have been entered out of alignment then this will give Music Publisher some problems in playback, and also in Neatening. So it s a good idea to align the notes. There are basically 4 ways: A. Put the mouse over a note and press Tab. It will move forward to the note.'s position The same principle applies to moving backwards except in this case the keystroke is shift+tab, commonly called backtab. B. Use block tool to put a box around the note and align the objects within it. See Blocks of objects on page 68 for further details on block mode. C. Use multiple-select mode to click the reference note, then after that any other note(s). Then use the alignment button on the toolbar to line them all up to the first note you selected. See page 64 on Multi-select Mode. D. Put the mouse over the one furthest left and press the Tab key: it will jump to the right to join the next note. Alternatively if you want a note to jump left then use Shift+Tab (also known as backtab). E. There is a command Fixup Note Alignment on the Tools menu which allows you to do align notes quickly if they are less than a certain horizontal distance apart. F. There is a new command (in MP7) which aligns notes on different staves. See Tools Align Notes by Time is explored on page 128. Objects belong to staves Since objects belong to staves you have to take care to put them on the correct stave. If you do not then you would find that free-floating objects such as fermata signs, dynamic markings (mf etc) or lyrics would not move up or down if you move the stave up or down. This requires care on your part to implement, and is emphasised in the sections below on adding text and other symbols to Music Publisher scores. Meanwhile, it may simply be observed that pressing the attachment toolbutton ( ) shows which staves all the loose objects are attached to for as long as it is depressed.

23 Music Publisher 8 manual Page 23 Fig 14 - showing the effect of the Attachments Button being pressed. The purple lines show which stave objects are connected to.
24 Page 24 Music Publisher 8 manual 8. MUSIC MODE DEFINING YOUR SYSTEMS When you first start to use Music Publisher you will be offered a list of pre-defined templates (you can add your own, see Templates on page 33) but if you select No Template then you will see a single empty stave, and you can build your own. The most visual way is to do this with the System Construction Wizard (see the Chapter on page 221). However we describe here the way of doing it manually, since this illustrates how the program works and also may be needed to make quick simple changes or create percussion staves or staves for fretted instruments ("TAB notation"). Building staves into systems Each stave contains information about how it is joined to the stave below. In this way staves can be formed into systems. The specific information each stave has can be seen on the General tab of the Stave Attributes and System Construction screen. When the I-cursor is on a stave access this by one of these methods: Press the Attributes shortcut ( ). Right-click the stave and select Properties. Press? when the I-cursor is on a blank part of the stave). Fig 15 - The stave attributes (General) screen t Once you have decided that a stave should be joined to the next one (the top left panel) then the method of joining is defined in the centre panel.
25 Music Publisher 8 manual Page 25 Aside: notice that the stave has a name: this stave name is very important to the way that Music Publisher works, it is used to track parts from one system to another as the score grows. You will see it used later. Staves may be braced (or not), bracketed (or not) or both and may be braced in two different ways. They can also have barlines going through the gap or not. Here is a sample, showing the interpretation of these terms: Fig 16 - Stave attributes in action This diagram shows the difference between square braces and curly ones:
26 Page 26 Music Publisher 8 manual Fig 17 - Curly braces and square braces Curly braces are almost always used for keyboard instruments or other instruments played by one person (such as the Harp) which require two staves to show the whole range of notes. Square braces can define more instrumental grouping, see Fig 16where the Violin parts could have been square-braced. Stave types You will see a box in Fig 15 at the middle left indicating which of three Stave Types are to be defined: Normal staves Drum kit As expected. Five lines are used for a variety of pitched instruments. Also known in Music Publisher as Percussion Stave. This can have any number of lines from 1 to 5 where each line and space does not represent a particular pitch, but rather a particular instrument. If you select this option then another tab becomes visible on the dialog which when selected enables you to define which percussion instrument is allocated to which stave position. Fig 18 - A percussion stave See Chapter 18 Special staves - percussion instruments on page 98.

.")
27 Music Publisher 8 manual Page 27 TAB staves Guitars and other instruments with frets sometimes use staves which visually show where a string is to be stopped, rather than the normal pitch. If you select this option then another tab becomes visible on the dialog which when selected enables you to define the pitches of the strings and the style of the TAB stave. See Chapter 19 Special staves TAB notation on page 104 for more details. Fig 19 - A typical TAB stave with the normal stave above The System Construction Wizard At this stage you may want to cast an eye over Appendix A: The System Construction Wizard (page 221). This is a more visual approach to creating a system either by amending an existing one or starting from scratch. The stave size A full description of this important point is made in chapter 24 on page 121. Suffice to say at this point that when you first start a score (with File New) - whether you select a template or not - you will be presented with a screen asking for the stave size: Fig 20 the initial Stave Size menu
 and selecting OK or pressing Enter gives the value in the Stave Size box. See the Appendix on page 263 for information about Industry-wide stave sizes.")
28 Page 28 Music Publisher 8 manual The options shown should be fairly self-explanatory, and clicking Abort (or pressing Esc) gives the default which you have defined in the first Options Desktop page (page 136) and selecting OK or pressing Enter gives the value in the Stave Size box. See the Appendix on page 263 for information about Industry-wide stave sizes. Other attributes of staves In Fig 15 we saw the General tab of the Stave Attributes form. Here it is repeated for your convenience: Fig 21 - Stave Attributes, General tab The other controls on this screen comprise of Page Break after stave If you want the next stave to appear at the top of the next page then use this control. It will not be available for staves which are not the last in each system. If you select this it will appear like this on your editing screen: Fig 22 - showing forced page break The page break is shown in pink as usual showing that it will not print out on paper.


29 Music Publisher 8 manual Page 29 Stave size The size of the stave. You can have small (cue-sized) staves, or normal size. Fig 23 - small stave example A hint: The shortcut to convert one to the other is the + sign on the keyboard. You cannot edit small staves: simply convert to large with +, then edit, then convert back with +. Invisible staves Sometimes you might want the stave lines themselves to be invisible. Tick the box. You could, for instance, create a cover page by using an invisible stave with page break after, and the title in large font attached to this stave. Replicate attributes This is an important control. It is shown in Fig 21 in the active (down) position. This means that when you exit the menu the values you have defined will not only be applied to the current system but also to all lower systems which are similarly constructed (ie with similar stave lines). The Sound tab Fig 24 - Stave Attributes, Sound tab
30 Page 30 Music Publisher 8 manual Instrument This is where the details of the sound playback of this stave are defined. There are two possible instruments per stave, those with stems up and those with stems down. If you click the top button (labelled All) then both instruments will be affected. Clicking the Stems Down Only will change only the stems down. Selecting either of these will provide the menu where you can define your instrument, see Fig 174 on page 172. Uniform volume Pitch If you wish an instrumental sound to ignore dynamic marks and the first-in-the-bar emphasis then you can tick this box. Note also that certain instruments will always have uniform volume, see Appendix J: General Midi instrument names on page 256. For full details of sound and playback see Sound output on page 168. Many instruments do not play at the pitch they are notated at. Examples are B flat instruments (either 2 or 14 semitones half steps lower than written) or some woodwind such as Descant Recorder or Piccolo which sound an octave (12 semitones) higher. Not forgetting the Double Bass at an octave lower. The box Transpose by allows you to define this transposition, and the buttons Octave Up, At Pitch and Octave Down are a quick method of placing +12, 0 and -12 respectively in the box. Relative Volume As the title suggests, this is where you can make a stave sound less than normal. Simply drag the volume slider. The Bar Numbering tab See Bar (measure) numbering on page 180 for full details of bar numbering. New Systems The command Add New system (with shortcut Ctrl+N) will add another system identical in spacing and construction to the last one. In addition the last clef and last key signature on each corresponding line of the previous system will be added. So it s not usually a good idea to create your systems before you start filling them just add them as you need as you go along with Ctrl+N and the new system will be filled with the current clefs and key signatures.
31 Music Publisher 8 manual Page 31 Barlines It is important to realise that only the top stave of a system contains barlines, the other barlines being drawn by the program using the stave attributes to decide how to draw them. The existence of the barline on the top only is emphasised in that the it only appears in black on the top stave, but in grey on the others. On the printout, of course, it will be black on all staves. Barlines are produced with the key, or for convenience, the / key may be used instead this does not need a shift to be pressed on most keyboards. Pressing one of these keys cycles through the possible types of barline which are available in the package: single double (thin-thin) repeat left repeat right repeat both way final double bar at end-of-score (thin-thick). As usual in Music Publisher, a completion key such as space or Enter must be given before the object is finally in place. Remember: you can place a barline when you are editing any of the staves, but it will be attached to the top stave of a system. This has important consequences when changing, moving or deleting barlines. Stave positioning The staves may not be in exactly the right vertical position for what you want to do. Moving them is very simple: you drag the stave up or down with the mouse. But you must press Ctrl before you press the mouse: when you do this if your mouse cursor is over a stave you will see the cursor change to a vertical up-and-down arrow. When the cursor is this shape you can move the stave up or down and when you release the mouse the stave will be redrawn in the new position. In addition all the staves below will be moved up or down. Fig 25 - the mouse cursor shape is a 2-headed arrow when moving a stave
32 Page 32 Music Publisher 8 manual Since moving a stave down could result in some staves dropping off the bottom of the page (everything below it moves too), you are advised to repaginate (see below) after this operation. This will mean that the computer has an opportunity to reallocate systems between the pages. Repaginate is on the Page menu and has the shortcut Ctrl+F5. Pages and paginating Music Publisher will always print a complete system on one page, and in addition it will put as many systems on one page as there is room for. Consequently, if a system will not fit one a particular page then it will be put at the top of the next during a Repaginate command. Repagination is the means whereby the program decides what systems to put on each page by considering the vertical extent of each system and whether it will fit on the space left below the last system. You can manually repaginate or the program will do it automatically when: Loading a file Previewing a file When the program repaginates it first looks carefully to see if all systems are safely on the page. If they are, it does nothing more. If a system stretches off the top of the page or hangs off the bottom then it will put stystem(s) on the next page and generally mess up your page structure. In order to make a particular system fit on the page you can repaginate after decreasing gaps between staves by one or more of these methods: move the top stave closer to the top edge of the plate (see above) move the staves closer (see above) make the top and bottom margins smaller (see page 121) make the stave size smaller (see page 123). If you want a particular system to start on a new page even if there is room for it on the previous (such as the beginning of a new movement) then you can flag a page break after stave to the last stave on the previous page. See Page Break after Stave above on page 28. Strong Repagination A normal repagination, above, will keep the separation between systems which you have chosen if they will fit on the page. So it will only move a system to the next page if it does not fit at the position you put it in.

33 Music Publisher 8 manual Page 33 Templates However it may be that you could get more systems on a page if you allow the program to move systems closer together and closer to the top of the page. In Music Publisher this is called a Strong repagination and if you select this with Ctrl+Shift+F5 or Page Strong Repaginate then the program will ask you for a spacing between the systems. This spacing will take into account low and high objects so there is no need to have it very large: the default value of 30 would give moderately close systems and 50 would give fairly widely spaced systems. However a value of 10 does not look too cramped you may wish to try this process several times to see how many pages it results in. When you select File New a list of currently-defined templates is offered to you: Fig 26 - a Template selection screen (contents will vary depending on what you have saved). Example This is a list of all templates currently in the Template folder, and selecting one will load that template staves, bindings and objects you may have defined but it will use the default page size you have set up. In other words, your templates contain information about the makeup of the instruments in your score but nothing about the stave size. If you want to save a particular size of stave as a template then save it as a normal file and load that file in to start your scoring session. You can add your own templates to the list which was prepared for you on first installation, and to save clutter you can delete templates you are never likely to use. Re-installing the software would replace deleted templates without affecting ones you have created. Suppose that you often write for violin and viola duet. On a clean score you could define two staves bound together exactly as you want, and including correct clefs and instrument names, but without key signatures or notes (see Changing the stave length on page 124).
34 Page 34 Music Publisher 8 manual Fig 27- about to save as template To save this as a template, select File Save as Template. You will be asked for a filename in a standard File Save As dialog box, and following this, a title by which the template will be known on the template menu, say perhaps Violin/Viola duet. This will be added to your template list in alphabetical order and whenever you select File New this template will be available. Selecting it will load the above score, but on a page whose size is determined by the default page size setting (see page 136). To delete a template, simply highlight it and select the Delete button on the Template Selection Screen (Fig 26). Note that it is normal musical practice to have the first system of a score indented from the left, with the names of the instrument(s) appearing on that stave. Consequently even if your template has the stave indented from the left, subsequent staves will be full-width.
35 Music Publisher 8 manual Page ENTERING MUSIC There are three ways of getting music into Music Publisher. 1. By entering from the computer keyboard 2. By entering from a midi keyboard (step-wise play-in) 3. By scanning in from a scanner (only available on the Scanning Edition) In this chapter we deal with the first. There are separate chapters on the others. General principles Clefs In the same way as a word-processor captures text and words by typing letters at the keyboard, rather than by selecting words or letters from a menu, so the user of Music Publisher types in the names of the notes etc at the keyboard. This makes it very fast to enter your music. There are also two other general principles, the first of which if you are reading through this manual you will have met already: the idea of cycling. In a large number of cases in Music Publisher, pressing a key gives a provisional object on the screen (in grey) and pressing the same key again changes the type of the object or some other of its characteristics. Keep on pressing the same key and after cycling through all the possible values the characteristic will return to the original. Sometimes pressing Shift+key will go backwards through the list, if the list is long. But however you peruse the list, you must press a completion key to place the object permanently on the score. This is the second general principle and has already been mentioned on page 21. It will be easier to understand in the context of each particular object. Press Home to put your cursor near the left edge of the stave. There are now three ways of producing clefs: Select the Add Clef menu item Press Ctrl+C (this is really just a shortcut to the above) Press the clef shortcut key Ctrl+Q. The first two methods give the clef attributes form:

 parts written in the treble clef but to be sung an octave lower: Fig 29 - Treble clef with octave down indication The third method of producing the clef is")
36 Page 36 Music Publisher 8 manual After defining the type of clef, its size (the small ones are intended for changes of clef within the stave) and octave indication, then a grey clef is placed at the position of the cursor on the screen. This now needs to be completed with one of the completion keys. Fig 28 - Clef attributes The octave indication is a small figure 8 placed either above or below the clef. It is most commonly used in tenor (singer) parts written in the treble clef but to be sung an octave lower: Fig 29 - Treble clef with octave down indication The third method of producing the clef is faster, and will appeal to the regular user. Simply press Ctrl+Q and a large treble clef appears in grey. Press Ctrl+Q again and it turns to a bass clef. Press again and it returns to a treble clef (unless you have the Option set to include tenor and alto clefs - see Options Music, page 139). Note that when producing a clef this way, the clef will be large if it is the first on the stave, or small if it is not, and no octave indication will be included, so if you want anything different you will need to place the clef with an Add Clef command. However you produced it you should then complete the clef typically with the space bar so that the cursor moves on a suitable distance to insert the key signature. Key signatures Again there are three ways of inserting a key signature: Select the Add Key signature menu item. Type Ctrl+K Repeatedly type the shortcut K, or its opposite Shift+K The first two methods give the key signature attributes dialog:

37 Music Publisher 8 manual Page 37 Fig 30 - key signature attributes Select the number of sharps or flats, and then whether they are sharps or flats, and then OK. Your key signature will appear, in grey of course, with the correct accidentals in the correct places according to the last clef defined on the stave. (If no clef has been defined, layout as for a treble clef is assumed). You can move the key signature left or right with and or clicking on the stave with the mouse before completing it with space. This moves the music cursor with sufficient clearance to the next object. Alternatively you can select your key signature with the cycling shortcut key K or Shift+K, and you can keep typing K or Shift+K to cycle through the keys in a flattening (K) or sharpening (Shift+K) direction. This will appeal to more experienced users as it is faster than selecting via the key signature dialog. However you insert your key signature, if you insert it on any stave of a system then the program will offer to place the key signature at the same place on every stave of the system. If you accept this it will still ignore the staves where there is already a key signature at this point. This is particularly useful when your score includes transposing instruments which will have different key signatures. The C major key signature If from the key signature (Fig 30 - key signature attributes above) you select the Number as 0, or type K, Shift+K as the key signature, then you will find that a single natural appears on the central line of the stave, and when you complete it will be shown in pink. All things on the stave shown in pink are never printed, and purple is known as as the non-printing colour
38 Page 38 Music Publisher 8 manual This key signature like all objects shown in this colour - will not appear on a printout, and this one natural key signature is really a place marker for a key signature s position in case the music is transposed in the future. If you are never going to transpose your music (for instance if you have a fixed-key instrument such as the Scottish Pipes) then you can quite happily proceed without it. Even if you omit it then Music Publisher will insert it if it needs it so you don t need to worry too much about this. Naturalising key changes An older style of music notation dictated that, when a change is made in the middle of a line of music from a flat key to a sharp key, then the key signature should have naturals preceding it: However, the modern style is to omit the naturalisation as being over-fussy and write For each key signature you can choose which style you prefer. By default you will not have the naturals in the key signature but you will be able to define them by ticking the box With naturals in key sig in Fig 30 above. Time signatures The time signature is best entered with the Add Time signature or Ctrl+T command. This produces the following dialog box:

.")
39 Music Publisher 8 manual Page 39 If you want one of the time signatures listed in Quick Set then simply click that and then OK. The common time time signatures are provided for in the upper box, and a central number time signature is selected by Single Number and the Upper Box. Fig 31 - Time signature dialog Samples of these are shown here: Fig 32 - Types of time signature An aside: the symbol, loosely called common time has come to be synonymous with 4/4, and the symbol, sometimes loosely called cut time has become to mean 2/2 (but is in fact also used to represent 4/2 and 8/2). A single figure in the central line refers to the number of breves (whole notes) per bar (measure). So a central 2 is the same as 2/1 and can be used interchangeably. If you require a key signature such as 7/4 which is not in the Quick Set box, then choose Other there and the upper number and lower number (7 and 4) from the Other panel. However you have selected it, choosing the required time-signature will provide a provisional (grey) time-signature in just the same way as clefs and key-signatures. And again you define a time signature on a stave in a system, then the program will offer to place it at the same relative position on every stave of the system, just as for key signatures. Should a time signature be required which is not on this list, such as 3/3 or 16/12 (and I have heard of modern music with these!) then you can drop the symbols onto the stave carefully in from symbol mode, and then copy to the rest of the system using block copy. Music Publisher printout will not care about this, but there may be some problems on playback when the number of beats in a bar is not what Music Publisher expects.


40 Page 40 Music Publisher 8 manual Tempo markings Simple tempo markings such as Allegro etc can be entered in text mode (page 51) but for the more complicated exact tempo indications such as you should use Add Tempo. Selecting this will give a screen and result as on the top of Fig 33 below once you have defined the length, type and the tempo in notes per minute. Should you require a change of tempo then select Relative in the Tempo dialog and this produces the tempo change shown. There is a third type of tempo instruction but it is used to perform changes of tempo in playback and never appears on paper as a number. It is used when you indicate rallentando or accelerando etc. Text describing these tempo changes should be placed over the top stave of a system. See Tempo changes (page 170) for more details. Both these tempo operations will affect the Playback provided Auto is selected in the Tempo box (page 169).


, and its position on the stave will be either the nearest to the centre line, or if you already have music on that stave,")
41 Music Publisher 8 manual Page 41 Percentage change. This type is always invisible. It is used to indicate changes of tempo which do not appear on the paper. Fig 33 - the three types of Tempo screen Notes Note that the point at which the tempo is changed is governed by the position of the = sign in all cases. The note length which appears first will be determined by the current default, which on program start is a crotchet (quarter note), and its position on the stave will be either the nearest to the centre line, or if you already have music on that stave, the nearest to the previous note you entered. Pressing the same key again will turn it into a note of half the length, eg pressing a, a produces a quaver (eighth note), and a, a, a would be a semiquaver (16th note), etc.
42 Page 42 Music Publisher 8 manual Pressing Shift+key turns it into a note of double length, eg a, Shift+a would give a minim (half note) and Shift+A Shift+A a semibreve (whole note). Here is a complete list of the active keys which can be used while a provisional note (grey) is on the screen: 1-8 turn the note to a different length: Key British note name American note name 1 Breve Double whole note 2 Semibreve Whole note 3 Minim Half note 4 Crotchet Quarter note 5 Quaver 8th note 6 Semiquaver 16th note 7 Demisemiquaver 32nd note 8 Hemidemisemiquaver 64th note Table 2 - British/US note names move the note up or down an octave move the note right or left (as with any provisional object). To move faster, you can use Ctrl+ and Ctrl+. (backspace key) if the note is a quaver or shorter, this will produce a beam between the current note and the previous quaver whose stem is in the same direction. The duration of the note will tell the program how many beams to use in this operation. If the note is already beamed, pressing the backspace key will remove the beam.. (full stop/period). Add a dot to the note. Pressing. a second time will remove the dot, unless the Option Music Dots: include double and triple is set in which case pressing. will cycle through the four cases. a-h change the pitch of the note to the nearest new note name (H=B) P change the stem to down, and also the default to down. The letter P is reminiscent of a note with stem down. This also changes the default stem direction (see the status bar at the bottom left) so that all subsequent notes are stem down by default. J I change the stem to up. (The letter J is supposed to be reminiscent of a note with its tail up. Well I did my best ) change the stem to automatic. The stem will be made to go up or down depending on where you place the note within the stave.
43 Music Publisher 8 manual Page 43 O (letter O): the notes have no stems at all. Z Make the note into a rest. See Rests below. or > This cycles around a set of emphasis marks: Fig 34 cycling through emphasis marks (apostrophe) Mark the note as staccato. A second press will make it staccato at the tail end, 3rd and 4th presses produce staccatissimo, at each end. T/t Tie the note to the previous note at the same pitch, regardless of stem direction. If Shift+t is pressed (ie capital T) then the tie is overhand, if the shift key is not pressed, it is underhand. A second press of a t will remove the tie. U/u Slur the note to the previous note which has a stem in the same direction. This is an alternative to T/t as the two cannot be used together. Like the tie, the uppercase gives an over-hand slur and the lowercase an under-hand. If the slur is not exactly the shape required then the alternative method of creating one is to use curve mode (see pages 71 and 78) or try flat curves below. = (Underscore). If the note has a slur or tie then this will make the curve shape flatter, or if already flatter will make it normal. See Curves on page 78 for more details about flat curves. 0 (number zero) This alters the size of the note, using the usual cycling approach. There are two styles for the notes, normal and small. Small notes are for cues in parts and grace notes or appoggiatura. Like J, O, I and P, this command leaves the default style at this value. It is likely that after one grace note you want to put others in which are also small. % Convert the note into an acciaccatura (slashed grace note). Press again to undo. Ctrl+X Make the head an x-head. Press again to undo. R/r Add a stem tremolo to the note. Again this is a cycling command.? This is the general key for obtaining a form relevant to the object s attributes, and in the case of a note allows all the above attributes. See Appendix C: Note attributes on page 221. Typing? is equivalent to right-clicking any object and selecting Properties. Much faster!
44 Page 44 Music Publisher 8 manual Rests The key which produces a rest is Z (zzz=asleep, see?). As with notes, repeated pressing shortens the rest, or Shift+Z lengthens it. Also the keys move it not an octave in this case, but one space on the stave should you require the rest in a non-standard central position. The keystrokes from the above list which are relevant to rests still work, such as. (period/full stop) to make it dotted. Multi-bar rest One special type of rest is the Multi-Bar Rest. This is entered most easily with Add Other Multi-bar Rest or by its shortcut Ctrl+Shift+Z. The music cursor must be in an empty bar and if the bar is indeed empty then the program will ask how many bars to enter and place the symbol at the centre of the bar concerned. Fig 35 - a multi-bar rest Accidentals There are two distinct ways of making accidentals. You can create them as an attribute of the note or add them by themselves. Accidentals as an attribute of the note The long (but obvious) way Once it is formed, right-click the note, the popup menu will appear. Move the cursor to the Accidentals item and a submenu will appear. Simply select the type of accidental you want:
45 Music Publisher 8 manual Page 45 Fig 36 - adding an accidental to a note. (You will only see the quarter-tone accidentals offered if you have enabled quarter tones for this score. This is on Options Score Allow ¼ tones) The short way Again put the mouse over the note but now press one of our standard keystrokes for accidentals: N, S or V (natural, sharp, flat). If you want a different accidental then choose the right-click way. Independent accidentals Pressing the key # will produce a single sharp on the central line of the music. Now press a note name (A to G) and it will jump to the required pitch. You can the up and down arrow keys to change the octave, just as for notes. The keys which are active during formation of an accidental are: # Cycle through the three most popular accidentals. S Turn the note or accidental into a sharp sign. Pressing a second time will turn it to a double sharp. V Turn the note or accidental into a flat sign ( V points downwards to help you remember this). Press a second time will turn it to a double flat. N Turn the note or accidental into a natural sign X Turn the note or accidental into a double sharp sign W Turn the note or accidental into a double flat sign ( W = 2 V s is how you remember it) Q (If the options for this score allow quartertones see Quarter tones page 201) cycle through the four quartertone accidentals.

46 Page 46 Music Publisher 8 manual 0 (number zero) change the size of the accidental. Use small accidentals for small notes and large accidentals for large notes. Alternatively you can form a note first then convert it to an accidental: For instance, if you press A then a note A is formed. But before it is completed, press # and it turns to a sharp. Pressing # again and it becomes a flat, then a third press makes it a natural sign, and so on. The accidental is formed some distance to the left of the note so that completing the accidental with Enter leaves you in the default position to type the note to which the accidental referred. Alternatively after forming the note you can press S to make it a sharp, just like the list above. Accidentals are objects in their own right The accidentals are not attributes of the note but symbols in their own right. While you can add them as attributes, they remain individual objects so you can put the mouse over and delete or modify them. The set opposite were placed automatically by the program, but you could adjust these if you wish simply by dragging left or right. Fig 37 - showing offset placement of accidentals in a chord Here is the popup-menu which you will see by right-clicking an accidental. The quarter-tone items are only offered if the score is quarter-tone enabled. (See Quarter tones page 201.) Fig 38 - accidental popup menu
47 Music Publisher 8 manual Page 47 Barlines Important note: it is quite feasible to copy accidental signs off the symbol mode menu and drop them on your score. But if you add accidentals in this way then the program will not be able to transpose them if the score is transposed. They are just dead symbols lying on the page. Do not use this method of placing accidentals on the music except for special reasons. Since barlines can extend across a number of staves, then the barline has been defined as existing only on the top stave. For this reason, even after completion it appears in black only on the top stave. The other staves show it only in a lighter grey to emphasise this point. This becomes important when trying to change the barline in Edit Mode (Altering existing music, page 62), as you will find the bar line only when editing the top stave. There is only one attribute to a barline: its type. Music Publisher caters for six styles of barline: normal; double; repeat mark left; repeat mark right; repeat bar both; end section as shown here Fig 39 - barline types Whether a barline continues through the gap or not is a characteristic of the stave above the gap. See Fig 16 - Stave attributes in action on page 25.
48 Page 48 Music Publisher 8 manual 10. MOVING AROUND YOUR SCORE The screen and the page With many Windows programs - for instance a word-processor - the screen resolution of your Windows system dictates how much of the page you can see at once. Music Publisher is the same, but here the height of the stave which you have chosen also has a profound effect. When Music Publisher 8 is delivered to you it starts with a page size that depends on the country your computer is set to: for the US and Canada the default size is Letter Size, 8½ x 11, otherwise it is set to A4 (8.27 x ). Both are initially defined with ½ margins all round and with this paper size and stave size then you can just about see the full page width with a screen resolution of 800x600 pixels (dots) or higher. If you have a screen which is 1024x768 pixels you can just about see A4 paper (for instance) in Landscape mode, or down to a stave size of ¼ (6mm) in Portrait mode. The music cursor The music cursor (not to be confused with the mouse cursor) is by default an I- shaped blue mark aligned at the current position on the current stave, and this is where music, clefs etc would be placed if you put them on the music. (See Options Configure Colours in the chapter on Options on page 134 for the way to change the shape and colour of the music cursor.) You can change the position of this cursor in a number of ways: Press the arrow keys to move along the line. You can enhance this movement by adding Ctrl as you press the arrow key. Press space to move a distance set by the spacing gap (see page 121). Press tab to move to the next defined note on the stave. (Strictly, the next tab point a point at which a note is defined on any of the staves making up the system. Press shift+tab to move to the previous tab point. Shift+tab is also known as a backtab in Windows parlance. Backspsace can also be used to move to the previous note or tab point. Backspace is the left-pointing arrow on a UK/US keyboard just above the central Enter (Return) key. Home and End move the cursor to the left- and right-most usable positions on the stave. The Home key leaves the cursor just right for a clef position. Ctrl+Home moves the cursor to the extreme left edge of the stave.
49 Music Publisher 8 manual Page 49 Ctrl+End moves the cursor to the end of the largest stave which would be possible with this size plate. Press or to move to the previous or next stave on the page, if there is one. For these to be effective you must not have a provisional symbol which you are creating - if it s a note then it will cause the note to jump up or down an octave! PgUp and PgDn also move to the previous or next stave, but if you are defining a provisional symbol then this will complete it before moving. Ctrl+PgUp will move to the first stave of the previous system. Ctrl+PgDn moves to the first stave of the next system. The cursor shape Scrollbars? The cursor can be one of three shapes: I-shaped, Box-shaped, or X-shaped and in various thicknesses and colours. See Options Configure Colours in the chapter on options on page 134 to change the cursor. Music Publisher has more in common with drawing packages or photo editing packages than a word-processor. Consequently the normal way of running the program is not to have scrollbars enabled in the Options Configure Desktop on page 134. In such packages the 'paper' on the screen can be dragged with the mouse. In Music Publisher you can do this but you need to press the Ctrl button first. See below (marked paragraph '4') for full instructions. Other than this automatic way there are many ways of moving around the screen in Music Publisher, and these can include the traditional scrollbars along bottom and right side of the score. However, these take up room and you may prefer to hide them and use the alternative methods which are always available whether or not you have scrollbars available. You can remove or add scrollbars with the option on Options Desktop on page 136. The full list of ways of moving around in Music Publisher are: 1 Automatic: as you select more staves, eg with PgDn or PgUp then your viewpoint will scroll into place. 2 To force the screen to move, you can use the mouse wheel if you have one. This moves the score up and down as you would expect, but you can also move left and right by pressing shift while you use the wheel. 3 If you have a 3-button mouse then the middle mouse button can be used for dragging the paper around and so seeing different sections of the page.
50 Page 50 Music Publisher 8 manual 4 As mentioned above if you have a 2-button mouse then pressing the Ctrl button and dragging with the left mouse button accomplishes the same effect. However you will need to place the mouse on an empty area of the paper, ie not over a stave because this would drag the stave rather than the paper. As soon as you press the Ctrl button the mouse cursor changes according to the function you are going to use. For dragging the paper it will be a flat hand; for dragging the stave it will be a up/down arrow: Fig 40 - showing the difference in cursors between dragging the paper and dragging the stave Moving further than the current page If you wish to move further than the current page, then there are icons on the toolbar which will move to the next or previous page. For even longer movements, you can click the tabs at the bottom left of the screen (Fig 12 on page 19) use the Goto menu which allows you to specify the Page number, the System Number, the Stave Number or the Bar Number of your target position. Or simply select Top or End. If you know a particular piece of text to find, you can use Goto Find (text) which will find the location of a particular textual element. Fig 41 - the Find Text menu Altertatively the following is a list of shortcuts for jumping around the score: Alt+PgUp/Dn moves to the previous/next page Ctrl+PgUp/Dn moves to the previous/next system Shift+Ctrl+PgUp/Dn move to the start/end of the whole score.
 Chord Names (Shift + F9) Lyrics (Ctrl + F9) The three tool buttons on the tool column.")
51 Music Publisher 8 manual Page ADDING TEXT What is 'text'? A music publishing system would be of little use without the ability to put words in. Music Publisher allows this with three tools: General Text (F9) Chord Names (Shift + F9) Lyrics (Ctrl + F9) The three tool buttons on the tool column. General Text The text tool can be invoked with the button as shown above, or its equivalent shortcut F9, or even the more convenient (quotation mark) key on the keyboard. When Text Mode is started, the current stave turns purple and a purple 'string' joins the cursor to the stave. This is very important. It means that the text you are about to place will be attached to this stave and be part of it. If you move the stave or justify it the text will move too. If this is not the stave you want the text to be attached to then you can press PgDn or PgUp to re-attach the purple string to another stave. The cursor also turns into a pen nib and you can then type on the normal keyboard whatever text it is which you want: Fig 42 - entering text As always, the text is in grey until fixed in place by completing and thus finishing with the text tool. Once placed, or while still placing it you can place the text wherever you like by dragging it with the mouse or cursor keys. However remember that it is always attached to the purple-shown stave and it would not be a good idea to place text far from its parent stave. For instance the text would not move when you move the stave it it is not attached to the best stave. To assist you in remembering this when you are at User level 3 or below then the text is limited in the distance it can go from the owning stave.
52 Page 52 Music Publisher 8 manual In addition to the normal keys used for typing, the following keystrokes have special meanings in text mode: ^ Ctrl+B Inserts a major 7th symbol ( ) Make the current text bold, or if bold already, then normal. Ctrl+C Insert a copyright symbol Ctrl+D Insert a diminished chord symbol ( ) Ctrl+F Ctrl+G Ctrl+I Ctrl+M Ctrl+N Ctrl+U Ctrl+S Ctrl+[ Inserts a flat symbol Insert a half-diminished chord symbol (Ø) Make the current text italic, or if italic already, then normal. Move the text so far typed horizontally into the middle of the paper. This is very useful just before you complete a title for the music, or to centralise a footnote etc. Ctrl+M does not complete the text so you can still carry on typing and recentralise again with Ctrl+M later. Insert a natural symbol Make the current text underlined, or if underlined already, then normal. Insert a sharp symbol As with Microsoft Word, this key decreases the text size by one point, and Ctrl+] increases it. Ctrl+space Inserts a breaking space. Words separated by non-breaking spaces will be kept together (such as titles) boxed as one (see attributes, below) and generally treated as one object by Music Publisher. However if you do want the words to be divided up into separate words so that you can push them individually into position later, then use Ctrl+space. The reverse interpretation is used in Lyric Mode where Ctrl+space creates a non-breaking space. See Liturgical chants on page 54 below. Esc Enter Abandon the text currently written. The words are not saved. Complete the text in the current position. Ctrl+Enter Complete text, but open a new text line of text with the start position just underneath the last piece of text. This is very useful when you have a lot of text to place on the stave, and is particularly handy for several verses of a song or hymn: but be aware that all the text will all be attached to the stave you started off with. However, as mentioned next, PgDn and PgUp can be used to attach to the next or previous stave even without leaving text mode if you use Ctrl+Enter.
53 Music Publisher 8 manual Page 53 PgUp/PgDn The attachment stave will be changed, so that the purple-ness and the string will be the next or previous stave. Insert This is a special 'dead key' which enables you to enter characters with accents, or other characters which are not on your UK or US keyboard. See Appendix H: Text mode special characterson page 253 which contains an extensive list of special characters which you can type using this method. It is very convenient by users who have to type characters in a language that their keyboard is not set up for. It is by no means uncommon to write lyrics in French, German, Cyrillic Lyrics When you use the Lyric tool (Ctrl+F9 or with the tool for lyrics), then the text cursor will jump to a point below the first note on the stave you are working on. And as you type the word or syllable is moved to remain central under the note. The font which the system will use is by default the first of your Favourite Fonts whose convenience name starts with the word Lyric. When you press space then this word is completed and the cursor moves to the next note. In musical lyrics, a word which is slurred over two or more notes is called a melisma and is always notated with one or more underscores ( _ ) at its end. So any word with an underscore as its last character will be aligned in a different way with the notes. Music Publisher does this automatically; as soon as you press the underscore key then it creates a suitable number of underscores to stretch to the next note. To go to the note beyond (as on line 1 of this example) the melisma line is extended. It is a rule of notation that the melisma line should extend just to the right side of the last note encompassed. Fig 43 Automatic alignment of melismas and text in Lyric Mode If you press the hyphen key as you are typing (as after long in the example above) then the hyphen will be placed midway between the syllables as the rules require.
54 Page 54 Music Publisher 8 manual Hyphenation If you are not sure where hyphens go in musical lyrics then Music Publisher can help you. Simply type something convenient but using the correct spelling and afterwards you can tidy up with Tools Hyphenation Check. See the section Tools Hyphenation check on this topic on page 154. Liturgical chants If you need to put more than one word under a note, then rather than pressing space to finish a word, press Ctrl+space. This keystroke is similar to MS Word, and called a "non-breaking space". Chord names This is similar to Lyrics except that the words are by default written over the stave rather than under it (see below) the font used by default is the first Favourite Font which starts with 'Chord'. underscores and hyphens have no effect the text is immediately given the attribute of Transposable. While the cursor moves over the stave initially, if you move it down to start the Chord name then all future starts of Chord Name Mode will offer this position to start. Transposable is an important text attribute and shows up in green on the screen (printing in black of course!). Text which is transposable will change when a transposition to other keys is performed, and will also signal to the program that playback can produce an appropriate chord. See the section on the A7 button on page 175. The text toolbar When you enter text or lyric mode the normal toolbar is replaced by one specific to this mode. The symbols on it are: These three keys change the text attribute, making it respectively transposable, immobile and boxed. See Text attributes below, page 59 These two buttons complete and abandon the text creation. They are directly equivalent to pressing Enter and Esc.

55 Music Publisher 8 manual Page 55 This key places the currently forming text in the middle of the page. It is useful for creating titles and headings, and is equivalent to pressing Ctrl+M. Select a font from the favourite fonts screen. See the section on favourite fonts below. These three keys make the text bold, italic, and underlined respectively. They can be used independently of each other and will appear depressed when in action. They are equivalent to using Ctrl+B, Ctrl+I, and Ctrl+U. This button gives access to the full font selection screen. Allows editing of the favourite fonts. Saving and using your favourite fonts Font menus can be tedious to change, so Music Publisher allows you to choose your 16 most used fonts. More than this should be regarded as too fussy. Music in particular looks better with a minimum number of font styles. Selecting any of the numerous menus labelled as such and buttons indicating favourite fonts ( ) you will see a screen similar to this: Fig 44 - The Favourite Fonts screen This screen will vary from that here in the titles you give for the fonts, the screen title ( Edit or Select ) and even the spelling of favourite if you have the US language option selected. We aim to please!
56 Page 56 Music Publisher 8 manual The fonts are listed by title and are shown in the style in which they appear, ie including bold, italic or underline attributes. There are 7 on the left half and 9 on the right to allow you room to see the larger fonts which you should place in the first 7 positions. From this screen the following operations are available: If your title on this screen is Select Favourite Font then you can select it by simply clicking on its name or typing the letter to its left. If the title is Edit Favourite Font then clicking on it will allow you to change what the font is actually defined as. This depends on what command you used to start the favourite fonts screen. To change its title (eg from Font 12 to Composer ), right-click the name and a box will appear where you can do this. To find out exactly what the font is defined as, let the mouse hover over the font name and the definition will appear. See Fig 44 above, showing that the font which has been called Chord Symbols is actually Arial size 14. What fonts should I use? TrueType fonts work very well. Fonts marked as Screen Fonts, Printer Fonts or Vector fonts will be less successful, so if in doubt experiment on a trial printout. The success of your trial will also depend on the stave size as this reflects the magnification factor used. But remember that if you are giving your music file to another user of Music Publisher you will need to be sure that they have the same fonts installed on their computer. As a general rule the TrueType fonts shown in Table 3 below will be found installed on Windows systems:
57 Music Publisher 8 manual Page 57 First supplied with Windows 95 Found on absolutely all Windows systems Supplied fonts (often with variants, ie bold and/or italic): Arial Times New Roman Modern Courier New Internet Explorer 4 Almost guaranteed to be found on all systems Andale Mono (IE5) Arial Black Comic Sans Impact Verdana Supplemental pack for IE4 Found on pretty much all systems Windows 98 Microsoft plus! For Windows 95. You re pretty safe to use these too. Trebuchet Georgia Monotype Book Antigua News Gothic Abadi MT Calisto MT Century Gothic Copperplate Gothic Lucida Console Lucida sans Lucida Calligraphy Lucida Handwriting News Gothic MT OCR Tahoma Westminster Table 3 - Reliable fonts to be used Windows XP introduced more fonts but the only extra interesting one for music use is probably Palatino (as used in this paragraph).
58 Page 58 Music Publisher 8 manual Windows Vista gave us a splendid new set of fonts all beginning with C! - (this manual has its main text set in 'Cambria') but sadly these should be avoided if you expect to share your source scores with others who may not have Vista. 1 However if you are distributing your music in PDF format then this is no problem. See the section on PDF export on page 118. The table above should be quite sufficient for musical use, and including fancy titles. Especially if you take note of the normal standards for font use in music which are in Table 4 below. 1 Even for Windows XP users the Vista fonts can be downloaded from the Microsoft web site by installing the free Microsoft Office Powerpoint Viewer when you will find Cambria, Consolas, Calibri, Constantia, Candara and Corbel have been installed too.
59 Music Publisher 8 manual Page 59 Usage Font Example Lyrics Composer, arranger, lyricist Times New Roman or Arial according to taste For Vista users, Calibri uses exactly the same space as Times NR but is a non-serif font. 2 Times New Roman, slightly larger than lyrics King of kings! (TNR) King of kings! (Arial) King of kings! (Calibri) Arr: B R Hill, 2006 Tempo marks Times New Roman Bold Allegro con moto Font size Fingerings Chord names Arial, smaller. (Note however that there are good fingering symbols in Symbol mode to drop on the music) Arial or Times New Roman, larger than lyrics. Bold according to taste. Table 4 - Recommended fonts 2 5 Am7 Am7 Am7 Am7 The best size to use is about size 12 to 14 for lyrics and general text, but this will depend on the font. Note that unlike most applications, in Music Publisher the font size is not constant but is relative to the stave size. So if you change your stave size at any stage then the actual text size will change with it to avoid a great deal of reformatting work. However, it does mean that Music Publisher s Arial size 12 is not necessarily the same as MS Word s Arial Size 12 when printed out. Text attributes When text is being formed, the three buttons certain attributes. These are can be used to give the text 2 If you are intending to print only then of course use whatever font you wish. The same applies if you are creating files for others with the File Export As PDF document.
60 Page 60 Music Publisher 8 manual Transposable If you transpose the music, then any text marked with this attribute will be altered. All capital letters in the range A to G will be altered. Thus chord symbol text such as Bm7 will transpose to Am7 when the music is transposed down a tone. Furthermore chord names can trigger a playback of that chord when the music is played or saved as a midi file. See the section on the A7 button on page 174f. Immobile Boxed Text so marked will not be moved horizontally if a compression or justification of music is made with the compress or justify commands. This is used for titles which would be attached to the top stave and remain where you first designed them. Note, however, that immobile text does move vertically with the stave if you move the stave up or down. Text can be boxed to provide extra emphasis, or rehearsal marks. Note that each word would be individually boxed unless separated by a non-breaking space. Keyboard shortcuts for text attributes The following keys give quicker ways of allocating commoner attributes. While typing text: Ctrl+B Ctrl+I Ctrl+U Bold Italic Underline Ctrl+M Centralise text Table 5 - Text attribute shortcuts in text modes See also Error! Reference source not found. (page 249) for other keyboard shortcuts while typing text.
61 Music Publisher 8 manual Page 61 When editing, ie with the mouse over and the text turned red: M Y T X G Immobile Invisible Transposable Boxed Global Table 6 - Special attributes for all objects A note about large and small fonts Windows has the ability to change screen resolutions (eg 1024x768, 1280x1024) and within each to define what size of fonts are in use (Large or Small indeed you can define your own size small is 100% and large is 125% and you can define other sizes). These settings are found by right-clicking the Windows Desktop and selecting Properties Settings (and possible Advanced in some later versions of Windows). Small and Large Fonts cause problems for Music Publisher as with Large Fonts the on-screen text will be larger than if it were Small Fonts. This is no serious problem as long as you keep your work on one system. However, should you be using Large Fonts and send your Music Publisher file to another user who has Small Fonts set then without compensation that user would see smaller writing than you do. To attempt to cope with this, Music Publisher records within each saved file the size of fonts (Small/Large) on the system which created the file. And when loading the file it checks against those currently set on the system. If there is a discrepancy it will issue a warning and offer to compensate by changing the actual font sizes Arial size 10 to Arial size 8 etc). But this procedure can still give errors since only whole font sizes can be used. For instance, converting a Large Font size 10 to Small Font it needs to multiply by 1.25, giving 12.5 which rounds up to become a font size of 13. Consequently some long words might be too long for the space allocated. This is a problem which is basically intractable when using text in graphics programs, and the best advice is to use Small Fonts in your Windows setup if you ever expect to send Music Publisher files to other users as this is the most popular setting.
62 Page 62 Music Publisher 8 manual 12. ALTERING EXISTING MUSIC Undoing The simplest way of correcting mistakes is by making use of the Undo facility. As you work in Music Publisher, a temporary file on your hard drive records your actions. To perform an Undo operation, select menu Tools Undo, or the equivalent shortcut is Alt+Backspace, in common with many word-processor systems. Ctrl+Z also performs the same task, in common with many graphics packages. There is also a button on the toolbar to Undo. Editing single objects When you need to make changes to an existing score you need first to enable editing. This is done with one of the following: Mode Lock/unlock for editing Tools Lock/unlock for editing Pressing the shortcut key F10 Selecting the padlock toolbar button When editing is enabled the padlock button appears depressed and now when you move the mouse cursor over an object then that object turns red and the mouse cursor changes to a pointing finger (see the first picture in Fig 46 below). This shows it has the 'focus' of your attention. At this time you can do a number of things: 1 Dragging and Ctrl-dragging Drag the object left or right with the left mouse button. Many objects will not move up and down of course, such as notes and clefs, but some objects such as text or symbols are free to move up and down. But if you press shift while you are dragging this keeps the object moving only vertically or horizontally and is very useful for (eg) moving text into place without allowing it to wander up or down. Some objects respond in special ways to holding the Ctrl key down whilst dragging: (a) If you drag a barline with the Ctrl key down then the contents of the previous and next bars are moved in proportion also. When the mouse moves over a barline and Ctrl is pressed then the cursor is a 2-directional arrow:
63 Music Publisher 8 manual Page 63 Fig 45 before and after dragging the barline with Ctrl pressed (b) If you drag a note in a chord with Ctrl pressed then the whole chord moves. If you don t have Ctrl down as you drag then only the one note moves. Note that it only moves horizontally, to make a note move up or down you need a different command. In addition if the note has lyrics underneath it then the lyrics will move left or right when Ctrl is pressed with the drag. (c) If you drag text up or down with Ctrl pressed then any text at the same height is also moved up or down. This is particularly useful for moving a whole line of lyrics up or down, and may be used to even up irregularities in the alignment of such lyrics. First put the mouse over the lowest word and press Ctrl Now drag the mouse up, keeping Ctrl down. As it ascends it 'collects' another word. and another Finally all are collected and can be moved to a better position.

64 Page 64 Music Publisher 8 manual (d) If you press Ctrl when moving a time signature left or right then all the time signatures will move with it. The same feature applies to dragging clefs or key signatures. 2 Press the right mouse button You can press the right mouse button and a popup menu appears. ASIDE: This is always a very good idea in any Windows program when you don't know how to accomplish something: Just RIGHT CLICK SOMETHING RELEVANT! Fig 46 - editing the time signature : first place the cursor over, then press right mouse button When this appears, the contents of the popup menu will depend on what sort of object is selected and for some objects the commands can be quite extensive. But all will have a Properties entry and this is most useful. 1 You can press Del to delete it (or of course it is on the popup menu). 2 You can press alt+ or alt+ to move the focus to the previous or next object. This is useful in complex parts of the score when it is difficult to click on the object you require. Small (cue-sized) staves Note that you cannot edit objects on small staves. First make them large and then edit - simply press the keyboard shortcut + to toggle the size of stave between small and normal.
65 Music Publisher 8 manual Page 65 Multi-select mode: selecting a number of objects at once If you press Shift whilst clicking on objects, you can select many objects at once. This is most useful when you want to do the same thing to each one. This is similar to the equivalent Shift+click command in Windows list dialogs. As each object is selected, it turns blue. (To unselect it, click it again). And when the first object is selected in this way a new toolbar appears and the buttons available are as follows: Delete the objects Invoke the attributes screen relevant to the object type. If there is more than one object type selected then a menu will appear asking you to choose which attribute screen you see. See Fig 49 - selecting the objects to modify below on page 70. Cross-stave beaming: this is a special key for beaming together notes on separate staves. First select two quavers (or shorter) on adjacent staves in this multiple selection mode, and then invoke this function. The same button can be used to break such a cross-stave beam if it has already been formed. This button will not be available unless stringent conditions are met, ie the notes must be quavers (8th notes) or shorter, and they must be on adjacent staves and these staves must be bound together in the same system. This is a special shortcut to make a set of notes into a triplet. It will not be available unless the notes selected form some type of threesome, eg 3 quavers, 2 quavers+2 semiquavers or crotchet+quaver [3x8th notes; 2x8th notes+2x16th notes; quarter note+eighth note]. This function simply makes the notes in question sound at two-thirds of their normal length. It only has a meaning in the context of sound generation. If you are not intending to play back your music then this operation does not matter, although you should be aware that a check of the bar lengths * will give an error if you don t tell Music Publisher that the triplets are shorter notes. As triplets, but for quintuplets. * Bar length checks are performed either by Tools Check bar lengths or by right-clicking a bar and selecting Check this one bar length.
.")

66 Page 66 Music Publisher 8 manual Insert tuplets of any length. The way that Music Publisher allows you to put notes where you wish can be confusing if you want to insert triplets immediately against quintuplets (or any larger numbers). Suppose we want to insert three quaver notes on the stems-up notes against 5 semiquavers on the stem down. The pitch of the notes is not important because it can be changed later. Shift-click the two stemdown notes and click the button. A small menu appears asking for the number of notes. Select 5 for quintuplets and and press OK. Four notes equally spaced have been inserted. (The notes are shown blue because they are marked as having a duration different from what they are drawn as.) Do the same with the two upper notes, using 3 for triplets: Finally you can alter the notes and their pitches to become what you want to see. The point of all this is that the 2nd triplet appears before the 3rd quintuplet and so on. Maybe this wasn t hard but do you know the positions if you are putting 11 notes against 15? Shift-click two notes, possibly at a distance, and you can place a slur between them with this button. The notes must be on the same stave. If you wish an overhand tie then press shift while you are clicking: note that the icon changes too.

67 Music Publisher 8 manual Page 67 When the two notes selected are adjacent and of the same duration, with stems in the same direction then selecting this button will produce a dialog asking for the length of the tremolo, eg quavers, semiquavers etc. See Fig 260 on page 238. This option is used for creating multi-bar rests from music with many normal bar rests. See the chapter on page 186 on Part Extraction. Join two curves. You can make two curves into one curve by shiftclicking the anchors at the end of one and the start of the other and using this button. See Curves on page 78. Selecting one of these will align the selected objects in the required direction. It is useful for making lines of text straight, or aligning notes together, or notes with text or fermata symbols etc. This is the button to create swung duplets much beloved of jazz and folk music. In this notation the printed music simply has two notes of the same length but the intention is that the player plays them unevenly. Perhaps as triplets (durations 2:1) or hornpipe rhythm (3:1) or other units between. Fig 47 - Swung duplets menu For a fuller explanation see the help topic: Help Search and type swung. Abort the selection. If the operation is not appropriate to the objects which have been selected then the relevant button will be greyed out and unavailable.

68 Page 68 Music Publisher 8 manual Blocks of objects In addition to changing just one object at a time, you can select several to change by using block mode. Enter Block mode with the Block tool or the shortcut F3. Now you are using the Block Tool and a green cursor enables you to form an area on the screen to include objects to operate on. You can use the left mouse button to drag a box around the objects which you wish to change, and as you do so you will find the swept-out rectangle turning green. When you release the mouse button any objects which are enclosed within the block turn blue as if you had selected them one by one. and are thus included in block operations. When you release the mouse button the following form then appears: Fig 48 - Block action Copy Once As the form indicates, this offers a choice of things you can do with this block: You are returned to your editing screen and as soon as you move the cursor, another box moves with the mouse which is the target block for your copy operations. You can now move the target block with: The Mouse or arrow keys It is important to realise that if you use these keys only, the objects will only be copied to another part of the same stave. And furthermore, some objects are fixed vertically, such as clefs, notes, key signatures and so will only slide horizontally, whereas other objects such as text, symbols, or lines can move vertically too, and within the same box you may have both types. So if you want to move the block perfectly horizontally (or vertically) you can keep the shift key pressed at the same time.
69 Music Publisher 8 manual Page 69 PgUp, PgDn Ctrl+PgDn, Ctrl+PgUp. These keys move the box to another target stave or staves. On a multi-stave system, if you are copying objects from several staves to another system you will need to press PgDn/Up more than once to make sure the target block covers the right staves of the target system. For instance, in piano work you would press PgDn twice to make the box become part of the next system down. In fact in most cases, it will be best to use Ctrl+PgDn to move the box to the next system. Move the box to the next/prior system. Alt+PgDn/Up Move the box to the next or previous page. Once you have the box in position as required, then press one of: Enter to complete the copy. Left mouse button to complete the copy. Esc to abort the copy. Copy Many After copying the program returns to normal Music Mode. The functionality here is identical to Copy Once, so you should read that section above carefully. But in this case when you have made a copy the box is still on the screen: you can make more copies if required, pressing Esc or the Right mouse button to finish. Moving blocks This is similar to the Copy Once operation, the same keys work in the same. manner. However, once the move is completed with Enter the original blue objects are deleted and the program returns to normal Music Mode. Deleting blocks Just as it says - all the objects will be deleted. However, the program is polite enough to ask you if you want to delete bar lines too very useful when you only want to delete the contents (only) of several bars. In any case check to make sure that any objects you don t want deleted are not blue in the box. You can move the Block Mode Action dialog to see behind it by the usual method of dragging it by its title bar.

70 Page 70 Music Publisher 8 manual Copying blocks to picture files or the Clipboard See Creating a picture file of part of a page on page 119 Altering the attributes of blocks of objects If you select Alter Attributes then you can change the characteristics of the contents of a block in one go. However, you can only change one type of object at once, so if your block contained, say, a clef, key signature, text and notes, you will see the following dialogue: Fig 49 - selecting the objects to modify Once you select any of these, the relevant object attributes screen will be shown and if this is not aborted, the objects will be altered accordingly. Aligning objects At times notes can get out of horizontal alignment, or perhaps you need to align a symbol or word with notes. In this case the first alignment button is very useful as it moves notes, symbols, text etc left or right so that they are lined up. The second alignment button moves objects vertically into alignment. It is very useful for aligning text when the words become misplaced vertically. Whether aligned horizontally or vertically, objects aligned via Block Mode in this way are placed at the average position of the items, so they may well all be moved into position. If you wish to align to a particular fixed object then you should use Multi-Select mode (shift+click), when the first-clicked object will be used as the fixed reference. For Multi-select mode see page 64.
, or while you are editing a note (it shows in red) you can press the")
71 Music Publisher 8 manual Page ADDING LINES, SLURS AND PHRASE MARKS Tied notes Since tied notes are very common, while you are defining a note (it shows in grey), or while you are editing a note (it shows in red) you can press the key T which will tie the note to the previous note at the same pitch on the same or the previous stave. If you wish the tie to be overhand then press Shift+T (ie capital T) or for underhand, use T without the shift. A second press of the same T (shifted or not) removes the tie, but pressing the alternative T (ie with or without shift) changes it. It is possible to change the shape of the tie - press underscore (_) while forming or editing. Or dotted ties are useful on songs where notes are tied on some verses and not on others: you create this by selecting the command on the popup menu for the second note. Fig 50 - Making a tie dotted Slurs If the tie shape and position is not to your taste then using this same popup menu you can convert it to a curve which has points just like any other curve (see page 78 below) which can be modified and moved. In the same way as you can create tied notes with T, you can use U when creating or editing a note to slur it to the previous note. (The note chosen will be the previous note with its stem in the same direction.) Again, u denotes an underhand tie, and U a tie to the upper side of the note. The slur will be placed on the end of stems, but if the exact positioning of the slur is not appropriate then a slur can be created with curve mode, see below page 78.
72 Page 72 Music Publisher 8 manual Fig 51 - slurs placed with U and u If you wish to slur notes at a distance then you could use curve mode (page 78) or use Multi-select mode to shift+click the two notes. See page 64. As with ties, you can convert slurs to curves again with the slur completed, rightclick the note on the right and on the popup menu select Convert slur to curve (see Fig 50 above as is dotted slur. Straight lines Straight lines are drawn by using the Line Tool from the Tools bar or pressing the shortcut key F11. When you enter line mode, the cursor changes to a pencil. Again, the stave to which the lines are to be attached turns purple and a string joins the cursor to the stave: be sure to select a suitable stave for the lines to be a part of, otherwise moving staves up and down will leave your lines isolated. PgUp and PgDn will change the stave. The options for lines are found on a new toolbar which appears when the Line Tool is selected. They are fairly self-explanatory and govern width, style (solid, dotted, wavy, with a gap) and for further line attributes, the usual attributes button is available ( ), which gives access to the menu in Fig 66 below. Line Attributes Fig 52 - various types of line The line object is very flexible so that it can be used for the many reasons that lines are drawn on the music. The full options give access to many effects but there are shortcuts in the program which enable certain types of line to be drawn quickly without specifying many options:


73 Music Publisher 8 manual Page 73 First- and second- time bars The extent of 8va sections Tuplet markers Pedalling marks for piano. The full attributes Not only can a line thickness be stipulated but also its type: Simple Simple with a gap Wavy Dotted Pedalling mark for piano (contains up to twenty inverted Vs) Simple example drawing a glissando mark Fig 53: Line tool selected and the Wave button pressed Fig 54: Mouse being dragged to form the line Fig 55: Mouse released and Escape pressed closes the line tool
 to contain the start of the first time section and select Make 1st Time Bar.")
74 Page 74 Music Publisher 8 manual Example first and second time bars First time bars always terminate at a repeat back sign. So right-click the bar (measure) to contain the start of the first time section and select Make 1st Time Bar. Fig 56 - about to right-click the bar Fig 57 - about to select from the popup menu Fig 58 - the 1st time bar has been drawn Drawing second-time bar markings is equally simple. 2nd time bars always occur immediately after the repeat-back mark so simply right-click that bar and select Make 2nd time bar. Example an octave section First put in the notes. Here is a short example where the last four notes are to be an octave higher: Fig 59 - about to put in an octave marker at the mouse cursor Now right-click the stave (not the area above it) at the location where the marking is to start and select Start 8va here. A dialog box appears:

 And you can generally tidy up any aspects not quite right eg to move a whole line, drag by its centre: Fig 62 - completing the 8va mark NB: I'm sure you know that the term 8vb is incorrect: 8va")
75 Music Publisher 8 manual Page 75 Fig 60 - choosing the type of octave marker Press OK and lo! Fig 61 - the 8va section is formed Now it is unlikely that the 8va line stops in exactly the right place. So since it consists simply of a dotted line with a jog down at the end, you can drag the righthand end with the mouse to the place you want it to end. (As you start dragging, hold Shift down to keep it horizontal.) And you can generally tidy up any aspects not quite right eg to move a whole line, drag by its centre: Fig 62 - completing the 8va mark NB: I'm sure you know that the term 8vb is incorrect: 8va stands for ottava, octave, and its position below the stave would indicate it is to be played lower. Example pedalling marks for Piano First of all click the bass stave of the piano (to give it the focus) and use the Line tool to draw a horizontal line under the piano system in the approximate position of the pedalling mark. It does not matter about being exactly horizontal as the program will neaten this later. Fig 63 - rough position of the pedal mark

76 Page 76 Music Publisher 8 manual Now right-click the line (the 'sensitive points' are ends and middle) and select Convert to pedalling line. An information message follows and the line is straightened and a jog up added at the right. Also a Ped mark is added at the left. Fig 64 - after right-click and "convert to pedalling mark" (Remember that lines can be neatened by dragging the whole line ("hold" it at the centre of the line), or drag an end tolengthen or shorten the line.) Now right-click the line at point where you want a pedal up mark and select Add pedalling point here. Fig 65 - after adding a pedalling mark Once the pedalling marks are approximately in place then they can be dragged left or right to fine-tune the notation. If the Ped mark is not needed then it can be deleted simply by placing the mouse over it and pressing Del. More general properties of lines Once a line is drawn, right-clicking it and selecting Properties gives access to the Line Properties dialog which takes one of two forms, depending whether the Legs or Arrows button is selected: Fig 66 - Line Properties Dialog showing (i) legs, and (ii) arrows
77 Music Publisher 8 manual Page 77 Here can be chosen the line thicknesses, the line type (corresponding to Fig 52 above) and some more parameters: The Segment size is enabled when the line type is dashed, and refers to the length of the visible line segment. It is also enabled when the line type is wiggly and in this case refers to the width of the wiggle. The Gap size is enabled for dashed lines and refers to the size of the invisible part of a dashed line. It is also enabled for with gap lines and refers to the size of the gap. As with all Music Publisher measurements the scale is 1 black note width = 10 units. If Legs are selected in the box on the right then the attributes are: The Leg Definition buttons enable a given line to be drawn in one operation with one or more legs. This is particularly useful for tuplet markings, or first or second time bars. In fact the three buttons on the above menu are specifically created to make it easy to enter these parameters in one operation and simply add the number and direction of legs automatically, and in the case of the tuplets, add a break in the middle. Then you can define the direction of the legs (left, right, up, down) and the length of the legs. If Arrows are selected then there are four types of arrow sharpness: experiment with the values until you find one suitable. The Allow leg/arrow change checkbox is here so that if you have selected a number of different leg-style lines with shift+click in editing, you can uncheck this box to leave the legs alone. Otherwise they would all be set to the style given in the lower part of the dialog box.. Dynamic Markings ( Hairpins ) To create a hairpin on the score, select Hairpin mode: By pressing the shortcut key Ctrl+F11 By clicking the tool button Just like lines, the stave to which the hairpin are to be attached turns purple and a string joins the cursor to the stave: be sure to select a suitable stave for the mark to be a part of, otherwise moving staves up and down will leave your hairpins isolated. PgUp and PgDn will change the stave it will be attached to.
78 Page 78 Music Publisher 8 manual To create the dynamic mark, drag the mouse across the paper, starting with the sharp end of the hairpin. When you release the mouse the hairpin will be completed and the program will return to Music Mode. Fig 67 - drawing a hairpin Hairpins have thickness, like lines, and this can be set on the special toolbar which occurs when drawing hairpins. As with lines, thickness 0 means as thin as possible. As with adding pp, ff signs etc you will find that the hairpin you have added affects the volume of playback. Normally a crescendo would move up one level of volume (eg ppp pp p mp mf f ff fff ). If you want a larger range than one step, (eg have a crescendo moving from p to f ) then once the hairpin is entered, right-click it, select Properties and select the final volume at the bottom section of the dialog page. If you have selected Invisible objects on (Ctrl+Y) then you will see this annotation in small lilac print at the right hand side of the hairpin. See Fig 68 below and Special on-screen information on page 96. Fig 68 - showing the closing volume on a hairpin Curves Curves can be drawn on the music, either to represent slurs or phrase marks. Enter curve mode with By pressing the shortcut key F12. By clicking the tool button. Just like lines, the stave to which the curve is to be attached turns purple and a string joins the cursor to the stave: be sure to select a suitable stave for the curve to be a part of, otherwise moving staves up and down will leave your curves isolated. PgUp and PgDn will change the stave the curve will be attached to.
79 Music Publisher 8 manual Page 79 When you enter curve mode, the cursor turns to a paintbrush. Now the curve is made from a number of anchor points, through which a smooth curve can be drawn. Each left click of the left mouse button defines an anchor point, denoted with a small anchor symbol, which will disappear when Music Mode is resumed and the curve is drawn properly. When enough anchor points have been placed, the Right mouse button is pressed to resume edit mode. Alternatively, Enter can be used to define the anchor point and Esc to complete the curve and return to Music Mode. See the figure overleaf: Fig 69 - drawing a curve Hint: It is a temptation to place too many anchors in defining the curve. The majority of curves require only three points to define them (as in the diagram above). While still defining the curve you can always go back and add one or two if the shape is not quite right. However, the curve will be very neat when drawn through just three anchor points, so be very conservative with the number. To add more points or delete a point, right-click one of the anchors and use the menu which pops up. When in doubt, right-click something useful! Curve attributes Like lines, curves have thickness, and the default is set from the Desktop page of the Options menu. However, curve thicknesses are not uniform, and the maximum thickness is only attained in the centre. (See Fig 70 below). As with lines and hairpins you can set the thickness of the curve individually using block mode or by editing and right-clicking.
80 Page 80 Music Publisher 8 manual In addition to thickness, curves can be dashed, and may have an editorial slash mark. (This is a small vertical line in the middle of the slur/phrase mark etc which denotes that it has been added by an editor and was not part of the original manuscript). These options, like the thickness, are on the special toolbar which appears during Curve Mode. Fig 70 - Types of curve Curve shapes Sometimes the shape of a curve is quite hard to get right, even with a lot of anchor points. So another shape has been introduced, the flat curve. You can alter the shape from flat to normal or back again by ctrl+click when forming the curve. Or see the next section below. Editing existing lines, curves and hairpins Curves The following methods are available: When the cursor is over any anchor (it turns red) then as normal in Windows right-clicking it will bring forward a popup menu of operations. This enables you to create and delete anchor points, change the curve type (Fig 70 above) or thickness. Or of course you can drag the anchor to another position or type F to toggle the flatness. Flat curves have the same endpoints but the shape is flatter in the centre and is particularly useful for long phrases. Fig 71 - showing the difference between normal and flat curves Lines As expected you can right-click either end or the centre to get the popup menu; and if you wish to alter the position of the line then either

 look untidy if they are all at different heights and of different mouth size.")
 a")
81 Music Publisher 8 manual Page 81 Hairpins Drag one end to move just that one end. Drag the centre to move the whole line. Similar to lines, but drag the point to move the whole object or one end to change the shape. There is also a command to make the hairpins in a work of uniform height: Tools Other Uniform hairpins: Fig 72- the Uniform Hairpin tool page Hairpins (dynamic marks) look untidy if they are all at different heights and of different mouth size. This menu allows you to correct this. Fig 73 non-uniform and uniform hairpins Other facilities with curves Join curves You can also Multiple-select (shift+click) a point from each curve and press the "join two curves" button on the toolbar. You will probably need to move one or more anchor points afterwards:
 move accordingly.")
82 Page 82 Music Publisher 8 manual Fig 74 - how to join curves Invert curves Right-click an anchor point and select Invert Curve. The end-points will be preserved and the centre point(s) move accordingly. Extend curves Right-click a relevant anchor point and select Create Anchor Point Delete anchor points Right-click the anchor point and select Delete Anchor Point

83 Music Publisher 8 manual Page ADDING MUSICAL SYMBOLS General symbols Occasional symbols are available from using the Symbol Tool: Enter symbol mode by one of the following: pressing the shortcut key Ctrl+F12. clicking the Symbol tool button. Just like lines, curves, hairpins, the stave to which the symbol will be attached turns purple and a string joins the cursor to the stave: be sure to select a suitable stave for the symbol to be a part of, otherwise moving staves up and down will leave your symbols isolated. PgUp and PgDn will change the stave the symbol will be attached to. When you do this, you are presented with a panel from which to select your symbol. The width of the symbol depends on the width of your monitor. In addition, this menu can be resized by dragging the corners and your system will remember this size for next time the program runs. Fig 75 - choosing the fff symbol If you do not see the symbol you want, use the scroll bars at the right to see more (or equivalently, scroll with the mouse wheel).

84 Page 84 Music Publisher 8 manual Simply click on the symbol: the choice screen will close, the cursor will disappear (the chosen symbol becomes your cursor) and you can place your symbol exactly where you want it by clicking the left mouse button at the appropriate place: Fig 76 - placing the fff symbol. If you need to place more than one symbol of that particular type on the score, then before you click the symbol on the choice page, check the More than one box before selecting the symbol (or, equivalently, press the space bar). Every mouse click will then place that symbol, and you terminate your symbol mode with the Right mouse button or Esc key. However, be aware that all the symbols you place are attached to the same purple stave. If you want to attach to another stave then use PgDn and PgUp to change this before you click. You will observe that a hint about the use of the symbol you are selecting appears as you move your cursor around the symbols available. This is intended to be a useful feature (particularly in number fonts), but if this annoys you then you can disable it by checking the box which is seen in Fig 75. Note also that the form can be resized so that it better fits your monitor. Simply drag the corners, as is normal with Windows windows. If you are fed up of seeing the remarks (in blue) as to what the symbol may be used for then untick the with hints box. The size of the object Many of the objects can be made to vary in size and this varies from 75% of normal to 125% of normal. The size which is used when the object is first placed on the paper is governed by the Default Symbol Size which is set in the Score page on Options Configure: Fig 77 - the default object size

85 Music Publisher 8 manual Page 85 To change the size of an individual object right-click the object and if the object is capable of being re-sized then select from the drop-down menu: Fig 78- context menu for size of object Trills Some of the available objects do special things when selected. These are listed here: Adding the trill continuation mark Examine Fig 75 above. The symbol in the first box on the 3rd line, which following the tr trill sign is a single turn of the trill. Now if you select this, while you are still placing it in position, pressing the spacebar replicates the symbol so that it forms a continuous mark. If you wish to make the symbol shorter then press backspace. Fig 79 - placing the trill continuation mark Playback and options If you place a trill (with or without the ~ turn symbol above) and then rightclick it you will see an option Ornament Properties which leads to this dialog box

86 Page 86 Music Publisher 8 manual Fig 80 - Ornament options (shown for a trill) Here you can add upper and lower accidental marks. And you can alter the playback with the Trill Options panel. Baroque indicates that the trill starts on the note above; modern trills start on the note given. With final turn indicates that the trill will have a final triplet turn in order that it will conclude on the given not. Since it is the normal practice that a trill ends on the note as shown then these two options are normally used in opposition ie with exactly one of them being selected. However you can define whatever is required for the playback. Other ornaments If you place an ornament and then right-click it a similar menu appears enabling you to define some of the characteristics of the ornament. One of the upper/lower accidental panels may be greyed out if they are not appropriate for that ornament. A list of these ornaments which are in Music Publisher together with some of their characteristics is shown below:
87 Music Publisher 8 manual Page 87 Turns Baroque trills Mordents Slide Appoggiatura Normal turn. Inverse turn. All four notations mean the same. These have slightly different forms but essentially consist of a short trill only sounded as the note is started. Upper mordent. The terms mordent and inverted mordent are used differently by different authorities, so upper and lower are preferred as they are unambiguous. Lower mordent. See box above. Long mordent. Slide first sound the two notes below the note concerned. Baroque appoggiatura - first sound the note above the note concerned. Table 7 - Ornaments available in Music Publisher Multi-bar rests Multi-bars rests also have a subsidiary attribute, in this case the number of bars (measures). Fig 81 - multi-bar rest When you select this symbol you will see that It only moves on the centre line of the stave. When you click the stave to accept the position a menu appears asking you to define the number of bars. As expected, to alter the number of bars' rest you should right-click the symbol once completed. Multi-bar rests are also easily entered with the keyboard shortcut Ctrl+Shift+Z. See page 44.
.")

88 Page 88 Music Publisher 8 manual Dynamic marks: pp, ff etc. These are also simply added from symbol mode. But they actually affect the volume of playback on the stave they are attached to (or in the case of braced staves such as a piano, on the braced pair they are attached to). If you want them to affect all the staves in the system, make them Global see page 94. Arpeggiando marks This spread chord symbol is formed by pressing the ~ key in normal Music mode. The sign starts to be built right under the cursor, so if you are using the I-shaped cursor you may miss it! However, you can move it around with the cursor keys or the mouse, and lengthen it by pressing ~ repeatedly (shorten it with the backspace key, just as if you were typing text). You can have the arpeggiando sign plain, or with an up-arrow, or a downarrow. But remember: the arpeggiando mark is always attached to the stave which it started off on, so be careful if you move it a long way. If the stave it appears to be on is not the stave it is really on, then moving a stave may not move the arpeggiando sign! The arpeggiando sign is reflected in playback. Once placed, you can change the number of bends and the arrows in the usual way, ie by right-clicking and select Properties: Fig 82 - Arpeggiando Properties

89 Music Publisher 8 manual Page OTHER OBJECTS General drawing shapes Just occasionally you may have need to enter a rectangle, square, circular or elliptical shape. This can be either solid or empty, and Shape Mode is entered by pressing the shortcut key Ctrl+F10. by clicking the toolbar button. Once again, and as always, be aware that the component is attached to the stave which turns purple and to which the purple string connects it. Fig 83 - choosing your shape Click the appropriate button and then the shape is just two mouse clicks away: For the circle and square, one press in the centre and one on the circumference For the rectangle and ellipse, one at each of the opposite corners Erasing parts of objects using 'white' (erase) shapes If, before you select the tool, you change the colour to White (erase) (Fig 85 above) then only the solid shapes are available, and when placed on your score these will be shown on the paper as cream, although when printed they will erase whatever is underneath them. It s cream rather than white because when editing your score it s important to be able to see exactly what size it is! Drawing over erased areas There is often a need to draw an object which partially erases another object behind it such as in breaking a barline to put text through, or a crescendo mark etc. Adding an erase objecdt as the last paragraph will result in erasing both objects so we proceed as follows:
 Now add the text in the location required, then right-click the text and select Set Special Attributes.")
90 Page 90 Music Publisher 8 manual Fig 84 - breaking a barline to place text This is done by first creating the music and the barline in the normal way: Now erase part of the barline by placing a rectangular object with the Colour property set to White (Erase) Now add the text in the location required, then right-click the text and select Set Special Attributes.
91 Music Publisher 8 manual Page 91 This gives the Special Attributes menu where you can select the Indelible attribute for the text object. See Chapter 16 on page 94 below. On-screen this is what you see, but the appearance on printout is as Fig 84 above. The text's indelible property means that the erase object has no effect on the text. Instrument change instructions If you wish to change the instrument allocated for a stave half-way through the stave then there is an object you can place to do this. 1 Click on the stave, at the appropriate position. 2 Do Add Other Instrument change (or Shift+F12) and at the menu select the instrument you wish to hear. 3 The instrument change command appears on the stave in purple (showing that it will not print out) and can be dragged left or right to be just to the left of the first note to be the new instrument: Fig 85 - the Change Instrument object 4 Verify with a playback (if you wish).
92 Page 92 Music Publisher 8 manual 5 You can examine or modify the instrument later if you wish by rightclicking the Change sign. Automatic changes of instrument 1. Pizzicato The pizzicato command for strings really requires a different Midi instrument (46 Pizzicato Strings) and Music Publisher will make this an automatic change of instrument when it sees the conventional pizz text. And it will change back on finding the arco command which as string players will know means with the bow. Fig 86 - pizzicato changes 2. Con sordini For this to work the following conditions must be true: One of the string instruments as the current MIDI instrument (41 Violin, 42 Viola, 42 Cello, 44 Contrabass, 45 Tremolo strings) The text must start with the letters p i z z, eg pizz or pizzicato. The revert text must be arco Many instruments can mute the sound and have mechanical devices to do so. These are called mutes and they are most commonly used with strings and brass instruments. Now MIDI has no sound for muted strings, sadly, and only Muted trumpet (sound 61) for brass. However Music Publisher 8 has the same sound change as for Pizzicato: if on a trumpet or trombone stave (Sound 57 or 58) you type any of con sordini mit dämpfer mute on muted then the sound changes to Muted Trumpet and reverts on the instruction senza sordini ohne dämpfer unmuted mute off
93 Music Publisher 8 manual Page 93 (Actually only the first few letters matter. So unmuted will activate as well as unmute only the underlined letters in the lists above are significant.
94 Page 94 Music Publisher 8 manual 16. OBJECTS SPECIAL ATTRIBUTES Global Immobile There are some attributes which almost all objects may have. These are Global Immobile Replicatable Invisible Indelible They can all be accessed by right-clicking the object and by selecting Set Special Attributes. You will also see its attributes listed on the same popup menu. Furthermore on the screen (but not of course on printout) they are colour-coded. (See Customising your screen, page 204 to change these colours.) This is particularly used by the Part Extraction process. Objects which are Global will appear on every one of the instrumental parts extracted. They would include titles, and tempo markings. See Part extraction (on page 186) for more information. These are objects whose position horizontally does not move if the music is moved in a Reflow, Neaten, Justify or other operation which moves the music. They do, however, move vertically when you move staves vertically. Replicatable When you select Add New System then the last key signature and clef used on the stave is copied to start the new stave. However you can add other objects to this too: you could for instance include an abbreviated instrument name at the far left of the stave. It's quite common in choral music to add S, A, T and B at the left of their respective staves and making them replicatable is a good idea. The colour of the text on-screen is changed to the colour you have chosen for Replicatable Objects. The default is green but you can change this, See Customising your screen, page 204.
95 Music Publisher 8 manual Page 95 Fig 87 - showing Replicatable objects in green Invisible Indelible It can occasionally be useful to have an object invisible, ie appearing on the screen but never printed out. You could add comments to your music which only you will read and even create a fly leaf or title page by making a whole stave invisible but with text appearing on it. (However invisible staves are selected on the Stave Attributes screen, Fig 15 on page 24). Another idea is to add keywords (such an a genre description) in invisible text to your scores, then you can search for all your 'Jazz' scores with the Text Search facility. See Chapter 20 on Importing and searching on page 108. Objects can be marked as Indelible, which means unable to be erased. This is so that they will show through an erase area. See the example above in Drawing over erased areas on page 89 above.
96 Page 96 Music Publisher 8 manual 17. SPECIAL ON-SCREEN INFORMATION When viewing the screen there is extra information available which will not show on a printout. This consists of: The C Major Key signature (see page 37). The stave name. The Midi instrument you have allocated (if you have) to play the stems up and stems down notes on that stave (shown in italics). Any transposition you have made on the stave, for instance a double bass sounds an octave (12 semitones/half steps) below its pitch, or a bass clarinet sounds 14 semitones lower. Virtual stems ie the stems on breves and semibreves (double whole/whole notes) which are used by Music Publisher to clarify which part on a stave the notes belong to. The Page Break After Stave setting (see Fig 22 - showing forced page break on page 28). The closing volume of a hairpin (if defined see page 77) Fig 88 Extra Information ON - Extra Information OFF Most of this information can be blanked to make the page less cluttered to work with, but the neutral key signature is an important place marker and so is permanently shown. If the Midi instrument for the down staves is the same as that for the up staves (see Fig 175 on page 173) then the down stave will be omitted, and if the Midi instrument has not been allocated then both will be omitted. Staves which sound differently to the notes on them have their transposition shown also. Here are four instruments with typical transpositions and sounds:

97 Music Publisher 8 manual Page 97 Fig 89 - transposition values showing Note the double stemmed arrows (, ) which indicate a simple octave. The keyboard shortcut Ctrl+Y turns the information on and off. The exact colour in which the objects are shown is governed by the setting of Non printing object on the Options Configure Colours page. (see page 144).
98 Page 98 Music Publisher 8 manual 18. SPECIAL STAVES - PERCUSSION INSTRUMENTS In this chapter we are referring to untuned percussion instruments. Tuned percussion (timpani, xylophone, glockenspiel etc) of course use one or more a normal staves with a clef appropriate to their pitch. We are concentrating here on drums, triangles, gongs, sleigh-bells and the myriad of other instruments which are struck to make the sound of indeterminate pitch. Drum kits and Percussion Maps Midi has the ability to play 'drum kits'. Internally a drum kit is one special instrument where the pitche does not sound higher or lower but rather has a different sound - a different instrument. So a middle C might be a bass drum and the B below it might represent a triangle. This connection of 'pitch' to instrument is called the Percussion Map - see below for how this is done in Music Publisher. The appearance of a percussion stave Fig 90 - Example percussion staves Clefs used Stave lines The clef of a percussion stave is not a clef which connets stave lines to note pitch. So any clef could be used. However it is conventional to use one of the two percussion clefs or if the number of lines is 5, then a bass clef could be used. You can, however, use any of the existing clefs in Music Publisher perhaps as in Fig 90 above - a Drum sound could be on a bass clef stave, but this is quite optional. The number of lines in a percussion stave is variable again as in Fig 90 above. It can be just one line, in which case notes are limited to just above, on, or just below the line. This type of percussion stave is therefore suited to no more than three instruments, preferably one or two. A clef is optional, but if used then one of the percussion clefs is most suitable.
99 Music Publisher 8 manual Page 99 The next most common number of stave lines is five, even in orchestral scores you can find just two instruments sharing a percussion stave. Other numbers of lines can be used as required. For instance a 3-line stave could be very reasonable for a set of 3 bongos: small, medium and large. Creating Percussion Staves in Music Publisher The basic point for this is the Stave Attributes form. This is reached in many ways, such as Stave Properties or right-click the stave and select Properties, or simply press? when the stave is shown. Fig 91 - Stave attributes showing Drum Kit In the Stave Type box select Drum Kit. Now become available both the Drum Kit tab and the Stave Lines box, here set to 5. Defining your Percussion Map Selecting the Drum Kit tab allows you to create or load a Percussion Map:

100 Page 100 Music Publisher 8 manual Fig 92 the Percussion Map screen with no map loaded All the notes shown are grey indicating that these notes do not have a percussion instrument allocated. Selecting a Percussion Map from the library You can select a predefined Library map by clicking it and then the Use button: Fig 93 A percussion map selected Looking at the grey and black notes on this figure you will see that five normal-head notes are defined and six x-headed. The Standard library contains an often-used percussion map which percussion-writers often use.

101 Music Publisher 8 manual Page 101 In the percussion map the top stave shows the instrument selected when used with an x-headed note and the lower stave's instrument will be sounded with a plain note. You can place the cursor over the note to show it, or right-click it to hear it or alter the instrument allocated it. The Note Heads box contains four other head shapes: triangles with inverted triangles, and x-in-circle and diamond-heads. To add to or alter the Percussion Map, rightclick a note. At this point you can hear the percussion instrument or change it. To alter or delete an instrument, click Change and the following screen appears: Fig 94 - selection of percussion instruments Here you can select either from the Recently Used list, or a complete list organised by type (press the + to expand the list) and hear the selection before choosing the instrument. Saving your percussion map If you simply select OK on the screen in Fig 93 then that percussion map is stored with the Stave Properties. This means that using the Replicate Attributes button you can make all later staves with the same name have the same Map. But if you want to keep this same percussion map for later scores then you can save it in the Library. Simply click the Save button in Fig 93 and you can either overwrite the previous library or define a new library.


102 Page 102 Music Publisher 8 manual Whether or not you have finalised the percussion map you can still add notes to a percussion stave. When you come to notes which do not have an entry in the percussion map then they will simply remain silent. When using no clef or a percussion clef you need to know what note name to use to create each note. For instance in Percussion Clef 1 which note name do you press to create a note on the top line of the stave? Of course for a bass clef percussion part (see Fig 90, last stave) then the bass clef is used, and for no clef at all then the default in Music Publisher is the treble clef. What you use for the percussion clefs is your choice: place notes as if Treble Clef or Bass Clef. This choice is on the lower left of the Options page (Configure Options Desktop). Placing percussion notes on a normal stave You can add percussion instruments to normal staves as in this example. The note(s) to be used for percussion instrument must be entered in a head shape supported by the Percussion Map (excluding normal). That is one of these: cross, diamond, triangle, inverted triangle or x-in-circle. Now right-click the Change Percussion Map command. You will be presented with the familiar percussion selection screen of Fig 94 and this will make this pitch and head shape combination into a the required instrument for the whole stave. If you wish you can add a description of the note sound eg "Hand Clap" by right-clicking the note and selecting Add "Hand clap" as text. Fig 95 adding a percussion instrument to a normal stave If the percussion map for this note has not yet been defined then this item will not be available on the right-click menu, and of course the correct instrument name will appear if Hand clap is not the noise defined.
103 Music Publisher 8 manual Page 103 Note that until the percussion instrument is defined there will be no sound heard when x-headed notes (etc) are part of a score being played. The complete list of percussion instruments This can be found in Appendix K: MIDI Percussion instrument names on page 258.
104 Page 104 Music Publisher 8 manual 19. SPECIAL STAVES TAB NOTATION What is TAB? TAB notation is most often used by guitarists, but any instrument with frets can use it. The stave consists of a number of lines, one for each string. So the normal limit of five no longer applies, indeed a guitar stave automatically has six lines, one for each string. Here is an example for standard-tuned Guitar. The guitar strings are tuned to the following notes: Fig 96- Standard guitar tuning Since the Guitar sounds an octave lower, middle C could be sounded by using the first fret on the B-string, or the 5th fret on the G-string, and so on. TAB notation consists of writing the number of the fret on the line representing the string. Here are the way that five notes sounding at middle C are written. Fig 97 Five middle Cs on standard guitar TAB notation does not strictly need the standard stave written above, but it is common and in fact this is the way that Music Publisher creates the TAB stave. Indeed the note lengths written in small are not compulsory, as usage varies. Creating a TAB stave Place the cursor on a stave and select Tools TAB tools for fretted instruments.

 you want to see with a TAB written below. TAB \"clef\" style The T-A-B which you see in Fig 97 is conventional as a \"clef\".")
105 Music Publisher 8 manual Page 105 The TAB menu appears: Fig 98 - TAB tools menu Instrument Tuning The target instrument can be defined by extracting from the library, or you can modify the standard tuning. For instance it is common to tune the low E down to D: simply put the mouse over the E and press D as you would if it were a normal note on a stave. Right-click a note to delete a note (string) or to insert another. Operational Controls When you press OK a TAB stave is inserted before the target stave with the numbers on the frets all completed. Select here the stave(s) you want to see with a TAB written below. TAB "clef" style The T-A-B which you see in Fig 97 is conventional as a "clef". For beginners the note names can be used, or indeed nothing at all. Fig 99- TAB stave with note names for "clef"
106 Page 106 Music Publisher 8 manual Capo A capo is a device which a player can place across all the strings at a certain point. Its effect is to raise the pitch of the instrument and shorten the fingerboard. You can dial-in the position of a Capo in order to create a different tuning and fret results on the TAB stave. Include Durations on TAB stave The small notes above the stave can be omitted if not required. Alternative fingerings on the TAB stave It is clear from Fig 97 above that the position of the fingers is not unique. since all of the notes shown are middle C. Music Publisher will always generate the lowest fret number in the first attempt. If this is not suitable to the player then an alternative may be performed simply by dragging the text to a lower string and the text will change automatically. If the target string is too high for the note so that it is impossible to use that string then the text will change to "?". The same will occur if notes too low for any string are found on the original stave when the TAB is first created. An example Fig sample music for TAB conversion This is an excerpt from one of the Sample files with the program. On requesting a TAB stave created from each then the following was obtained:
107 Music Publisher 8 manual Page 107 Fig a sample conversion to TAB The following should be noted: The? notes on the lower stave. These are too low for the chosen instrument. Tied notes are of course not plucked. On TAB staves they are shown in brackets, for instance at the beginning of bars 2 and 3. This is normal TAB notation for tied notes. Dragging a note on the top stave with Ctrl pressed moves the tab number too this is the same effect as dragging a chord. Although there are no chords in the example above, chords are handled quite happily: Fig 102- example TAB chords The font used for the TAB positions is that found in the Favourite Fonts which starts with the letters TAB font. See Fig 44 - The Favourite Fonts screen on page 55. If no such font is found then Verdana size 13 is used, as here. The TAB stave is a normal stave in that objects such as curves, dynamic marks, lines or text can be placed on it.

108 Page 108 Music Publisher 8 manual 20. IMPORTING AND SEARCHING Overview Music Publisher 8 can read files in abc format and with the Scanning Edition it can read printed music which has been scanned in. It can also search through MP files on your hard drive for text. Searching for files An example If you select File Text Search then you can enter any phrase which occurs in text objects in your files. This is very useful for searching for lost files. Perhaps you have lost the location of a setting you made of sea shanties which included Shenandoah. Fig searching for text within scores You invoke File Text Search and enter the text in Look for and the set above shows that there are two files with Shenandoah in the text.
109 Music Publisher 8 manual Page 109 You can select the drive containing your music in the Where to look box, and particularise it in the list of folders underneath. (You can mark as Case Sensitive if you feel it would help the search). And in the Look for box at the top left you type the text to look for. In a few seconds you find that there are two files containing this text. You can click one and then the button Load this file to open it. Support for abc format files A full description of abc is beyond the scope of this manual. But suffice it to say that it is a format which is intended to be read both by a human and a computer. The abc standard is described at and a Google search for abc music format should turn up references to definitions and file archives. The format was intended originally for capturing simple tunes such as folk tunes or fiddle music but has now evolved to version 2 which can do multipart music on more than one stave, with lyrics and so on. However Music Publisher does not support lyrics nor multi-part and essentially supports version 1 with some of the version 2 enhancements. A separate document is available from us on request. There are literally tens of thousands of tunes on the internet but the principal problem with abc format is that software developers writing interpreters, printers and players for abc have found the original 1.0 format limited and have invented their own extensions often incompatible with each other. Consequently a little reformatting of received abc files may be needed if they were intended to be used by uncommon software You will find many tunes within one collection file. Here is an example comments in italics are not part of the music definition. X:1 Tune 1 in the collection T: National Anthem Title K:G Key G M:3/4 Time signature 3/4 Q:240 Tempo 240 quavers per minute (optional) G2 G2 A2 F3 G A2 B2 B2 c2 B3 A G2 A2 G2 F2 G6 d2 d2 d2 d3 c B2 c2 c2 c2 c3 B A2 B2 cb AG B3 c d2 ec B2 A2 G6 The last two lines are the two lines of music showing the barlines ( ) and the note durations in quavers together with a code for their pitch. For more details see the website above or our fuller document available on request. In order to use abc files either as import or export you must first switch on the facility on the Options screen (Options Configure Desktop):
, and then a list of files in that archive.")
110 Page 110 Music Publisher 8 manual When this option is selected then the File menu on the opening screen will have an option Import ABC and when a score is loaded it will have an option Export as ABC. Importing abc music The File Import ABC command offers first a file selection screen for you to load your abc archive (file extension normally abc ), and then a list of files in that archive. Once a tune from that is selected this screen is offered: Please don t report the spelling of Lomond here I just got the tune from the internet where this, er, unusual spelling was what I found! Fig raw import from abc file The stave size field is the size it would need to be set at for the document as defined to be to fit on your default stave/page setup: if you wish any other stave size then you can change the Stave size field and press Reflow lines and the text in the box will be changed accordingly:


111 Music Publisher 8 manual Page 111 Fig after reflow to 0.25" stave size Pressing OK use this text gives the following output after using Tools Other Format for GHB: Export to ABC. With the File Export as ABC command a screen similar to this is offered:

112 Page 112 Music Publisher 8 manual Disclaimer Facilities are offered to save in a file, insert into or append into a file, as well as some of the options offered in an abc format file. If you are an inveterate abc file user you will know some of the problems which occur because of variations in file format, and to a certain extent the facilities offered by Music Publisher 8 are still provisional and still under improvement, so if you have problems then please report them.
113 Music Publisher 8 manual Page FILES SAVING AND MERGING Saving and loading your work If you do not have a score currently open, then at the lower part of the File menu is the history list of recently saved files. To select one of these historical files, simply click on it, or press its number, eg 1 or 2. To open another existing file, you can select the Open menu, and you will be presented with a standard Windows open file dialogue. When a score is open, the File menu changes, and you now see: Save Save As Save as Template Save part of score which saves your current score. If this is a new score which you have not yet saved then the Save As option is called as you select this command. which first gives you the opportunity to change the program name before you save the score. You may save this score as a template so that it will appear in your template list when you select File New. See the section on templates on page 33. If you wish to save only a selection of the staves in your score then you can select this option. It allows you to save a range of systems to a file of your choice. Merge File After this stave A file selection dialogue is offered and if a file is named then it is loaded after the current stave. If the current stave is not the last in a system then this item is greyed out and is not available because music cannot be merged into the middle of a system. Merge File Before this stave As above, except that the imported file would be placed before the current stave. This option is not available if the current stave is not the first of a system because music cannot be merged into the middle of a system. Merge File at end of score Does what it says on the can.
114 Page 114 Music Publisher 8 manual Backups When files are merged, the headers, footers, page and stave sizes the incoming file was saved with are ignored, and the values from the on-screen document are used. Music Publisher files are stored with a file extension of.mup. Whenever you save such a file, if there was one already on the disk then the old one is renamed with an extension of.mpb (MP backup) and has the words Backup of prepended to the name. For instance the previous version of a score named My Music will be called Backup of My Music when a new version is saved. If you do not want this feature then you can disable it from the Options menu. See Options Desktop on page 136. In Windows Explorer you will see Music Publisher files marked as MusPub7 document and backup files as MPB file. If you wish to reload an old backup file then close any existing work, and select File Open as before. However this time you can use the List Files of Type box to select MP backups. Or alternatively just type the file name of the score you want to load, but make sure you add.mpb at the end. For instance if you want to load the backup copy of My Music, then in the File Name box you can just type backup of my music.mpb.
115 Music Publisher 8 manual Page MAKING PICTURE FILES FOR WORD-PROCESSING Music Publisher can produce picture files for use in word-processors, desktop publishing or for posting on the internet for download and can also transfer high-resolution pictures via the Windows Clipboard into your documents. You can export picture files from the File Export menu: Fig The File Export menu Transferring via the Windows Clipboard This is the fastest way normally to copy music to another program. Transferring a complete page To copy the complete page select File Export This page to clipboard and switch across to your target application and Paste it in most likely this will be Edit Paste, or Ctrl+V. It works with MS Word, MS Publisher, MS Paint, Paint Shop Pro and almost every graphics program you can mention. Transferring part of the Score page You can copy any rectangular area of your music into the clipboard as a picture and then paste it immediately into your target application, whether Word, Publisher or other program. Enter Block Mode (F3) and create your rectangular area (see Blocks of objects on page 68). Then from block mode action (see Fig 48 - Block action on page 68) select Pic to clipboard. Now switch across to your target application probably with alt+tab (or in Vista, Windows+Tab) or select it from the taskbar - Windows is great, you can have them both running at once!) and move the cursor where you want the image to go and do Edit Paste (or Ctrl+V or Shift+Ins which performs the same function).
116 Page 116 Music Publisher 8 manual What you see then depends on the target application, but in MS Word the picture will be inserted at the maximum size it can fit into a screen width. This is normally too large, so you should then either drag a corner handle or, better, click the insert and do Format Picture and on the Size tab, choose Height at say 25%. That is normally a good value for most purposes, the music in this manual was inserted at that size. The advantage of going this long way round is that all musical inserts will then have the same stave size in the final document. I don t know of any word-processor, publishing system or graphics software which does not respond to this way of transferring images and in fact this complete manual was created with Microsoft Word Apart from screen shots all the music printed diagrams were imported from Music Publisher 8 by using the Pic to clipboard button of Block Mode. Transferring to a picture file for other purposes Graphics formats a brief introduction BMP files PCX files GIF files If you are a photographer, or web designer you will know that photographic pictures are normally stored and produced as JPG files. JPG is a special format for photographic work and show over 16 million colours and use high compression. However graphics files for work which shows sharp edges (diagrams, text, music ) are best stored in quite a different format, and in fact a choice is available. Moreover Music Publisher only produces monochrome pictures which are by their nature about 5% of the size of full-colour. These are basic Windows files, and cannot normally be processed by systems other than Windows. The files handle full colours (16M) and are large because there is no compression of the data. This was the first interchange format, and produces much smaller files than BMP. However it is not so popular these days as it was but it's worth a try in some cases of computers from different operating systems. This format was introduced by Compuserve in the 1980s. Sadly for a while GIF files ceased to be so widely used due to a legal dispute with Unisys of the USA who suddenly and belatedly claimed copyright over the file compression algorithm. But the claim of copyright has now lapsed and GIF files are a good way of saving data and the files are now displayed by Web browsers. In colour terms they can only handle 256 colours, but that is of no importance for Music Publisher whose output files are only 2 colours black and white.
117 Music Publisher 8 manual Page 117 Other graphics formats not yet supported by Music Publisher PNG ( Portable Network Graphics ) is an excellent format and was written to supersede GIF when the legal dispute started. Like GIF it is supported by web browsers and has excellent compression without losing data but as an improvement over GIF it can handle 16 million colours and so is excellent for photographic work too. Sadly it has not caught on but has less importance for us anyway. TIFF ( Tagged Image File Format ) has been around a good while and has many different forms. It its uncompressed format it is sometimes used by digital cameras as a high-quality storage, but one of its compressed forms was hit by the same legal dispute as GIF. JPG is mentioned here for completeness but is a lossy format. This means that it throws away and invents data in order to make files very much smaller. It should only used for pictures where there are no abrupt changes of colour such as photographs and can handle only full colour (16M colours). If Music Publisher (or other graphics) files are distributed in JPG format then they are converted to full colour (a waste) and show signs of fringing around all the music items. Avoid this format with Music Publisher!

118 Page 118 Music Publisher 8 manual 23. EXPORTING YOUR MUSIC TO OTHER PACKAGES It is possible to export your musical score to other packages for giving to other people who do not have Music Publisher. This is divided into export of the appearance of the score, and export of the sound of the score, and export of the music in the score. Fig the File Export menu Exporting the appearance of the score. See also the chapter on Making picture files for word-processing on page 115 above. PDF file export Word files PDF ( Portable Document Format ) files are not graphics files but document files. They can contain documents (text, diagrams, pictures) in pages and have long been the standard on the internet for reference material. You are probably reading this manual as a PDF file! The copyright to PDF is owned by Adobe and they distribute a free Reader program ( Acrobat Reader ) for many computer platforms. So creating PDF files of your music is an excellent way to distribute your music. The command in Music Publisher is File Export As PDF and has no options, it simply saves the whole score to a PDF in a folder of your choice. Export to Word was introduced in Music Publisher 7 but with the advent of PDF export in Music Publisher 8 it is likely to be used less. However it remains on the menu in case you want it. Like PDF export it saves the whole score. Creating a picture file of one page This is a very simple process. First make sure that the page you want saved is showing on-screen. Then select File Export This page to Picture file. Then a file creation dialogue box will be shown where you can define the name of the output file. The dialog box allows you to save in BMP, PCX or GIF format.
119 Music Publisher 8 manual Page 119 You can use the same name as the score because saving the graphics file will not overwrite the.mup file. The size of the image created is governed by the current Page Layout parameters, but the image is saved without Top, Left, Bottom, Right and Gutter margins - only Header and Footer margins are included (if they exist). Saving picture files for many pages at once This process is similar to writing one file, choose File Export All pages to picture files and you will be offered the same range of formats. But in this case the filename you select will be appended by (Page xx ) so for instance a Music Publisher file called My Music of 3 pages would result in picture files called My Music (Page 1) My Music (Page 2) My Music (Page 3) Creating a picture file of part of a page If you do not require a complete picture PCX file then any rectangular section of your music can be selected to make into a picture. In Music Mode, mark a block by dragging the mouse over it, just as if you were going to copy a block. But at the block selection stage, (Fig 48, page 68) you should select the Picture File button and at the next screen you will find you can stipulate the file name and format to save under. Fig an example of an imported file into Word while creating this manual Exporting to other applications via the clipboard The Windows clipboard is also ideally suited for transferring pictures from Music Publisher to another application such as a word processor or a Desk- Top Publishing system. Again you can select full pages, or sections of the music. Sections of music are performed as part of Block Tool. See Blocks of objects on page 68. Exporting the sound - Exporting to a MIDI file On the File menu the Export As MIDI file is an alternative to selecting the Save MIDI button on the Play menu (page 169).
120 Page 120 Music Publisher 8 manual This Export command has fewer options. It will represent the whole score played with repeats using the instruments defined in the stave, a Proximity of 2 (see page 174f) With Grace Notes ticked. If you want to use values other than these then you should go to Play dialog and set the values there before selecting Save Midi. Exporting the music ABC files. See Support for abc format files starting on page 109.
121 Music Publisher 8 manual Page LAYOUT AND FORMATTING Controlling the spacing of the music as you type it in As you type in notes, barlines, and clefs, you can press space to complete them, and the cursor moves onwards a short distance ready for the next object. This distance moved is governed by two parameters, both of which can be found in the Options Score page (page 140). (If you have no score open you will find the Score page missing because these options are only relevant to a specific score.) The parameters are Pulse and Spacing Gap. Pulse For a new score, this is set to Crotchet [Quarter Note]. If you are capturing an older piece of music which has mainly white notes, you may wish to set this to Minim [Half note], or if you are writing fast running passages to Quaver [Eighth note] or even shorter. What this means is that the notes of the length you have specified will have the Spacing Gap given by the next parameter. Notes shorter than the Pulse will give a smaller gap, and longer notes will give a longer gap, but as is customary in music printing these will not be exactly in proportion to the note lengths, so don t expect to produce exactly twice the spacing for a minim (half note) as you have for a crotchet (quarter note). Do not confuse Pulse with Default duration. The latter merely defines the length of note which appears when you first type a note name. Spacing For every new score you create, this is set at Standard. You can set it to any of the five descriptions shown in Options - Score, from Extra Narrow to Very Wide. While these parameters are saved with the music, they have no effect on the printout once the note entry has been made: they are merely for convenience in typing in notes. The page size and margins Very few printers can print to the very edge of the paper, and even if they could the result would not look good for a musical score. Consequently Music Publisher has the ability to set and change margins, as well as the overall page size you are using.

122 Page 122 Music Publisher 8 manual The default page size and margins settings are used whenever a new score is started with File New. They can be found on the Options menu under the Desktop tab in the Startup panel. See page 232. But if you've not altered these since the software was installed then all four margins were set at 0.5" (13mm) and the page size would be A4 unless in North America which would be Letter Size (8.5" x 11"). The current page size and margin settings can be changed either with the menu item Page Page Layout, or the Score tab on the Options menu and you can use inches or millimetres by checking the relevant box. If you have a printer using a standard size (A3, A4, A5, A6, US Legal or US Letter) then you can quickly set the size by selecting this option). Both the default and current page menus look similar apart from the title bar: Fig page layout dialog Most of the items are self-explanatory: Page Length; Page Width; Top Margin; Left Margin; Right Margin and Bottom Margin, but others may need explanation: Gutter Margin In any document, this refers to the extra allowance given to the page to allow it to be bound into a book. On oddnumbered pages it is an extra to the left margin, but on even-numbered pages it is an extra to the right margin.
123 Music Publisher 8 manual Page 123 Facing Pages Landscape Most Space This is the check-box which determines that the gutter margin is alternating: if you are printing out only on one side of the paper then you should leave this box unchecked, in which case the gutter margin is always on the left. Landscape format is merely when the paper is wider than long. Changing here from Portrait to Landscape of vice versa will mean that the Page Length and Width sizes are exchanged; as are the relevant margin sizes. The printer is also alerted that it will be required to print sideways if Landscape is selected. If you want to have the maximum amount of room available on your printed page for your score, press this button. Music Publisher will then interrogate your current printer and find out the largest page size it can handle, and the smallest margins and put them in the boxes on this page. However, one warning: if you change printers, the new printer may not support these sizes and you could find it awkward later to accommodate this. For this reason I recommend the "factory settings" of 0.5" margins (13mm) on all sides. Besides, music looks better with a good sized margin all around. When you have changed your page size, the program will check to make sure there are no objects which would be printed off the page (if you have made it smaller) and if not, it will change the page size accordingly. If you do have objects which would fall off the paper, you will need to Compress the staves and cut off their right sides first (see Changing the stave length, page 124). The stave size This is on the same Page Page Layout menu. It is covered by the box in the top right corner of the screen shown in Fig 109 above. The engraving industry has a number of standard stave sizes (top line to bottom line) named 0 to 8. The largest is size 0 at 0.36 and is typically used for children s instruction books. The use will be shown in a hint if you hover the mouse over the button (see Fig 109 above). Sizes 2 to 4 are the most commonly used sizes. However you can use any size you wish simply by typing the value into the box. If you are working in inches you can enter a fraction, eg 2/9 as it is easier than the decimal equivalent.
124 Page 124 Music Publisher 8 manual The stave size is the actual distance which you can measure on your output between the topmost line and the bottom line of a stave, and Music Publisher allows stave sizes from about 0.15" (4mm) to 0.6" (15mm). Should you select a small stave size, say 0.2", then the effect of this is that the document size will be larger on screen while the musical symbols remain the same size. Conversely if you choose a large stave size, such as 0.5" then the page size will apparently be smaller, reflecting the fact that at this size you can get less on it. To choose the largest size of stave which your music can fit on the current stave select Largest. Any changes to the layout will be reflected in the illustration, and will show if the music exceeds the page layout. If it does then you will have to Reflow the music later (see 2. Reflowing the music on page 197). Changing the stave length If you wish to make your stave shorter than the default, either indented from the left, or indented from the right, then you can do so. First make sure there are no objects on the stave beyond where you want to cut and place the cursor at that point. To chop off the right hand, select the menu System Make right of system at cursor or its shortcut Ctrl+R. The right side of the current system then moves to this point. To lengthen the stave, simply move the cursor out beyond the end of the stave to the new right hand side, and press Ctrl+R or select the menu again. The left side is similarly changed (the key is Ctrl+L), but is best done before any objects such as clefs etc are typed as they will have to be moved first if the clef is to be shortened. A Tip By shortening one stave at the left and one stave at the right, and then moving the staves into line, you can create stave setups suitable for a cantor and choir (see diagram below). However, it is a good idea to complete the contents of the staves first, and to move the cantor stave up into place as the very last operation. It can be very confusing as to which stave the cursor is on when two are at the same vertical level. Fig Staves 1 and 2 are bound and chopped left. Stave 3 is single bass clef and chopped right, then moved up to be in line with stave 2
125 Music Publisher 8 manual Page 125 Neatening your work: Justifying As you type in your notes, it is almost inevitable that the bars will not fit exactly into a line. You then have four options: 1. You could use split bars - where a bar is split across two staves. This is not favoured in modern notation. Fig split bars (notation not recommended, although occasionally seen. Note how the dotted C at the end of the first line carries over into the second) 2. You could push the existing bars out to the end of the stave, rather like right-justified text in a word-processor. See Justifying, below, for details on this. But basically it's a Ctrl+J keystroke. 3. You could compress the music in order to fit in some more (see section below - Creating more room: Compressing on page 126). 4. If it is the last bar of the work, you could cut it off short on the right (see section above -Changing the stave length). Fig cutting the end off a short line Justifying To justify your work out to the end, you must have a barline as the last item on the stave so that the program has a reference point to work to. Then select the menu option System Justify or its shortcut equivalent Ctrl+J. This operation causes the music to fill the stave. Note that the last object on the stave must be a barline, and that this barline will then be taken to the right-hand side of the stave and all the other objects in proportion:
126 Page 126 Music Publisher 8 manual Fig 113 before and after justifying. The bar line has moved to the extreme right If the last object on the stave is not a bar line, then the program will refuse to justify. It may be that a title or other text is further to the right than the last bar line if so, mark the text as Immovable (page 59) and try again. What justify actually does is leave initial clefs, key signatures and time signatures in place and then spread each bar out. The space within each bar is calculated on the amount of white clear space between each object, and these proportions are left intact. It is a general principal with Music Publisher that the relative spacing of objects within each bar is not changed by any operation of the program. Creating more room: Compressing Should you wish to compress the work you have done so far then you can push it back to the left. On the other hand, to widen a gap in the middle of the music to enter an extra bar you have forgotten, you may have to push back notes to the right and then also to the left. Select the menu option System Compress Left or Right. The mouse cursor changes to a double-direction arrows on a vertical line. Position it where you want to compress from and scrape (drag) in the direction you want to compress (usually left). As you drag you will find that the mouse cursor jumps to the nearest object and turns to a one-directional arrow. At the same time a red line appears on the stave in the direction of movement: this indicates the absolute limit of compression (it should be regarded very much as a theoretical limit where the notes are touching each other!). Just release the mouse button where you want the object to be moved to and the stave is redrawn with the notes in the positions you required. If you don t like the results you can Undo and try again, but with a little practice this will be simple. The process is shown in diagram form below:

127 Music Publisher 8 manual Page 127 Fig About to press the mouse button to compress to the left The cursor is the double-direction arrow Fig During dragging, and about to release the mouse button to complete compression. The cursor is a single-direction arrow and has been dragged from its position in Fig 114 Note the vertical (red) bar denoting the maximum compression limit Fig After compression. The music has been compressed, the last object is at the position where the mouse cursor was released and the mouse cursor is back to the normal arrow


128 Page 128 Music Publisher 8 manual 25. NEATENING AND TIDYING YOUR MUSIC Neatening and final tidying takes several stages Neatening the music on each stave Neatening the staves within each system Neatening the systems within each page All are controllable individually with Music Publisher. 1 Neatening the music on each stave a. Tools Align Notes by Time Here for convenience is a duplicate of Fig 13 (page 21). Fig about to enter a second stave Suppose we have started to add the bass clef to the sample above and we took no care to align the notes with Tab or anything else, and that this is what I placed: Fig before Align Notes by Time The Align Notes by Time tool would sort out the bass stave and put the notes in alignment with the upper part: Fig after Align Notes by Time

129 Music Publisher 8 manual Page 129 b. The Neaten command The basic command here is Tools Neaten Music, or simply press F6. This tool with its small menu is of value much beyond its size. It means that you can put music in using haphazard spacing and yet simply space it out in musically sensible fashion. One important control here is the Note Spacing slider. If set to Equal then the notes are given a spacing between them on an equal footing, ignoring their actual length. But using the opposite scale, Durational they have a spacing given entirely by their length. Fig the Neaten screen The best is normally found to be a compromise between the two extremes, at a position near to that in the diagram (see Fig 121 to Fig 124 below for differences). It is important to realise how this process takes place inside the computer, as it will explain why there is a Proximity value in the dialog box. As the computer works out durations, it uses the same reasoning as it does for playback: and so regards notes close to each other (less than the proximity value) as simultaneous. Consequently if you were to set proximity too large then you would find notes compressed together when they should not be. However the Neaten operation is very useful indeed because it means that to a certain extent you can enter single-line music in a careless way and have the system Neaten it note that about 60-75% durational gives an excellent proportion spacing. Fig music haphazardly entered Fig after Neatening with 100% Durational
130 Page 130 Music Publisher 8 manual Fig after Neatening with 100% Equal Fig after Neatening with 75% Durational Note that by proportion we mean that the clear spaces between notes are proportional to the length: so that the semiquavers (16th notes) in Fig 122 have spaces between the notes just half of the space of the quavers (8th notes). Options for Neaten You will see above that there are two other options for Neaten. You can opt to do a Time Align first, and/or a Justify afterwards. There is also a chance to tell the software whether to place the clef and key signature (etc) in close (Tight) form, normal or more relaxed (Broad) 3 Systems within the page (vertical placement) a. Automatic Tools Tidy has a command which will neaten the vertical placement of the systems on a page. This command places the systems equally on a page in such a way that the gap between them is constant and is repeated at the bottom. Here is an example of the result (shrunk to save space): Fig after Tools Tidy Neaten Systems
 this can be tedious.")

131 Music Publisher 8 manual Page 131 b. Semi-manual While you can manually place the systems on a page layout (just drag the top stave of a system up or down - See Stave positioning on page 31) this can be tedious. If you do not like the Automatic placement above then the system will still help you. First move the top and bottom systems on the page to the position you want them to be. Now select Page Adjust vertical stave spacing Fig 126. The vertical spacing menu The options govern whether you want the gaps between the systems to become of equal size, or whether they should start at regular intervals down the page. It may be worth experimenting with the settings because you can always Undo (page 62). Note that this operation never changes the internal layout of systems: the staves within the systems will not be moved relative to each other, only complete systems are moved up or down. The Tools Tidy Menu On Tools Tidy you will find a whole host of options. Fig The Tidy Tools menu
132 Page 132 Music Publisher 8 manual Operations Many tidying tools are brought together under one command here, so that you can perform many tools at once in a convenient fashion. For further convenience any selection of operations you use will be remembered next time you enter this menu. Fixup note alignment This simply performs the operation Tools Fixup Note Alignment with a Proximity factor of 5. See this topic on page 151. Tidy clef, key, time signatures Justify last barline Put full rest in empty bars This tidies up these items at the start of every stave. See Justifying on page 125. Equivalent to Ctrl+J command. Place a full bar rest sign in each bar with no notes in it. The full bar rest sign may be defined in Options Score Full Bar Rest. Delete full bar rests Clear each full bar rest. If this is chosen with the operation above then the deletion is performed first, so that the result is simply as if a full bar rest had been placed in each empty bar. Optimise Stems So that stem directions are placed in accordance with normal standards, eg notes half way and above have stems down. In the case of beamed runs the program makes a decision which is in agreement with standards. This is an intelligent operation so that it can distinguish between sections of a piece which have two parts with stems up and down. Neaten Accidentals In complex chords there are ways of writing the accidental cluster for neatness. This command performs this. Neaten Systems on page As mentioned above, see Fig 125. Place inter-system separators It is conventional in scores with larger systems to mark the gaps between systems with a sign ( ). See Fig 128 below for an example of the final result.
133 Music Publisher 8 manual Page 133 Fig 128 after neatening systems and adding separators

134 Page 134 Music Publisher 8 manual 26. OPTIONS AND INFORMATION When a file is open, there will appear an Information item on the File menu. Selecting this gives information about this particular score. All this information is contained in the score file itself when it is saved on disk. In addition there is information about specific objects and staves. These are all mentioned below. 1. The information pages Document There are five pages of information: Document, Fonts, Page Size, Settings and Printer. Fig the File Information Document screen This shows information about the current score, and how much space it would occupy if stored on disk. For further information on any of these items use the Explain button in the program. However some longer explanations are given here: An object is anything which is attached to a stave. Here is a compete list of all the types of object in Music Publisher: Clef, Key signature, Time signature, Note, Rest, Accidental, Barline, Word of text*, Tempo mark, Straight line segment, Hairpin, Curve anchor point, Arpeggiando mark, Musical Sign, Shape object, Tempo object, Instrument change object. Program Limitations: The information screen helps you assess how close to the maximum values you are coming in your current score: * An item can only be up to 80 characters; items over 80 characters are split into 2 or more objects


135 Music Publisher 8 manual Page 135 Fonts There is a limit of 10,000 staves in one score. This is enough for most purposes. There is a limit of 250 objects per stave. The information screen shows you which of your staves has the most, and so how close you are to that limit. There is a limit of 255 different fonts in one score. Fig the File Information Fonts screen Page Size This shows the fonts currently used in this document and the number of words using them. If you wish to substitute one font for another, for example perhaps you would like to change all Times New Roman Normal from size 12 to size 11, then click the line which has counted the Times New Roman size 12 and click the Change button. This leads you to menus where you can alter this font right through the document. Fig 131 the File Information Page size screen The screen shows your page size parameters in inches and millimetres.


136 Page 136 Music Publisher 8 manual Printer Fig the File Information Printer screen This information is not specific to the score you are editing, but rather to the currently selected printer. When you request this screen, Music Publisher interrogates the current Windows printer driver for the information shown. Thus you can find out the smallest margins and the largest page size which it can handle. 2. The options The Options menu item is available whether or not a score is open, because most of the options are not specific to one score. As with all forms, the Explain button gives details on the meaning of the controls when the program is running, but here are highlighted the functions of each tab. Options Desktop Fig the Options Desktop screen

137 Music Publisher 8 manual Page 137 User level With Rulers The competence level of the user. See User levels on page 11. Rulers in the currently-set measurements can be placed around the music if required. To change the ruler measurement from inches to mm or vice versa, right-click the ruler and select the option. Note the coordinates of the cursor show in blue at intersection of the rulers. Fig showing rulers Note that F4 shows and hides rulers as the program is running. With scrollbars See Scrollbars? on page 49. Scroll Speed This controls the speed at which the computer moves the screen to a new position when it is doing so automatically. For fast computers a low setting such as 5 or even 1 is comfortable here; for slower ones use a larger value such as 10 or 20. The default value is 5 when the program first runs. Keep backup file on save See Backups on page 114 Automatic save every The program can be set to save your work automatically at timed intervals. Then in the case of a system or program crash you will be informed of the existence of backup files so that you can reload them if required. Note that this button does not imply that your work is saved in a normal output file, so you need to save any work as normal when you close the program. Allow ABC This enables the ABC format on the Import and Export items on the File menu. It is by default disabled so as not to confuse the majority of users who do not need it.
138 Page 138 Music Publisher 8 manual No address on close Normally Music Publisher closes with the user's name and address on screen. Some users have objected to this since their laptops used in busy places may disclose their identities to identity thieves. So this can be disabled by ticking here. Percussion clef like When entering percussion music on a 5-line stave (see Chapter 18 on page 98) you need to know what key to press to give (eg) the centre line. Percussion Clef Like Treble would make that letter B but Bass would be letter D. Startup page layout When you issue a File New command then the page size given to you is governed by these settings here. With objects unlocked Normally when you start the program you have to select the Edit toolbutton ( ) or press F10 to have the objects on screen turn red when the cursor passes over them. If you wish to start Music Publisher with the objects already unlocked then select this. It may be less convenient, however, for creating new files. Without templates Audio Feedback Check this box and you will not be offered templates when you start. If you almost always use single-stave music then this could be useful to you as it cuts out an operation. See this section on page 177. This means that the audio feedback will be switched off so that the software can be safely used in public places without fear of inadvertent sounds. Allow Midi Keyboard input See the chapter on Using a MIDI keyboard to enter music on page 207. Completion only When audio feedback is enabled, then it can be either on the completion of a note, or the intermediate placement. Ticking this gives completion only. Reinstate warnings See section Cancellation of certain warnings on page 12.
 or a longer cycle Treble Bass Alto Tenor Percussion 1")
139 Music Publisher 8 manual Page 139 Options Music Fig the Options Music screen This screen deals with general program settings which come under the Music heading. Clefs: include all When you press Ctrl+Q to cycle through the clefs, you can select that the cycle goes a simpler cycle Treble Bass Treble (etc) or a longer cycle Treble Bass Alto Tenor Percussion 1 Percussion 2 Treble (etc). If you want this latter cycle, check here. Dots: include double When you press. (full stop/period) to add dots to notes, then it normally cycles (etc) dots. If you rarely use double and triple dotting this can be annoying, so unchecking this box will merely give 0 or 1 dot. Default line widths Default instrument These are the settings the system will initially use when you define lines, hairpins and curves. You can always change a specific line during creation with the toolbar buttons. Here you define the sound of your music if you do not request any other sound. See chapter Sound output - Error! Reference source not found. on page Error! Bookmark not defined.. Default bar number font See Bar Numbering, page 180.

140 Page 140 Music Publisher 8 manual Options Score Note: this tab will not appear if you have not got a score on the screen, ie you have selected Options from the introductory page. Fig The Options Score screen Pulse, Spacing See sections Controlling the spacing of the music as you type it in on page 121 for full explanations of these options. Key signature changes If you want naturals with your key signature as the default on this score, then check this box. Whether or not you select this you can define this as an individual property of each key signature change. See Key signatures on page 36. Allow ¼ tones If you write normal semitone-based music then you will find it annoying to have offered to you options about quarter tones. So Music Publisher is arranged so that you have to explicitly state if you want to have quarter tones in your music symbols and playback. GHB music GHB is Great Highland Bagpipe, commonly known as the Scottish Pipes. Music for this instrument is always in 2 sharps but never annotated as such (and is approximately sounding a semitone higher). In any case these options only affect playback.

141 Music Publisher 8 manual Page 141 First page number This only affects the simple or full page numbering on headers or footer See Headers and footers on page 159 and Simple Page Numbering on page 159. Suppose you create a score with, say, 2 movements and you want to keep the two movements in separate files. In that case when printing out with automatic page numbering it would not be a good idea to have the second movement s page numbering to start at 1. So instead enter here the first page number you wish the second movement to start with. First bar number Does what it says. See Bar Numbering, page 180. This page layout Start Symbol Size Select these buttons to make change the page size or stave size. See page 121 for details. This is the default size of all symbols created in symbol mode which are capable of resizing. The value is between 75% and 125% in 5% steps. See page 84 on The size of the object Options Language Fig the Options Language screen The two options here are self-explanatory. The implications of choosing British or American is that the relevant terms on menus and toolbars are used. See Appendix I: British and American musical terms on page 249 for these equivalents.
 a File Save As or a File Open then this program will normally offers you the last folder you used.")
142 Page 142 Music Publisher 8 manual Options Folders Fig the Options Folders screen This page enables you to select the place where files are by default and perform folder housekeeping. When you do (eg) a File Save As or a File Open then this program will normally offers you the last folder you used. However you can define a fixed, constant folder to use as your initial target folder, such as, perhaps, My Documents\My Scores. To do this, select Scores at the top, then find the folder in the tree view and select Use This. To revert to last-folder-used then select the Last Used button instead. You can also rename, create and delete folders in the current tree by using the buttons at the bottom. There are four types of files used here: 1. Scores where your Music Publisher documents (scores) are kept. 2. Sound where your Midi files will be stored (see section on Sound, page 168). 3. Pictures where your graphics files which you create are stored see pages 115ff on making files for word-processor programs. 4. Scan (only relevant if you have the Scanning Edition): where your scan files are stored.


143 Music Publisher 8 manual Page 143 Options Printer Fig the Options Printer screen Music Publisher does not have to use the standard default printer on your system. It may be that you use a black-and-white laser for printing music, and a colour printer for other tasks. In that case you can select the printer and its attributes in this screen in the drop-down menu and other buttons. Options System Fig The Options System screen The information on this screen cannot be changed from the screen. Some of the information may be requested by Braeburn Software (or our official agents) for diagnostic purposes.


144 Page 144 Music Publisher 8 manual Options Colours Fig the Options Colours screen In Music Publisher colours are used on screen to clarify the properties of objects, as you can see here. If the colours being used are not to your liking then you can change them. So for instance to change the Warnings colour (the orange colour above) then do one of these: Select Warnings in the Colour Of: box and click the orange box which will appear. Select Warnings and then the button Change Colour. Click the orange question mark in the Illustration. You will be presented with the standard Windows colour menu: Fig standard Windows color menu
145 Music Publisher 8 manual Page 145 to which we have added some Custom Colours which we believe could be useful for you. For instance if you find the paper colour too bright then the first colour is a gentle cream which will take away the brightness. Otherwise of course you can select any colour from the standard menu. Other buttons Reset Reset all Press this button to reset the function currently selected (in this example that is the Warning colour of thelarge? sign). It resets to that with which Music Publisher was delivered. The same, except that all colours are reset to factory default. This is a great idea when you have chosen too many of the special on-screen colours to the same as the paper colour! Bouncing Ball style When Music Publisher plays music then there is the option to have the program show you what notes are playing as they play. This is covered in Capter31 on Sound output starting on page 168. Options Colours (other items) You can change the cursor thickness and cursor shape as well as its colour. Here are some of the shapes and colour you can have for your music cursor. Fig 143 showing some of the cursor shapes and colours possible You can change the "desktop" texture which shows behind the plate. Click the Desktop panel to change or examine these. A screen such as this will appear:

146 Page 146 Music Publisher 8 manual Fig the desktop texture selection screen If you press Previous or Next then you will cycle through the available desktops. If you are running an evaluation copy then the number of these will be limited according in order to minimise download time. But a registered copy has at least 16 of these to satisfy your every whim. You can even make your Windows background of the same texture! Here are some of the textures. Well after all, sometimes I have to relax from the hard work of creating the real program


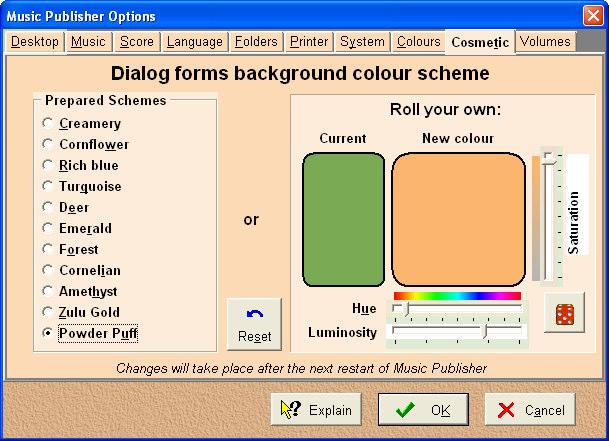
147 Music Publisher 8 manual Page 147 Fig some of the desktop textures Options Cosmetic

148 Page 148 Music Publisher 8 manual Fig Options Cosmetic screen This screen and the previous are the only fun pages in Music Publisher where the sad geeks among you can while away their lonely lunch breaks. Basically they can choose their colour scheme for Music Publisher 8. There are colour schemes defined for them on the left box, or they can make their own by moving the Hue, Saturation and Luminance slider bars. Good luck to them I say. I suggest you, O sensible reader, find a colour scheme to your taste and stick to it. Some of the standard colourings are really not bad. Try Rich blue Cornflower Deer Aw heck, go and look for yourself. Options volumes and MIDI Volumes There are lots of sounds coming out of Music Publisher. The broad categories are shown on this menu. For instance you would probably prefer your Feedback sounds (see page 177) to be of a lower volume than the playback. The System control is an overall volume indicator and controls everything. The small "ear" buttons are for you to test the volume with a short sample. Fig 147 Options Volumes To change a volume simply click inside the volume bar and drag up or down.
149 Music Publisher 8 manual Page 149 MIDI Some lucky users may have more than one sound card in their computer. If so these boxes are where the device to play back the musical sounds are heard, and where you can select the midi keyboard you use for play-in procedures (Chapter 36 starting on page 207).

150 Page 150 Music Publisher 8 manual 27. THE TOOLS MENU This menu is the main place for various operations to be performed on your score. Tools Transpose/Change clef Invoking this gives the following screen: Fig 148 thetranspose/change clef screen The options covered are: Interval Distance and Direction Clef change Extent This governs the number of semitones (half steps) through which the music will be transposed. The Distance and Direction box illustrates with the proper musical term, eg +2 = Major 2nd up. The limit is -24 semitones (Two octaves down) to +24 semitones (Two octaves up). Note that it is quite in order to transpose through a distance of zero this would be used to perform a clef change at unison. The target clef is specified here. Note that all existing clefs will be changed, so use with care. The notes are transposed at pitch, ie a distance of zero and a move from treble to bass clef may involve a lot of leger lines! This governs how much you transpose. One stave, all staves or all staves with particular names which you can choose from the drop-down list. Note that you can choose more than one name by using the standard Windows feature of shift+click to select a range, or ctrl+click to select individual items.

151 Music Publisher 8 manual Page 151 Adjust stem directions When you transpose a single melody then you would want the stems to be changed as the notes go above and below the middle of the stave. Conversely if it s a hymn tune then you would want the stem directions to be preserved. Use this option accordingly. Respace notes If you transpose down one semitone from two sharps to five flats then the width of the actual key signature has increased. So this option would squeeze the notes up slightly to make room for a larger key signature. Conversely they would be spaced out slightly more if the new key signature is smaller than the last. Just occasionally (presumably when the new key signature is smaller) you might want the notes to remain where they are: in which case remove the tick from this box. Tools Fixup Note Alignment Fig Do Fixup note alignment screen Sometimes it is necessary to re-align notes which are not well lined-up with other notes in the same system. While Block Mode can be used for a single chord (see Aligning objects on page 70), it can be laborious to do this throughout the whole document. This is particularly useful after a scan has been read with the Scanning Edition, as note alignment is recognised by tail position, but in Music Publisher by head position. Consequently large or small heads will lead to misaligned notes. This operation is intended to make that process easier and offers choices of the extent of the operation, and how notes should be lined up as well as how close in screen units notes should be to count as being simultaneous.

 The following menu appears.")
152 Page 152 Music Publisher 8 manual The exact new position of the notes moved is governed by the Method options: you can make the notes of a chord align to the leftmost note, or to align to an average position. Note that notes set on an interval of a second can safely be aligned since Music Publisher offsets the heads automatically. Tools Align Notes by Time See a. Tools Align Notes by Time on page 128 Tools Neaten See b. The Neaten command on page. Tools Tidy tools See The Tools Tidy Menu on page 131. Tools Check bar lengths (If language is chosen as US this will read Check measure lengths.) The following menu appears. Fig options for checking bar lengths The meaning of the second question can be explained better with an example. Here is a faulty score: Fig score with just one error in the note count per bar
 then selecting Check will give a report screen like this: Pressing Show in the problem box gives a visual marker on the staves in line")
153 Music Publisher 8 manual Page 153 As you can see there is one clear bar size error: one of the notes in the top stave should be a quaver (8th note). If we choose the option as given (All staves are separate parts) then selecting Check will give a report screen like this: Pressing Show in the problem box gives a visual marker on the staves in line with the list given: Fig bar error report Since we have elected to regard each of the three parts as individual staves then the program finds a problem with the bass stave bar. However this is not really an error, because it is quite legal for a part to be partially missing on this type of piano score. So to avoid spurious errors we should select Braced staves form a part and sure enough our error report finds no fault in the piano part: Fig a correct error report However if in doubt it is simpler and safer to use the default option of All staves are separate parts provided you are happy ignoring spurious error reports. You might have an occasion where you want to regard braces as being for other than keyboard parts. See Fig 16 (page 25) for an example. Finding out the problem If you are unable to see exactly what the problem is with the bar which is marked, then you can right-click that bar and from the popup menu select Check this one bar length and in this case the report gives:


154 Page 154 Music Publisher 8 manual Fig "Check this one bar length" result Tools Hyphenation check Lyrics in songs are not word-orientated but syllable-orientated. Words are separated into syllables and connected with a hyphen. But where does that hyphen go? The correct hyphenation is hard to guess sometimes. Did you know that it's correct to write fa-ther but moth-er is the correct hyphenation for his wife? Music Publisher has available a 153,000-word English dictionary which can correct your hyphenations. (At the moment there is no Latin, French or any other language available.) Example Well ru-ver is a typo and mig-hty looks wrong, but are you sure about lon-ger and today? Tools Hyphenation check gives this report: Fig a hyphenation check report
155 Music Publisher 8 manual Page 155 It lists only the hyphenated words it knows, and of those it lists only the ones which it finds are wrong. So to-day was correct, ru-ver was not found and the other two are mistakes. If you wish NOT to correct any term then you can click in the final column when a Yes will change to No (and vice versa) and finally you can accept with the Autocorrect button which will make your score correct. But you will have to correct ruver yourself. (On the music screen, right-click the ru and choose Quick Change Text.) Tools Reflow Music See 2. Reflowing the music on page 197. Tools Page Numbering See chapter 28 Simple page numbering on page 159. Tools Bar Maintenance See chapter 32 Bar (measure) numbering on page 180. Tools Part Extraction See chapter 33 Part extraction on page 186. Tools TAB tools for fretted instruments See Chapter 19 Special staves TAB notation on page 104 Tools Check Fonts This simply checks all the fonts in use in your score against the fonts installed in your computer and reports any fonts you do not have. In fact this command is performed silently when you open every score so that you know what will not display as intended. Tools Other Here are found some lesser-used options. The descriptions below are short as a lot of the operations explain themselves as they proceed. Tools Other Uniform Hairpins See Hairpins on page 81. Tools Other Format for GHB Music for the Great Highland Bagpipe has a number of particularities not shared by other music, and this tool enables you to format the music quickly. Particularly useful if you have scanned it in with the Scanning Edition. The options you can invoke are:
156 Page 156 Music Publisher 8 manual All grace notes to be placed stem up. All grace notes to have 3 beams. Melody notes (large) to be made stem down. An implied two sharps key signature for playback. A transposition of one semitone up for playback. Set the Midi instrument to Bagpipe. Set the tuning (temperament) to that used on the bagpipe. Tools Other Choir to piano reduction You can add a piano reduction automatically to choral parts for SATB and TTBB choirs. The music must consist of simply 3 or 4 choral lines and a piano part will be automatically added. If the SATB option is chosen then the progression is as in Fig 156: the Tenor and Bass parts are merged to the 2nd piano stave as shown; in TTBB male voice choir the parts are transposed and merged to the piano as show in Fig 157. Fig 156- adding piano to SATB Fig 157- Adding piano to TTBB The operation of the third option, other, is shown in Fig 158: the two clefs on the piano part are copies of the clefs on the 1st and 3rd staves, and the pitches of the notes are copied across without care for their meaning. The diagram is clearer:


157 Music Publisher 8 manual Page 157 Fig 158- Adding "Other" reduction (nonsense example) Tools Other Double/Halve note values This should be self-explanatory and is particularly helpful when music is scanned. Older style hymns were predominantly in white notes, but the modern style is black notes, so this option is provided to do the change. It will change note lengths and time signatures found in the music and in the range requested. Tools Other Delete off-screen objects Occasionally objects will move off-screen. Perhaps you have moved them yourself, perhaps the program has done it inadvertently. Such objects can cause problems with operations such as Justify or Neaten, so this operation is supplied in case of problems. Tools Other Separate hyphens in lyrics Older scans from MP Scan did not correctly move hyphens from the ends of syllables to mid-way between the syllable and the next. This operation does this for you.


158 Page 158 Music Publisher 8 manual Tools Other Add courtesy keysig at stave end When the key signature changes as a line ends, it is customary to put a courtesy key signature at the end. This operation will add in a key signature if needed: Tools Other Hunt the Piano Older scans from MP Scan 2 (the Scanning add-on module for MP6 earlier) did not recognise braces at the left of piano parts. The on-screen instructions should be clear. Tools Other Coverage information Typescript is quoted as around 5% ink coverage on the paper. This command will report for you the coverage of ink on the current page of music. I doubt it s much use, but I wrote it once and you might as well have it. Tools Other Delete duplicate Fermata After scanning, sometimes there is more than one fermata sign at a particular place. This command simply goes through the score deleting unnecessary fermatas. Tools Find text becomes Here you can type text into a dialog box and have the program jump to the first occurrence of that text anywhere in the score. It is a handy way of jumping around if you know some text to jump to. Note that the program will move to the page containing it and the cursor to the actual place which contains the target text. The program will find the target text anywhere within the text required: if your target is simply e then you will be shown all words containing an e. Tools Tidy Tools See The Tools Tidy Menu on page 131.
 but a simpler method is available on the Tools menu, the Add menu and the Page menu.")

159 Music Publisher 8 manual Page SIMPLE PAGE NUMBERING Page numbering can be performed via Headers and Footers (see page 160 below) but a simpler method is available on the Tools menu, the Add menu and the Page menu. Fig Page Numbering screen Much of it is self-explanatory but the following comments can be made There are 6 styles of numbering, as shown in the Style box. The first page can be numbered or not. See the Options area. The font used is defined by the Favourite Font which stats with "Page". See Fig 44 - The Favourite Fonts screen on page 55. If no such font exists then it is fixed at Arial size 12 although it can be bold or italic or both. It can be in a choice of 6 positions, and if other than the central position is chosen then the positions can alternate. The First page number field is the same as that on the Options Score page (Fig 136 on page 140). On the music screen the page number is shown in grey as it cannot be changed in the normal music editing screen. Fig showing the page numbering value, here at centre bottom
160 Page 160 Music Publisher 8 manual 29. HEADERS AND FOOTERS What are headers and footers? These are terms used in the world of publishing. A Header is an area of the page which contains information which is seen on every page, at the top of the page. A Footer is the same at the bottom of the page (it has nothing to do with Footnotes). For instance, the page number could appear in a header, and a copyright notice in a footer, as in this manual. It may be a good idea to include the location of the computer file in small type at the foot of every page. Setting the header and footer margins These are set on the same menu as the page layout, see Fig 109 on page 122. Either use a default header and footer (defined from Options Score) or one for the current document (Options Desktop Startup) or Page Page setup). Either way, remember that your header and footer steal area from the music and reduce the size of the plate (see page 17) and if you change these on a score being edited then it will change its dimensions to reflect the the change of length in header and footer margins. You may well find that systems which previously fitted on a page no longer do so. Note that the headers and footers do not appear on the main music editing screen. Defining the header and footer The header and footer are actually defined by selecting Page Header/Footer. Pressing the shortcut Alt+F3. Clicking the toolbar button. A dialog box now appears reminding you of the size of the header and footer margins and asking you to select which you want. Should either or both header or footer margins be too small then the program will make them unavailable.

 or the lower (the footer) in any font required the cursor will change to a no-entry sign for other areas of the")
161 Music Publisher 8 manual Page 161 Fig the header/footer introductory dialog Click the one you want, and OK to continue. You will now see the relevant area with a clear division between the rest of the page shown in grey as it is unavailable at this stage. You will also note that the cursor has changed. Fig about to enter header text Now the only command available is to insert text, either by toolbar button or menu or shortcut, as usual or return to normal Music Mode. Simply define text in the usual way, placing it in the upper white area (the header) or the lower (the footer) in any font required the cursor will change to a no-entry sign for other areas of the screen. For your convenience, however, you can use the following special text codes in headers or When actually printed, this gives the page number, eg would give Page 7 (or Similar except that any text this is only printed on odd numbered pages.
162 Page 162 Music Publisher 8 Similar but even numbered pages but in addition this will also not be printed on page Refers to the last page number Using these last ideas, you could define a footer which reads, in two text fields in the left and right of This would give Page 1 of 26 (or whatever) on odd pages, and Page 2 of 26 (etc) on even numbered pages, this giving alternating sides in a similar manner to the Page Page Numbering (see page 159) but with more flexible control over fonts Gives the full filename, for instance might be printed as File Gives the filename without the full path, eg might be printed as File Gives the long date format of the printing date. Thus Printed might come out Printed on Wednesday, 10 April Gives the short date format of the printing date. See above for how to change the format. Printed might then come out Printed on 10/04/02. The long and short date formats are a Windows feature and are set in Settings Control panel Regional settings The printing time. Be aware that changing the date formats affects the display of any other programs which use these, but in our experience very few programs do use these, with the exception of Windows utilities such as Clock. If you wish to have the composition or other dates in the score, it is recommended that you insert them in the normal way as text (eg 10 April In this way, unlike the printing date, they will not change with time. Closing the header and footer Close header/footer mode with the menu option Mode Header/footer again or shortcut Alt+F3, or the toolbar button. Note that the headers and footers are not shown on the normal music screen but can be seen on the Preview screens.

163 Music Publisher 8 manual Page PRINTING The page size and your printer When you set the page size, either by setting the defaults from Options Desktop and selecting File New, or by changing with Page Page Setup then the page sizes and margin sizes you have set are checked against your printer. Should your printer not be able to handle a page of this size, or boundary margins as small as these, then a warning is given. However, assuming that the values are acceptable, the printout you will get should fit onto the paper you have used. The print preview Although Music Publisher is very much a WYSIWYG program, there will be times when you wish to see how the margins etc will look before printing. Select File Preview or its shortcut Alt+F5 or the button on the toolbar ( ). The main sheet disappears and the page you were working on appears in the view screen, scaled to fit. Fig Preview

164 Page 164 Music Publisher 8 manual Printing The margin outlines (top, bottom, gutter, left, right, header, footer) are shown in red, and the contents of headers and footers can be seen. You can elect to hide the red margins by unchecking the Show Margins button, and move through previous and later pages with Previous and Next buttons. When finished, select Close or press Esc. Select File Print or its shortcut Ctrl+P and you have a new Windows Print Dialog: Fig 164 the Music Publisher print command screen By selecting the Name drop-down menu you can alter the printer, and by selecting the Properties button you can change the properties which are specific to your printer. Some modern printer drivers can do clever things such as printing two sheets of A4 at half size (A5) side-by-side on an A4 sheet. If yours can t and you would like this facility Music Publisher can help. See Booklet printing below. You can stipulate your pages required and the number of copies, and whether those copies are to be collated or not. Double-sided printing Double-sided printing is known as duplex in the printer world, and many laser printers have it these days as an option. If this is so, you should find the relevant setting in the Properties of the printer. If it is not there then Music Pubisher can still help you perform double-sided printing, but first there are two things to watch. When you put paper in the in-tray, does it turn the paper over on the journey to the out-tray, or not?
165 Music Publisher 8 manual Page 165 PDF output Generally speaking, ink-jet printers don't. They print on the top of the paper in the in-tray and leave the paper in the out-tray with the print up, to assist in drying. Laser printers can be either way, so you need to experiment a little. The point is that if the paper is turned over then multiple-page printouts are in the right order when you take it out of the out-tray. Suppose you have a 4-page score. To perform double-sided you need first to print pages 1 and 3 as normal. So specify Odd only in the Print Page Numbers panel. Now you will put the printed pages back in the in-tray of the printer and specify Even only in the Print Page Numbers panel. But wait! There are many ways to go wrong! You may need to turn the paper over and/or turn it round from the out-tray to the in-tray. And you may need to print in reverse order (page 4, then 2) in the menu above. So experiment carefully with a 3- or 4-page work and make notes of your findings ready for your next printout with Music Publisher. This is identical to File Export As PDF file. It simply creates the whole score as a PDF file in a folder of your choice and then shows it using Adobe Reader assuming this is installed on your computer. Booklet printing Most printers sold these days are A4/US Letter size printers. These are just about usable to print two pages of your score on each side using Landscape Mode and then folding them to form a booklet. Of course you need to be careful what pages you print opposite what other pages so that it folds up nicely, but be very grateful that Music Publisher takes away all this hard work for you. OK. Now for the details: Pressing the Booklet button gives a new printing menu:
 printing, and what its smallest possible paper margins are. Underneath the printer name you will find the results of the first and in the Layout Options the results of the second.")
166 Page 166 Music Publisher 8 manual Fig the Booklet printing menu When you choose this menu the program interrogates the printer concerned and finds out whether it can perform Duplex (double-sided) printing, and what its smallest possible paper margins are. Underneath the printer name you will find the results of the first and in the Layout Options the results of the second. Duplex printers This is the simplest of all for you. You can ignore almost all other options, and with the Printing Options Duplex ticked you should choose the nearest Paper Weight *value and then the Print button. Non-duplex printers Now it gets complicated. You need to run some tests to see if your paper is turned over in the printing, or is turned around when you put the half-printed paper it back in the in-tray. Select Test in the Printing Options box and press Print. Two pages are printed to the paper along with this dialog on screen: * Users in the USA are not used to seeing paper weights quoted in grams per square metre. They express their paper weights in pounds per 500 sheets for a "basic sheet size" and this basic sheet size varies by type of paper. It's a much more complex business than those countries who use A4 (etc) sheet sizes. American users simply choose from one of the nearest description in the Paper Weight box.

167 Music Publisher 8 manual Page 167 Fig 166 : Test dialog box for Booklet printing You will find that the paper printed has printed two sheets, clearly marked as being pages 8 1 and pages 6 3. Turn the pages over and perhaps around and place back in the in-tray and press OK on the box in Fig 166 above. If your two pieces form two sheets which you can fold into a booklet then you are the most fortunage user of all. Just remember whether you turned over and turned around and stick a note on your printer to use the next time you want booklet of music. If not, then you will need to experiment with this Test Print again and the interplay with the Pass 2 reversed tickbox and carefully remember your settings! During testing, to keep your toner and time to a minimum you can select Layout Boxes only. The Layout Options settings The margin settings only need to be involved if you do not want your music to be central on the output sheets. Otherwise the software will put the music as far out from the paper fold (centre) as it can so that it does not get lost in the gutter (the bit where the staples go). The Paper Weight panel When you fold, say 4 sheets of paper then no matter how tight they are together the centre sheet will "stick out" further than the outside. This is called Creep. While this can be trimmed with a heavyweight guillotine (most recommended if you are doing a lot of booklets) then without a Creep calculation the music would migrate across the page from the outer sheet to the inner sheet. So Music Publisher attempts to compensate for this and the Paper Weight setting reflects the difficulty of folding the paper. If you don't know your paper weight, select the Standard 80gm setting.
 or by")

168 Page 168 Music Publisher 8 manual 31. SOUND OUTPUT AND PLAYBACK Playing your files Fig Stave Attributes, Sound tab Select the Tools Play command, or the shortcut F2 or the toolbar button with the speaker on it ( ) or by right-clicking the stave/page and selecting the relevant option from the popup menu. When you do this, a subsidiary dialog window opens: The position of this window will first of all be at the extreme top right of the screen, but it can be dragged around by its title bar as usual, and if closed will re-open in the position you last left it. The interaction between the panel and screen is subject to the usual Windows controls about which window has the user s attention (technically called the focus ). For instance if you use the mouse to return to the editing screen by clicking on the page then that will move the focus back to the page rather than the sound panel, similarly clicking on a sound panel function will move the focus there. It is in keyboard interaction that there is room for confusion, and sometimes you may find that your keyclicks are going to the panel you did not expect. Fig the sound panel We will look at the functions of the sound window panel by panel.
169 Music Publisher 8 manual Page 169 The main command panel Fig the Play area Play Save Midi Play is the principal button which makes the program play the music which is on the screen. When a file is already playing this button is disabled. Save Midi opens a normal Save dialog allowing you to save the music for future use or exporting to other packages. It would normally be played using Windows Media Player, or by clicking on the file in Windows Explorer to run whatever software you have installed to run Midi files (eg Windows Media Player). The music which is saved is identical to the music which you would hear if you pressed Play. Close Less Close closes this whole window. It can only be re-opened by selecting Play, eg by pressing F2 from the score window Less is a button which will collapse the whole command panel to the main command panel only. When this is collapsed the button reads More and can be used to give access to the larger panel. The small panel is useful to minimise the size taken up on the screen by the play system. Playback tempo Fig volume and tempo playback controls The Tempo can either be a. set at Fixed and then the tempo set by moving the bar left or right. The units are in crotchets (quarter notes) per minute. The lowest value which can be selected is 30, and the highest is 240. If you wish your tempo to be measured in dotted crotchets per minute then you can do this by pressing the button with the dot. Pressing again reverts to undotted crotchets.
170 Page 170 Music Publisher 8 manual Tempo changes b. set at Auto in which case the tempo is taken from the Tempo objects in the score (see Tempo markings page 40). However the tempo can be changed by sliding the scale between 4 (ie a quarter speed) to x2, twice speed. c. If a formal tempo mark is not used, but rather a tempo word then this is equivalent. The actual tempos used for the various words are shown in Appendix E: Verbal Tempo marks on page 241 Tempo can be changed by 1. A new tempo marker placed on the stave. This can be visible, or invisible as described on page A new tempo description (allegro, etc) placed above the top stave of the system. See Relative tempo indications on page A tempo modifier description (accel, rit, etc) place above the top stave. See Appendix E: Verbal Tempo on page 241 for details about these. Should you want the tempo change to occur over a fixed range of music then add an invisible Tempo Marker at the end of the required range: Fig a gradual change of tempo Text indicating a tempo or equivalent (page 242) will revert to the tempo value in use at the point where the tempo change word was indicated. Range of play Fig the Range part of the Play box You can select the range of the playback from this menu. The options on the right are as follows:

171 Music Publisher 8 manual Page 171 & on If this is left unticked the playback will consist only of the range defined in the left part of the panel. For instance as shown above playback would stop at the end of the current page. If it were ticked then playback would continue to the end of the piece (but can always be stopped by pressing Stop in Fig 169 or the Esc or F2 keys). If this is selected with a single stave then the system will continue playing the stave of that name on subsequent systems. Repeats No MBR If ticked then all repeats in the music will be observed, otherwise the program will play repeat bars as normal bars. If there are Multi-Bar Rests in the piece then ticking this will give play them as the correct number of silent bars. Otherwise it will be heard as one bar rest, as it s a bit boring listening to many bars of silence. I---» Start playing at the beginning of the bar containing the cursor. Otherwise the playback would start at the start of the current system. Bouncing ball. Actually it's not a bouncing ball but is still an indication of which notes are playing. Playback Progress Indicator options The style and colour of indication can be changed by Ctrl+clicking this indication. See Playback Progress Indicator, below. Table 8 - the options for playback Ctrl-clicking the bouncing ball option gives access to a screen where the styles of progress indicator can be chosen: Fig Playback indicator styles Here is a sample of styles and colours corresponding to the options above:


 then the playback")

172 Page 172 Music Publisher 8 manual Stave left only: In this case the marker simply moves down the paper as the music plays Vertical line Marker Colour change Colour trail Table 9 - the options for the playback position marker Sound used for playback Fig Instrument playing choice If you select the first item (Defined in stave) then the playback for each stave will be according to the instrument defined in the Stave Attributes. This menu is repeated here for convenience:

173 Music Publisher 8 manual Page 173 Fig Sound tab of Stave attributes This is the more usual option to select. But if you've not got round to defining all the stave sounds yet then you can have your score played to you with all staves sounding any one of the 128 defined in Appendix J: General Midi instrument names on page 256. Do this either by choosing any of the instruments named in the panel, or should your required instrument not be seen on this list then it may be chosen by the More Sounds button, at which point the full instrument choice panel will enable you to choose from the full range of 128 voices. Fig 176 the first tab of the instrument selection screen When you choose a new instrument from this extended list the instrument chosen will appear on the radio button list. In this way the program keeps a short list of your "favourite" sounds. More favourites which you select also appear on the last tab of the instrument selection screen above. Note that in addition to the 128 General MIDI instruments, there is a 129th instrument called (silent) on the last menu of the instrumental choice screen above (Fig 176). This is provided so that you could for instance listen to only the alto part of a hymn tune by selecting the All sound set to (silent) and the Stems down only to Flute (or whatever). On the final Tab of this dialog screen there are also available some "group" instruments which are combinations of instruments. See Appendix B: 'Group' Instruments starting on page 227. If the stave represents a transposing instrument such as clarinet or saxophone then you can adjust the pitch heard with the Transpose box. For instruments which sound an octave above the written part (eg soprano recorder, piccolo) a quick way of entering this is to press the Octave Up, and for instruments sounding an octave lower (tenor voice, organ pedals, double bass) the Octave Down button is provided.
.")


174 Page 174 Music Publisher 8 manual Options Fig The Options part of the Play dialog There are four items here. 1. The Proximity value indicates that notes which are closer together than (in this case) 5 screen units will be regarded as sounding together. (10 units is the width of a black note head). This is so that constructions such as can be used and the program will not regard the notes as separated in time as they would be if the white note were farther away: 2. See the section below on page 177 below for an explanation of Play grace as normal 3. The tuning fork button gives access to changing the tuning or temperament of the work: For details on temperaments see Appendix L: Temperaments on page The button labelled A7 gives access to a menu which allows you to indicate how the Chord Names should be heard. You can choose what instrument should play the chord, and whether the chord should be played straight ("None") or as an arpeggio of different speeds:
 and fix immediately but this can be annoying for each correction. Instead you can press the spacebar to mark the position.")
175 Music Publisher 8 manual Page 175 Fig the chord playback menu Marking a position during playback While you are listening to a playback you will often see or hear mistakes or improvements that you want to make. Of course you can stop (eg press Esc) and fix immediately but this can be annoying for each correction. Instead you can press the spacebar to mark the position. In the example below as the music was playing I spotted the inconsistency in the beaming in the middle of the bar, and as the cursor went by I pressed the spacebar. An orange marker appears above the first stave of the relevant system and the playback continued. Fig marking a position while playing You can mark as many positions as you wish while the music is playing and the marks will remain in position until you clear them either by selecting the menu option to do so, (see the View menu, or right-click the page) by playing again (or at least starting to play). All marks are erased before music starts. To jump to the marks you have defined you can use the menu Goto Next mark, or equivalently press its shortcut, the * key either on the numeric keypad or on the maim keyboard. After the last mark, Goto Next mark will go to the first mark.
176 Page 176 Music Publisher 8 manual Other points about playback The Midi standard only allows 15 instruments (or channels as they are called) 15 melody+1 rhythm and conventionally one channel is a timing channel where all changes of tempo are kept. So that's down to 14 instruments. While it is possible to exceed this on a system with two separate Midi interfaces or by other direct interfaces to external sound devices, Music Publisher has at the moment this limitation of 14 different instruments. So for instance, this could be 14 staves with one sound on each, or 13 different instruments plus 1 stave with 2 sounds, etc. If you try to use more than 14 instruments then the 15th instrument etc will be given the same sound as the 14th. Scores which are quarter-tone enabled (see Chapter 34 on page 201) have fewer channels available because any channel with quarter tones has to have the "other" notes on an identical channel tuned half a semitone higher. People wanting more flexibility in the sound output generate Midi files from Music Publisher and import these into other software for general modification. VanBasco Karaoke Player is one such product, it can be used to silence some part or emphasise others with control over tempo. See Problems with playback Music Publisher still allows you to put whatever you wish on the paper, and for this reason the music played back to you may not be what you intended. If you break the normally accepted rules of music then you cannot expect Music Publisher to sound as you hoped. As an example, consider the following: This is correct notation and Music Publisher understands it and plays back correctly. But what is it to make of this? At beat 3 the stems-up count is 2 crotchets but the stems-down count is 2½ and Music Publisher cannot cope because this notation is illegal. Perhaps you meant the C to be a quaver? Or perhaps you really did mean this (yes, it s poor notation but at least it balances and Music Publisher knows how to play it):
177 Music Publisher 8 manual Page 177 While the above is very contrived especially as no time signature is given - it is still poor notation because the minim chord straddles two beat units it should ideally be written as: in order to preserve the beat. (Note that the presence of barlines is by and large ignored by Music Publisher in creating the sound. This is a reflection of the flexibility of the program and its noninsistence on barlines.) In essence when dividing parts on a section of the stave (as the first example above) make sure that the sum of the durations of any section with stems up is the same as the sum of durations of that section with stems down. You may need to put in rests to make it correct, but that s just good notation anyway. Since Music Publisher is constantly in a state of improvement you should look in the Help files for further information on limitations of the playback algorithm. Do a search on Playback algorithm. Small notes, acciaccaturas, and appoggiatura There is considerable ambiguity in music over what small notes actually mean. Generally speaking there are three different types which Music Publisher recognises and plays accordingly. These are summarised in this table:
178 Page 178 Music Publisher 8 manual Name Notation How they are heard Acciaccatura (often called simply grace notes) Appoggiatura Single notes always notated as a quaver (8th note) with a slash and always with stem up unless in a lower part on the stave as in (b). As in (c) multiple acciaccaturas are always notated as semiquavers (16th notes). 1 Played as fast as reasonably possible, usually stealing the time from the previous note so that the beat stays on the normal note following. A Baroque notation often seen in works of the time. They are played giving the small note its full duration, and stealing its time from the subsequent note. Cue notes More general small notes Table 10 - different types of grace notes In an instrument there can appear notes from another instrument to assist in starting at the correct time. To be played in a freer time. Normally a solo instrument eg Chopin's piano works. Now in Music Publisher the correct playback will be performed for acciaccaturas provided the Note Properties indicate that this is what it is (in the Size box on Note Properties Size. appoggiaturas other small notes are played or not played according as to whether the Play Grace as Normal box is ticked in Fig In some folk instruments these rules may change. The Highland Bagpipes always have demisemiquavers (32nd notes) for acciaccaturas.
179 Music Publisher 8 manual Page 179 Audio Feedback As you are entering notes, you can have the program play each note as it is being completed. This feedback will be played in the current stave's Instrument sound and will include other notes at this position (the chord). This feedback is controlled by an icon on the toolbar: Fig The audio feedback button, active and inactive Also the Options Desktop page has an option controlling whether it is to be heard. If you never want to hear the feedback (irrespective of the button shown above) then set the option on the Options screen. See Fig the Options Desktop screen, page 136 and the topic Audio Feedback on page 138. The volume of this feedback is controlled on the Options Volumes setting. See Fig 147 on page 148. You may prefer to have it quieter than the normal playback volume. Quality of sound The quality of sound is beyond the control of Music Publisher, but a comment here is worth making. In particular it depends on Your sound card. Cheaper sound cards imitate instrumental sounds electronically and may produce acceptable tones on some instruments and poor ones on others. For a little extra quality your card may be equipped with wave table synthesis whereby the instrumental sound has been captured by recording a real instrument ("sampling") and storing its sounds. The quality of this sampling can vary also the tone produced by most instruments varies considerably over the range, and the points at which a sample has been taken may be dictated by the quality of your wave table synthesis. Your card may even be able to load better instrumental sounds with Sound Fonts but discussion of these is well beyond the scope of this manual. Your speakers. Whatever the card, the sound it produces can be improved drastically with good speakers, or even an external amplifier. Even a humble sound card can sound astonishingly good when played through a hi-fi system. But the net result is that what sounds good on your system may not sound good on your friend s. So it s best to stick to a small range of established instrumental sounds. If you write parts for Helicopter or Gun Shot (sounds 126 and 128) then you deserve all you get
180 Page 180 Music Publisher 8 manual 32. BAR (MEASURE) NUMBERING Introduction I apologise for the use of the term bar exclusively in this chapter. It would make the chapter more awkward to read to use bar (measure) throughout. Apologies to my US customers. The program is a little kinder, if you selected US as the Language in Options then the program uses measure rather than bar throughout. Capabilities Numbering The bar numbering normally starts at 1 (ie the first complete bar is bar 1 this is the usual standard and initial bar segments which are incomplete are not counted. See Fig bar numbers at the left. However it is possible to have the bar numbers start at a value other than 1. This is particularly useful when dividing a work into several files when the second and later files would not have the first bar numbered 1. You can also force a bar number to be out of sequence. This could be useful in a long work where you do not wish to mark the work with multi-bar rests. Placement of bar numbers These can be placed at three possible positions: 1 At the extreme left of each stave. This is appropriate for single-stave orchestral parts. Fig bar numbers at the left 2 Above the beginning of each stave. (Optionally other staves in each system can be numbered, see Deciding which staves are to have bar numbers on page 184.)
181 Music Publisher 8 manual Page 181 Fig bar numbers at top left of stave 3 Above the barlines themselves. Traditionally this means every 5 th bar line but the program can place the numbers every bar, 2 nd bar, 5 th or 10 th bar. Fig 183 bar numbers above every 5 th bar line Font used In all cases the first (pickup, anacrusis) bar is not numbered 1 because the normal standard is to number from the first complete bar. The font used above is Times New Roman, Bold, Size 10. If you prefer another font then this can be defined (see below). It will be saved with the score so you can have different scores with different fonts, but within one score you cannot vary the font. You can also have the bar numbers boxed, which helps them to stand out. Fig 184- showing bar numbers with boxes Other facilities Once a work has had bars numbered then you can jump to a particular bar number in the same way as you can jump to a page, system or stave.
.")
182 Page 182 Music Publisher 8 manual Operation Basic renumbering and choices To perform the bar renumbering, from the main Tools menu select Bar Maintenance. (Measure Maintenance on US Language selection). A dialog box appears: Fig The bar maintenance screen Note that not all parts of the figure above may show, depending on what options you select in the Operation and Numbers position box. To do the actual renumbering, simply select Refresh Bar Numbers, the position in the Numbers Position box and then OK. Should any of the barlines have a forced bar number (see Out of sequence bar numbers on page 183) then you will be given the opportunity to resequence or keep this numbering. From this screen you can also change the font of the barline numbers and indicate that they should be boxed, or not. Moving to a bar number You can use the screen in Fig 185 to jump to a particular bar number, or you can use the menu item Goto Bar Number [Measure Number in the US]. When this is selected the program will jump to the first note of the top stave of the bar in question, or if no such note exists, then a suitable barline.


 under the Score tab. To change the value simply change this box and OK.")
183 Music Publisher 8 manual Page 183 Out of sequence bar numbers Should you require a bar number which is not in sequence, then you must first find the barline. Then in edit mode right-click that barline. One of the items on the popup menu will then be Force bar number to be and the following dialog appears: Fig out of sequence bar numbers Once you have selected a particular bar number to have a forced value then each resequencing operation (such as from Fig 185 above will ask for confirmation that you wish the forced sequence to be maintained. Starting at bar numbers other than 1 If you have divided your score into two sections then you may wish to start the bar numbers at a higher value than 1, in the same way as you can start your page numbers at values over 1. The option which covers this is on the Options screen (Options Configure) under the Score tab. To change the value simply change this box and OK. Fig setting the first bar number Multi-bar rests Fig the multi-bar rest in action Multibar rests are created in Symbol Mode. When you place one then the software will request the number of bars which it lasts for. To change the value of this afterwards right-click the rest when it is highlighted in editing mode and select the option offered: Change multi-bar rest value.
 method of numbering the bars straight through and ignoring their function: Fig 189 - showing bar numbering through repeats.")

184 Page 184 Music Publisher 8 manual Numbering the 1 st and 2 nd time repeat bars There is no unanimity in musical circles as to how these should be numbered. Music Publisher uses the most practical (although perhaps illogical) method of numbering the bars straight through and ignoring their function: Fig showing bar numbering through repeats. If you do not like this then you must use the Out of sequence bar numbers facility, page 183. Deciding which staves are to have bar numbers In multi-stave systems it is normal to have the bar numbering on the top stave of the system. But additionally bar numbers may occur on other staves: Choral scores: above the voices (if more than one) and also above the accompaniment (if any). Orchestral scores: above the score and also above the strings. Band scores: above the score and also above the brasses. By default Music Publisher will only place the bar numbers on the top stave. To place on the other staves, eg the piano, go to that stave, right-click and select Properties. Here on the Bar Numbering tab you can find the place to place the explicit type of bar numbering you want to see on this stave: Fig 190- Altering the individual setting for where bar numbers go
185 Music Publisher 8 manual Page 185 In this way you can define a numbering layout such as this, where staves 1 and 3 have the numbers but 2 and 4 do not: Fig 191- Showing staves 1 and 3 with bar numbers When to renumber the bars While you can add bar numbers at any time, it s probably best to complete your work first and renumber at the end.
186 Page 186 Music Publisher 8 manual 33. PART EXTRACTION Music Publisher can extract parts from a master score for distribution to players. This is a major feature of course and this chapter gives the details on it. Capabilities What is to be extracted? Here is an example full score: Fig 192 an example of a full score A full score will consist of a number of parts for the players of various instruments. There are three possible cases: One part has use exclusive of one stave. The Viola part above is of this type. A part might have use of two or more staves in the full score. This would apply to a piano, xylophone, or organ part (etc) within a full score. A part may be just a part of a score. This would apply to the first stave above: Flute 1 is notated with stems up and Flute 2 notated with stems down and the resulting part extraction should create both these two parts from the one stave. The Tools Part Extraction can handle all these cases, but no more than two parts can be produced from one stave. Shown below are the parts which Music Publisher 8 produced from the above extract:
187 Music Publisher 8 manual Page 187 Fig 193- first flute part Fig 194 second flute part Fig 195 viola part Fig 196 piano part (Actually in a small chamber work of this type, the part given to the pianist would probably contain the other parts in a small stave format but this will do for illustration) Other facilities To save time in rehearsal it is very important that the parts be accurate. So built into this module is the ability to run a check on the full score first, to make sure that The staves which represent the parts are unambiguously defined throughout the score. All parts have the correct number of beats in each bar. These are explained in the Preparation section below, and the second of these is also available outwith the Part Extraction Wizard on the Tools Check Stave Contents command.
188 Page 188 Music Publisher 8 manual You may also need to perform post-processing operations on each of the individual parts. These include: Merging of empty bar rests into multi-bar rests. Subsequent re-flowing of the music to close the resulting gaps. Changing the paper size and/or the stave size. Full scores are often printed smaller than players parts. The latter operation is available on the new Tools Reflow music command, and the Page Page Layout and Page Stave Size commands have been enhanced to handle this new reflow concept. See 2. Reflowing the music on page 197 below for details. Preparation Stave names: making sure the right staves are extracted It is a convention in a full score that system 1 contains all the parts which will appear at any stage in the score. Music Publisher makes use of this convention and System 1 plays a vital part in the part extraction process. It is used to define all the instruments which appear and even if they are silent at the beginning they should be present in the first system as a complete line of full bar rests. Silent parts may be omitted in following systems but System 1 must include all extracted parts for the module to work. The continuity of the part from system to system is tracked by the Stave name so you need to name all your staves and check them carefully before you start extracting. If you have created the first stave carefully and added later staves with Add New Stave then this will be taken care of.
 within the first system and you should override this with something more")
189 Music Publisher 8 manual Page 189 Create the stave name with the Stave Attributes dialog: Fig 197 Naming a stave Note the Instrument/stave Name field. If the stave has not already been named then the system gives it a name based on its position (eg Stave 5 or Staff 5) within the first system and you should override this with something more sensible, such as Flute. You should be careful of pressing OK with the Replicate Attributes button down as that would rename every top stave in subsequent systems and that may not be what you want. But conversely if all your systems contain the same number of staves then this is precisely what you want and so should be used. In this way you name all staves in all systems, and as a help you will see the Stave name shown in purple if you press the attachments button ( )on the toolbar. The stave name is not case-sensitive (ie Flute is the same as flute for extraction purposes) but otherwise you should be careful with your naming. I advise the use of singular terms for consistency use Flute rather than Flutes Global objects Look back to Fig 192 an example of a full score (page 186) and the extractions in the next figures. The word Allegro appears only once on the full score, but appears in the same position on all the other parts. You would want the same feature to happen for items such as titles, composer names, tempo changes, first/second time bars and so on. This is accomplished easily by giving the item in the full score the Global attribute: right-click the word you wish to make Global, and select Set Special Attributes:

190 Page 190 Music Publisher 8 manual Select Yes in the Global box and OK. The object text now appears in a special colour on the screen so that you can distinguish this attribute from normal black local objects. Only text, symbols, lines, hairpins and shape objects can be made to be Global objects. Fig 198. Setting Global text attribute A shortcut: The faster way to define Global attributes for an object is to highlight the word with the mouse so that it turns red, then press G on the keyboard. You will see the colour change when the mouse moves away. A second press of G turns it off. Putting the name of the part on each of the parts Operation In any set of orchestral parts, it s useful to have the part name clearly written at the top. To accomplish this in Music Publisher, place text on the score attached to Stave 1 (at the page top left is recommended) which with the special term [partname]. Text with this special name is a place marker. On the full score it will not print out, but on each extracted part this text will be replaced with the Stave name you specified in Stave names, on page 188 above, possibly with a number 1 or 2 following for the extraction of 2 parts from one stave, eg Flute 1. The general process of Part Extraction is started with the command Tools Part Extraction and a Wizard appears to guide you through the process:


191 Music Publisher 8 manual Page 191 Fig 199. The first page of the Part Extraction Wizard I leave you to read that! The details of it are covered here in this manual but are in the first page of the Wizard to remind you. The error checking screen. Pressing Next gives this screen: Fig 200 Page 2 of the Wizard This is an important page from which you can generate reports on possible errors in your master score or part names. You ignore these reports at your peril! You could end up with parts which are incorrect and cause havoc at rehearsal.
192 Page 192 Music Publisher 8 manual The stave names check The function of this check is to make sure that naming of the staves is sensible so that the correct sections of the score are copied to the parts. Example 1 If you had not named your staves at all then but every system had the same number of staves then while not very adventurous, this would give an unambiguous part extraction. So a message similar to this would be generated: The stave names used in system 1 are: Stave 1 Stave 2 Stave 3 Stave 4 No problems. While systems are differing sizes, system 1 contains all parts and all stave names are recognised. Clear to proceed! If you have a message similar to this then you can in fact define your stave names (and so your part names) at a later point in this wizard (see Renaming staves on page 194 below). Example 2 The program checks for duplicated stave names in the first system, but obviously if both those names are referring to a keyboard instrument then this is fine. You might get a warning message like this: The stave names used are: Flute Viola Piano Piano WARNING: stave name "Piano" is repeated on 1 occurrence(s) but refers in each case to connected staves. This is not expected to be a problem provided you extract parts carefully using the repeated-name staves into one part. Simply take care to extract the piano staves correctly. Example 3: If system 1 is not the largest system you will obtain the following report: ERROR: System 1 MUST have the largest number of staves and contain staves whose "names" will define which other staves are going to take part in the part extraction process and name them. Before part extraction you MUST add to the first system the staves which are used in all the later systems. This emphasises the importance of system 1 mentioned in Stave names on page 188 above. You may also have warnings about other items in this report box, such as

193 Music Publisher 8 manual Page 193 Warning - there are also no objects with a global attribute found on stave 1. This is unusual - please check. See the section on Global objects on page 189 above. The bar length check. The purpose of this check is to alert you to missing or extra notes in the parts. The system will compare the number of notes in each bar of each part with the time signature (omitting the first and last bars from this comparison as long as they are not longer than the time signature). In a large work this check could take quite a time, so you may be given an estimate of the time involved as a warning. If you give the go-ahead a report is generated. It may be the all-clear but if not it may look something like this: Stave 2 bar 2 (page 1) Stave 39 bar 1 (page 3) Stave 40 bar 3 (page 3) 3 errors found. You may wish to abandon part extraction and run Tools Check Stave Contents as this is easier to locate the problems. It s probably best to click the Print Reports button for reference here, and if there are a small number of errors you may be able to find them directly. Otherwise you can take the advice of the error report and after cancelling the Wizard, select Tools Check Stave Contents. See the section Checking the bar contents on page 200 below. Meanwhile, pressing Next gives the next page of the Wizard: The How to extract screen. Fig 201 Part Extraction Wizard page 3
194 Page 194 Music Publisher 8 manual This is where you define which staves are to be extracted and how the extraction is to be performed. As stated above, System 1 is the reference stave since it must contain all the parts to be extracted. The vertical arrows in the centre enable you to move up and down through the staves of system 1, selecting the options from the left hand panel. The right-hand panel gives a summary of the options you have selected so far. For each stave you have a choice of four things to do (see What is to be extracted? on page 186 above) which reflects the first three options there: 1 You can extract simply: one part made from the one stave. 2 You can extract the stave to two parts: e.g. Flute 1 and Flute 2. 3 You can extract the stave and the next to one part: as you would do for a keyboard or harp part. 4 You can omit this stave s part extraction entirely: useful if you only want to re-do one part because of changes to the master score. Diagnostic statements may be seen in red on the left panel to help you decide. You may see one or more of: Two parts on stave detected This indicates that the system has found two parts and that you may wish to extract to multiple parts as in the Flutes case. Stave is braced to next stave This indicates that the staves are joined with a brace at the left it may well be that they are part of a keyboard or harp part, but there may be other reasons for the bracing. Staves share barline with next This may also be an indication of a keyboard part but again there could be other valid reasons. These reports are simply advisory to guide you and perform no active function other than reporting to you what is found. Renaming staves There is also a small Rename button to enable you to rename the stave name, and hence the resulting part name. This is useful if you ve not bothered to name the staves beforehand.

195 Music Publisher 8 manual Page 195 Where to put the parts on your disk Fig 202 Part Extraction Wizard 4: where to put the parts At the next page of this page of the Wizard, you will be offered a tree view of your hard drive with the location of the score shown. It s probably best to save the parts in their own folder, either in the same folder as the master score or in a subfolder named Parts underneath it. If you wish to use the latter format, select that folder on the tree view and click the Create new folder button: Fig 203 making a new folder for the parts Doing the actual extraction The next screen is simple. There is a Start button to press, a progress form to watch and one control to use.

196 Page 196 Music Publisher 8 manual The System Separation value gives a distance between the staves of each part. The value of 30 is about average, but can be varied up and down experiment if you wish. Alternatively the stave separation can be varied by changing the stave separation in the parts individually afterwards. Press Start, and when all is complete you should have a screen something like this: Fig 204- The extraction is complete And finally Pressing Finished or Next takes you to a warning screen telling you to check over the parts and do some post-processing. This is the subject of our next section. Tidying up the parts Close down the full score (saving if you have made changes to things like stave names) and open each of the part scores you have extracted to perform the following checks and operations: 1. Empty bar compression There are likely to be long passages of empty bars for many of the parts. These should be combined to a single multi-bar rest to save both paper and eyesight. Here is a short example:


197 Music Publisher 8 manual Page 197 Fig 205 showing empty bars to be merged To merge the first 5 bars, shift+click the full bar rest in the first bar and the same in the 5th. As you do this the standard multi-select toolbar will appear: Fig 206 after shift+click on 1st bar s rest and 5th bar s rest When exactly two appropriate objects have been selected the Combine Rest icon ( ) becomes available on the toolbar (the 7th from the left in Fig 206). Click this and the sequence of bars will be merged to one like this: Fig 207 the bars are merged Had there been a problem with this process, such as a note between the two rests, or perhaps a time signature, then an error message would be given and the process aborted. Note that no shuffling of bars along the stave has been attempted just the deletion of the one completely empty stave. In order to neaten up the staves we now need to consider the next operation. 2. Reflowing the music Select Tools Reflow Music.

198 Page 198 Music Publisher 8 manual Fig 208. The Reflow Music dialog box This is from music which has 16 systems. The options being offered you range from a Music Density of 30% which would require 25 systems, to a density of 72% which would fit into 9 systems. You can see that the current system count for this particular work is 16 systems at 42% density and this is emphasised by being the default choice on entry and with the [*] mark on the list. What is Music Density? This value represents the blackness of the music, so the larger it is, the smaller is the white space between the symbols at 100% the notes, barlines and suchlike would be touching each other. By way of illustration as to the practical effects of this value, here are some examples:
199 Music Publisher 8 manual Page 199 Fig 209. Music density 40% Fig 210. Music density 50% Fig 211. Music density 60% Fig 212. Music density 75% You will see immediately that the ideal density is around 50% for practical reading of the music. The densities offered you in the Reflow Music box always vary between 40% and 75%. If you choose one of the values in the lower box and press OK then the program will try to make all the lines (systems) of similar density by re-arranging the bars among the systems, so even if you choose the same density as currently you may find your bars re-shuffled in an attempt to equalise the music density across all systems. Changing the stave size or page layout If the stave size or page layout of your full score is not adequate for the parts then you can alter it on the top panel. As soon as you make a change there the lower half will change in response by recalculating for the current score the density options you have, listing again by density and system count.

200 Page 200 Music Publisher 8 manual For instance, let us suppose you are requiring for one of the parts a stave size of one third of an inch (8mm) appropriate perhaps for a cello part where the music is always quite a distance from the player s eyes. When you change the Stave Size box to 1/3" you will quickly see the lower half change in response: Fig 213. Changing stave size to 1/3" This shows that to retain the same number of systems (11) you would have to increase to a (probably) unacceptable density of 69%, or to retain the density of around 50% would mean an increase to 16 systems. In between there are other options. Checking the bar contents While selecting the Bar length check button on the 2nd page of the Part Extraction Wizard (see Fig 200 on page 191 above) gives a report about which bars the program thinks have faults, a more visual check can be made with a single command. See Tools Check bar lengths on page 152. Other things to check Once your parts are extracted be sure to check them over. There are many things which make life easier for the player, such as good page turn points, and cueing of other parts to help an entry: so take time to think about this and amend the parts.
201 Music Publisher 8 manual Page QUARTER TONES Introduction Most musicians never come across and never use quarter tones. However it's a fascinating area for sound and Music Publisher allows you to investigate this easily. In this chapter the British English musical terms tone and semitone are used. US English usage prefers step and half-step although quarter tone seems to be universal. I have avoided the term half sharp, which while consistent with current double sharp is completely confusable with the American half step. Capabilities The program extends the sequence of accidentals from the standard list of double flat, flat, natural, sharp and double sharp to include ¼ tone sharp; ¾ tone sharp; ¼ tone flat and ¾ tone flat. The symbols used in Music Publisher 8 are Function ¼ tone sharp ¾ tone sharp ¼ tone flat ¾ tone flat Notation Comments This notation is called the Tartini sharp as it was proposed as early as 1756 by Giuseppe Tartini. The symbolism is clear, it being half of a normal semitone sharp. Also by Tartini. Again visually clear: it is three times the sharpening power of the quartertone above. There is no universally accepted notation for quarter flats. However this reversed form has near standard status in atonal woodwind music, which also uses the Tartini sharps above. Although acceptance is growing, there is less general agreement about the ¾ flat, but this symbol here seems clear being the admixture of a half and a quarter. It s also rather pretty. Table 11 - Quarter tone symbols and their origins Quarter tones in key signatures. Currently Music Publisher does not support this facility, just as it does not support mixed key signatures of sharps and flats.
202 Page 202 Music Publisher 8 manual Placing the quarter tone accidentals To enable quartertones to be used in a score it is necessary to enable it for that score. This is done on the Options Configure menu. Select the Score tab (only visible when a score is loaded) and tick the Enable ¼ tones box. If you wish you could load an existing template, enable this option, and then save as a template (File Save as Template) so that you have quarter tone templates available if required. Fig detail from Options Configure Score However it s done, once this option is enabled the following commands are available: The keystrokes q and Q Q or q can be used in a similar manner to S, V, X, W and N which are used for placing the standard sharps, flats and naturals - they can be used to start placing a quarter tone sign or to convert a provisional note to a quartertone sign. Repeated pressing of the key will cycle through the four possible quarter tone signs, but Q (=shift+q) will start with the two quarter sharp signs and q will start with the flat ones. The keys Q and q can also be used to edit an existing accidental, in exactly the same way as S, C, X, W, N and #. The keystroke # With the score enabled for quarter tones, repeated pressing of the # key will now cycle through the additional quarter tone signs as well as the standard sharps and flats. Right-clicking Right-clicking any flat or sharp sign in the music brings a pop-up menu which allows the change. With quarter tones enabled this menu is extended to include the four new symbols. You can also right-click a note to add the accidental. You can see this happening in Fig 36 on page 45.
203 Music Publisher 8 manual Page 203 Playback The notation plays back as you would expect it. However there are two restrictions: a b You cannot use more than 7 different instruments in the music to be heard (as defined in Stave Properties Sound). This is due to a technical limitation of Midi which limits it to 14 tracks and the fact that it takes 2 tracks to produce both normal and superchromatic notes simultaneously. You can only have one instrumental sound per stave. When quartertones are enabled then the stem-down notes will sound in the same voice as the stemup notes when on the same stave. (When quarter tones are disabled then you can have different voices for the different parts). This is because the second track is now being used for the 12 extra sounds in each octave.

204 Page 204 Music Publisher 8 manual 35. CUSTOMISING YOUR SCREEN Smaller monitor screens 800x600 Music Publisher 8 is intended to run in 800x600 resolution or higher. It will run quite satisfactorily in 640x480 but you will find you need to move the plate around quite a lot, and some of the larger menus will exceed the screen size. Fortunately not many people have this basic resolution any more. However, even at 800x600 there are some inconveniences. Principally the main menu bar will wrap to form two rows: Consequently for your convenience it is possible to eliminate some of the buttons on the toolbar. Simply right-click a button and one of the items on the popup menu will be Remove button from toolbar. There are some exceptions to this. Some buttons are vital for normal operation (the attachments and alignments buttons: ) so there is no option to remove these.
205 Music Publisher 8 manual Page 205 Right-clicking any of the three text mode buttons (Text, Lyric, Chordname: ) will result in an option to Reduce to single text button. Choose this and you will see only the first icon on the toolbar, and this should generate sufficient space that the toolbar is not doubled in height on an 800x600 screen. While this might be presumed an inconvenience, you can still use the Lyric Mode and Chordname Mode buttons by pressing the Ctrl and Shift key respectively in fact the icon on the button will change as you do so. So you can select Lyric Mode with Ctrl+F9 or Ctrl+Text button (and similarly for Chord Name Mode: Shift+F9 or Shift+text button). Alternatively you may prefer to remove other buttons which you don t use: you will still be able to use the keyboard shortcuts (see Error! Reference source not found. page Error! Bookmark not defined.) or the relevant menu items to use the commands. To restore the buttons right-click an empty part of the toolbar and select Restore all buttons. Higher resolutions You should not need the above section if you are running at 1024 pixels or more wide (eg 1024x768). But there is another convenience you may appreciate. Due to confusion amongst users inadvertently pressing alt+f12 this feature has been disabled in Music Publisher 8. If you miss it then please contact Braeburn Software as it may be possible to re-instate it in the future. Pressing alt+f12 will move the toolbar around clockwise, to the right hand side of the screen:
.")
206 Page 206 Music Publisher 8 manual This can be useful if you prefer to see your more height of your music rather than width. A further press will bring it to the bottom, then the left side and so on. This position will apply to the other toolbars (Text Mode, Line Mode, and so on). However some of the modes (Text, Line, Multi-select) are not suitable for left and right positions as they have information which is too wide, such as Font Description etc), so these will go to the bottom if the main toolbar is at either side.
207 Music Publisher 8 manual Page USING A MIDI KEYBOARD TO ENTER MUSIC An alternative input method There are three methods of putting music into Music Publisher 8: by typing on a computer keyboard (the subject matter of Chapters 1 to 20) by recognising printed music from the scanner or bitmap (Scanning Edition only see Chapter 37). by using a midi keyboard to enter notes. There are no great new methods to learn for music keyboard entry. It is simply a faster way of typing in the notes. However in comparison with the entry by keystroke this method can enter a whole chord at a time. A real-time "Play-in" which takes note of the time you take over playing each note is not available at this point in time and indeed causes a great deal of time in setting up (clef, key signature, time signature, barlines, tempo) and very careful "mechanical" playing: strict tempo, unphrased. There is always in such systems a large amount of time spent afterwards in correcting all the input. So if you have a midi keyboard attached to your computer then you can simply activate the Midi-In tool see Fig 219 below to make your program listen to the music keyboard and record all notes and chords typed but with no attempt to make the correct note length or tempo. You can now play a chord for instance D F# A - on the midi keyboard and see the notes appear on screen complete with the correct accidental if necessary. Hardware requirements You need a midi keyboard, obviously. These come in all sizes from 2-octave (15 notes) to 5 octaves (61 notes) and may have many other features built in. But the simplest is quite good enough for our purposes as Music Publisher won't need any fancy extras such as touch-sensitivity, pitch bend and other effects keyboards sometimes offer. If you see "polyphony" mentioned in a keyboard description then this is the number of simultaneous notes it can transmit. For instance hymn tunes are 4-note polyphony and this is probably adequate for MP purposes. They cost as little as 40 ($60). Even if you have only a 2-octave keyboad Music Publisher can change the octave which the notes on the midi keyboard refers to so avoiding the need for a larger keyboard and the space required.


208 Page 208 Music Publisher 8 manual There are even midi keyboards which double as typing keyboards, Fig 215 shows one of the three-octave "Prodikeys" manufactured by Creative - indeed on which I am typing this manual! There is a plastic cover for the music keys which also acts as a wrist rest and it works well. Fig 215 a combined music and typing keyboard Connections an introduction Obviously you should read your keyboard's manual too, but for people considering the possibilities then this is an introduction. If your music keyboard has a USB output then this may simply connect to a USB port on your computer and the whole operation should be easy. Otherwise the typical midi keyboard will have one or more sockets something like Fig 216 (left) on the back. Some have only the OUT socket and this is all that is needed for a keyboard. Some keyboards have only the USB socket and this is the simplest connection of all. Fig Typical MIDI IN and OUT connections on your keyboard and a Standard Midi cable 5-pin 180 But what of the other end, your computer? If your MIDI keyboard is USB-enabled then a simple USB card can be used to connect to your computer (eg Fig 215 above). Otherwise your sound card may have a MIDI IN socket like the one on the left of Fig 216, but if not it may require an adaptor to connect the old-fashioned Games Port to a midi socket: Fig older sound card connectors: Games Port and three mini jack plugs for audio


209 Music Publisher 8 manual Page 209 If your sound card does not have the 5-pin socket to match this then you will need an adaptor. For fixed sound card interfaces this is probably a Games Port to MIDI converter Once your hardware is installed then if drivers are provided with the sound card then install these and you should see your sound card appear on the MP Options Configure Volumes screen, something like Fig 218. If your keyboard does not appear under Midi Input Devices then you have not installed your sound card drivers correctly. Fig 218 Midi devices screen in Music Publisher on Options Configure Volumes If there is an input device showing and selected then the Midi Input tool in the left toolbar will be available. Fig the Midi Input tool Operation Press the MIDI In tool (the button appears depressed) and the main top toolbar will be replaced by the purple Midi In toolbar: Fig the Midi In toolbar
210 Page 210 Music Publisher 8 manual The controls are simple: The five buttons at the left end change the octave which the music keyboard's keys will refer to. If you require octave changes of +3 or 3 (!) then the Set menu item can change this. The next set of four buttons refer to the spacing which the program will give after each note/chord has been played. Narrow, medium, wide, or move to the next TAB position. The next five buttons refer to the stem direcction: The first three are the equivalent of J, P and I keyhyboard commands to produce stems which are Up, Down and Automatic. But since the music keyboard can produce chords in one press we have two more options. All notes of any chords you play will have these characteristics. The fourth button "twin stem mode" provides for chords played to separate the stems in systems with two parts on a stave. Furthermore if in this mode you type a single note then it will be produced with two stems, both up and down. The SATB button only becomes useful when you have two staves joined by a brace. Then with either of the staves as current stave, playing a four-note chord gives four notes with stems you expect to find in a hymn tune, and it does its best with three- and two-note chords. If you use the SATB button on music where it is not useful (eg singlestave music) then the setting will revert to Automatic Stem. The last button turns off the midi input. To use the system simply play some chords on your keyboard: Fig after playing some chords The chords played here were, in optimum stem mode: D F# A; E G# B; D F A and then after pressing the twin-stem button: D F#; E G; F#

211 Music Publisher 8 manual Page 211 Note that: The accidentals placed were inserted as needed according to the key signature and previous accidentals. The single note F# at the end gave two stems since it was typed in twin-stem mode. Be aware that with chords the system recognises only what notes have been pressed when you release the last note so play in "staccato" fashion. See the first figure in the case study below. Completing the work Return to editing mode with Esc key, or the button on the toolbar or alt-f2, it's shortcut key. It is now necessary to tidy up the music: The program may have chosen the wrong accidental. In the example below C# was preferred over D flat so right-click the note and select Enharmonic Change. The note lengths need correcting (unless you altered them at input time): put the mouse over each chord in turn and press the standard number key for the note length: 3=minim (half note); 4=crotchet (quarter); 5=quaver (8th note) and so on. Add quaver beams, ties and slurs in the normal way you would do editing (mouse over, press the shortcut key) Add the barlines and Tools Neaten and the music is done. Hymn-writing mode If you select the SATB button then you can type 4- or 3-note chords to enter hymns much faster. Case study: Caswall Fig after playing. Note the options chosen in the button bar
: Fig 223 - Changing to enharmonic equivalent Now to correct a few wrong note durations (mouse over, press 3 or 2) and")
212 Page 212 Music Publisher 8 manual Note I played the 6th chord D flat by itself, not slurred into the 5th chord. But it needs altering to a C# (mouse over, right click, select Enharmonic Change): Fig Changing to enharmonic equivalent Now to correct a few wrong note durations (mouse over, press 3 or 2) and add a slur: mouse over, press u key. Fig 224 change some durations, add a slur Add the barlines (click the gap, press / and Enter): Fig add barlines Finally a simple Neaten operation (F6 or Tools Neaten): Fig after Neatening

213 Music Publisher 8 manual Page SCANNING IN YOUR MUSIC Introduction The normal way of entering music into Music Publisher 8 is of course by typing it in from the keyboard or assisting this process by playing it in (Chapter 36 on page 207). However if you have bought the Scanning Edition of the program then a faster means is available to you. Normally you will need a scanner for this purpose (but see Opening a Bitmap below for exceptions) when the program can obtain music much more quickly from printed music which you place on your scanner. Scanning and OCR All scanners do is take pictures which can be loaded into your computer (or sent straight to the printer) for insertion into documents, for recolouring or resizing and so on. In order to recognise music within such a picture the computer has to examine that picture and discover (hopefully!) musical items such as staves, clefs, notes and text. This process is called Optical Character Recognition and is well-established in document handling. Indeed you may have received some OCR software with your scanner which will enable you to put text documents on your scanner and (with varying degrees of success) insert them into a word-processor. That supplied software will be no use in recognising music. For that you need Music OCR software, and this is precisely what the Scanning Edition of Music Publisher contains and which the Standard Edition does not. Getting the scan If you have bought the Scanning Edition then on the main File menu you will see an item Import from Bitmap or Scanner and invoking this takes you to a new screen which is where you obtain your scan:

214 Page 214 Music Publisher 8 manual Pressing the Scan button will give load Music Publisher's interface screen which can control your scanner. Fig about to use the scanner The arrows indicate the normal sequence of operations. 1 Select Scanner. This allows you to select your scanner from a range of devices on the TWAIN interface, such as scanners or webcams. If you only have one device then you don't need to bother with this. 2 Set Resolution. At this stage this will be set to the value of Scan DPI on the previous screen. But in any case 300 dots per inch is best 1. Only if you have tiny scores such as pocket scores should you need to increase this to 400 or dpi is a standard OCR setting and is chosen here because the recognition software performs best at about dots per stave height. So if you have music which is significantly smaller such as a miniature score then you could increase this to 450 or even 600. However the 300 setting will usually be best and you should not automatically choose a larger resolution as the results will be no better and often a little worse.
 uses.")
215 Music Publisher 8 manual Page Acquire 3. This will cause your scanner to scan at the given resolution and in 1-bit colour mode 2 which is the setting that all Optican Character Recognition software (OCR) uses. Obviously this will take some seconds but once complete the scan obtained will appear in the empty space as the in Fig 228 below. Fig scan has been acquired 4 Use. This button simply returns you to the main Scanning screen and is disabled until a scan has been taken. The Abort button does what it says, and returns you to the previous screen without any action. The GUI button enables you to use the Graphical User Interface which is in your scanner. This varies from scanner to scanner and I leave you to explore it but the expectation is that you will use GUI OFF and have the program make all the settings for you. 2 There are three types of colour depth on scanners. Colour; Greyscale and Monochrome. These last two can be confusing. Greyscale is actually 256 shades of grey whereas Monochrome is only two colours: pure black and pure white. Greyscale is used for scanning black and white photographs but Monochrome is reserved for OCR purposes and occasional other usage such as scanning a black and white diagram which has no shaded areas hence Line Art. 3 Acquire is the term that scanner manufacturers recommend software authors to use.
, PCX or GIF format then you don t have to scan it in but can simply load it into this screen with the Open button.")
216 Page 216 Music Publisher 8 manual Opening a Bitmap It may be that you have access to a picture file with the music. In this case, if the picture is in Windows bitmap (BMP), PCX or GIF format then you don t have to scan it in but can simply load it into this screen with the Open button. This is particularly handy for loading music in from other packages. Even if you don t have a scanner you can create BMP files for importing to Music Publisher by using a utility such as Zan Printer which will produce BMP files rather than a printout. See for details. Getting ready for the next phase Once you close your scanner interfacethen the image will be shown on the screen: Fig The scanning screen with music scaled This is a picture of the scan which has been scaled to fit the screen. This is more useful for cropping or rotating, but in order to show the music as the computer sees it then select the menu item Picture Show Scaled. (Later versions of the program have an equivalent button Zoom which appears near the cropping buttons.)

217 Music Publisher 8 manual Page 217 Fig Scanning screen with music at full size This is useful to see exactly what the computer has to deal with in fact from this example you can imagine that the recognition of the two beams shown above will be problematic as there is hardly any white paper showing between them. Rotating and cropping Sometimes the image needs rotating, for instance if it were a hymn book page. Or it may be a good idea to remove extraneous non-music parts from the image by cropping. This would speed the recognition process. There are two blue rotation arrows on buttons above to rotate the image by 90 degrees. If your area of screen is smaller than shown above then to save space the four right-most buttons will disappear but the Picture menu contains the same operations. Cropping is performed with the topmost button and a red area can be stretched around the music. For instance this was taken after scanning a hymn book and can be performed with the crop button or the menu item Picture Define Cropping Area:

218 Page 218 Music Publisher 8 manual Fig 231 cropping an area: now select Picture Crop To abort the crop and re-define the area choose Picture Abandon Crop. Once the area is defined then the lower cropping button is available and selecting it will perform the crop and re-centralise the picture. Interpreting the scan This is the central operation of this section. But first you should check the options in the central area of the screen. Lyrics In You can define a choice of eight European languages which the lyrics are written in. This is not so important as might be thought at first, but after recognition has occurred certain filter operations are language-dependent. For instance if English is selected then the letters ijk are unknown, so the program would choose an alternative such as yk because ij and y are similar shapes. However choosing the language as Dutch would not do this since these are common there. If the text is of mixed language, choose the commonest. Scan DPI This is an important box. It is where you tell the program at what resolution you scanned. It is not where you define the required scan resolution to the scanner. Some scanners cannot report back what they scanned at, and no bitmap contains this information. Yet Music Publisher requires this information to work out how large the stave size is. It may perhaps find it is 100 dots high by looking at the image, so if you have set Scan DPI to 300 then it works out that the stave size is 1/3. However if you really scanned at 150 dpi (a popular default on scanners) but leave this box at 300 then the software will calculate the stave height to be 1/6 and the resulting music will occupy only the top left hand corner of the page!

219 Music Publisher 8 manual Page 219 Include Words If you deselect this then words and text generally will not be included in the resulting music. If the words on the original are hard to read then it may well be quicker to re-type them afterwards than correct them one by one. In which case this option is useful. Include Curves The same comment applies as did to words above. Allow Accents Accents on notes, such as tenuto or marcato can be omitted. This can be useful if some or all of them are being interpreted as words. However this is normally left enabled. Old Symbols This refers to straight quaver (8th note) etc flags and backwardshaped F-clefs. If you have old music you may get better results by enabling this option. Symmetric WhitesModern minims and semibreves are shaped internally. In some old manuscripts this is not so, and you can tell the program here what to expect. It remains only to activate the interpretation process by clicking the button and watching the progress bar. It will take a few seconds up to half a minute on older computers but when complete a report similar to this will be offered: Fig the post-interpret report
, then after closing the Music Publisher file you can return to the scanning page")
220 Page 220 Music Publisher 8 manual Obviously you are not expected to check this in detail! But if you Cancel then you have the opportunity to change some of the options, or crop and try again. If after seeing the results you decide that you should have changed the Include Words or Include Curves options (etc), then after closing the Music Publisher file you can return to the scanning page and simply select Reinterpret from the Interpret menu to produce a new Music Publisher file very quickly, rather than waiting the minute or two necessary for the usual Interpret process. If you accept then the music is placed onto your default page layout (complete with margins) and presented to you for checking, editing, transposing etc and the scan-in is complete. However occasionally an warning message will occur at this point: Fig mismatch of size warning Scanners can scan to the very edge of the paper but printers generally cannot print to the edge. This is why your music has been defined with margins which you set up as the default and the scanned music will be placed into this page layout. If it does not fit because the calculated stave size makes the music too wide then a message similar to this is shown. If it is vital to keep the stave size exactly the same then select Landscape orientation, but normally you can accept the reduction by a few percent in order to have the scanned music fit on the default page. You can always change it later with the standard Page Page Layout and Page Stave Size commands. Should the warning message indicate over a few percent then it is likely that a mismatch has occurred between the Scan DPI box and the actual scanned resolution. However you can accept a reduction and then rectify this later with the Page Stave Size command and select the Largest button. You should now check through your music to make sure that it is identical to the original using the techniques in Chapter 12 Altering existing music on page 62.

221 Music Publisher 8 manual Page APPENDIX A: THE SYSTEM CONSTRUCTION WIZARD This allows you to create a system from scratch, modify an existing one, or use an existing file or template as a start. Its strength is its visual feedback at each stage. As an example, let s create a voice+piano score. To show how it works from scratch, start the program and if you are offered a Template select No Template to produce a single empty stave on the screen. Select System System Construction Wizard. The wizard consists of three screens defining what you start from. the building of the system. what you do with the results. What you start from Fig 234: System Wizard opening screen At the first screen of the wizard, select either Empty system or Current system since the current system is empty it makes no difference!

222 Page 222 Music Publisher 8 manual Building the system Fig 235: Starting to define the system This is the most complex screen and is where you will do the work of defining the system construction. As mentioned above, the most important attribute of a stave is its name. So let's change it to something meaningful. In the Instrument/Stave Name box type Voice. You will see the name change in the view at the right. Now for some more staves. Press Add Stave Below and when prompted give the name as Piano RH. Another Add Stave Below and you can add the left-hand with a similar name. Note that the name appears in purple, which is the colour Music Publisher uses to show that it will not appear on the printout.
223 Music Publisher 8 manual Page 223 Fig 236: after adding two more staves You can define the top stave by clicking the top tab, pressing alt+1 or clicking the top stave on the diagram. It will turn blue. You can then add the required clef to each stave on the Clef menu by selecting the stave and selecting a Clef. This is optional and in any case would only cover the clef on the first system.
 and select both Brace to Next and Barlines through.")
224 Page 224 Music Publisher 8 manual Fig 237: After defining the stave "binding" Binding the staves into a system We need to tell the program that the 2nd stave is to be joined to the 3rd with a brace and that the barlines here should go right through. These are attributes of the 2nd stave, so click the 2nd stave (or press Alt+2) and select both Brace to Next and Barlines through. This appears:
225 Music Publisher 8 manual Page 225 Fig 238: After defining the three staves Optional This completes as much as we need to have to create a system which looks right on paper. If the program is also to be used to play back also then we need to create the right sound, and for this we would select for each stave select All in the Instrument section and choose a sound for playback. It might also be that the voice is to be heard an octave lower: this involves putting 12 in the Transpose by box (or press the button as a shortcut) Our system is now defined, so we can select Next to arrive at the final Wizard screen.

226 Page 226 Music Publisher 8 manual What you do with the results Fig 239: The final page of the System Construction Wizard The options here should be straightforward, and we here select the first to give us the required system construction on the plate.

227 Music Publisher 8 manual Page APPENDIX B: 'GROUP' INSTRUMENTS Background In older scores of the classical period the cello part was labelled "Cello and Bass" so that by playing the same written notes on a Double Bass the cello line was also heard also an octave lower. This facility of combining one stave to cover more than one instrument is available in Music Publisher in all menus which call the General MIDI Instruments panel: on the Groups tab: Fig 240 Showing the Groups instrument tab Here you can define up to 126 more instruments (which the system will give a number in the range 130 to 255) and defining your own name and how it should sound. To use the instrument named simply press OK. To change the contents of the group, click Edit Group.

228 Page 228 Music Publisher 8 manual Fig creating or editing a group Up to five instruments can be defined at various pitches and volumes. To change or add a new instrument click Select, and to remove an instrument select Remove. The volume is adjusted with the same method as volume changes in the rest of Music Publisher simply drag the volume control up or down. The pitch box may need explanation. Here there are three ways of describing the pitch of playback of a voice: Organ Style Semitones MIDI organ sounds are in general poor, so this option has been inserted for them. Organists express pitch in length of pipe of the lowest note on the keyboard: normal pitch is 8 feet, an octave higher is 4 feet and so on. If you are not familiar with this then simply sellect one of the other options: The pitch is expressed as semitones from the written pitch. So zero represents at pitch, +12 is an octave higher and so on. Interval names Here we use unison, octave higher, fifth lower and so on. Simply select the one you are happiest with and the program will remember this next time you see this page.


229 Music Publisher 8 manual Page 229 Fig three ways of describing pitch on the group definition To change the instrument in the group, click the relevant Select button and the MIDI instruments will be displayed by sections, as shown in Chapter 47 on page 256, and Fig 176 on page 173.

230 Page 230 Music Publisher 8 manual Fig after pressing Select the instruments are offered When you are happy with the definition, or the sound, then press OK and the program will use this "group instrument". Note, however that currently it will not transfer reliably to other users unless they are all using a copy of the same library file.

 can be up to 3 in number ( ) Size can be Normal or Small or Acciaccatura.")
231 Music Publisher 8 manual Page APPENDIX C: NOTE ATTRIBUTES Not surprisingly notes are the most complex objects, and this appendix lists the attributes each note can have. It is best illustrated with the separate pages of the Note Attributes Dialog: The Standard Note Attributes page Fig Note attributes, Standard tab Duration is expressed as the note length. When American is selected on Options Language then the names are changed to American names Stem Direction is either up, down or none. Dots (augmentation dots) can be up to 3 in number ( ) Size can be Normal or Small or Acciaccatura. Small is for grace notes and appoggiatura, but acciaccatura is represented by a note with a slash through the tail. A note can be tied to a previous note. The note tied to must be at the same pitch. A note can be slurred to a previous note. The note slurred to must have its stem in the same direction.
232 Page 232 Music Publisher 8 manual Slurs and ties can be dotted and flat in shape, exactly equivalent to curves (see page Curve attributes on page 79). The box labelled Modify Note Duration is only relevant when you are playing back your music. There is no visual difference as far as the program is concerned between triplets and three notes having their full value, so this is the place that such a change is defined. If three notes are to be played in the time of two (normal triplets) then the Modify box should be ticked and 3:2 be place in the next box. Other common values might be 2:3 for duplets in triple time, or 5:4 for quintuplets in normal time, or, more rarely, 5:3 for quintuplets in triple time. Think of the : as meaning played in the time of Fig Note duration modification examples Non-regular duplets When notes have had their duration changed the editing screen shows them in a blue colour purely as a reminder, but of course they print out black as expected on paper. Some forms of music may notate music as regular pairs of quavers (etc) but in fact play them back differently. It is quite normal in jazz to play duplets in triple-time (approximately there is latitude for performance) or for hornpipes and other dance music to be notated evenly but be played dotted: Music Publisher can create the sound of the latter half from the notation of the former half by simply altering the Modify Duration parameter of the duplets. It can be done quickly by right-clicking one of the duplet notes, when the command Swung Duplets can be seen. Selecting this gives a new dialog box:


233 Music Publisher 8 manual Page 233 Fig Swung Duplets dialog box The menu on the left is self-explanatory and gives the range of notes which would be altered. The right-hand panel gives the amount by which this alteration would be performed. If you select Plain then the notes will be as written, and the Length of first note will be 50%. At the other extreme the Hornpipe would give a Length of first note as 75% representing the 3:1 ratio of normal dotted notes. The traditional jazz value of 2:1 is 33%, triplets, but there are two other lazier values at 60% and 64%. You can also enter the Length as a percentage yourself, so that for instance double-dotting (7:1) would be entered as 87%. The Beams * Page Fig Note attributes, Beams tab * A beam is sometimes referred to as a balkan or ligature.


234 Page 234 Music Publisher 8 manual On this page you can select whether the note is beamed or not. The beamed attribute is an attribute of the note on the right hand end of the beam. In other words a note is said to be beamed back to its previous one. Of course it is only quavers (8th notes) or shorter which can be beamed, and all the options on this menu will be unavailable if the note is longer than that. Attributes are: Beamed or not beamed. If a note is not beamed it appears with a tail, and if a note is beamed it will have the correct number of fractional or stub beams attached to it depending on the duration of the note. Principal beam only. If a group of many notes are all beamed together it is sometimes customary to join them in sections of 4 (commonly but not exclusively) for visual clarity Accents (The long beam across the top is called a Primary (or principal) beam; the others are secondary beams). It is possible to force a beam to be flat if the angle which Music Publisher chooses is not visually attractive. See also the section on Stem Length below on page 235 for further control over the angle of beaming. Fig Note Attributes - Accents tab


235 Music Publisher 8 manual Page 235 The attributes on this screen describe the particular accents or articulations on the note: Staccato. This can be the normal staccato dot, or the triangular symbol for staccatissimo, and can be shown at either head or tail of the note. Fig showing staccato and staccatissimo The other accents can be one of the Tenuto, Accent or Marcato and are shown here at the note head end of the notes: Fig showing accents on notes accents are also available at the tail end of the note Stem Length Fig 251 Note attributes, Stem Length tab Autoshorten stems The normal length of a stem is one octave. However in two-part staves where the stem points outwards into the space above or below it is conventional to shorten these stems.
236 Page 236 Music Publisher 8 manual Fig autoshortening stems But shortening is not possible for visual reasons when the notes have tails with a number of flags. So it may be preferable then to have longer notes also without shortening in order to give a better visual impact to the whole part. Stem length adjust Notwithstanding the autoshortening, it is sometimes desirable to lengthen or shorten a stem beyond the normal octave length. Fig lengthening note stems This is performed in the Amount spinner box in the menu shown in Fig 251. Judicious lengthening of individual notes in a beamed group can alter the beam angle. Fig showing various beam angles The way in which Music Publisher normally calculates the beam angle is solely by reference to the first and the last notes. It ignores any notes internal to longer beams. So in Fig 254(a) the overall beam slopes downwards, reflecting the start and end notes. However, by forcing the beam flat (see The Beams Page on page 233 above), then layout (b) is produced. If layout (c) or similar is preferred then the stem length of the last note can be increased to produce the angle shown. Note that if you set the Stem Length Adjust value then the autoshorten is automatically disabled. Reverse-stem beaming

237 Music Publisher 8 manual Page 237 Note head Fig 255 If you require stem-up and stem-down on the same beam as in Fig 255 then you must first make a beam with both notes stem up (or down) and then reverse the stem of one, eg by right-clicking the note when editing. Fig Note Attributes, Note Head tab Selecting the head style gives the following examples of head styles which correspond with the menu above. The first row is a set of crotchets (quarter notes) with the various head styles and the second row are minims (half notes). Note that the head style overrides the look, so for instance the fourth item on the top row is a white-headed crotchet not a minim. The only difference it would make, though is on playback. Fig head styles: normal, x, diamond, white, no-head, slash, circle, square, x-circle, triangle, inverted triangle


238 Page 238 Music Publisher 8 manual Tremolos Fig 258- Note Attributes, Tremolos tab There are two types of tremolo: On one note or chord, meaning a repetition of that note/chord Between two notes/chords, meaning an alternation of those notes/chords. This is sometimes called a shake. The first is represented by a number of beams on the stem of the note. Note that in the 3rd note here this would be referred to as 3 (demisemiquaver) because one beam is represented by the tail itself. Fig various stem tremolos The second is represented by bars between the notes: Fig various beam tremolos
.")
")
239 Music Publisher 8 manual Page 239 Percussion Fig Note Attributes, Percussion tab This is where you can alter the percussion instrument allocated to percussionheaded notes (x-heads, triangle-heads, x-in-circle, diamond-heads). Simply press Change to alter it. If no percussion instrument can be set to this note (either it is outside the range of "pitches", or a normal head) then one or two messages may be shown: Fig warnings on Note Attributes, Percussion Tab
240 Page 240 Music Publisher 8 manual 41. APPENDIX D: CLEF TYPES The common clefs are show here, and the pitch middle C is shown where relevant. These are the commonest clefs in normal use. The neutral clef is just a place-marker on a stave and indicates that the notes which follow are of no definite pitch. It is of course used for percussion instruments, or other non-pitched effects such as hand-claps or shouting. See Chapter 18: Special staves - percussion instruments on page 98 for fuller details. A second neutral clef is offered: the first is more common but the second seems to be increasing in popularity. Neutral clefs can be used on any percussion staves defined as in the chapter mentioned above.
241 Music Publisher 8 manual Page APPENDIX E: VERBAL TEMPO MARKS Fixed tempo indications All words are independent of spaces, case and accents, eg Tres lent=très lent=treslent Tempo word used Larghissimo, Adagissimo, Lentissimo, Very slow, Tres Lent, Sehr Langsam, Ganz langsam, Very slow Interpreted by MP as beat = 40 Largo, Lento, Adagio, Slow, Langsam, Breit, Slow 50 Larghetto, Un Peu Lent, Etwas langsam 55 Andante 60 Andantino, Allant 72 Moderato, Modere 84 Allegretto 100 Fast, Quick, Anime 120 Allegro, Bewegt, Schnell 140 Vivace, Vivo, Vif, Vite, Lebhaft, Eilig 150 Presto 180 Alegrissimo, Vivacissimo, Tres vif, Ganz schnell, Ganz lebhaft 208 Prestissimo 220 Table 12 - tempo indications recognised
242 Page 242 Music Publisher 8 manual Relative tempo indications When this term is found and no closing tempo mark is there then the speed change is performed according to this table. Tempo word used Interpreted as speed change of accel, accelerando, accelerato +40% molto accelerando, molto accel +60% poco accel +20% molto rit -50% rit, ritardando, ritardare, ritardato -40% rall, rallentare, rallentando, -20% poco rit -10% a tempo, tempo 1, tempo uno 100% Table 13 - tempo change words recognised Any tempo mark placed before the end of the line will act as a final tempo and override the values above:

243 Music Publisher 8 manual Page APPENDIX F: USING THE MOUSE AND KEYBOARD EFFECTIVELY What's best? Mouse only There are some operations in Music Publisher which can only be done with a mouse; and some which can only be done with the keyboard. You will find that you need to use a mouse to draw lines and curves, and to access the many Explain buttons. (The Explain button is the only one on menus which does not have an underlined character to use Keyboard only Apart from playing-in you must place notes by their name on the keyboard and obviously you use the keyboard to type in the various forms of text on your music (lyrics, titles, instructions and so on) and of course to type in a file name for File Save and similar. Like any good Windows program, most of the buttons in Music Publisher menus react to the Alt key with a letter. Here is an example of the many available: Fig Keyboard shortcuts on normal menus The underlined n in the Bar numbering tab shows that typing Alt+n will be the same as clicking the tab. Or alt+2 will give a two-line stave, alt+w will give a binding With bracket and so on. Sometimes the underline is hard to see alt+i gives With brace! What you use for everything else in Music Publisher depends on you. If you are a touch-typist who is used to using keyboard shortcuts in Word then there are a great number of keyboard shortcuts in Music Publisher (see the next Appendix). Look also for shortcuts on menu items and toolbar buttons. For instance on the Lyric tool when you hover over it with your mouse you will see Ctrl+F9 shown:
244 Page 244 Music Publisher 8 manual Fig a keyboard shortcut shows on a tooltip Since entering Lyrics takes you straight to a convenient position for the first syllable I always enter Lyrics by Ctrl+F9 and then immediately typing the first line. It's faster than picking up a mouse and putting it straight down. But there are more interactions between mouse and keyboard. Here are some that you are probably not aware of: Pressing the arrows keys often adjusts the position of an object. For instance text can be nudged around easier with the keyboard arrows than with the mouse. Ctrl+arrow usually nudges the mouse by 5 units. Pressing spacebar when doing nothing else will move the I-cursor to the right: hold spacebar down and it zooms quickly. And pressing backspace moves it left. In block mode, once the objects are defined with the green box, use the keyboard to move the target block around. You need to press PgDn or alt+pgdn (etc) anyway, but the big advantage is that the target box will not wobble up/down as you use the right/left arrows (and conversley) so you don't end up with things out of place. Pressing? yields an appropriate Properties menu. For instance with the cursor over an empty part of a stave the? gives the Stave Attributes menu above (Fig 263 above). Or pressing? when an object is red under the mouse gives the same as Right-click, Properties. Properties is such an important and oft-used menu that you can use a mouse entry to it: press the left button when over a stave and keep it down (this is called Click and Hold). In a short time (currently 1 second) the Stave Properties is shown. The same works for objects which are selected (red). If you find this functionality annoying then you can turn of the hold property on the Options Configure Desktop menu: Press and hold the mouse over an empty part of the paper to start the Block Tool. However because of the paragraph above you will need to use the Block Tool button (or shortcut F3!) to start if you need it tostart in the middle of a stave. See note above about the Options menu

245 Music Publisher 8 manual Page 245 Shift+hold left mouse button when selecting notes will select/unselect not only the one note but also all those which are beamed to it: Fig shift-click and hold to select beamed notes See note above about the Options menu One key I want to impress in your mind is F5. In Music Publisher it is equivalent to Page Redraw. It re-draws the music on the current page by checking against the data held about the music. In other words, if you feel what's on the screen is not right, press F5. On many systems it's the same key (eg most internet browsers I have used) and is often called the Refresh key. As befits the last paragraph in this Appendix, don't forget the Esc (Escape) key. Located at the top left of most keyboards it's in a position easily found. It's a Windows-wide standard that the Escape key is equivalent to an Abort opion. Use it when you want to close a menu or pressed the wrong key and found yourself in unwanted territory. I call it the get me out of here! key.
Introduction to capella 8
 Introduction to capella 8 p Dear user, in eleven steps the following course makes you familiar with the basic functions of capella 8. This introduction addresses users who now start to work with capella
SmartScore Quick Tour
 SmartScore Quick Tour Installation With the packaged CD, you will be able to install SmartScore an unlimited number of times onto your computer. Application files should not be copied to other computers.
Sibelius In The Classroom: Projects Session 1
 Online 2012 Sibelius In The Classroom: Projects Session 1 Katie Wardrobe Midnight Music Tips for starting out with Sibelius...3 Why use templates?... 3 Teaching Sibelius Skills... 3 Transcription basics
Pictures To Exe Version 5.0 A USER GUIDE. By Lin Evans And Jeff Evans (Appendix F By Ray Waddington)
") Pictures To Exe Version 5.0 A USER GUIDE By Lin Evans And Jeff Evans (Appendix F By Ray Waddington) Contents 1. INTRODUCTION... 7 2. SCOPE... 8 3. BASIC OPERATION... 8 3.1 General... 8 3.2 Main Window
Pictures To Exe Version 5.0 A USER GUIDE By Lin Evans And Jeff Evans (Appendix F By Ray Waddington) Contents 1. INTRODUCTION... 7 2. SCOPE... 8 3. BASIC OPERATION... 8 3.1 General... 8 3.2 Main Window
Sibelius: Tips for Working Effectively
 2012 Sibelius: Tips for Working Effectively Katie Wardrobe Midnight Music About Katie...4 Professional development & training...4 In- person training... 4 Online courses... 4 Free tips, tutorials, articles
NoteWorthy Composer Version 2.75a
 NoteWorthy Composer Version 2.75a How To Guide Table of Contents... 0 Table of Contents... 1 The Workspace... 3 How to Change the Toolbars... 3 How to Use the Piano Keyboard Toolbar... 5 How to Use the
MICROSOFT WORD FEATURES FOR ARTS POSTGRADUATES
 MICROSOFT WORD FEATURES FOR ARTS POSTGRADUATES...2 Page Setup...3 Styles...4 Using Inbuilt Styles...4 Modifying a Style...5 Creating a Style...5 Section Breaks...6 Insert a section break...6 Delete a section
APA Research Paper Chapter 2 Supplement
 Microsoft Office Word 00 Appendix D APA Research Paper Chapter Supplement Project Research Paper Based on APA Documentation Style As described in Chapter, two popular documentation styles for research
Word Tutorial 2: Editing and Formatting a Document
 Word Tutorial 2: Editing and Formatting a Document Microsoft Office 2010 Objectives Create bulleted and numbered lists Move text within a document Find and replace text Check spelling and grammar Format
Linkage 3.6. User s Guide
 Linkage 3.6 User s Guide David Rector Friday, December 01, 2017 Table of Contents Table of Contents... 2 Release Notes (Recently New and Changed Stuff)... 3 Installation... 3 Running the Linkage Program...
Finale Tips and Tricks For Music Teachers
 Finale Tips and Tricks For Music Teachers LAUNCH WINDOW The Launch Window is basically the main menu for the program. document setup tools, tutorials, and exercise tools can be accessed from here. This
Formatting Dissertations or Theses for UMass Amherst with MacWord 2008
 January 2015 Formatting Dissertations or Theses for UMass Amherst with MacWord 2008 Getting started make your life easy (or easier at least) 1. Read the Graduate School s Guidelines and follow their rules.
Tutor Led Manual v1.7. Table of Contents PREFACE I.T. Skills Required Before Attempting this Course... 1 Copyright... 2 GETTING STARTED...
 EndNote X7 Tutor Led Manual v1.7 Table of Contents PREFACE... 1 I.T. Skills Required Before Attempting this Course... 1 Copyright... 2 GETTING STARTED... 1 EndNote Explained... 1 Opening the EndNote Program...
Score Printing and Layout
 Score Printing and Layout - 1 - - 2 - Operation Manual by Ernst Nathorst-Böös, Ludvig Carlson, Anders Nordmark, Roger Wiklander Quality Control: Cristina Bachmann, Heike Horntrich, Sabine Pfeifer, Claudia
Word Module Each time the key is pressed, the paragraph formatting in the previous paragraph is carried forward to the next paragraph.
 1. By default, the Normal style places points of blank space after each paragraph. a. 8 b. 10 c. 12 d. 14 ANSWER: a REFERENCES: WD 62 Changing Document Settings 2. By default, the Normal style inserts
Shelly Cashman Series Microsoft Office 365 and Word 2016 Introductory 1st Edition Vermaat TEST BANK
 Shelly Cashman Series Microsoft Office 365 and Word 2016 Introductory 1st Edition Vermaat TEST BANK Full clear download (no formatting errors) at: https://testbankreal.com/download/shelly-cashman-series-microsoft-office-365-word-2016-
EndNote Miscellany. 2 Backing Up an EndNote Library
 EndNote Miscellany EndNote Training 1 Overview EndNote can do a lot. This class is meant to cover some of the features that may not be used frequently but can sometimes make a big difference in the right
EndNote X7: the basics (downloadable desktop version)
") EndNote X7: the basics (downloadable desktop version) EndNote is a package for creating and storing a library of references (citations plus abstracts, notes etc) it is recommended that you do not exceed
EndNote X7: the basics (downloadable desktop version) EndNote is a package for creating and storing a library of references (citations plus abstracts, notes etc) it is recommended that you do not exceed
Introduction to EndNote Desktop
 Introduction to EndNote Desktop These notes have been prepared to assist participants in EndNote classes run by the Federation University Library. Examples have been developed using Windows 8.1 (Enterprise)
The. finale. Projects. The New Approach to Learning. finale. Tom Carruth
 The finale Projects The New Approach to Learning finale Tom Carruth Addendum for Finale 2010 The Finale Projects Addendum for Finale 2010 There are seven basic differences between Finale 2010 and Finale
Impro-Visor. Jazz Improvisation Advisor. Version 2. Tutorial. Last Revised: 14 September 2006 Currently 57 Items. Bob Keller. Harvey Mudd College
 Impro-Visor Jazz Improvisation Advisor Version 2 Tutorial Last Revised: 14 September 2006 Currently 57 Items Bob Keller Harvey Mudd College Computer Science Department This brief tutorial will take you
Keyboard Version. Instruction Manual
 Jixis TM Graphical Music Systems Keyboard Version Instruction Manual The Jixis system is not a progressive music course. Only the most basic music concepts have been described here in order to better explain
Chapter 4 Working with Bands
 Chapter 4 Working with Bands Introduction This chapter explains how to create band areas; insert, move, and copy band lines; and specify and modify band line properties. This information is presented in
Score Layout and Printing
 Score Layout and Printing Cristina Bachmann, Heiko Bischoff, Christina Kaboth, Insa Mingers, Matthias Obrecht, Sabine Pfeifer, Benjamin Schütte, Marita Sladek This PDF provides improved access for vision-impaired
Chapter 40: MIDI Tool
 MIDI Tool 40-1 40: MIDI Tool MIDI Tool What it does This tool lets you edit the actual MIDI data that Finale stores with your music key velocities (how hard each note was struck), Start and Stop Times
The Basics of Reading Music by Kevin Meixner
 The Basics of Reading Music by Kevin Meixner Introduction To better understand how to read music, maybe it is best to first ask ourselves: What is music exactly? Well, according to the 1976 edition (okay
Cakewalk Score Writer Getting Started
 Cakewalk Score Writer Getting Started Copyright Information Information in this document is subject to change without notice and does not represent a commitment on the part of Twelve Tone Systems, Inc.
The Complete Guide to Music Technology using Cubase Sample Chapter
 The Complete Guide to Music Technology using Cubase Sample Chapter This is a sample of part of a chapter from 'The Complete Guide to Music Technology', ISBN 978-0-244-05314-7, available from lulu.com.
Using a predefined template in an alternate tuning. Using a predefined rule set for alternate tuning
 Alternate tuning 01/11/2006 07:40 PM Previous page Melody Assistant Next page Products What's new? Tutorial Notation Rendering Rules Effects/Expression Microtonal adjustment Alternate tuning Digital Effects
Study Guide. Solutions to Selected Exercises. Foundations of Music and Musicianship with CD-ROM. 2nd Edition. David Damschroder
 Study Guide Solutions to Selected Exercises Foundations of Music and Musicianship with CD-ROM 2nd Edition by David Damschroder Solutions to Selected Exercises 1 CHAPTER 1 P1-4 Do exercises a-c. Remember
Swinburne University of Technology
 Swinburne University of Technology EndNote X9 for Mac Swinburne Library EndNote resources page: http://www.swinburne.edu.au/library/referencing/references-endnote/endnote/ These notes include excerpts
Using EndNote X7 for Windows to Manage Bibliographies A Guide to EndNote for Windows by Information Services Staff of UTS Library
 1 Using EndNote X7 for Windows to Manage Bibliographies A Guide to EndNote for Windows by Information Services Staff of UTS Library University Library University of Technology Sydney February 2015 2 Section
Note Names and Values, and the story of The Great Stave
 Note Names and Values, and the story of The Great Stave The Great Stave originally looked like this, and was diabolically difficult to read: Then along came a shrewd scholar who thought it would be easier
Introductory Course EndNote X2 for PC users. University of Otago Library.
 Introductory Course EndNote X2 for PC users University of Otago Library www.library.otago.ac.nz/endnote on-campus type endnote in web browser address bar July 2009 1 Course Objectives: Create a new EndNote
Using EndNote X6 to Manage Bibliographies
 1 Using EndNote X6 to Manage Bibliographies A Guide to EndNote by Information Services Staff of UTS Library University of Technology, Sydney University Library (May 2013 version) 2 Section Table of Contents
Music theory PART ONE
 Music theory PART ONE STAVES Music lives on staves - a stave consists of 5 horizontal lines, and the spaces in between those lines. The position of notes on the lines or in the spaces, in conjunction with
Version history Known issues & solutions
 Version history Known issues & solutions December 2017 Steinberg Media Technologies GmbH Table of contents Dorico 1.2... 3 New features... 3 Improvements... 36 Issues resolved... 51 Dorico 1.1.10... 55
Using EndNote X7 to Manage Bibliographies on a Mac!
 1 Using EndNote X7 to Manage Bibliographies on a Mac! A Guide to EndNote by Information Services Staff of UTS Library University of Technology, Sydney University Library (May 2014 version) 2 Section Table
Sibelius Advanced Session 2
 Online 2012 Sibelius Advanced Session 2 Katie Wardrobe Midnight Music Playback of your score: the importance of text 4 Tempo markings 4 Creating tempo markings 4 Metronome markings 4 Creating metronome
UTS: Library Using EndNote X8 for Windows. A guide to EndNote X8 for Windows by Information Services Staff
 UTS: Library Using EndNote X8 for Windows A guide to EndNote X8 for Windows by Information Services Staff April 2017 Table of Contents 1. What is EndNote? 3 2. Getting started with an EndNote Reference
Using the Australian Guide to Legal Citation, 3rd ed. (AGLC3) with EndNote X6
 with EndNote X6") Using the Australian Guide to Legal Citation, 3rd ed. (AGLC3) with EndNote X6 1. INTRODUCTION... 2 1.1 About this Guide... 2 1.2 Terminology... 2 1.3 Downloading the AGLC3 Output Style for EndNote... 2
Using the Australian Guide to Legal Citation, 3rd ed. (AGLC3) with EndNote X6 1. INTRODUCTION... 2 1.1 About this Guide... 2 1.2 Terminology... 2 1.3 Downloading the AGLC3 Output Style for EndNote... 2
YouCompose User Manual
 YouCompose User Manual App Version 4.22 Contents Introduction - Meet Aimée 5 Quick start with Tutorial Mode 7 The basic structure of a composition 8 Composition View 9 Grid mode 9 Score mode 11 Files View
APA Style Page Formatting Instructions Microsoft Word Windows Version. Adjust all margins to 1 inch on each side, page in Portrait orientation
 APA Style Page Formatting Instructions Microsoft Word Windows Version PART 1 GENERAL FORMATTING AND COVER PAGE Adjust all margins to 1 inch on each side, page in Portrait orientation 1. Click on the Page
Edition February Tutorials written by Tom Clarke.
 Tutorials Edition 7.1.1 February 2012 Tutorials written by Tom Clarke. See the About Sibelius dialog for a full list of the software development team and other credits. We would like to thank all those
Using EndNote X4 to Manage Bibliographies
 1 Using EndNote X4 to Manage Bibliographies A Guide to EndNote by Information Services Staff of UTS Library University of Technology, Sydney University Library (April 2011 Version) 1 2 Section Table of
User s Guide W-E
 Presto! PVR ISDB User s Guide 518100-02-01-W-E-112307-02 Copyright 2007, NewSoft Technology Corp. All Rights Reserved. No portion of this document may be copied or reproduced in any manner without prior
Chapter 02: Creating a Research Paper with References and Sources
 Cengage Learning Testing, Powered by Cognero Page 1 Cengage Learning Testing, Powered by Cognero Page 2 1. When using the MLA style, position in-text parenthetical references either at the, as shown in
Managing your References using EndNote X7 (PC): getting started
: getting started") [Type here] Managing your References using EndNote X7 (PC): getting started This workshop is an introduction to using EndNote X7 on a Windows PC. EndNote is a bibliographic database program designed to
[Type here] Managing your References using EndNote X7 (PC): getting started This workshop is an introduction to using EndNote X7 on a Windows PC. EndNote is a bibliographic database program designed to
The World s Best Braille Music Transcription Program
 TM The World s Best Braille Music Transcription Program from OPTEK SYSTEMS Systems you can rely on TM Manual with Worked Examples version 1.0.1 toc ca ta noun Music 1. A composition, usually for the organ
USER GUIDE. Table of Contents
 Table of Contents USER GUIDE USER GUIDE...1 1. Installation of Personal Music Collection Database...2 2. Working with Personal Music Collection Database...4 2.1. General Information...4 2.2. Navigation
EndNote X7: the basics (downloadable desktop version)
") EndNote X7: the basics (downloadable desktop version) EndNote is a package for creating and storing a library of references (citations plus abstracts, notes etc) it is recommended that you do not exceed
EndNote X7: the basics (downloadable desktop version) EndNote is a package for creating and storing a library of references (citations plus abstracts, notes etc) it is recommended that you do not exceed
EndNote X7 Reference Management Software The Complete Reference Solution
 EndNote X7 Reference Management Software The Complete Reference Solution Dr. Abbas B. Qadir Salihi University of Salahaddin, College of Science, Biology Department. 1 EndNote is a piece of computer software,
ToshibaEdit. Contents:
 ToshibaEdit Contents: 1 General 2 Installation 3 Step by step a Load and back up a settings file b Arrange settings c Provider d The favourite lists e Channel parameters f Write settings into the receiver
Keeping a Bibliography using EndNote
 Keeping a Bibliography using EndNote Student Guide Edition 5 December 2009 iii Keeping a Bibliography using EndNote Edition 5, December 2009 Document number: 3675 iv Preface Preface This is a beginner
Table of Contents. Chapter 1 Introduction System Requirements Chapter 2 Introducing the AVerTV Application... 3
 Table of Contents Chapter 1 Introduction... 1 System Requirements... 2 Chapter 2 Introducing the AVerTV Application... 3 Launching the AVerTV DVB-T USB2.0 Application... 3 Running AVerTV DVB-T USB2.0 application
Lime User's Manual Music Notation Software. Windows. Macintosh
 Lime User's Manual Music Notation Software Windows and Macintosh Lippold Haken and Dorothea Blostein and Paul S. Christensen David Cottle, Editor 12/7/01 If you have questions or comments about Lime, send
2. Document setup: The full physical page size including all margins will be 148mm x 210mm The five sets of margins
 Submission Guidelines Please use this section as a guideline for preparing your manuscript. This set of guidelines (updated November 2007) replaces all previously issued guidelines. Please ensure that
Neuratron AudioScore. Quick Start Guide
 Neuratron AudioScore Quick Start Guide What AudioScore Can Do AudioScore is able to recognize notes in polyphonic music with up to 16 notes playing at a time (Lite/First version up to 2 notes playing at
Background. About automation subtracks
 16 Background Cubase provides very comprehensive automation features. Virtually every mixer and effect parameter can be automated. There are two main methods you can use to automate parameter settings:
Kindle Add-In for Microsoft Word User Guide
 Kindle Add-In for Microsoft Word User Guide version 0.97 Beta, 9/21/17 Contents 1 Introduction...2 1.1 Overview of Kindle Tab...2 2 Anatomy of a Kindle Book...3 3 Formatting Your Book...4 3.1 Getting Started...4
Music Theory. Level 1 Level 1. Printable Music Theory Books. A Fun Way to Learn Music Theory. Student s Name: Class:
 A Fun Way to Learn Music Theory Printable Music Theory Books Music Theory Level 1 Level 1 Student s Name: Class: European Language Version Printable Music Theory Books Level One Published by The Fun Music
THE CHORAL SINGERS TOOLKIT
 THE CHORAL SINGERS TOOLKIT A compact (but NOT totally comprehensive) guide for choral singers CONTENTS Page 2 Finding and Keeping Your Place in the Music 1 (High notes, low notes, the stave, lines and
EndNote Essentials. EndNote Overview PC. KUMC Dykes Library
 EndNote Essentials EndNote Overview PC KUMC Dykes Library Table of Contents Uses, downloading and getting assistance... 4 Create an EndNote library... 5 Exporting citations/abstracts from databases and
SNR Playback Viewer SNR Version 1.9.7
 User Manual SNR Playback Viewer SNR Version 1.9.7 Modular Network Video Recorder Note: To ensure proper operation, please read this manual thoroughly before using the product and retain the information
UNC. JlJ1 THESIS AND DISSERTATION SUBMISSION CHECKLIST
 THESIS AND DISSERTATION SUBMISSION CHECKLIST The following checklist items should be used to ensure your document is properly formatted prior to submission. These items will be reviewed by staff in The
APPENDIX A: ERRATA TO SCORES OF THE PLAYER PIANO STUDIES
 APPENDIX A: ERRATA TO SCORES OF THE PLAYER PIANO STUDIES Conlon Nancarrow s hand-written scores, while generally quite precise, contain numerous errors. Most commonly these are errors of omission (e.g.,
7thSense Design Delta Media Server
 7thSense Design Delta Media Server Channel Alignment Guide: Warping and Blending Original by Andy B Adapted by Helen W (November 2015) 1 Trademark Information Delta, Delta Media Server, Delta Nano, Delta
Grade Five. MyMusicTheory.com. Music Theory PREVIEW: Course, Exercises & Answers. (ABRSM Syllabus) BY VICTORIA WILLIAMS BA MUSIC
 BY VICTORIA WILLIAMS BA MUSIC") MyMusicTheory.com Grade Five Music Theory PREVIEW: Course, Exercises & Answers (ABRSM Syllabus) BY VICTORIA WILLIAMS BA MUSIC www.mymusictheory.com Published: 5th March 2015 1 This is a preview document
MyMusicTheory.com Grade Five Music Theory PREVIEW: Course, Exercises & Answers (ABRSM Syllabus) BY VICTORIA WILLIAMS BA MUSIC www.mymusictheory.com Published: 5th March 2015 1 This is a preview document
Credo Theory of Music training programme GRADE 4 By S. J. Cloete
 - 56 - Credo Theory of Music training programme GRADE 4 By S. J. Cloete Sc.4 INDEX PAGE 1. Key signatures in the alto clef... 57 2. Major scales... 60 3. Harmonic minor scales... 61 4. Melodic minor scales...
Data Acquisition Using LabVIEW
 Experiment-0 Data Acquisition Using LabVIEW Introduction The objectives of this experiment are to become acquainted with using computer-conrolled instrumentation for data acquisition. LabVIEW, a program
Creating a Lead Sheet Using Logic Pro X and Sibelius
 Creating a Lead Sheet Using Logic Pro X and Sibelius As part of your composition portfolio, you are required to create a lead sheet for your song. This guide explains how to complete the process 1. Create
Introduction to EndNote
 Library Services Introduction to EndNote Part 2: Creating an EndNote Library Table of Contents: Part 2 2. CREATING AN ENDNOTE LIBRARY - 3-2.1. CREATING A NEW LIBRARY - 3-2.2. ENTERING NEW REFERENCES MANUALLY
This handout will help you prepare a research paper in the APA 6th Edition format.
 Easy APA Formatting Guide- Word 2010/2013 This handout will help you prepare a research paper in the APA 6th Edition format. FONT The font for APA is Times New Roman, with 12-point font size. MARGINS APA
OLS Original Lead Sheet CLS Completed Lead Sheet, also referred to as simply the LS CS Chord Sheet HS Hymn Sheet VS Vocal Sheet
 Abbreviations OLS Original Lead Sheet CLS Completed Lead Sheet, also referred to as simply the LS CS Chord Sheet HS Hymn Sheet VS Vocal Sheet Published Product The publisher's printed product (the OLS)
SetEditHD25Zapper for Comag HD25 Zapper. Contents:
 SetEditHD25Zapper for Comag HD25 Zapper Contents: 1 General 2 Installation 3 Step by step a Load and back up a settings file b Arrange settings c Provider d The favourite lists e Channel parameters f Write
Contents DIVISION OF LIBRARY SERVICES. EndNote X7 Mac User Manual Part 2
 DIVISION OF LIBRARY SERVICES EndNote X7 Mac User Manual Part 2 Contents Using EndNote with Word (Cite While You Write)... 2 Inserting Citations into the Text... 2 Removing Citations Very Important!...
EndNote X7. Department of Information Technology Services: Strategic Support & Department of Library Services
 EndNote X7 Department of Information Technology Services: Strategic Support & Department of Library Services 1 Table of Contents Course Overview... 3 Prerequisites... 3 Objectives... 4 Install Endnote
The Keyboard. An Introduction to. 1 j9soundadvice 2013 KS3 Keyboard. Relevant KS3 Level descriptors; The Tasks. Level 4
 An Introduction to The Keyboard Relevant KS3 Level descriptors; Level 3 You can. a. Perform simple parts rhythmically b. Improvise a repeated pattern. c. Recognise different musical elements. d. Make improvements
SetEditPFL for Philips PFL. Contents:
 SetEditPFL for Philips PFL Contents: 1 General 2 Installation 3 Step by step a Load and back up a settings file b Arrange settings c Provider d The favourite list e Channel parameters f Write settings
Lab experience 1: Introduction to LabView
 Lab experience 1: Introduction to LabView LabView is software for the real-time acquisition, processing and visualization of measured data. A LabView program is called a Virtual Instrument (VI) because
Clef Transposition. If I leave the notes precisely where they are on the staff, but change the clef sign to a bass clef, this is what happens:
 Clef Transposition The technique of transposing by changing clef is probably the single best technique to master for the reading of orchestral scores, which typically demand the performance of multiple,
Getting started with Mendeley
 UNIVERSITY OF TWENTE. Getting started with Mendeley C.M.Gerritsen ITC faculty library https://www.itc.nl/library August, 2018 1 Table of Contents 1 Mendeley in not even 10 steps... 3 1.1 Go to www.mendeley.com
Course Report Level National 5
 Course Report 2018 Subject Music Level National 5 This report provides information on the performance of candidates. Teachers, lecturers and assessors may find it useful when preparing candidates for future
Statement SmartLCT User s Manual Welcome to use the product from Xi an NovaStar Tech Co., Ltd. (hereinafter referred to as NovaStar ). It is our great
. It is our great") LED Display Configuration Software SmartLCT User s Manual Software Version: V3.0 Rev3.0.0 NS110100239 Statement SmartLCT User s Manual Welcome to use the product from Xi an NovaStar Tech Co., Ltd. (hereinafter
LED Display Configuration Software SmartLCT User s Manual Software Version: V3.0 Rev3.0.0 NS110100239 Statement SmartLCT User s Manual Welcome to use the product from Xi an NovaStar Tech Co., Ltd. (hereinafter
The Keyboard. Introduction to J9soundadvice KS3 Introduction to the Keyboard. Relevant KS3 Level descriptors; Tasks.
 Introduction to The Keyboard Relevant KS3 Level descriptors; Level 3 You can. a. Perform simple parts rhythmically b. Improvise a repeated pattern. c. Recognise different musical elements. d. Make improvements
USER GUIDE V 1.6 ROLLERCHIMP DrumStudio User Guide page 1
 USER GUIDE V 1.6 ROLLERCHIMP 2014 DrumStudio User Guide page 1 Table of Contents TRANSPORT... 3 SONG NAVIGATOR / SECTION EDITING...4 EDITOR...5 TIMING OPTIONS...6 PLAYBACK OPTIONS... 7 RECORDING OPTIONS...8
Homework Booklet. Name: Date:
 Homework Booklet Name: Homework 1: Note Names Music is written through symbols called notes. These notes are named after the first seven letters of the alphabet, A-G. Music notes are written on a five
Primo Theory. Level 5 Revised Edition. by Robert Centeno
 Primo Theory Level 5 Revised Edition by Robert Centeno Primo Publishing Copyright 2016 by Robert Centeno All rights reserved. Printed in the U.S.A. www.primopublishing.com version: 2.0 How to Use This
Exercise #1: Create and Revise a Smart Group
 EndNote X7 Advanced: Hands-On for CDPH Sheldon Margen Public Health Library, UC Berkeley Exercise #1: Create and Revise a Smart Group Objective: Learn how to create and revise Smart Groups to automate
Self Publishing Your Genealogy. You can do it!!!
 Self Publishing Your Genealogy You can do it!!! Start with your Genealogy Software From your genealogy software, go to publish or generate a report. Start with the oldest member in the family you are going
ENDNOTE X6 FOR HEALTH
 ENDNOTE X6 FOR HEALTH Contents Aims... 2 Further help... 2 Part A - Adding references to an EndNote library... 3 1. Opening EndNote and creating an EndNote library... 3 2. Importing/exporting references
The Kikuchi Music Institute Library. Creating Music LEVEL ONE. A comprehensive course in music composition. By Lee W. Kikuchi
 The Kikuchi Music Institute Library Creating Music LEVEL ONE A comprehensive course in music composition By Lee W. Kikuchi Creating Music, is a systematic approach to teaching composition with substantial
Scan-Light Supplement. Fitting instructions and hardware details For Mitsubishi MH105AG and MH216CG scanners
 Scan-Light Supplement Fitting instructions and hardware details For Mitsubishi MH105AG and MH216CG scanners Contents Contents Fitting instructions and hardware details... 1 For Mitsubishi MH105AG and MH216CG
Thieme Dissector Manual
 Thieme Dissector Manual Contents About the Thieme Dissector Important Notes Overview Organizing and Editing Content Getting Started Manage Content Page Editing Text in Editing Mode Notes on Images Notes
Word 4 Activity 1 - Report
 Computer Technology Instructions Word 4 Activities 1-2 Word 4 Activity 1 - Report 1. Open the document titled Word 4 Report Activity 1 Text from the shared drive. Save it to your own drive as ClassHour.W4A1-Report.Lastname.Firstname
Primo Theory. Level 7 Revised Edition. by Robert Centeno
 Primo Theory Level 7 Revised Edition by Robert Centeno Primo Publishing Copyright 2016 by Robert Centeno All rights reserved. Printed in the U.S.A. www.primopublishing.com version: 2.0 How to Use This
Student Guide for SOLO-TUNED HARMONICA (Part II Chromatic)
") Student Guide for SOLO-TUNED HARMONICA (Part II Chromatic) Presented by The Gateway Harmonica Club, Inc. St. Louis, Missouri To participate in the course Solo-Tuned Harmonica (Part II Chromatic), the student
Student Guide for SOLO-TUNED HARMONICA (Part II Chromatic) Presented by The Gateway Harmonica Club, Inc. St. Louis, Missouri To participate in the course Solo-Tuned Harmonica (Part II Chromatic), the student
Nodal. GENERATIVE MUSIC SOFTWARE Nodal 1.9 Manual
 Nodal GENERATIVE MUSIC SOFTWARE Nodal 1.9 Manual Copyright 2013 Centre for Electronic Media Art, Monash University, 900 Dandenong Road, Caulfield East 3145, Australia. All rights reserved. Introduction
Analyzing and Saving a Signal
 Analyzing and Saving a Signal Approximate Time You can complete this exercise in approximately 45 minutes. Background LabVIEW includes a set of Express VIs that help you analyze signals. This chapter teaches
SetEditDVBViewer for DVBViewer. Contents:
 SetEditDVBViewer for DVBViewer Contents: 1 General 2 Installation 3 Step by step a Load and back up a settings file b Arrange settings c Provider d The favourite lists e Channel parameters f Write settings