The Complete Guide to Music Technology using Cubase Sample Chapter
|
|
|
- Miranda Daniel
- 5 years ago
- Views:
Transcription
1 The Complete Guide to Music Technology using Cubase Sample Chapter This is a sample of part of a chapter from 'The Complete Guide to Music Technology', ISBN , available from lulu.com. It's published by musictechtuition.com, and for more information on the book, please go to : The content shown here is around 25% of the first chapter of the book, taking the user through basic sequencing and recording, but it covers many more techniques in over 600 pages: Sequencing - from basics to complex editing Samplers - Including Sampler Tracks Synthesizers - theory and programming Microphones - types, characteristics and placement Music Theory - understanding why music works Arrangements - how to arrange a piece in a new style Audio Editing - detailed editing techniques Effects - effects types and applications Mixing - techniques and practice The Mix Console - mixing effectively with Cubase Automation - making your mixes more interesting Chords - chord tracks, editing and chord pads 1
2 Sequencing 2
3 sample downloaded from Sequencing - Sample Chapter Cubase 9.5 is music production software, and one of its features is that it is a sequencer. This means it can record notes that you play on a keyboard, and then play them back through a synthesizer, allowing you to create compositions and hear what they sound like without using other musicians. Very complex pieces of music can be built up doing this as you can create one track at a time and rerecord it until you are totally happy with it, all at your own pace. You don t need to be a good keyboard player to get good results, either (although having some keyboard skills is a big help). It s important to remember that it deals with MIDI (which will be covered fully later on), and that really means notes being played, usually on a keyboard, so you can change the sound of what you ve recorded afterwards, but there are some limitations to how it will sound. Getting Started Firstly you will need to start your computer and any other items in your setup. The order of this will change depending on your specific equipment, but there is a good rule of thumb here: Tip: The speakers should be the last thing you turn on, and the first thing that you turn off this is to avoid any thumps damaging them (or your ears) when you turn the equipment on. Usually the computer will be one of the first things to be turned on and the last to turn off. Once this is done, you can start Cubase. Once it loads (which can take some time as it s a large program), you will see a screen like the one on the left, it is the Steinberg Hub and it is there to allow you to pick from a number of templates, as well as tell Cubase where you want your project to be saved. Tip: Whenever you use Cubase, it s important to make sure your files are where they should be in some situations the computer is used by a number of people, and in addition it s really important to save each project in a separate folder this means you will easily be able to back your work up later on. To create a new folder for your project, click in the area next to Project Folder at the bottom right of the Steinberg Hub window, and type the name of the folder you want to create, and then in the upper section click More and then pick Empty. Now click the Create button at the bottom and Cubase will make the folder and a new project. Tip: Remember that USB flash drives and external hard drives are becoming increasingly affordable, and their cost is small compared to the amount of time that you would need to recreate any work if it was lost. Backing up your work is a necessity, as is regularly saving your work. Computers crash, particularly when running complex software such as sequencers, and hard drives fail. If you save regularly and back up often then you will not lose a great deal if the worst happens. 3


4 Sequencing - Sample Chapter Here we see the main Cubase window, with the Transport Bar at the bottom. The transport bar is like the remote control for a video recorder, although it has more functions, the basic controls are the same, as we ll see later on. The central area is the project window. This is where all your tracks will be created and the majority of your work will be. The first thing to do is to create a new track. Go to Project > Add Track > Instrument, and a new window will appear where you can select an Instrument. Click where the window says No VST Instrument and a list will appear of the instruments your computer has available. Pick Prologue from the Synth folder (as it is available on all Cubase 9.5 systems), and click Add Track. You should now see a screen similar to the one shown below. Here there is a track called Prologue 01, and to the left of it the Inspector, which shows details about it, such as the track name, inputs and outputs, etc, as shown on the left of this screen shot. If the inspector isn t enabled, then hit SHIFT + F2 and tick Right Zone in the box that appears. The Inspector is very important as it allows you to alter the volume and panning of a track (more of this later), and most importantly pick the sounds you wish to use. We will see how this works in a while, but firstly we will look at a few things we need before we get started. The Transport The transport (hit F2 if you can t see it) allows us to control Cubase, making it play, stop, record, rewind and a host of other features. We won t cover them all here, but we will cover the basic controls that you need to get you sequencing. sample downloaded from 4 The transport controls, allowing us to control Cubase and move to different parts of the song, much like a video or DVD recorder. In addition, there are controls to go to the previous marker or zero (at the left), the end of the song (2nd button in), and cycle mode (5th button in), which we ll see later on.
5 sample downloaded from Sequencing - Sample Chapter Tempo control, metronome and count-in. Here the tempo can be set (once the tempo track is turned off by clicking the button at the top left), and the click and count in can be turned on and off with the bottom two buttons. Time readout. This can be in a number of formats, but bars and beats (at left) is probably the best setting. Locators. As we ll see later on, the locators allow us to cycle round a section, to practice it or record several times. They can be set by double-clicking the numbers and typing a new value. Input/Output activity. This shows MIDI in and out (left two meters, red and green) and audio input and output; initially only the MIDI meters will be of use to you. Master Fader This control allows you quick access to Cubase s master fader to control the overall volume of your sequencing The Metronome It is very important that when you play music into Cubase that it is in time with the metronome. Computers may work extremely quickly, but they do not have much intelligence, and as a result they need to be told things that we may take for granted. One of them is the tempo of a piece of music Cubase can t really work that out, so to make life easy in the long run, you should play in time with the metronome. This is easily achieved, firstly by turning it on! To do that, click the button marked click in the transport bar it will turn light blue, and pressing Play on the transport bar should now mean you hear an indication of the tempo of the piece. Changing Tempo If you want to change the speed, make sure that the tempo track is turned off (click TEMPO) on the transport bar so that it is dark grey, and then enter the tempo that you want by double-clicking it and typing the speed you want. You may need to experiment to find the right speed, and remember that you can always change the speed of what you ve recorded after you ve done it. This has an important benefit if you re finding a part difficult - you can record difficult parts slowly to make them easier to play, then return the tempo to normal afterwards. Picking a sound Many synthesizers provide a wide range of sounds (referred to as patches) and these should cover most eventualities there are usually over a hundred on a basic synth, and on some there can be thousands. However, picking them can be a little difficult as there are so many to choose from, but the Inspector makes it easier. 5
 is where the patch name will appear when one is selected, so click there... 6... and the patch list appears.")

 then it will only show you sounds that are relevant to that both in their names and also their categories/description, so")
6 Sequencing - Sample Chapter Here is the inspector, with the Prologue in the track. The black area at the bottom (above No Drum Map) is where the patch name will appear when one is selected, so click there and the patch list appears. Here you can list all the sounds that the synth has, and there are many (334, as shown at the top right). If you want to explore, feel free to do so, you can scroll through the list and click once on a sound and you will be able to hear it played using your MIDI keyboard you may find a sound that inspires you or takes your compositions in new directions. There are so many sounds that it s hard to find the right one quickly. If you click where it says Search Results and enter a word (or part of one) then it will only show you sounds that are relevant to that both in their names and also their categories/description, so if you enter bass (as seen here) then you should get bass sounds, even if their name doesn t make that obvious. Not all instruments have descriptions in their patches, however. Naming your tracks It s important to name each track at first it s easy to know what s what as you may only have one or two tracks. When your piece develops, you may end up with many tracks, and knowing instantly what each one is will help. To name it, double click where the track says Prologue 01 and name it appropriately melody, bass, chords or whatever you want to call it. If you have the Info Line present (click the icon at the right if it isn t), then you can name each part as well, avoiding confusion if you have musically different parts. It can also be of benefit to use the colour palette to colour parts, providing an instant visual clue when a part is different from its neighbours. sample downloaded from Making a recording Cubase will record whatever you play on the keyboard. To do this, select a track (if you only have one it will already be selected, this is shown by it being lighter than the others), and look to see that the red record enable button is lit up on the track itself it should be as soon as you select the track, but it s possible for it to be turned off. This button doesn t mean that the track is recording straight away, but it means that when you press record it will record on this track. Next,
7 Sequencing - Sample Chapter we need to tell Cubase to give us a count-in (normally this is 2 bars). This is done by activating the Precount/Click button, near Click it looks like this: - Now make sure Cubase is at the start of the song, and hit Record. Cubase will give you a 2 bar count-in, and then start recording. Play something on the keyboard, and you should see it appear as you re recording. Once you re happy, press Stop. Go back to the beginning of the piece (use the buttons on the transport bar to do this)and press play to hear what you recorded. If you re not happy with the recording, then often the best thing to do is to delete it and start again unless there is some unique part of it that you think you could never reproduce, the best thing to do is to start again, as this will improve your keyboard skills quite quickly if they need to be improved, and mean that in the future you can sequence things with much more speed and accuracy. Tip: To delete a part, select it (left-click it) and then hit Backspace on the computer keyboard. To record again, just repeat the steps above. Snap Snap is extremely important. Without it, it would be very difficult to make parts in the project window which were exactly the right length, whether it s bars or beats we are after. What snap does is makes sure that any movements you make and any edits you do are constrained to a grid, which minimizes the room for errors. Whenever you re making any changes in the project window, make sure that snap is turned on, and initially make sure that it s set to Bar. The settings for Snap are found at the top of the project window, and the correct ones are shown below: The button at the left turns snap on or off. Next to it is an area that shows the current setting (which is set to Grid). The size of the grid is set by the next two boxes - the first is currently set to Bar (which we want). Ignore the 1/16 section for the time being this only applies if the middle menu is set to Use Quantize, sample downloaded from which you will need later on. Later on, as your sequencing develops, you will find times when you don t want to use snap, or you want it set to different values. But initially it s best to stick with it set to a grid of bars, as this leaves the least room for problems! Trimming a part to size When creating a song, it s often made up of smaller building blocks these could be a verse, chorus or other section of a song that you wish to repeat. When you originally record them, they might end up being too long, for instance if you didn t 7


8 Sequencing - Sample Chapter hit stop right on the end of a bar, you may well end up with a bar of silence. This can be easily trimmed away just hover your mouse over the part in question, and it will have small handles at the bottom corners one for the start and one for the end. Here we see the part, with a bar of silence at the end. At the bottom corners there are handles which you can click and drag to size the part. If the part has been selected, it will look like this - dark with the handles being lighter. In either case, you can click and drag the end one to the left to produce a part of the correct length. Note that if you do this to an area which has notes in it, they will not be played, but they are not lost you can extend the part again using this technique and they will reappear. Make sure snap is turned on when doing this, or the timing of your part will suffer. Adding another track To add another track, you can do so in the way you did before go to Project > Add Track > Instrument. It is important to experiment with the different Instruments you have on your system, which can create a wide range of sounds. Adding Drums Drums are an important part of many styles of music, so adding them is often needed. To do this, create an instrument track as shown above, but this time you will pick Halion One from the Instrument menu. Now, using the patch selector (as shown on page 5) pick the Dry Standard Kit (remember you can search for it with the keyword drum ). This means that instead of playing notes, the keyboard will play drum sounds on most keyboards/synths you will find that the C note to the left of the keyboard will be a bass drum, with snare above it on D and E, toms above that, while the hi-hats will be on F#, G# and A#. Learning what sounds are where will take some time (experiment to find which sounds are where), but the basic parts of the drum kit are found on the left-hand end of the keyboard. There is a map of some of the keyboard in the MIDI Chapter on page 51. As before, recording drums is just like recording any other MIDI, although the playing may be more complex if you re trying to play a full kit s worth at once. sample downloaded from 8
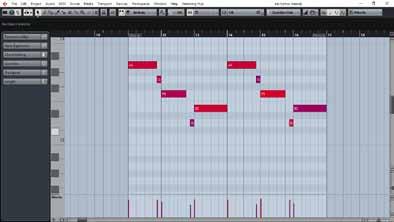
9 sample downloaded from Sequencing - Sample Chapter Adding more notes to a part If you have problems playing all of a drum track at once, then there are a number of ways to do it. The first way is to record on top of the first part you have recorded. Simply go back to the beginning of the track, and then record again on the same track the notes you ve already played will be played back to you, and you ll create a new part on top of the original one; Cubase will show the part with diagonal lines on it to show you that there is more than one part in that location, and once you re happy with the second part you have made, you can select the glue from the toolbar at the top and glue the top part to the bottom you ll now see a part with both sets of notes in (see diagrams below). Once you re finished working with the glue, you can return to the arrow tool, either by using the toolbar, or right-clicking on the white area of the project window and selecting it from the pop-up menu. Here we see the initial part that has been recorded. Cubase is set to record from the start on the same track, and we see below that the notes get recorded and seem to be in the same part, but when your cursor is anywhere on that track, the part gets a diagonal pattern on it - this shows that there is another part below this one. Both still play, even though they are on top of each other. If we want them to be one part, we select the glue from the toolbar above, and click on the part, leading to a final part which has the notes of both parts. Picking which tracks play Cubase has two important buttons which will let you hear the tracks you want, and stop others from playing. Mute Mute will stop any track that has it turned on from playing. Click on the button so that it is selected in yellow, and play your track back - the track will not be heard. You can do this for as many tracks as you want. To un-mute them, either click the mute button on the track, or you can clear all mutes with the clear mutes button which is in the toolbar at the top of the window. If you want to mute a track you have selected (i.e. it is in white in the list) then press M on the keyboard. 9
10 Sequencing - Sample Chapter Solo Solo will mute all tracks other than the one(s) you have soloed (press S). This makes it quick and easy to hear a track you want to hear in isolation. You can solo multiple tracks if you want, and each one is toggled by clicking the solo button on the track in question. CTRL clicking a Solo button will mute any other already soloed tracks. As with mute, there is a clear all solo button in the toolbar at the top of the window. Creating an arrangement Usually, a song will consist of several parts, some of which will be repeated. This can be done quickly and simply in Cubase. Firstly, create the parts that you want to use for the song you can do this on several tracks, using different instruments, but for clarity the diagrams below will only show one track. The first thing to realise is that you can move any part to a new location by clicking and dragging it there. When you do so, make sure you have snap turned on, as then your part will be in time. You can also drag a part to a new track to make it play on a different sound sometimes this happens accidentally. However, often copies of the original parts are needed, to make the piece larger repeating sections of an entire song, or copying a bar from one place to another. There are a few ways to do this, as seen below. Here we see the original part, 4 bars from bar 1 to bar 5. For each step below, the first part has to be selected. Edit > Functions > Duplicate. A single copy is made, directly after the original part. Edit > Functions > Repeat. A new dialogue box appears, asking for the number of copies here 3 was entered. Useful for creating many copies. Holding down ALT while dragging the part to a new location will create a copy this is useful when a copy doesn t need to be directly after the original. Using these simple techniques allows a song s structure to be built up quickly and easily. Practicing a section When a part is simple to play, then it can often be done with little practice. But sometimes it s necessary to repeat a section so you can practice or work out what you want to play. Here s where the locators come in. Cubase has two main locators, left and right. They can be used to create a cycle which Cubase will repeat until you tell it otherwise. To do this, firstly we need to set the left and right locators. This can be done in a number of ways: 10 sample downloaded from
11 sample downloaded from Sequencing - Sample Chapter 1 Double-click the area on the transport bar where the current value of the locator is, and enter a new value. For bar 5, just hit 5 and Enter on the keyboard. 2 You can CTRL-click on the ruler (showing the bars across the top of the project window s white area) to set the left locator, and ALT-click to set the right locator. This needs accurate mouse placement, though. 3 If you have a part or parts that you want to cycle round, select them and then hit P on the keyboard. All of these will set the locators, and once you have done this, you can activate Cycle on the transport bar (the button to the left of stop it will turn blue when it s on), and Cubase will cycle round the contents between the two locators. You can now practice the section that you wish to record or create until you get it right. Cycle Recording While cycling to play a section and practice it is useful, it is also useful sometimes to record while in cycle mode. This gives a number of different options, including recording several different versions of the same part, or to add notes to the part as you go. We will look at three of the available options. Adding notes to a part A common need is to add notes to a part. While we have seen this being used when recording without Cycle mode, in cycle mode it is possible too. The first thing is to ensure that the MIDI Record Mode is set to Mix, as seen on the left of the transport bar: If it is not set, click in this area and a pop-up menu will appear, where you can select it. Now, with the locators set, a part can be played. Each time round the cycle, the notes you play will be added to the previous notes - they will not overwrite them. This is a quick way of building up a drum part, as seen here. The first time round the cycle, the bass and snare drums were played: 11
12 Sequencing - Sample Chapter The next time round the hi-hats were added: You can cycle round as many times as you like, and whenever you add a note it will become part of the recording. Keeping only the last version If you want to keep only the last version you record, this is easily done. Set the MIDI Record Mode to Keep Last: Now proceed as in the previous section; when you stop, only the last version you did will be left. This can be useful when you are trying to get a part right, and will stop as soon as you have done that. Often if you keep starting and stopping to record, it can stop you from getting in the feel of things, so having Cubase cycle round until you get it correct can save time. Recording different versions Sometimes, you may want to keep recording while you play different versions of that section, and then decide later which version you want to keep. To do this, set the MIDI Record Mode to Stacked, from the right-hand side of the pop-up menu on the Transport Bar. As you record with cycle turned on, you will see each part recorded, and it may look as if the other versions have been lost (much as in the previous section) - here is the result after four cycles. sample downloaded from Note that the part says Lap 4 - this was on the fourth repeat. If we play the track back, we get the fourth version that was played. However, the others are still present. 12


13 Clicking the Show Lanes button will reveal the previous 3 Laps. Sequencing - Sample Chapter At present, Lap 4 is the version that is heard. If you want to hear another one, you can use the Comp tool - see page 24 - or you can use the Mute tool to mute one of the lanes, and then again to allow another one to play (see page 22 for the Mute tool). The Comp tool is explained on page 445 in the Audio Editing chapter, but works for MIDI as well as audio, so the instructions there will show you how to use it for more than merely choosing which lane to play. Note that with either method, if you change the lane which is active, the note display on the track changes to reflect the part that will be played - here Lap 2 has been chosen, and the track part reflects this both in name and note content. sample downloaded from If you want to return the track back to being viewed normally (without lanes), then click the Show Lanes button again. 13
14 This represents just a small fraction of the first chapter of the book - around 12 pages from a total of over 600. If you have found this information useful, please consider purchasing the book from lulu.com. Thanks Darren Jones (author) 14
Background. About automation subtracks
 16 Background Cubase provides very comprehensive automation features. Virtually every mixer and effect parameter can be automated. There are two main methods you can use to automate parameter settings:
Reason Overview3. Reason Overview
 Reason Overview3 In this chapter we ll take a quick look around the Reason interface and get an overview of what working in Reason will be like. If Reason is your first music studio, chances are the interface
USER GUIDE V 1.6 ROLLERCHIMP DrumStudio User Guide page 1
 USER GUIDE V 1.6 ROLLERCHIMP 2014 DrumStudio User Guide page 1 Table of Contents TRANSPORT... 3 SONG NAVIGATOR / SECTION EDITING...4 EDITOR...5 TIMING OPTIONS...6 PLAYBACK OPTIONS... 7 RECORDING OPTIONS...8
Mackie Control and Cubase SX/SL
 Mackie Control and Cubase SX/SL - 1 - The information in this document is subject to change without notice and does not represent a commitment on the part of Steinberg Media Technologies AG. The software
MUSC 1331 Lab 1 (Sunday Class) Basic Operations and Editing in Performer. Quantization in Performer
 Basic Operations and Editing in Performer. Quantization in Performer") MUSC 1331 Lab 1 (Sunday Class) Basic Operations and Editing in Performer Objectives: Quantization in Performer; Cut, Copy, and Paste editing in Performer; Transposing parts in Performer; Repeating tracks
MUSC 1331 Lab 1 (Sunday Class) Basic Operations and Editing in Performer Objectives: Quantization in Performer; Cut, Copy, and Paste editing in Performer; Transposing parts in Performer; Repeating tracks
Operation Manual (not in Cubase LE)
") Operation Manual (not in Cubase LE) Matthias Klag, Michael Ruf Cristina Bachmann, Heiko Bischoff, Christina Kaboth, Insa Mingers, Sabine Pfeifer, Kevin Quarshie, Benjamin Schütte This PDF provides improved
Operation Manual (not in Cubase LE) Matthias Klag, Michael Ruf Cristina Bachmann, Heiko Bischoff, Christina Kaboth, Insa Mingers, Sabine Pfeifer, Kevin Quarshie, Benjamin Schütte This PDF provides improved
OPERATING MANUAL. including
 OPERATING MANUAL including & If a portable or temporary three phase mains supply is used to power this desk, we recommend that the desk mains plug is removed before connecting or disconnecting the supply.
Manual Version 1.0. User Guide. English
 Manual Version 1.0 User Guide English Table of Contents Introduction... 6 Tutorial... 14 Support... 6 Starting Up... 14 About This User Guide... 6 Launching Clips... 14 Important Notes... 6 Editing Clips
The MPC X & MPC Live Bible 1
 The MPC X & MPC Live Bible 1 Table of Contents 000 How to Use this Book... 9 Which MPCs are compatible with this book?... 9 Hardware UI Vs Computer UI... 9 Recreating the Tutorial Examples... 9 Initial
Score Layout and Printing
 Score Layout and Printing Cristina Bachmann, Heiko Bischoff, Christina Kaboth, Insa Mingers, Matthias Obrecht, Sabine Pfeifer, Benjamin Schütte, Marita Sladek This PDF provides improved access for vision-impaired
YouCompose User Manual
 YouCompose User Manual App Version 4.22 Contents Introduction - Meet Aimée 5 Quick start with Tutorial Mode 7 The basic structure of a composition 8 Composition View 9 Grid mode 9 Score mode 11 Files View
R H Y T H M G E N E R A T O R. User Guide. Version 1.3.0
 R H Y T H M G E N E R A T O R User Guide Version 1.3.0 Contents Introduction... 3 Getting Started... 4 Loading a Combinator Patch... 4 The Front Panel... 5 The Display... 5 Pattern... 6 Sync... 7 Gates...
Nuendo 3 / DM1000 V2 Setup and Operation
 Nuendo 3 / DM1000 V2 Setup and Operation Page 1 Nuendo 3 / DM1000 V2 Setup and Operation This document describes setup and operation for remote control of Nuendo from the DM1000 digital mixing console.
Finale Tips and Tricks For Music Teachers
 Finale Tips and Tricks For Music Teachers LAUNCH WINDOW The Launch Window is basically the main menu for the program. document setup tools, tutorials, and exercise tools can be accessed from here. This
OVERVIEW. 1. Getting Started Pg Creating a New GarageBand Song Pg Apple Loops Pg Editing Audio Pg. 7
 GarageBand Tutorial OVERVIEW Apple s GarageBand is a multi-track audio recording program that allows you to create and record your own music. GarageBand s user interface is intuitive and easy to use, making
Using Impact LX+ with Reason
 www.nektartech.com Using Impact LX+ with Reason Reason Integration Setup and Configuration The Impact LX+ Reason Integration is compatible with all Reason products from version 5 or higher. These instructions
Getting started with music theory
 Getting started with music theory This software allows learning the bases of music theory. It helps learning progressively the position of the notes on the range in both treble and bass clefs. Listening
American DJ. Show Designer. Software Revision 2.08
 American DJ Show Designer Software Revision 2.08 American DJ 4295 Charter Street Los Angeles, CA 90058 USA E-mail: support@ameriandj.com Web: www.americandj.com OVERVIEW Show Designer is a new lighting
COPYING A PATTERN...35
 f TABLE OF CONTENTS INTRODUCTION...5 WELCOME TO THE SR18 DRUM MACHINE!...5 GROUND RULES...5 CONNECTION DIAGRAM...8 TOP PANEL PHYSICAL LAYOUT...9 GENERAL CONTROLS...9 NAVIGATION BUTTONS...10 MODE BUTTONS...10
Diamond Piano Student Guide
 1 Diamond Piano Student Guide Welcome! The first thing you need to know as a Diamond Piano student is that you can succeed in becoming a lifelong musician. You can learn to play the music that you love
Creating a Lead Sheet Using Logic Pro X and Sibelius
 Creating a Lead Sheet Using Logic Pro X and Sibelius As part of your composition portfolio, you are required to create a lead sheet for your song. This guide explains how to complete the process 1. Create
SmartScore Quick Tour
 SmartScore Quick Tour Installation With the packaged CD, you will be able to install SmartScore an unlimited number of times onto your computer. Application files should not be copied to other computers.
User Guide Version 1.1.0
 obotic ean C R E A T I V E User Guide Version 1.1.0 Contents Introduction... 3 Getting Started... 4 Loading a Combinator Patch... 5 The Front Panel... 6 On/Off... 6 The Display... 6 Reset... 7 Keys...
timing Correction Chapter 2 IntroductIon to timing correction
 41 Chapter 2 timing Correction IntroductIon to timing correction Correcting the timing of a piece of music, whether it be the drums, percussion, or merely tightening up doubled vocal parts, is one of the
Introduction to EndNote Desktop
 Introduction to EndNote Desktop These notes have been prepared to assist participants in EndNote classes run by the Federation University Library. Examples have been developed using Windows 8.1 (Enterprise)
Using Your TiVo Remote Control
 Using Your TiVo Remote Control Your TiVo remote control can be used for much more than meets the eye, from setting your recordings and managing your TiVo services, to streaming and downloading videos from
GarageBand Tutorial
 GarageBand Tutorial OVERVIEW Apple s GarageBand is a multi-track audio recording program that allows you to create and record your own music. GarageBand s user interface is intuitive and easy to use, making
NATIVE INSTRUMENTS North America, Inc Sunset Boulevard 5th Floor Los Angeles, CA USA
 MANUAL Disclaimer The information in this document is subject to change without notice and does not represent a commitment on the part of Native Instruments GmbH. The software described by this document
The 01X Configuration Guide
 The 01X Configuration Guide A Very Brief Introduction Welcome to the world of learning! Like many of you, I have spent countless hours reading and re-reading the 01x and the Cubase SX owner's manuals,
Lets go through the chart together step by step looking at each bit and understanding what the Chart is asking us to do.
 Lesson Twenty Lesson 20 IDS PAS2 Performing a Song- The Buzz Lesson Objectives Developing our ability to play a piece of music. Strengthen our understanding chart reading. Apply many of the skills learned
Tobias Escher. Steinberg Media Technologies GmbH, All rights reserved. Iconica
 Operation Manual 2 Tobias Escher This PDF provides improved access for vision-impaired users. Please note that due to the complexity and number of images in this document, it is not possible to include
Show Designer 3. Software Revision 1.15
 Show Designer 3 Software Revision 1.15 OVERVIEW... 1 REAR PANEL CONNECTIONS... 1 TOP PANEL... 2 MENU AND SETUP FUNCTIONS... 3 CHOOSE FIXTURES... 3 PATCH FIXTURES... 3 PATCH CONVENTIONAL DIMMERS... 4 COPY
Melody Sauce is an AU / VST / MIDI FX device that creates melodies as MIDI.
 Melody Sauce is an AU / VST / MIDI FX device that creates melodies as MIDI. Designed as a co-creation tool for anyone making music in electronic pop, dance and EDM styles, Melody Sauce provides a quick
Sibelius Advanced Session 2
 Online 2012 Sibelius Advanced Session 2 Katie Wardrobe Midnight Music Playback of your score: the importance of text 4 Tempo markings 4 Creating tempo markings 4 Metronome markings 4 Creating metronome
Linkage 3.6. User s Guide
 Linkage 3.6 User s Guide David Rector Friday, December 01, 2017 Table of Contents Table of Contents... 2 Release Notes (Recently New and Changed Stuff)... 3 Installation... 3 Running the Linkage Program...
For complete system requirements, compatibility information, and product registration, visit the AIR website:
 Introduction Strike is a virtual instrument that can be used to add realistic drum tracks to your music software. Using proprietary technology, Strike goes beyond the boundaries of conventional MIDI and
Nodal. GENERATIVE MUSIC SOFTWARE Nodal 1.9 Manual
 Nodal GENERATIVE MUSIC SOFTWARE Nodal 1.9 Manual Copyright 2013 Centre for Electronic Media Art, Monash University, 900 Dandenong Road, Caulfield East 3145, Australia. All rights reserved. Introduction
Applicable to Panorama P1, P4 & P6. Using Panorama with Reason
 Using Panorama with Reason Applicable to Panorama P1, P4 & P6 www.nektartech.com www.nektartech.com Using Panorama with Reason Reason Integration Setup and Configuration The Panorama Reason Integration
Sibelius: Tips for Working Effectively
 2012 Sibelius: Tips for Working Effectively Katie Wardrobe Midnight Music About Katie...4 Professional development & training...4 In- person training... 4 Online courses... 4 Free tips, tutorials, articles
Igaluk To Scare the Moon with its own Shadow Technical requirements
 1 Igaluk To Scare the Moon with its own Shadow Technical requirements Piece for solo performer playing live electronics. Composed in a polyphonic way, the piece gives the performer control over multiple
The. finale. Projects. The New Approach to Learning. finale. Tom Carruth
 The finale Projects The New Approach to Learning finale Tom Carruth Addendum for Finale 2010 The Finale Projects Addendum for Finale 2010 There are seven basic differences between Finale 2010 and Finale
Getting started with music theory
 Getting started with music theory This software allows to learn the bases of music theory. It helps learning progressively the position of the notes on the range and piano keyboard in both treble and bass
Cakewalk Score Writer Getting Started
 Cakewalk Score Writer Getting Started Copyright Information Information in this document is subject to change without notice and does not represent a commitment on the part of Twelve Tone Systems, Inc.
Recording KARMA OASYS (KO) Software into Cubase Setup and Workflow
 Software into Cubase Setup and Workflow") By Progster Document initiated on 28-Jul-2016 Recording KARMA OASYS (KO) Software into Cubase Setup and Workflow Recording KARMA OASYS (KO) software output into Cubase This setup will let Cubase intermediate
By Progster Document initiated on 28-Jul-2016 Recording KARMA OASYS (KO) Software into Cubase Setup and Workflow Recording KARMA OASYS (KO) software output into Cubase This setup will let Cubase intermediate
HD Guide. User Manual
 HD Guide. User Manual You ve decided you want better TV. Here s how to enjoy it. Welcome to Shaw HD TV. To get the most out of your experience, it s best to know absolutely everything the service offers.
ENDNOTE X6 FOR HEALTH
 ENDNOTE X6 FOR HEALTH Contents Aims... 2 Further help... 2 Part A - Adding references to an EndNote library... 3 1. Opening EndNote and creating an EndNote library... 3 2. Importing/exporting references
WAVES Cobalt Saphira. User Guide
 WAVES Cobalt Saphira TABLE OF CONTENTS Chapter 1 Introduction... 3 1.1 Welcome... 3 1.2 Product Overview... 3 1.3 Components... 5 Chapter 2 Quick Start Guide... 6 Chapter 3 Interface and Controls... 7
For example, an indication of Range: 60, 67, 72, 75 (Hz) means that 60 Hz is the default value.
 means that 60 Hz is the default value.") Owner s Manual This manual explains how to use an MV-8000 in which System Program Version 3.0 is installed. About the Symbols and icons in this manual Text in square brackets [ ] refers to buttons on the
Owner s Manual This manual explains how to use an MV-8000 in which System Program Version 3.0 is installed. About the Symbols and icons in this manual Text in square brackets [ ] refers to buttons on the
Digital Video User s Guide
 Digital Video User s Guide THE Future now showing www.ntscom.com Welcome the new way to watch Digital TV is TV different than anything you have seen before. It isn t cable it s better. Digital TV offers
Swinburne University of Technology
 Swinburne University of Technology EndNote X9 for Mac Swinburne Library EndNote resources page: http://www.swinburne.edu.au/library/referencing/references-endnote/endnote/ These notes include excerpts
Score Printing and Layout
 Score Printing and Layout - 1 - - 2 - Operation Manual by Ernst Nathorst-Böös, Ludvig Carlson, Anders Nordmark, Roger Wiklander Quality Control: Cristina Bachmann, Heike Horntrich, Sabine Pfeifer, Claudia
Introduction to EndNote
 Library Services Introduction to EndNote Part 2: Creating an EndNote Library Table of Contents: Part 2 2. CREATING AN ENDNOTE LIBRARY - 3-2.1. CREATING A NEW LIBRARY - 3-2.2. ENTERING NEW REFERENCES MANUALLY
Using Cubase SE with DSP Factory
 Manual by Ludvig Carlson, Anders Nordmark, Roger Wiklander Quality Control: C. Bachmann, H. Bischoff, S. Pfeifer, C. Schomburg The information in this document is subject to change without notice and does
Eventide Inc. One Alsan Way Little Ferry, NJ
 Copyright 2017, Eventide Inc. P/N 141298, Rev 3 Eventide is a registered trademark of Eventide Inc. AAX and Pro Tools are trademarks of Avid Technology. Names and logos are used with permission. Audio
Drummer for Kontakt Manual - v. 2.0 (TBAD) 2016 Chocolate Audio
 2016 Chocolate Audio") C A Drummer for Kontakt Manual - v. 2.0 (TBAD) 2016 Chocolate Audio Welcome Thank you very much for purchasing one of the Drummer for Kontakt instruments! We hope you ll make the best out of this carefully
C A Drummer for Kontakt Manual - v. 2.0 (TBAD) 2016 Chocolate Audio Welcome Thank you very much for purchasing one of the Drummer for Kontakt instruments! We hope you ll make the best out of this carefully
45 Routing Audio and CV 46 About the various signals that can be routed 46 About Cables 47 Automatic Routing 48 Manual Routing 49 Using CV and Gate
 Operation Manual D Table of Contents 7 Common Operations and Concepts 8 About this manual 8 About this Chapter 8 Conventions in the Manual 8 Making Settings 9 Tool Tips 10 Context menus 10 Undo 11 Window
WAVES H-EQ HYBRID EQUALIZER USER GUIDE
 WAVES H-EQ HYBRID EQUALIZER USER GUIDE TABLE OF CONTENTS CHAPTER 1 INTRODUCTION...3 1.1 WELCOME...3 1.2 PRODUCT OVERVIEW...3 1.3 CONCEPTS AND TERMINOLOGY...4 1.4 COMPONENTS...7 CHAPTER 2 QUICK START GUIDE...8
How to create a video of your presentation mind map
 How to create a video of your presentation mind map Creating a narrated video of your mind map and placing it on YouTube or on your corporate website is an excellent way to draw attention to your ideas,
Exercise #1: Create and Revise a Smart Group
 EndNote X7 Advanced: Hands-On for CDPH Sheldon Margen Public Health Library, UC Berkeley Exercise #1: Create and Revise a Smart Group Objective: Learn how to create and revise Smart Groups to automate
Digital Video User s Guide THE FUTURE NOW SHOWING
 Digital Video User s Guide THE FUTURE NOW SHOWING Welcome The NEW WAY to WATCH Digital TV is different than anything you have seen before. It isn t cable it s better! Digital TV offers great channels,
Remote Control Devices
 Remote Control Devices The information in this document is subject to change without notice and does not represent a commitment on the part of Steinberg Media Technologies GmbH. The software described
Explore your new TiVo Service only from Cogeco
 TiVo Quick Tips Guide Explore your new TiVo Service only from Cogeco Discover the most personalized TV experience TiVo Service gives you total control of the TV programming you love and it s so much more
TV User s Guide THE FUTURE NOW SHOWING. New and Improved Movies On Demand Screen!
 TV User s Guide THE FUTURE NOW SHOWING New and Improved Movies On Demand Screen! Welcome The NEW WAY to WATCH Endeavor Digital TV is different than anything you have seen before. It isn t cable it s better!
Digital Video User s Guide THE FUTURE NOW SHOWING
 Digital Video User s Guide THE FUTURE NOW SHOWING TV Welcome The NEW WAY to WATCH Digital TV is different than anything you have seen before. It isn t cable it s better! Digital TV offers great channels,
Contacts: English Department Office 238 Moreland Media Services 109 Kidder
 Contacts: English Department Office 238 Moreland 7-3244 Media Services 109 Kidder September 2006 Welcome...3 Starting Out...5 Unlocking the Station...5 Touch Panel Operation...5 Projector...6 Selecting
StudioLive Series III
 www.presonus.com English Table of Contents 1 Introduction 1 2 Getting Started 1 2 3.1 Making the Connections 2 3.2 Channel Controls 3 3.2.1 Arming Tracks 3 3.3 Fat Channel Controls 4 3.4 Touchscreen Controls
y POWER USER MUSIC PRODUCTION and PERFORMANCE With the MOTIF ES Mastering the Sample SLICE function
 y POWER USER MUSIC PRODUCTION and PERFORMANCE With the MOTIF ES Mastering the Sample SLICE function Phil Clendeninn Senior Product Specialist Technology Products Yamaha Corporation of America Working with
ecast for IOS Revision 1.3
 ecast for IOS Revision 1.3 1 Contents Overview... 5 What s New... 5 Connecting to the 4 Cast DMX Bridge... 6 App Navigation... 7 Fixtures Tab... 8 Patching Fixtures... 9 Fixture Not In Library... 11 Fixture
User Guide. Version 2.0.0
 II User Guide Version 2.0.0 Contents Introduction... 3 What s New in Step Note Recorder II?... 3 Getting Started... 4 The Front Panel... 5 The Sequence... 5 The Piano Roll... 6 The Data Lane... 7 Velocity...
spiff manual version 1.0 oeksound spiff adaptive transient processor User Manual
 oeksound spiff adaptive transient processor User Manual 1 of 9 Thank you for using spiff! spiff is an adaptive transient tool that cuts or boosts only the frequencies that make up the transient material,
MAutoPitch. Presets button. Left arrow button. Right arrow button. Randomize button. Save button. Panic button. Settings button
 MAutoPitch Presets button Presets button shows a window with all available presets. A preset can be loaded from the preset window by double-clicking on it, using the arrow buttons or by using a combination
HDR 24/96 TECHNICAL REFERENCE 24 TRACK/24 BIT, DIGITAL AUDIO HARD DISK RECORDER AND EDITOR
 HDR 24/96 TECHNICAL REFERENCE 24 TRACK/24 BIT, DIGITAL AUDIO HARD DISK RECORDER AND EDITOR HD24/96 Technical Reference 2 TABLE OF CONTENTS FOREWORD... 7 About This Manual/How To Use This Guide... 7 CONVENTIONS...
Digital Video User s Guide THE FUTURE NOW SHOWING
 Digital Video User s Guide THE FUTURE NOW SHOWING Welcome THE NEW WAY TO WATCH Digital TV is different than anything you have seen before. It isn t cable it s better. Digital TV offers great channels,
M-16DX 16-Channel Digital Mixer
 M-6DX 6-Channel Digital Mixer Workshop Getting Started with the M-6DX 007 Roland Corporation U.S. All rights reserved. No part of this publication may be reproduced in any form without the written permission
Edit Menu. To Change a Parameter Place the cursor below the parameter field. Rotate the Data Entry Control to change the parameter value.
 The Edit Menu contains four layers of preset parameters that you can modify and then save as preset information in one of the user preset locations. There are four instrument layers in the Edit menu. See
Introduction to capella 8
 Introduction to capella 8 p Dear user, in eleven steps the following course makes you familiar with the basic functions of capella 8. This introduction addresses users who now start to work with capella
AVOLITES DIAMOND II OPERATION MANUAL SOFTWARE VERSION 3.x
 AVOLITES DIAMOND II OPERATION MANUAL SOFTWARE VERSION 3.x revision 3.01 Useful phone numbers:- Avolites England sales and service (+44) (0) 181 965 8522 service out of hours (+44) (0) 831 17 88 88 fax
Advanced Audio Effects in GarageBand by Jeff Tolbert
 Advanced Audio Effects in GarageBand by Jeff Tolbert GarageBand ships with plenty of fantastic effects and several useful presets for those effects. But the wonderful thing about audio effects is the vast
TABLE OF CONTENTS TABLE OF CONTENTS TABLE OF CONTENTS. 1 INTRODUCTION 1.1 Foreword 1.2 Credits 1.3 What Is Perfect Drums Player?
 TABLE OF CONTENTS TABLE OF CONTENTS 1 INTRODUCTION 1.1 Foreword 1.2 Credits 1.3 What Is Perfect Drums Player? 2 INSTALLATION 2.1 System Requirments 2.2 Installing Perfect Drums Player on Macintosh 2.3
Workshop. MPC-to-MV Translator ÂØÒňΠMV-8000
 ÂØÒňΠMV-8000 Workshop MPC-to-MV Translator 2005 Roland Corporation U.S. All rights reserved. No part of this publication may be reproduced in any form without the written permission of Roland Corporation
I) Documenting Rhythm The Time Signature
 Documenting Rhythm The Time Signature") the STARTING LINE I) Documenting Rhythm The Time Signature Up to this point we ve been concentrating on what the basic aspects of drum literature looks like and what they mean. To do that we started by
the STARTING LINE I) Documenting Rhythm The Time Signature Up to this point we ve been concentrating on what the basic aspects of drum literature looks like and what they mean. To do that we started by
Korg Kronos Workflow for Worship
 Korg Kronos Workflow for Worship I have been playing Korg keyboards since the OASYS in 2005. Korg has graciously carried over most of the workflow to their current product the Korg Kronos. This keyboard
Digital Video Users Guide THE FUTURE NOW SHOWING
 Digital Video Users Guide THE FUTURE NOW SHOWING THE FUTURE NOW Digital TV is TV different than anything you have seen before. It isn t cable it s better. Digital TV offers more channels, more features
EDL8 Race Dash Manual Engine Management Systems
 Engine Management Systems EDL8 Race Dash Manual Engine Management Systems Page 1 EDL8 Race Dash Page 2 EMS Computers Pty Ltd Unit 9 / 171 Power St Glendenning NSW, 2761 Australia Phone.: +612 9675 1414
Digital Video User s Guide. the Future. now showing
 Digital Video User s Guide the Future now showing Welcome the new way to watch Digital TV is TV different than anything you have seen before. It isn t cable it s better. Digital TV offers great channels,
Swinburne University of Technology
 Swinburne University of Technology EndNote X8 Basics For Windows Swinburne Library EndNote resources page: http://www.swinburne.edu.au/library/referencing/references-endnote/endnote/ These notes include
Chapter 40: MIDI Tool
 MIDI Tool 40-1 40: MIDI Tool MIDI Tool What it does This tool lets you edit the actual MIDI data that Finale stores with your music key velocities (how hard each note was struck), Start and Stop Times
The BAT WAVE ANALYZER project
 The BAT WAVE ANALYZER project Conditions of Use The Bat Wave Analyzer program is free for personal use and can be redistributed provided it is not changed in any way, and no fee is requested. The Bat Wave
001 Overview 3. Introduction 3 The Kit 3 The Recording Chain Technical Details 6
 Table of Contents 001 Overview 3 Introduction 3 The Kit 3 The Recording Chain 4 002 Technical Details 6 The Samples 6 The MPC Kits 7 Velocity Switching Kit 8 Round Robin Kit 10 The Full Monty JJOSXL Kit
Remote Control Operation
 Remote Control Operation When you first switch the TV on, you will be presented with either the preview screen which shows the current program along with a brief summary of future programs or the full
G-Stomper Mixer & Master V Mixer & Master... 2
 G-Stomper Studio G-Stomper Rhythm G-Stomper VA-Beast User Manual App Version: 5.7.2 Date: 04/06/2018 Author: planet-h.com Official Website: https://www.planet-h.com/ Contents 11 Mixer & Master... 2 11.1
Quick Start. Congratulations on choosing of the Roland Digital Intelligent Piano KF-7! Score Display
 Quick Start Congratulations on choosing of the Roland Digital Intelligent Piano KF-7! Select/Listen to a Song The KF-7 features over 170 songs in its memory. Use this button to select a song. P. 6 Score
Digital Video Recorder From Waitsfield Cable
 www.waitsfieldcable.com 496-5800 Digital Video Recorder From Waitsfield Cable Pause live television! Rewind and replay programs so you don t miss a beat. Imagine coming home to your own personal library
THE FROG SERIES OPERATING MANUAL
 THE FROG SERIES OPERATING MANUAL THE FROG SERIES OPERATING MANUAL If a portable or temporary three phase mains supply is used to power this desk, we recommend that the desk mains plug is removed before
The world s smartest PVR. User guide 1
 The world s smartest PVR. User guide 1 Get to know your TiVo. Welcome to the TiVo Experience The TiVo experience instantly gives you total control of the TV programming you love, and much more! With six
About the CD... Apps Info... About wthe Activities... About the Ensembles... The Outboard Gear... A Little More Advice...
 Contents Introduction CD Track Page About the CD... Apps Info... About wthe Activities... About the Ensembles... The Outboard Gear... A Little More Advice... 3 5 5 ACTIVITIES Buzz-A-Round... Free Improv...
GarageBand for the ipad, A Superstar for the Music Classroom
 GarageBand for the ipad, A Superstar for the Music Classroom Floyd Richmond University of Valley Forge frichmond@valleyforge.edu Texas Music Educators Association (TMEA) TI:ME National Conference San Antonio,
Sibelius Projects for Students
 Online Course Notes Sibelius Projects for Students Session 3 Katie Wardrobe Midnight Music www.midnightmusic.com.au Getting Started With Film Scoring 3 Project #1: Box Clever 3 Aim 3 Skills 3 Steps 3 Empty
CE 9.1 Cisco TelePresence User Guide Systems Using Touch10
 CE 9.1 Cisco TelePresence User Guide Systems Using Touch10. Contents What s in this guide All entries in the table of contents are active hyperlinks that will take you to the corresponding article. To
NoteMix Player Note Mixer/Shifter/Splitter/Filter with Snapshot Morphing Rack Extension for Propellerhead Reason
 NoteMix Player Note Mixer/Shifter/Splitter/Filter with Snapshot Morphing Rack Extension for Propellerhead Reason USER MANUAL version 1.0.0 NoteMix User Manual www.retouchcontrol.com Page 1 of 26 Table