Service manual Cantano W/T
|
|
|
- Russell Stanley
- 5 years ago
- Views:
Transcription
1 Service manual Cantano W/T Here you will see everything that should be included in your Cantano package 2 Prerequisite: Placement and leveling of the drive 5 Setting up the motor and connecting it to the drive 5 First assembly of the tonearm and phono cartridge 6 Adjusting the stabilizer weight 6 Height adjustment of the tonearm suspension for adjusting the vertical tracking angle 6 Alignment of the phono cartridge 7 Setting the azimuth angle (HTA) 7 Anti-skating adjustment 8 Warranty 8 1
2 Dear Sound Connoisseur, Thank you for choosing a Cantano product. This purchase is already a big step towards a perfect listening experience. Its full potential can only be tapped after it has been set up and all components tuned. This means: take your time, adjust everything calmly and cautiously, and read carefully through each individual step in the instructions. Cantano products are CNC manufactured, in some cases right to the thousandth millimeter. Over-tightening the screws or even minor discrepancies in the adjustment angle can make a world of a difference in the enjoyment of your favorite record. Should you become overwhelmed, contact your trusted Hi-fi shop or reach us under support@cantano.berlin if they cannot be of further help to you. We will do our absolute best to offer you support. In case of uncertainties in regards to the instructions, don t hesitate to contact us, as we are always trying to improve ourselves and the Cantano experience. Please note: Each Cantano product is unique and a child of the manufacturer. We have built and assembled its individual parts by hand and have performed the final polishing with love and muscle power. We have also taken care to use natural materials, like solid wood and stone. This can cause discrepancies in the outer appearance, for example in regards to nuances in color or in the structure of the stone and wood. Furthermore, we are continually developing our products. Changes and developments are sometimes too minor to announce a new version. It is thus possible that your Cantano differs slightly from what you have seen on our website or other media. Here you will see everything that should be included in your Cantano package 1x square drive belt 1x spacer for the drive motor (if optional reference motor) 1x additional load for the turntable 1x string drive 1x spirit level 1x alignment protractor for speed of 33,3 and 45 rpm 2x large counterweight for the tonearm 2x small counterweight for the tonearm Caution - transport securing device (!) 1x transport securing device for the turntable (ruby bearing): synthetic plate between the turntable and VA Basis 1x rubber cap over the hard metal tip of the tonearm bearing 2
3 3
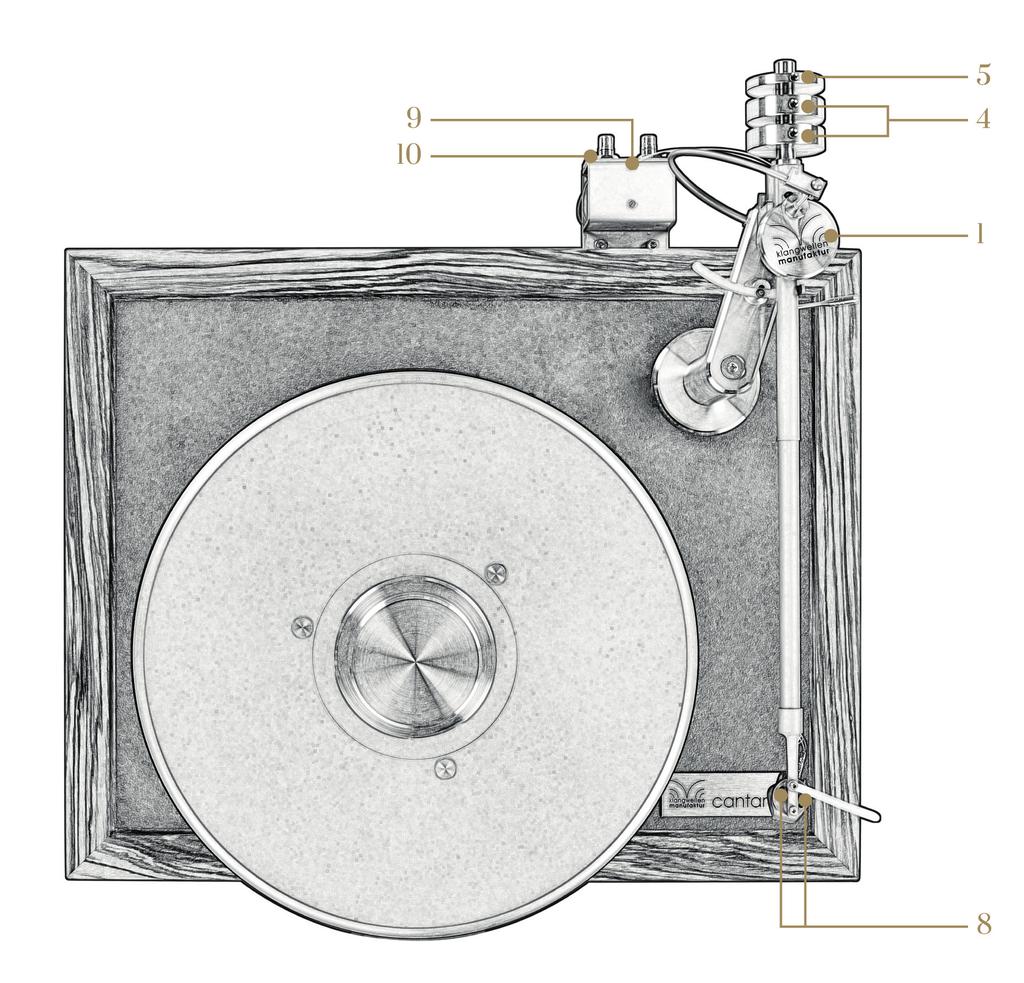
4 Key: 1. Tonearm mid-weight 2. Set screw for anti-skating adjustment 3. Spring bar for anti-skating adjustment 4. Large counterweight 5. Small counterweight 6. Double screw for tightening the tonearm 7. Screw for loosening and tightening the tonearm height 8. Screws for attaching the phono cartridge 9. Cable route for tonearm inner wiring 10. Two screws for attaching the jacks 11. Height-adjustable feet, tightened and loosed with setscrews 4
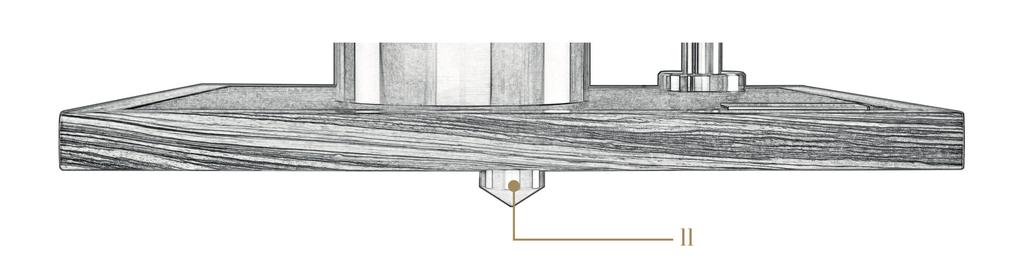
5 Prerequisite: Placement and leveling of the drive a) As you might have already noticed when unpacking your Cantano: This guy is no lightweight. Therefore, make sure that the base you are putting it on is robust and stable. It must be designed to distribute the weight of the turntable at three contact points. If you are placing it on a piece of furniture, don t forget that it should also be able to accommodate a weight of around 30kg (approx. 66lbs). b) Leveling the drive: The term leveling is used to describe the even alignment of the turntable. You must adjust it so that it stands perfectly straight on its base. For this purpose you will find a spirit level in your Cantano package. Place it on a graphite plate and adjust the 3 feet (11) until the spirit level is exactly in its center position. Afterwards the feet must be fixed in place, which can be done by tightening the setscrews in the feet. c) Positioning the turntable on the stand: The stand s ability to decouple the turntable from impact sound or vibration stimulations impacts the influence that disturbances can have on the turntable. The stand must be at least stable and heavy enough, or on a stable enough base, that the tonearm needle will not jump in the groove, even when you are, for example, dancing in front of the turntable. d) Wall mount: A proper wall mount on stable walls is often the best recommendation for the placement of the turntable. Setting up the motor and connecting it to the drive a) All Cantano drives are powered by a free-standing motor with belts. This ensures that the clear separation of motor sounds from the drive will occur on its own. We have supplied 2 belts of varying thickness. b) The somewhat thicker belt ensures a more secure drive stability and a faster acceleration of the turntable as the motor starts. The connection between the plate and the motor is generally more stable, but also transfers more vibrations from the motor onto the plate. c) The thin belt is actually more like a string and is the best alternative for perfect sound. It does, however, take longer for the plate to reach its programmed speed, but will not dampen the sound of your favorite record. d) The lower the belt tension, the less lateral forces will affect the turntable. The belt tension must be set up to at least make sure that the rotational speed of the turntable remains constant and doesn t stagger when the position of the motor switches. For this purpose there is an alignment protractor for 33.3 and 45 revolutions per minute. 5
6 First assembly of the tonearm and phono cartridge a) Mounting the phono cartridge: Before you mount the tonearm onto the device, you should attach the phono cartridge of your choice onto the head of the tonearm. You do this by securing both screws onto the head (8). Afterwards we recommend that you quickly secure the safety cap on the phone cartridge before further assembly b) Mounting the tonearm: Warning: Please make sure to secure the safety cap on your phono cartridge! The tonearm is placed at the height of the armature (bearing bore) on the tonearm axis. The counterweights are adjusted so that the side of the tonearm with the phono cartridge is heavier. The tonearm mid-weight (1) is mounted by being rotated slightly outward. In order to do this, release the hexagon bolt at the mid-weight and turn it slightly outwards. After doing so, fasten the screw again. This positioning of the mid-weight makes it possible to adjust the contact pressure of the arm on the armature and therefore to calibrate the damping of the arm vector. This will equalize vibrations. c) Installation of jacks: The jack plate with connection sockets is to screwed onto the back of the drive on the right side. The tonearm s inner wiring is guided by the groove (9) onto the jack plate. Note that the cable is made of the most high-quality and finest materials. It must therefore not be bent or pinched in any way. So proceed with the utmost care and with a steady hand. Adjusting the stabilizer weight Use the tonearm scale to make the first adjustment for the right stabilizer weight for the phone cartridge as specified by the manufacturer. You can purchase one at your trusted hi-fi retailer. For a rough alignment, use the wide counterweights (4). You can change the position and with it the active weight by pushing the weights to the back of the tonearm. Once you have found the correct position, secure the weights with the set screws. The narrow counterweight (5) is responsible for fine adjustments. Here, follow the same steps as you did with the rough adjustment. Please note: Always use the weights in the same order as pictured at the beginning of the instructions. The fine weights are always adjusted on the outer side, while the rough weights are always mounted inside. Height adjustment of the tonearm suspension for adjusting the vertical tracking angle The goal when setting the optimal tonearm suspension level is a perfect horizontal alignment of the tonearm when it is lying on the record. In combination with the adjustment of the phono cartridge, this guarantees optimal guiding onto the grooves of the record. In addition, the vertical tracking angle (VTA) can affect sound playback. To adjust the VTA, you must adjust the height of the tonearm by yourself. 6
7 For this purpose, put the spirit level onto the tonearms middle weight and put the cartridge on a spinning vinyl. Now, check the spirit level to see the longitudinal axis tilt of the tonearm. After that, please secure your cartridge with the safety cap, since you are heading for the tonearms height adjustment (Stop playing the vinyl, of course). Please hold the tonearm pillar while unscrewing the screw at the back of the tonearm base (7). Now, gently adjust the height of the pillar. Afterwards, tighten the screw again. To check and measure for readjustments, you can now place the spirit level on the tonearm mid-weight for example and play a record. If the optimal height has not yet been reached, start over from the beginning. Warning: Please remember to fasten the safety cap on your phone cartridge! Alignment of the phono cartridge The phono cartridge must be aligned as precisely as possible using the alignment protractor. The quality of this alignment will determine the sound. Important points of alignment are the offset angle and overhang of the phono cartridge. The goal is to find and approximate the right tracking angle of the diamonds on the grooves of the plate. a) Setting the offset angle and the overhang You adjust the offset angle and the overhang manually. Gently loosen the screws (8) which will secure the phono cartridge. The design of the tonearm s head allows you to now adjust the phono cartridge within the guidance by rotating it in order to set the correct angle. To find the right setting please use a template, like the Schön template, e.g. b) Second adjustment of the stabilizer weight after aligning the phono cartridge (as indicated by the manufacturer) using the tonearm scale: Use the wide counterweights for rough adjustments, use the narrow balance weight for fine adjustments. Setting the azimuth angle (HTA) a) Rough preset with mirror The rough preset of the HTA is performed optically by using a magnifying glass and a mirror. Place the head of the tonearm on a flat mirror, while the latter lies on the turntable. After that, loosen the screws holding the tonearm (6). Now you can turn the tonearm around its axis. After you have reached the correct setting, fasten the tonearm back in place. The needle has to line in one axis with its mirror picture. b) Recommended: Use the Dr. Feickert Adjust Software. An exact adjustment is possible with measurement software (for example, Feickert AdjustPlus). Phase shifts and changes in pedestal levels can only be taken into account this way. The sharper the diamond cut, the more crucial the perfect alignment is for the sound. 7
8 Anti-skating adjustment The characteristic spring, which extends vertically beyond the tonearm, is used for anti-skating adjustment. To make an adjustment, loosen the set screw (2) that secures the spring pin (3). Now turn the spring slightly counter-clockwise to increase the effect of the anti-skating and afterwards secure the spring pin again. While lowering the cartridge afterwards, the cartridge should be placed inwards with a slight twist. Note: Everyone has a different taste. We recommend a setting where a very slight twist inwards can be seen when placing the needle on the record. Warranty 3 year warranty (except for wearing parts) 8
Instruction manual. KUZMA 4POINT 14 inch TONEARM Serial Number:
 Instruction manual KUZMA 4POINT 14 inch TONEARM Serial Number:.. 2016-09 1 KUZMA LTD INSTRUCTION MANUAL FOR 4POINT 14 tonearm The 4POINT 14 tonearm is a very precisely engineered piece of equipment, however,
KUZMA 4POINT TONEARM
 KUZMA 4POINT TONEARM Instruction manual 2008-6 Serial Number:.. 1 KUZMA LTD INSTRUCTION MANUAL FOR 4POINT tonearm The 4POINT tonearm is a very precisely engineered piece of equipment, however, the construction
INSTRUCTIONS FOR USE Pro-Ject RPM 10 Carbon
 INSTRUCTIONS FOR USE Pro-Ject RPM 10 Carbon 2 Pro-Ject RPM 10 Carbon Controls, features and connections 1 Separate motor unit (motor and motor base) * 2 Drive pulley 3 Drive belt * 4 Speed control button
INSTRUCTIONS FOR USE Pro-Ject 1 Xpression III Comfort
 INSTRUCTIONS FOR USE Pro-Ject 1 Xpression III Comfort 1 1 2 PRO-JECT 1 Xpression III Comfort Controls, features and connections 1 Motor transportation screw (marked red) 2 Stepped drive pulley 3 Drive
[ ] Concept. User manual. Made in Germany
![[ ] Concept. User manual. Made in Germany](/thumbs/87/97076677.jpg "[ ] Concept. User manual. Made in Germany") Made in Germany [ ] Hi-Fi Components clearaudio electronic GmbH Spardorfer Str. 150 D-91054 Erlangen Tel. +49(0)1805/059595 FAX +49(0)09131/51683 www.clearaudio.de info@clearaudio.de copyright clearaudio
Made in Germany [ ] Hi-Fi Components clearaudio electronic GmbH Spardorfer Str. 150 D-91054 Erlangen Tel. +49(0)1805/059595 FAX +49(0)09131/51683 www.clearaudio.de info@clearaudio.de copyright clearaudio
INSTRUCTIONS FOR USE Pro-Ject RPM 10.1 Evolution
 INSTRUCTIONS FOR USE Pro-Ject RPM 10.1 Evolution 14 14 16 17 6 6a 15 9a 18 8 9 7 21 14 2 Audio Trade GmbH Pro-Ject RPM 10.1 Evolution Revision 2013.2.1 Pro-Ject RPM 10.1 Evolution Controls, features and
INSTRUCTIONS FOR USE Pro-Ject RPM 1 Genie
 INSTRUCTIONS FOR USE Pro-Ject RPM 1 Genie 8 9 4 1 11 2 6 16 5 3 7 10 Controls, features and connections 1/11 Motor unit with stepped drive pulley and power switch 2 Drive belt * 3 Platter 4 Tonearm counterweight
INSTRUCTIONS FOR USE Pro-Ject 2 Xperience SB S
 INSTRUCTIONS FOR USE Pro-Ject 2 Xperience SB S 2 Pro-Ject 2 Xperience SB S Controls, features and connections 1 Motor transport foam inserts 2 Motor with motor pulley 3 Drive belt * 4 Sandwich platter
INSTRUCTIONS FOR USE Pro-Ject RPM 10.1 Evolution
 INSTRUCTIONS FOR USE Pro-Ject RPM 10.1 Evolution 14 14 16 17 6 6a 15 9a 18 8 9 7 21 14 2 Audio Trade GmbH Pro-Ject RPM 10.1 Evolution Revision 4.5.09/15.10.09 Pro-Ject RPM 10.1 Evolution Controls, features
INSTRUCTIONS FOR USE Pro-Ject RPM 9.1
 INSTRUCTIONS FOR USE Pro-Ject RPM 9.1 2 PRO-JECT RPM 9.1 Controls, features and connections 1 Separate motor unit (motor and motor base) * 2 Stepped drive pulley 3 Drive belt * 3a Hook 4 Operation indicator
INSTRUCTIONS FOR USE Pro-Ject RPM 5
 INSTRUCTIONS FOR USE Pro-Ject RPM 5 1 1 2 PRO-JECT RPM 5 Controls, features and connections 1 Motor transportation screw (marked red) 2 Stepped drive pulley 3 Drive belt * 3a Hook * 4 Hub 5 Platter * 6
INSTRUCTIONS FOR USE Pro-Ject 1 Xpression Carbon
 INSTRUCTIONS FOR USE Pro-Ject 1 Xpression Carbon 2 Pro-Ject 1 Xpression Carbon Controls, features and connections 1 Motor brackets with ORTOFON pads 2 Stepped drive pulley 3 Drive belt * 3a Hook * 4 Hub
INSTRUCTIONS FOR USE Pro-Ject 2 Xperience Acryl Pro-Ject 2 Xperience Classic
 INSTRUCTIONS FOR USE Pro-Ject 2 Xperience Acryl Pro-Ject 2 Xperience Classic 5 2 Audio Trade GmbH Pro-Ject 2 Xperience Acryl / Classic / Ortofon 2M Red Revision 2012.7.1 Pro-Ject 2 Xperience Acryl / Classic
INSTRUCTIONS FOR USE Pro-Ject Xtension 9 Evolution
 INSTRUCTIONS FOR USE Pro-Ject Xtension 9 Evolution 2 Pro-Ject Xtension 9 Evolution Controls, features and connections 1 Power supply socket 2 Stepped drive pulley 3 Drive belt * 4 Platter * 5 ON/OFF switch,
INSTRUCTIONS FOR USE Pro-Ject 2 Xperience SB DC
 INSTRUCTIONS FOR USE Pro-Ject 2 Xperience SB DC 2 Pro-Ject 2 Xperience SB DC Controls, features and connections 1 Motor transport foam inserts 2 Motor pulley 3 Drive belt * 4 Sandwich platter * 5 Tonearm
A wireless turntable for new way of enjoying vinyl records
 Bluetooth Turntable TN-280BT 2-speed Analog Turntable with Phono EQ and Bluetooth A wireless turntable for new way of enjoying vinyl records Main Features 2-speed Belt-drive turntable Built-in MM phono
Guía del usuario Español ( 7 10 ) Guide d utilisation Français ( ) Guida per l uso Italiano ( ) Benutzerhandbuch Deutsch ( )
 Guide d utilisation Français ( ) Guida per l uso Italiano ( ) Benutzerhandbuch Deutsch ( )") User Guide English ( 3 6 ) Guía del usuario Español ( 7 10 ) Guide d utilisation Français ( 11 14 ) Guida per l uso Italiano ( 15 18 ) Benutzerhandbuch Deutsch ( 19 22 ) Appendix English ( 23 ) User Guide
User Guide English ( 3 6 ) Guía del usuario Español ( 7 10 ) Guide d utilisation Français ( 11 14 ) Guida per l uso Italiano ( 15 18 ) Benutzerhandbuch Deutsch ( 19 22 ) Appendix English ( 23 ) User Guide
INSTRUCTIONS FOR USE Pro-Ject RPM 9.1 SuperPack 1&2
 INSTRUCTIONS FOR USE Pro-Ject RPM 9.1 SuperPack 1&2 2 PRO-JECT RPM 9.1 SuperPack 1&2 Controls, features and connections 1 Separate motor unit (motor and motor base) * 2 Stepped drive pulley 3 Drive belt
MT2 Precision Turntable Owner s Manual
 McIntosh Laboratory, Inc. 2 Chambers Street Binghamton, New York MT2 Precision Turntable Owner s Manual 13903-2699 Phone: 607-723-3512 www.mcintoshlabs.com Important Safety Information is supplied in a
INSTRUCTIONS FOR USE Pro-Ject Studie
 INSTRUCTIONS FOR USE Pro-Ject Studie 6a 15 20 13 1 4 2 6 16 3 17 7 9 818 21 16 17 6 30 0 5 9 7 6a 15 5 8 18 21 20 24 25 1 22/23 14 23 26 22 2 Pro-Ject Audio PRO-JECT STUDIE Controls, features and connections
MT10 Precision Turntable Owner s Manual
 McIntosh Laboratory, Inc. 2 Chambers Street Binghamton, New York MT10 Precision Turntable Owner s Manual 13903-2699 Phone: 607-723-3512 www.mcintoshlabs.com The lightning flash with arrowhead, within an
INSTRUCTIONS FOR USE Pro-Ject 2 Xperience
 INSTRUCTIONS FOR USE Pro-Ject 2 Xperience 2 Pro-Ject Audio Pro-Ject 2 Xperience Revision 15.4.2004/7.2004 PRO-JECT 2 Xperience Controls, features and connections 1 Motor transportation screw (marked red)
P7 English.qxd 09/02/ :27 Page 1. Research Ltd, England w w w.rega.co.uk
 P7 English.qxd 09/02/2004 10:27 Page 1 Research Ltd, England w w w.rega.co.uk P7Rega P7 English.qxd 09/02/2004 10:27 Page 2 p7 P7 English.qxd 09/02/2004 10:28 Page 4 Mission Statement Rega s philosophy
INSTRUCTIONS FOR USE Pro-Ject Essential Basic
 INSTRUCTIONS FOR USE Pro-Ject Essential Basic 12 14 14 10 44 22 4 9 1 2 77 8 66 7 3 66 6 5 11 14 13 Controls, features and connections 1 Power switch 2/22 Stepped drive pulley and drive belt * 3 Platter
Monolith Turntable P/N User's Manual
 Monolith Turntable P/N 27749 User's Manual SAFETY WARNINGS AND GUIDELINES Please read this entire manual before using this device, paying extra attention to these safety warnings and guidelines. Please
TD 170 EV LAB POINTS LAB REVIEW
 TD 170 EV LAB POINTS vintage aesthetic Made in Germany fully automatic operation built-in phono pre-amp plays 33/45/78 RPM records easy operation, play records right out of the box - no alignment work
INSTRUCTIONS FOR USE Pro-Ject Debut Carbon
 INSTRUCTIONS FOR USE Pro-Ject Debut Carbon 11 13 11 21 2 1 3 16 6 30 0 5 6a 17 15 9a 1 4 5 8 18 9 7 19 20 17 9a 22 3a 10 11 12 14 2 Pro-Ject Debut Carbon Controls, features and connections 1 Motor brackets
User Manual Notice d'utilisation
 G056F USB TURNTABLE User Manual Notice d'utilisation OPERATION Before use please Inspect the product including its cable and plug for any signs of damage. If the product is damaged, DO NOT use it, and
Luxurious turntable inherits modern technology and contemporary design.
 Analog Turntable TN-350 Analog Turntable with Phono EQ Luxurious turntable inherits modern technology and contemporary design. Main Features Manual Belt-drive Turntable supporting 33/45rpm Heavy MDF cabinet
Pro-Ject Essential III Flexi-Range
 INSTRUCTIONS FOR USE Pro-Ject Essential III Flexi-Range Dear Music Lover, Congratulations and thank you for choosing Pro-Ject Audio Systems record player. Your Essential III turntable has been handcrafted
2100/2200/4100/6200 & MPB Series Bottom Mount Drive Pack. for Standard Load Parallel Shaft 60 Hz Gearmotors
 00/00/400/600 & MPB Series Bottom Mount Drive Pack. for Standard Load Parallel Shaft 60 Hz Gearmotors Installation, Maintenance & Parts Manual DORNER MFG. CORP. INSIDE THE USA OUTSIDE THE USA P.O. Box
DREAMOC DIAMOND 4K - ASSEMBLY GUIDE VERSION ORIGINAL ASSEMBLY GUIDE
 DREAMOC DIAMOND 4K - ASSEMBLY GUIDE VERSION 1.2 - ORIGINAL ASSEMBLY GUIDE It is important to read this assembly guide before using the Dreamoc Diamond, and to follow advices and instructions on safety,
Manual placement system MPL3100. for BGA, CSP and Fine-Pitch components
 Manual placement system MPL3100 for BGA, CSP and Fine-Pitch components Part No: MPL3100BA1.0e Issue Date: 02/2001 You have opted for an ESSEMTEC MPL3100 pick and place system. We thank you for this decision
Phono Amplifier brinkmann «EDISON» Manual.
 Phono Amplifier brinkmann «EDISON» ----------------------------------------------------------------------------------------------- Manual Preface We congratulate you on the purchase of our «EDISON» phono
MP Maker Pro Mk.1. Quick Start Guide
 MP Maker Pro Mk.1 P/N 33013 Quick Start Guide ONLINE SUPPORT Monoprice is pleased to provide free online support. For order related issues, contact the Customer Service department through the Live Chat
TV Lift System Model CL-65 Installation Instructions
 TV Lift System Model CL-65 Installation Instructions Contact: Support@Nexus21.com Toll Free: (866) 500-5438 Phone: (480) 951-6885 Fax: (480) 951-6879 Revised: 01/17/17 Below is a parts list describing
INSTRUCTIONS FOR USE Pro-Ject Primary Phono USB
 INSTRUCTIONS FOR USE Pro-Ject Primary Phono USB 2 Pro-Ject Audio Systems Pro-Ject Primary Phono USB/ Pro-Ject 8.6E Revision 2015.08.28 Pro-Ject Primary Phono USB Controls, features and connections 1 Power
Chapter 4. Dish Antenna Installation. Installing a DISH 500 Antenna. Finding the Satellites
 These instructions guide you through the installation of a satellite system which includes your receiver (included with this manual), and a DISH Pro DISH 500 antenna system that can be identified by the
Vibratory Deck Sieves 15 in. (380 mm)
") Instruction Sheet P/N 1604433-01 Vibratory Deck Sieves 15 in. (380 mm) Introduction This instruction sheet covers the vibratory deck sieves listed in the following tables. 15-Inch Deck Sieves with 2.5
Instruction Sheet P/N 1604433-01 Vibratory Deck Sieves 15 in. (380 mm) Introduction This instruction sheet covers the vibratory deck sieves listed in the following tables. 15-Inch Deck Sieves with 2.5
Rega RP1 Turntable 2017 year end special, brand new only R
 Croak Audio Exploration PO Box 3899, Cramerview 2060 South Africa Tel: 083 565 1236 Fax: 086 572 2797 E Mail: info@croak.co.za Some Great Specials, New and Pre Owned for the end of 2017. Croak Audio Exploration
3B SCIENTIFIC PHYSICS
 3B SCIENTIFIC PHYSICS Complete Fine Beam Tube System 1013843 Instruction sheet 10/15 SD/ALF If it is to be expected that safe operation is impossible (e.g., in case of visible damage), the apparatus is
VALORE 425 Lite Italian Prestige Turntable
 VALORE 425 Lite Italian Prestige Turntable OWNER S MANUAL IMPORTANT SAFETY INFORMATION CAUTION: TO REDUCE THE RISK OF ELECTRIC SHOCK, DO NOT REMOVE COVER (OR BACK). NO USER-SERVICEABLE PARTS INSIDE. REFER
2100, 2200, 4100, 6200, MPB Series Side Mount Drive Package for Light Load 60 Hz Gearmotors
 00, 00, 400, 600, MPB Series Side Mount Drive Package for Light Load 60 Hz Gearmotors Installation, Maintenance & Parts Manual DORNER MFG. CORP. INSIDE THE USA OUTSIDE THE USA P.O. Box 0 975 Cottonwood
Assembly instructions
 Assembly instructions Model: MXR0024/KIT TV Aerial - 18 Element Kit Contact: Helpline: +44 (0)1553 811000 Email: support@maxview.co.uk Web: www.maxview.co.uk Maxview reserve the right to change specifications
3. Electronics and MMU2 unit assembly
 Written By: Jakub Dolezal 2018 manual.prusa3d.com/ Page 1 of 34 Step 1 Tools necessary for this chapter Please prepare tools for this chapter: 2.5mm Allen key for M3 screws 2mm Allen key for nut alignment
Field Service Procedure Replacement EL Motor Kit, ST24
 1. Brief Summary: Troubleshooting document for diagnosing a fault with and replacing the elevation motor and encoder on the ST24 antenna. 2. Checklist: Verify Initialization Run the Built In Test 3. Theory
SCREEN WINCH SYSTEM INSTALLATION MANUAL FOR SCREENS UP TO 300 cm. of width
 SCREEN WINCH SYSTEM INSTALLATION MANUAL FOR SCREENS UP TO 300 cm. of width Before installing the screen winch system, please read the following instructions carefully: The screen winch system must be used
MY-HITE ADJUSTABLE TABLE
 MY-HITE ADJUSTABLE TABLE Corner T Leg Base Model Number : FCNAHBT Please Read Instructions Before Use ASSEMBLY INSTRUCTIONS ALL WORKSTYLES WELCOME Thank you for choosing Friant. We appreciate the trust
SCREEN WINCH SYSTEM INSTALLATION MANUAL FOR SCREENS UP TO 300 cm. of width
 SCREEN WINCH SYSTEM INSTALLATION MANUAL FOR SCREENS UP TO 300 cm. of width Before installing the screen winch system, please read the following instructions carefully: The screen winch system must be used
INSTRUCTIONS FOR USE Pro-Ject Essential III RecordMaster
 INSTRUCTIONS FOR USE Pro-Ject Essential III RecordMaster 2 Controls, features and connections Essential RecordMaster (1) POWER SWITCH (2) STEPPED DRIVE PULLEY (22) DRIVE BELT (3) PLATTER & FELT MAT (4)
Assembling and Mounting the Presentation Display, Speakers, Speaker Screens, and Table Door
 CHAPTER 8 Assembling and Mounting the Presentation Display, Speakers, Speaker Screens, and Table Door July 13, 2012, This document provides you with the procedures you perform to assemble and mount the
I OPERATING PRECAUTIONS
 I OPERATING PRECAUTIONS Please place the turntable on a horizontal support free of vibrations. For prevention of acoustical feedback, the speakers must be placed a sufficient distance from the turntable.
Operating Manual. Automated Gear. Apollo Design Technology, Inc Fourier Drive Fort Wayne, IN USA
 Operating Manual Automated Gear Apollo Design Technology, Inc. 4130 Fourier Drive Fort Wayne, IN 46818 USA PH: +01(260)497-9191 FX: +01(260)497-9192 www.apollodesign.net 11-25-09 5-6 POWERING UP THE RIGHT
READ ME FIRST. Touchstone TV Lift
 Whisper Lift II PRO 2 READ ME FIRST 1. After completing the unpacking and uncrating of the cabinet, you will find the Owner s Manual, TV, installation hardware, and the wireless remote all together and
Essential III. Flexible Range. Essential III. FlexiRange
 Essential III Essential III Flexible Range FlexiRange 33 45 Essential III FlexiRange E III 4 E III Phono 6 E III SB 8 E III Bluetooth 10 E III Digital 12 E III RecordMaster 14 aluminum pulley 42cm anti-skating
#YourGearUpgraded. TV Stand Model EGTV1 INSTRUCTION MANUAL
 #YourGearUpgraded TV Stand Model EGTV1 INSTRUCTION MANUAL IMPORTANT SAFETY INSTRUCTIONS. READ ENTIRE MANUAL PRIOR TO USE. SAVE These INSTRUCTIONS Yea, the boring stuff...... but read it, so you don t jack
SCREEN WINCH SYSTEM INSTALLATION MANUAL FOR SCREENS FROM 300 cm. UP TO 450 cm. of width
 SCREEN WINCH SYSTEM INSTALLATION MANUAL FOR SCREENS FROM 300 cm. UP TO 450 cm. of width Before installing the screen winch system, please read the following instructions carefully: The screen winch system
75 Elliptical Antenna System
 Instruction and Assembly Manual 75 Elliptical Antenna System 7291 NW 74th Street Miami, FL 33166 GlobeCast Technical Service: (888) 988-5288 Manufactured By: 2002 Channel Master LLC Printed in U.S.A. 8000915-02
USER MANUAL. GOLDMUND LOGOS 1N-2N SPEAKER SYSTEM Active Speaker
 USER MANUAL GOLDMUND LOGOS 1N-2N SPEAKER SYSTEM Active Speaker Thank you for purchasing the Goldmund LOGOS 1N-2N SPEAKER SYSTEM The Goldmund Logos line fully incorporates the technological expertise developed
MclNTOSH MODEL C-4 and C-4P
 INSTRUCTION MANUAL MclNTOSH MODEL C-4 and C-4P AUDIO COMPENSATORS McINTOSH LABORATORY, INC. 320 Water St. Binghamton, N. Y. U.S.A. - 1 - INSTRUCTION MANUAL McINTOSH MODEL C-4 and C-4P AUDIO COMPENSATORS
BIRD 2. Owners manual MADE IN SWEDEN
 BIRD 2 Owners manual 1 MADE IN SWEDEN Table of contents Introduction Marten Philosophy Unpacking Quick Setup Connecting the loudspeakers 2 3 3 4 4 5 Choosing cables Connections Burn-in Room Acoustics Positioning
ModWright Instruments, Inc. PH 150 Tube Phono Stage Owner s Manual
 ModWright Instruments, Inc. PH 150 Tube Phono Stage Owner s Manual Manufactured by ModWright Instruments, Inc. 21919 399th St., Amboy, WA 98601 USA www.modwright.com 1 CAUTIONS: Do not operate or power
Preface. About this Manual. Notational Conventions. Warnings, Cautions, and Notes
 Preface About this Manual PLEASE READ THIS INSTALLATION MANUAL CAREFULLY AND IN ITS ENTIRETY PRIOR TO COMMENCING INSTALLATION. This installation manual contains important information for the safe and successful
AB CRUNCH SIT UP BENCH MODEL# 8642AB PRODUCT MANUAL - VERSION
 AB CRUNCH SIT UP BENCH MODEL# 842AB PRODUCT MANUAL - VERSION 01.18.0 FOR AGES: WEIGHT LIMIT: 20 Lbs 3 Kgs TO BUILD: 13+ 1 X TOOLS NEEDED: CUSTOMER SERVICE GQBrands.com CustomerService@GQBrands.com 1-8-498-29
FOSC 450 C6 and D6 Closures
 FOSC 450 C6 and D6 Closures I N S T A L L A T I O N I N S T R U C T I O N Fiber Optic Splice Closure 1. General Product Information The FOSC 450 C6 and D6 fiber optic splice closures use compressed gel
DJ SET ORDERCODE D1210
 DJ SET ORDERCODE D1210 Congratulations! You have bought a great, innovative product from DAP Audio. The DAP Audio DJ Set brings excitement to any venue. Whether you want simple plug-&-play action or a
WID-DL74 WID-DL74 BLP WID. Designed for. Installation guide for workitdesk interactive table for. BrightLink Pro
 WID-DL74 WID-DL74 BLP WID Designed for BrightLink Pro Installation guide for workitdesk interactive table BrightLink Pro for Mounting the table unit 1 Unpack boxes 1 of 4 (Mobile base) and 2 of 4 (Motorized
SRV02-Series. Rotary Pendulum. User Manual
 SRV02-Series Rotary Pendulum User Manual Table of Contents 1. Description...3 2. Purchase Options...3 2.1 Modular Options...4 3. System Nomenclature and Components...5 4. System Configuration and Assembly...6
Check what you have received against the component checklist and hardware above.
 SA46S SA46W SA46B SA46PB Component Checklist Installation Instructions SYSTEMA Systema Monitor Arm 460mm HARDWARE Display Mounting Spacers (x4) Display Mounting Screws Arm Assembly VESA monitor head M4
EAT C Sharp Turntable Combination
 A C r e a t i v e F o r u m f o r t h e A u d i o A r t s EAT C Sharp Turntable Combination 01-03-2018 By Robert H. Levi Issue 95 This review started out an examination of the popular EAT C Sharp Turntable,
NewScope-7A Operating Manual
 2016 SIMMCONN Labs, LLC All rights reserved NewScope-7A Operating Manual Preliminary May 13, 2017 NewScope-7A Operating Manual 1 Introduction... 3 1.1 Kit compatibility... 3 2 Initial Inspection... 3 3
Cable installation guidelines
 The Quality Connection Cable installation guidelines Business Unit Industrial Projects 2 Cable installation guidelines www.leoni-industrial-projects.com GENERAL Installation methods Many different methods
In-Ceiling Electric Motorized Front Projection Screen Evanesce Series. User s Guide
 In-Ceiling Electric Motorized Front Projection Screen Evanesce Series User s Guide Important Safety & Warning Precautions Make sure to read this user s guide and follow the procedures below. Caution: The
Preface 11 Key Concept 1: Know your machine from a programmer s viewpoint 17
 Table of contents Preface 11 Prerequisites 11 Basic machining practice experience 11 Math 12 Motivation 12 Controls covered 12 What about conversational controls? 13 Controls other than Fanuc 13 Limitations
SUMIKO. Starling. Moving Coil Cartridge
 SUMIKO Starling Moving Coil Cartridge Dear Starling owner, Thank you for your purchase of our new moving coil cartridge. Our intention in producing the Starling is simple and unequivocal: to deliver the
2X2 Panel. 1X2 Panel
 2X2 Panel 1X2 Panel PRO-PANEL LED SOFTLIGHT Features: 2700K Tungsten - 6500K Daylight Controllable Range Continuous DMX 512 Dimming Control: 100%-0% Connect Multiple Fixtures for Uniform Dimming and Color
Field Service Procedure Replacement PCU Kit, Coastal
 1. Brief Summary: Troubleshooting document for diagnosing a fault with and replacing the PCU assembly on the coastal series antennas. 2. Checklist: Initialization Rate Sensor Outputs Run the Built In Test
3.22 Finalize exact specifications of 3D printed parts.
 3.22 Finalize exact specifications of 3D printed parts. This is the part that connect between the main tube and the phone holder, it needs to be able to - Fit into the main tube perfectly - This part need
INSTALLATION GUIDE FOR THE MOTOR
 INSTALLATION GUIDE FOR THE MOTOR Motor Horizon-Horizon ref 450907 MET542 This symbol indicates that the product must not be treated as household waste. The harmfull substances possibly contained in the
Operation and Maintenance Guide Electric Needle Scalers
 Operation and Maintenance Guide Electric Needle Scalers Models Covered Model Number ENS100V ENS200V Electric Needle Scaler, 110V-1ph Electric Needle Scaler, 220V-1ph Description IMPA Number 59 12 01 59
Check what you have received against the component checklist and hardware above.
 SSS SSPW SSW SSPB SSB Component Checklist Installation Instructions SYSTEMA Systema Monitor Spring Arm HARDWARE Display Mounting Spacers (x4) 3/4mm Allen Keys Display Mounting Screws M4 x 14mm (x1) Silver
Pro-Ject Elemental/Phono USB
 INSTRUCTIONS FOR USE Pro-Ject Elemental/Phono USB Controls, features and connections 1 Power switch 2/22 Stepped drive pulley and drive belt * 3 Platter with felt mat * 4 Tonearm counterweight 5 Tonearm
World class Hi-Fi made in England. First Edition
 World class Hi-Fi made in England First Edition PLANAR 1 PLANAR 2 PLANAR 3 This multi-award winning Plug and Play design utilises our handmade RB110 tonearm. With our pre-set bias and a factory fitted
Low Noise Solid State Phono Preamplifier User's Guide and Operating Information
 Bel Canto Design PHONO 1 Low Noise Solid State Phono Preamplifier User's Guide and Operating Information Bel Canto Design 212 Third Avenue North Suite 345 Minneapolis, MN 55401 Phone: (612) 317.4550 Fax:
INSTRUCTION AND MAINTENANCE VIDEO MOTORE PROJECTION SCREEN
 INSTRUCTION AND MAINTENANCE VIDEO MOTORE PROJECTION SCREEN 1.1 TECHNICAL DATA PRODUCT DESCRIPTION Screens made with the following projection fabrics: SOFT WHITE, MATT WHITE SOFT, SOFT WHITE TRANSOUND,
Setup Guide. Read me BefoRe unpacking!
 Setup Guide Read me BefoRe unpacking! Package Contents In The Replicator package The Replicator SD card (in The Replicator SD card slot) In the Accessory Box found within The Replicator frame Single or
DEEPFRAME BASIC KIT- USER MANUAL VERSION ORIGINAL USER MANUAL
 DEEPFRAME BASIC KIT- USER MANUAL VERSION 1.0 - ORIGINAL USER MANUAL new type of mixed reality display that enables digital content to appear as a hologram on top of reality seen 1 Content Security precautions
TT-1600, TT-1650 Operating Instructions
 TT-1600, TT-1650 Operating Instructions INSIDE THE BOX: OR (1) TT-1650 or TT-1600 Turntable (1) Aluminum Platter (TT-1650) or (1) Plastic Platter w/ Belt (TT-1600) (1) Headshell w/ Cartrdige (1) Counter
TECHNICAL INFORMATION
 OCTALUMINA 120: PARTS LIST AND TECHNICAL INFORMATION HIGH POWER LEDS INNER CORNER LABELED FRAME MOUNTED POWER SUPPLY UNIT EASY PLUG-IN CONNECTION BRACING TECHNIQUE CABLE OUTLET AT THE BOTTOM SYSTEM PACKAGING
Replacing the PanelMate epro PS, PanelMate epro PS EE, and PanelMate epro PS OD 7685x-12 Series Backlight Assembly
 Replacing the PanelMate epro PS, PanelMate epro PS EE, and PanelMate epro PS OD 7685x-12 Series Backlight Assembly Introduction The Backlight Replacement Kit provides a replacement backlight for the PanelMate
Installation Guide OvalSox TM Cable
 Installation Guide OvalSox TM Cable Thank you for selecting a DuctSox System. This guide will be helpful for the installation of an OvalSox Cable System. Sections of fabric will be labeled, assembled,
Cable System Installation Guide
 Overview Cable System Installation Guide 5/19/2008 Our recommended approach for the installation of your Circle Graphics Cable Systems on the panels in your market is to install the fixed hardware (namely
1-Touch Vibratory Sieve Shaker SS-10
 1-Touch Vibratory Sieve Shaker SS-10 Safety Instructions WARNING!! This machine operates on electric current. Improper operation could result in electrical shock, electrocution, or an explosion! 1. ALWAYS
ELLIPTICAL ANTENNA E0851B11
 ELLIPTICAL ANTENNA E0851B11 INSTALLATION GUIDE E0851B11 Installation Manual Step 1: Finding a suitable antenna site A suitable antenna site requires an unobstructed view and a stable antenna mounting surface.
ASSEMBLY, INSTALLATION, AND REMOVAL OF CONTACTS AND MODULES
 ASSEMBLY, INSTALLATION, AND REMOVAL OF CONTACTS AND MODULES FOR 75 OHM AND 75 OHM HD COAXIAL CONTACTS AND MODULES Table of Contents SECTION 1 RECEIVER CONTACT ASSEMBLY INSTRUCTIONS SECTION 2 ITA CONTACT
USER MANUAL. DE-1 Police-light. CAUTION! Keep this device away from rain and moisture! Unplug mains lead before opening the housing!
 USER MANUAL DE-1 Police-light CAUTION! Keep this device away from rain and moisture! Unplug mains lead before opening the housing! For your own safety, please read this user manual carefully before you
Section 2 Normal Procedures
 1 Section 2 Normal Procedures The Pro Flight Trainer Evolution BL is a HID USB Device that Plug & Play to any compatible Operating System. It will be recognized as a USB Input Device with 5 axis, 6 buttons,
Litile34 INSTALLATION MANUAL
 Litile34 INSTALLATION MANUAL Seamless Tiled Panel Wall Solution for Large Area Digital Signage Display (1st Edition 3/25/2009) All information is subject to change without notice. Approved by Checked by
L. Sound Systems. Record Players
 L. Sound Systems We address three more sound sources in this section. These are the record player, tape deck, and CD player. They represent three levels of improvement in sound reproduction. Faraday's
Freedom for your work environment
 Freedom for your work environment MULTI-DIRECTIONAL FLAT SCREEN ARM Free to think Make the most of your flat screen monitor Thinking space is not just room to move your mind, it s an environment that nurtures