Educational Series. Educational Collaboration between King Systems and Michael Sweeney MSN, CRNP, CFRN, CCRN, CNRN, CEN, CPEN
|
|
|
- Garey Craig
- 5 years ago
- Views:
Transcription


1 Educational Series Educational Collaboration between King Systems and Michael Sweeney MSN, CRNP, CFRN, CCRN, CNRN, CEN, CPEN


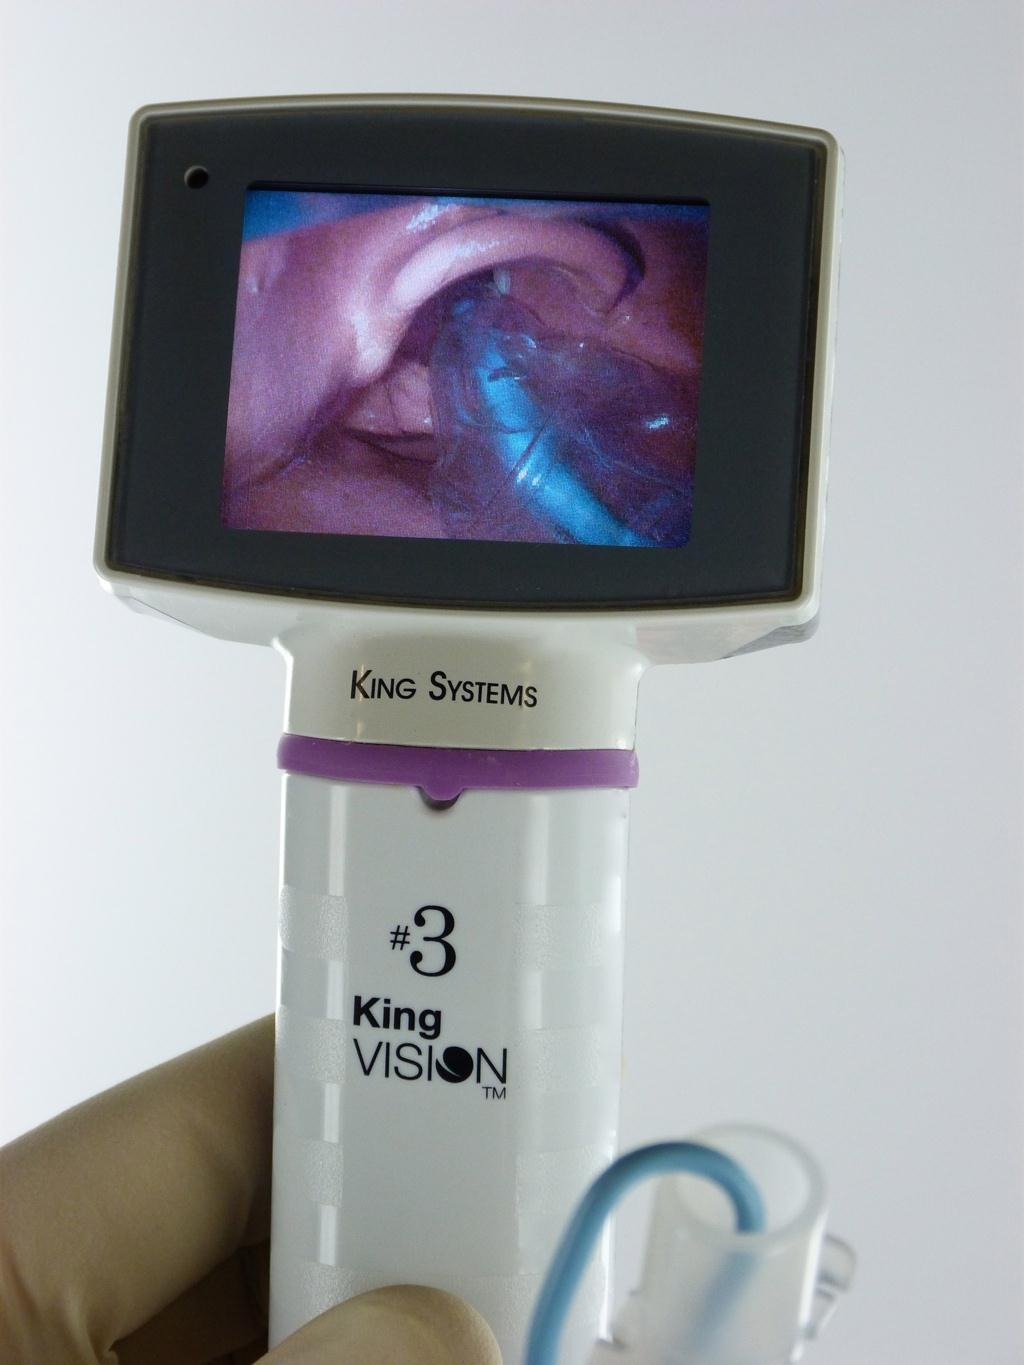
2 Learning Objectives Understand the following: Design and fundamental operation of the King Vision Technique for channeled blade intubation Technique for standard blade intubation User tips for improving intubation success


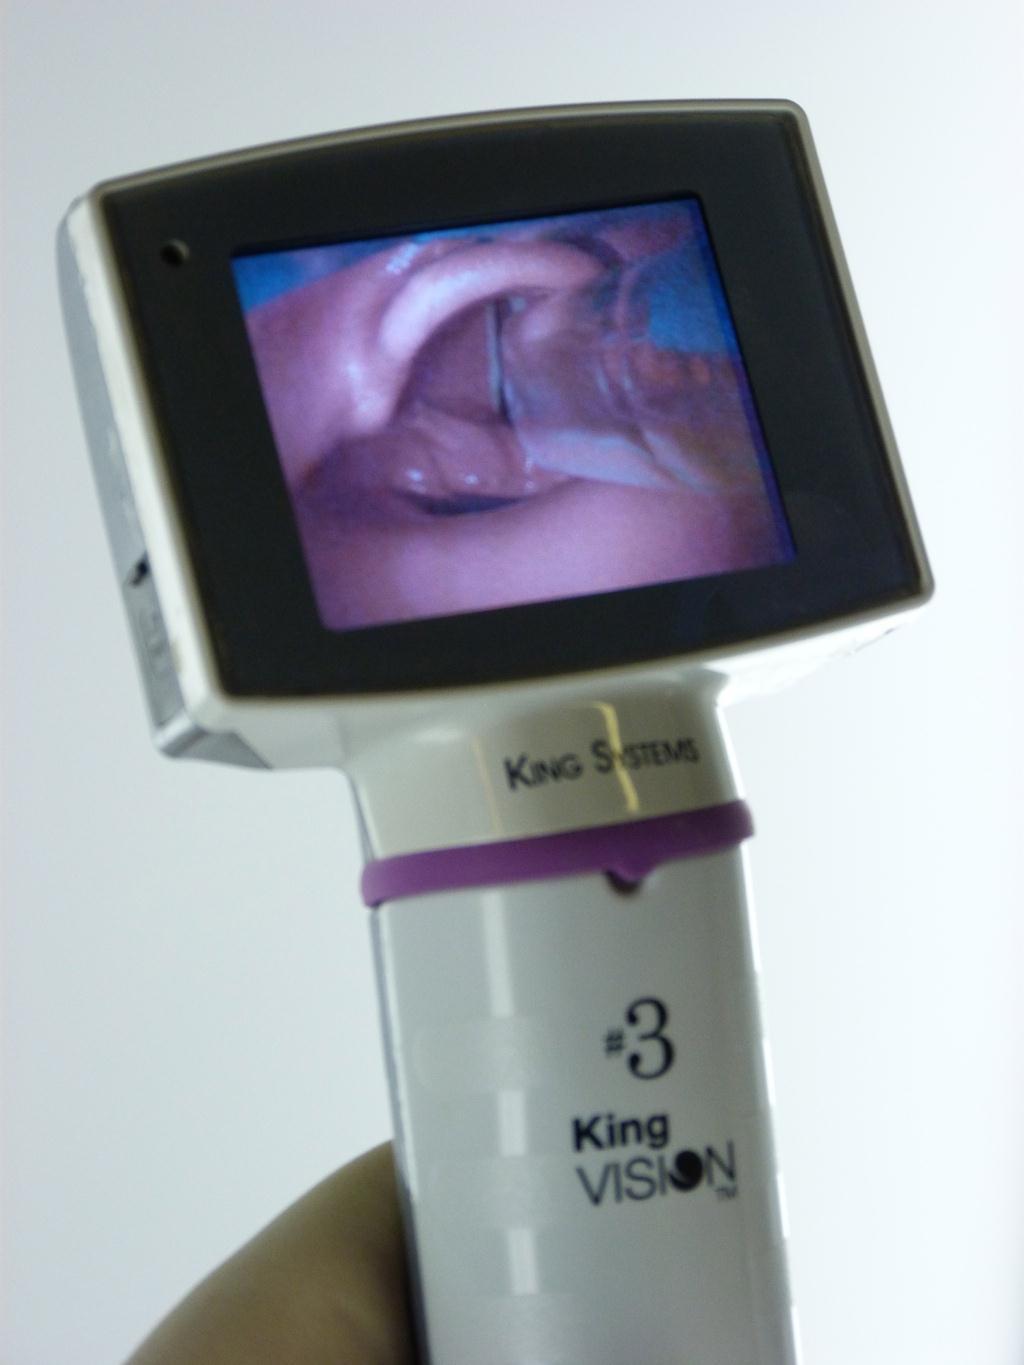
3 Display Anatomy Rubber Gasket The disposable blade slides over the stem of the display and locks into place at the rubber gasket m High Intensity OLED Display Creates clear image viewing in 160 panoramic field Power Source Removal of the plastic cover in the identified direction exposes the storage of the three AAA batteries that power the King Vision Latest Camera Chip Technology Cell phone camera technology in the blade connects to the bottom of the display for lightweight use and accurate imaging
 Low power consumption Anti-glare coating for viewing in bright")
4 OLED Screen (Organic Light Emitting Diode) Exceptional brightness Exceptional color reproduction Outstanding contrast levels Crisp wide angle viewing (160 ) Low power consumption Anti-glare coating for viewing in bright light

5 Reusable Display Stats 2.4 Full Color OLED Screen Three AAA Batteries Auto Shut Off Auto Exposure, White Balance Protective Foam Case LED Battery Indicator Video Output


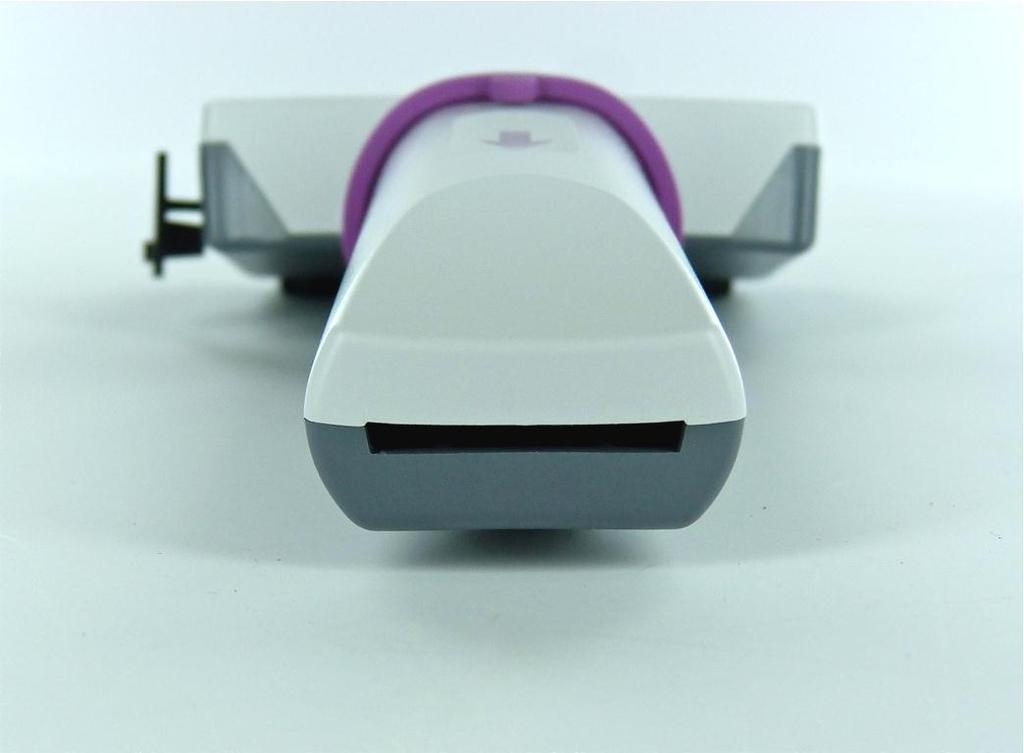
6 Blade Type Standard Blade A non-channeled blade allows freehand manipulation of the endotracheal tube to the laryngeal inlet Channeled Blade Blade includes a guiding channel to load and aim the endotracheal tube toward the laryngeal inlet
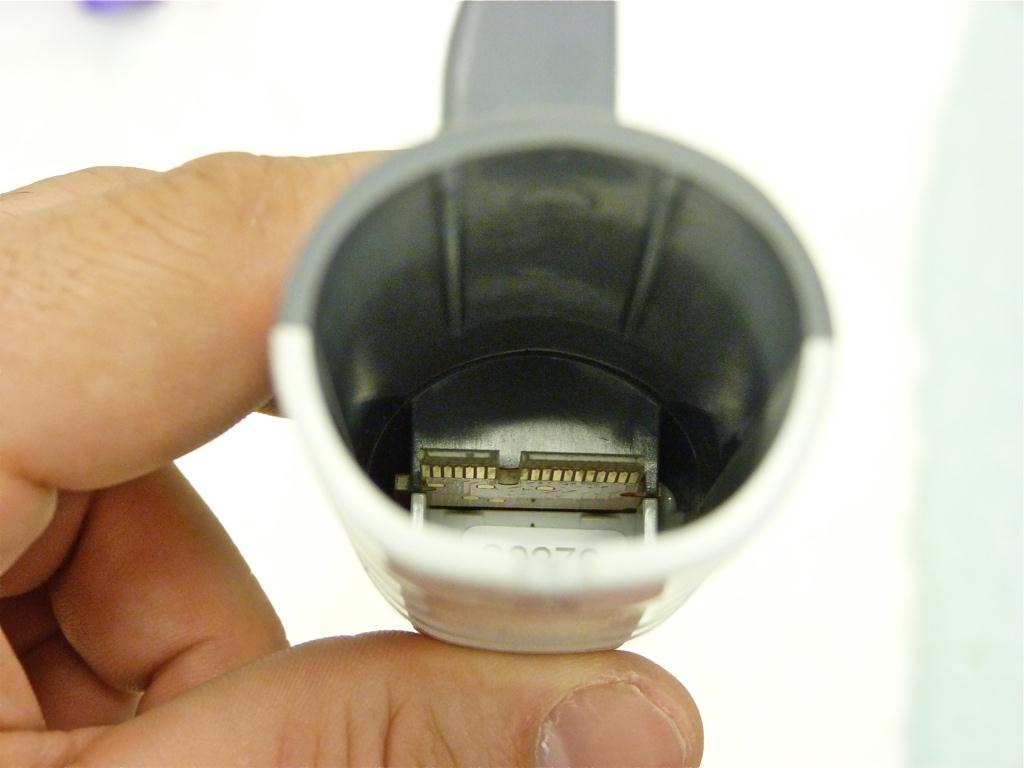

7 Blade Connection Display Blade


8 Connecting The King Vision White Gray Power Off Align Colors Connect Device Merge 1/2 Circles Will Click When Connected


9 Display Power Press to power on. Press and hold for approximately one second to turn power off. Green Light indicates adequate power (90 minutes of continuous battery life). Flashing Red Light indicates the batteries need to be replaced.


10 Camera and Light Source Anti-Fog Coating Camera Brilliant White Light LED


11 Trouble Shooting The King Vision Display Split screen: Caused by powering the display and then connecting to the blade. Static screen: Caused by the display being powered but not connected to the blade. Frozen Screen: Caused by the display being disengaged from the blade before powering off the device.


12 Replacing the Batteries Pull Push Down to Remove Cover Pull Black Strap To Remove Batteries Replace Three AAA Alkaline Batteries
.")


13 The Video Display Output Only use the custom cable from King Systems (item # KVCABL). The custom cable incorporates a standard RCA male adapter for connection to an external display. Video Output should only be connected to certified devices conforming to UL/IEC Standards.


14 Blade Anatomy Channeled Standard
15 Channeled Blade Stats Min.18mm mouth opening required No stylet required ETT can be preloaded in the channel Accommodates ETT

16 Standard Blade Stats Min.13mm mouth opening required Stylet required Stylet shaped to Freehand guiding of ETT

17 Fundamental Operation Blade lubrication Hand position Avoiding the chest Tips to optimize the view of the larynx Epiglottic elevation


18 Lubricate the Blade Lubricate the posterior aspect and the tip of the blade using a water soluble lubricant. Channeled blade only: Lubricate channel to allow endotracheal tube to slide easily in the channel. Avoid getting lubricant on the camera.


19 Hand Position Proper hand position is pinching mid-blade with the thumb on the anterior side and the second, third, and fourth fingers compressing the King Vision on the posterior side.


.")

20 Holding the King Vision Do not hold the device above the purple gasket Holding the device at the gasket loses some of the focused control and can cause accidental separation of the blade from the monitor. Do not hold like a direct laryngoscope Indirect Video Laryngoscopy is very different than Direct Laryngoscopy(DL). Holding the device like a DL will make the clinician revert back to the techniques used for direct laryngoscopy and may result in intubation difficulty. x x
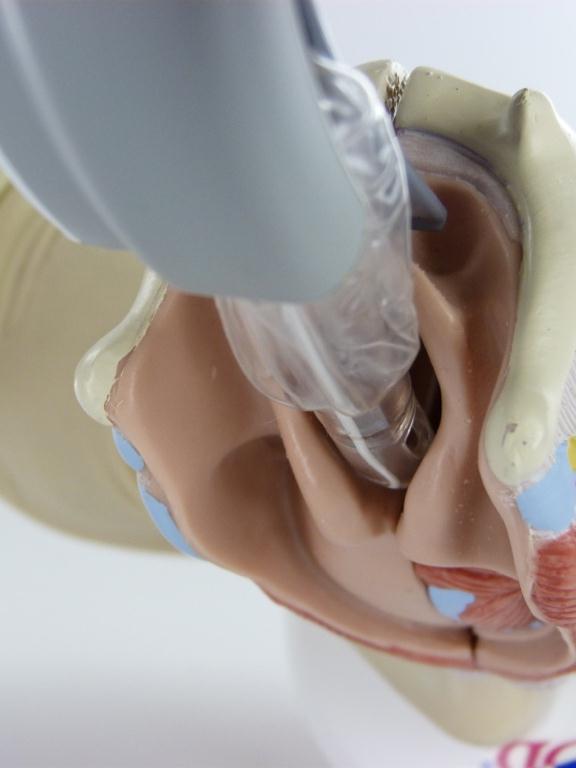
21 Avoiding the Chest During Insertion In patients with a small oropharynx, large tongue, or large body habitus, introducing the blade into the mouth can be complicated by the display contacting the chest.

22 Tips for Avoiding the Chest During Insertion 1. If not contraindicated, elevate the head or place in a ramped position 2. Scissors the mouth open 3. Use lateral insertion technique 4. Disconnect Display from Blade Note: As illustrated, all these techniques can be combined.


23 Lateral Blade Insertion Channeled Blade introduced from the left Standard Blade introduced from the right


24 Lateral Blade Introduction Technique 1 2 Start Midline aim perpendicular to the nose 3 4 Rotate inline towards the feet End Midline Lifting Upwards


25 Keys For Optimal Placement Maintain tongue and jaw retraction, device elevation, and midline approach while seeking optimal placement.


26 Optimal Placement Placement in the vallecula View should not be a close-up view of the vocal cords


27 Common Problem with any VL: Inserting Too Far When the video laryngoscope is inserted too far, there is limited room to pass the tube, and it can get caught on the right arytenoid. A panoramic view should be obtained, which allows for plenty of room to pass the tube.


28 Elevating the Epiglottis Problem: Difficulty elevating the epiglottis to visualize the laryngeal inlet Solution: Change approach and directly elevate the epiglottis


29 TECHNIQUE FOR INTUBATION CHANNELED VERSION
30 Channeled Blade Connect blade and power on as previously shown


31 Channeled Blade Preload of Endotracheal Tube After lubrication, load the endotracheal tube into the channel, stopping at the end of the channel, not the blade tip.


32 Channeled Blade Progression of device placement to endotracheal tube delivery through the laryngeal inlet


33 Channeled Blade Tube Advancement Tube advancement should be performed in slow one centimeter progressions with correction after each movement.


34 Optimal Placement Slight anterior lift may be needed to visualize vocal cords


35 Channeled Blade Endotracheal Tube Placement Difficulties Due to the leftward bevel, it is common to catch the right arytenoid or aryepiglottic fold.


36 Avoiding Right Arytenoid/Aryepiglottic Fold Option #1: Retract endotracheal tube, twist counterclockwise and advance through vocal cords


37 Avoiding Right Arytenoid/Aryepiglottic Fold Option #2: Rotate blade to redirect ETT 1 Aim blade tip towards the left aryepiglottic fold. Advance ETT 1cm. The endotracheal tube will enter slightly in your field of vision. 2 Then redirect King Vision back towards the interarytenoid notch and advance endotracheal tube.


38 Channeled Blade Catching on Tracheal Rings and Tube Rotation Problem: Tracheal Rings Solution: Leading Edge The leading edge of the endotracheal tube can get caught on the tracheal rings. Twist endotracheal tube clockwise 90


39 TECHNIQUES FOR INTUBATION STANDARD BLADE VERSION

40 Standard Blade Connect blade and power on as previously shown


41 Standard Blade Shaping the ETT and Stylet Shape stylet to mirror contour of the blade (approx )


42 Standard Blade Keys To Success Midline Insertion (Use Nose As Reference) Tongue and Jaw Retraction


43 Standard Blade Why Do We Follow the Midline? Following midline provides a reference point when there is no channel. Camera The endotracheal tube will come into the field of vision of the camera if you follow the underside of the blade.


44 Midline Standard Blade Inserting Endotracheal Tube Tongue and jaw retraction View from user s perspective


45 Standard Blade Lifting Device for Optimization Optimizes View Lift Lift Lifting the blade creates a larger opening to pass the endotracheal tube.


46 Standard Blade Inserting Endotracheal Tube Ensure that the device is midline. Insert the shaped ETT with stylet. Direct the tip of the ETT along the underside of the Standard Blade.

47 Standard Blade Once Through Laryngeal Inlet Once the endotracheal tube has passed through the vocal cords you must do one of the following: You must partially retract the stylet before advancing the endotracheal tube. or You must turn the tube clockwise 90 as you pass the tube through the laryngeal inlet.


48 Standard Blade Once Through the Vocal Cords, Why Do We Have to Retract the Stylet? Recall that the stylet was shaped to a 60 to 70 angle. If no manipulation of the stylet is performed, the sharp angle will cause the endotracheal tube to catch on the anterior tracheal rings.


49 Standard Blade Progression of stylet withdrawl


50 Other Tips Use of a Bougie There may be a few cases where passing the endotracheal tube may be difficult secondary to small anatomy, swollen laryngeal structures, or abnormal anatomy. In these cases, a bougie may be beneficial.


51 Channeled Blade Using a Bougie Bougie inside ETT; ensure angled bougie tip is facing upward as it exits the ETT


52 Standard Blade Using a Bougie A bougie has a significantly smaller outer diameter than an endotracheal tube. This allows for easier passage into challenging airways.

 1-317-776-6823 (International) 1-317-776-6827")
53 King Vision Contact Information Corporate Office Address Herriman Boulevard Noblesville, IN Phone Numbers (Within the United States) (International) (Fax Number)


54 For more information visit All video and educational content has been created by: Michael Sweeney MSN, CRNP, CFRN, CCRN, CNRN, CEN, CPEN in collaboration with King Systems
MiniXtend Cable with Binderless* FastAccess Technology Jacket and Buffer Tube Removal Procedures. 1. General. 2. Precautions
 MiniXtend Cable with Binderless* FastAccess Technology Jacket and Buffer Tube Removal Procedures 004-273-AEN, Issue 2 Table of Contents 1. General.... 1 2. Precautions.... 1 2.1 Cable Handling Precautions...
FOSC-600 C and D I N S T A L L A T I O N I N S T R U C T I O N
 FOSC-600 C and D I N S T A L L A T I O N I N S T R U C T I O N In-line and butt version Cold applied re-usable fiber optic closure Contents 1 Introduction 1.1 Product description 1.2 Capacity 2 General
Water blocking tape. Locator ridge HPA-0486
 Table of Contents STANDARD RECOMMENDED PROCEDURE 004-138 ISSUE 1 MARCH 2012 PAGE 1 OF 12 Sheath Removal and Mid-Span Access of Dielectric ALTOS Cable with FastAccess Technology p/n 004-138, Issue 1 1.
ALTOS LITE Loose Tube, Gel-Free Cables with FastAccess Technology, Fibers
 ALTOS LITE Loose Tube, Gel-Free Cables with FastAccess Technology, 12-72 Fibers P/N 004-223-AEN Issue 1 1. General This procedure describes cable-end and mid-span sheath removal and fiber access of ALTOS
VL35 QUICKSTART GUIDE. 3.5" 4K HDMI Field Monitor w/ Canon LP-E6 Battery Plate
 VL35 QUICKSTART GUIDE 3.5" 4K Field Monitor w/ Canon LP-E6 Battery Plate What s Included 1 x VL35 Monitor 1 x AC Adapter 1 x Camera Shoe Mount 1 x Canon E6 Battery Plate 1 x AV Break Out Cable 1 x Screen
Instructions. Cable with Armor F CAUTION. October Rev A
 3M Single Conductor Accessory Breakout Kits (BOK's) for use with 3M Cable Accessories (Terminations, T-Bodies and Push-On Elbows) For Use With Single Conductor Accessories On Three-Core Conductor Cables
Monolith Turntable P/N User's Manual
 Monolith Turntable P/N 27749 User's Manual SAFETY WARNINGS AND GUIDELINES Please read this entire manual before using this device, paying extra attention to these safety warnings and guidelines. Please
Installation Guide. NEC InfinityBoard 65 & 84
 Installation Guide NEC InfinityBoard 65 & 84 Table of Contents Please be aware. This manual is a supplement to the monitor s manufacturer instruction. It can not be treated as a separate document. Please
Installing a Wire Mesh Pulling Grip on All-Dielectric DX Armored Fiber Optic Cables
 revision history Issue Date Reason for Change Related literature SRP-004-136 Accessing All-Dielectric DX Armored Fiber Optic Cables Admonishments 1. General This procedure provides instructions for installing
REQUIRED TOOLS. Wire cutters Razor blade Soldering iron Pliers 11/16 Wrench for Tube 18mm Wrench for Ring
 S9122 PWS BNC MALE CABLE MOUNT COMPRESSION CONNECTOR S9022 PWS N TYPE MALE CABLE MOUNT COMPRESSION CONNECTOR S9322 PWS TNC MALE CABLE MOUNT COMPRESSION CONNECTOR The PWS S9122 is a BNC male cable mount
Clarinet Assembling the Instrument
 Clarinet Assembling the Instrument 1. Have students take instrument cases to another area of the room and set the cases flat on a table. If no table is available, students should put cases on the floor
Buffer Tube Midspan Access Tool Accessing fibers in buffer tube procedure
 Buffer Tube Midspan Access Tool Accessing fibers in buffer tube procedure Table of Contents page 1.0 Product Applications... 1 1.1 Purpose Of The Procedure... 1 2.0 Warning and Cautionary Statements...
XTRA-VOIS. Electronic Larynx. Operations Manual
 XTRA-VOIS Electronic Larynx Operations Manual Welcome Congratulations on your purchase of the Xtra-Vois Electronic Larynx! The Xtra-Vois offers the following features: High quality voice with full control
FusionLink Central Tube Ribbon Preparation & handling procedure
 FusionLink Central Tube Ribbon Preparation & handling procedure Table of Contents Page # 1.0 Scope... 1 2.0 Safety...1 3.0 General Installation Considerations.... 1 4.0 Reference Drawing... 2 5.0 Tool
Toshiba TLP-B2 Training Module Introduction
 Toshiba TLP-B2 Training Module Introduction Toshiba TLP-B2 Introduction Welcome! Welcome to the Toshiba TLP-B2 training module offered by UT Career Services! It is highly recommended that all faculty &
2002, Cisco Systems, Inc. All rights reserved.
 2002, Cisco Systems, Inc. All rights reserved. 1 Panduit Network Infrastructure Essentials Chapter 8 Tools of the Trade Learning Objectives Learn about common tools used in the telecommunications cabling
DL-AR2 Technical Specifications Universal HDMI Adapter Ring Rev
 DL-AR2 Technical Specifications Universal HDMI Adapter Ring Rev. 130814 The DL-AR2 Digital Adapter Keychain was developed to support the rising proliferation of mobile devices used in presentation systems.
Camera 220C Document Camera User s Guide
 Camera 220C Document Camera User s Guide #401-220C-00 Table of Contents TABLE OF CONTENTS... 0 TABLE OF CONTENTS... 1 COPYRIGHT INFORMATION... 2 CHAPTER 1 PRECAUTIONS... 3 CHAPTER 2 PACKAGE CONTENT...
Troubleshooting Guide for E-Poll Book
 Troubleshooting Guide for E-Poll Book CHANGING USERS ON THE E-POLL BOOK Changing Users on the E-poll Book 1. Tap Return to Main button on the voter search screen. 2. Tap on the Manage Polls tab in the
3M Cold Shrink Splice Kit QS-III 5514A
 3M Cold Shrink Splice Kit QS-III 5514A for UniShield, Wire Shielded, Longitudinally Corrugated (LC), and Tape Shielded (Ribbon Shielded) Cable or Transitions to Concentric Neutral (CN)/Jacketed Concentric
Cable System Installation Guide
 Overview Cable System Installation Guide 5/19/2008 Our recommended approach for the installation of your Circle Graphics Cable Systems on the panels in your market is to install the fixed hardware (namely
4320 SS-25 Self-Strip Terminating Block
 4320 SS-25 Self-Strip Terminating Block Instructions May 2002 78-8130-7677-1 1.0 General The 3M 4320 SS-25 Self-Strip Terminating Block is a factory stubbed, self-stripping connecting block designed for
Figure 1. MFP-3D software tray
 Asylum MFP-3D AFM SOP January 2017 Purpose of this Instrument: To obtain 3D surface topography at sub-nanometer scale resolution, measure contact and friction forces between surfaces in contact, measure
Experimental Procedure
 1 of 15 9/13/2018, 3:16 PM https://www.sciencebuddies.org/science-fair-projects/project-ideas/energy_p009/energy-power/human-powered-energy (http://www.sciencebuddies.org/science-fair-projects /project-ideas/energy_p009/energy-power/human-powered-energy)
MAKE AN RGB CONTROL KNOB.
 MAKE AN RGB CONTROL KNOB. This is a knob based colour changing controller that uses a custom programmed microcontroller to pack a lot of features into a small affordable kit. The module can drive up to
3M Cold Shrink Splice Kit QS-III 5515A
 3M Cold Shrink Splice Kit QS-III 5515A for UniShield, Wire Shielded, Longitudinally Corrugated (LC), and Tape Shielded (Ribbon Shielded) Cable or Transitions to Concentric Neutral (CN)/Jacketed Concentric
Operating Instructions Digital Color Monitor
 Operating Instructions Digital Color Monitor Please read this manual thoroughly before operating the unit, and keep it for further reference. 9. Accessories 9 8. Remote Control 1. Contents Pull out Push
Bright. Sharp. Brilliant.
 Bright. Sharp. Brilliant. The Gratical HD Micro-OLED Electronic Viewfinder Full Digital Manual Table of Contents Gratical Features...3 Included Components...4 Battery Usage...4 Power Sources...4 HDSDI
First Question: Camera head. Lighting unit. Shooting stage
 Elmo P30 Visualiser First Question: Q. Is everyone familiar with exactly what a visualiser is? A. A visualiser is effectively a camera on an arm, usually with a shooting stage and its own lighting source.
Lynx Broadband Installation Manual for Residential Packages with a 35 db Amp Quick Start Guide (first 3 pages)
") Lynx Broadband Installation Manual for Residential Packages with a 35 db Amp Quick Start Guide (first 3 pages) 1. Be sure that your kit includes all the parts shown in the Check the Equipment section in
Lynx Broadband Installation Manual for Residential Packages with a 35 db Amp Quick Start Guide (first 3 pages) 1. Be sure that your kit includes all the parts shown in the Check the Equipment section in
Instruction Manual Fixed Speed Vortex Mixer Analog Vortex Mixer Digital Vortex Mixer Pulsing Vortex Mixer
 Instruction Manual Fixed Speed Vortex Mixer Analog Vortex Mixer Digital Vortex Mixer Pulsing Vortex Mixer Table of Contents Package Contents............ 1 Warranty............ 1 Installation............
Instructions for Use: Video Inspection Scope with Display
 Instructions for Use: Video Inspection Scope with Display Brand Name of Product Video Inspection Scope Generic Name of Product Video Inspection Scope Product Code Number(s) FIS-004 Intended Use For visually
INSTALLATION INSTRUCTIONS
 LIGHTGUARD 350-20-WTC SEALED FIBER OPTIC CLOSURE VIEW ONLINE TABLE OF CONTENTS: GENERAL...2 SPECIFICATIONS...2 PACKAGE CONTENTS...3 PACKAGE CONTENTS: ACCESSORIES...3 RECOMMENDED TOOLS...3 ADD-ON COMPONENTS...4
FOSC 450 C6 and D6 Closures
 FOSC 450 C6 and D6 Closures I N S T A L L A T I O N I N S T R U C T I O N Fiber Optic Splice Closure 1. General Product Information The FOSC 450 C6 and D6 fiber optic splice closures use compressed gel
Installing iphone 3G Display
 Tools used in this guide Phillips #00 Screwdriver (1) Small suction cup (1) Spudger (1) Parts relevant to this guide iphone 3G Display (1) Cracked or faulty display? Replacing the glass is somewhat involved
Installation Overview
 Installation Overview Overview This chapter presents cable preparation and installation procedures for coaxial cables. Many connectors and special-purpose installation tools required for these cables are
Troubleshooting Guide 9630 Series
 Troubleshooting Guide 9630 Series Satellite Solutions for Mobile Markets 11200 Hampshire Avenue South, Bloomington, MN 55438-2453 Phone: (800) 982-9920 Fax: (952) 922-8424 www.kingcontrols.com 1305-SEMI
K Service Source. Apple High-Res Monochrome Monitor
 K Service Source Apple High-Res Monochrome Monitor K Service Source Specifications Apple High-Resolution Monochrome Monitor Specifications Characteristics - 1 Characteristics Picture Tube 12-in. diagonal
PRECAUTIONS CONTENTS: Please follow these precautions:
 PRECAUTIONS Please follow these precautions: To prevent fire or shock hazard, do not expose the unit to rain or moisture. To prevent electrical shock, do not open the cabinet. Refer to qualified personnel
MonoBright LED DAYLIGHT 750
 MonoBright LED DAYLIGHT 750 USER MANUAL MonoBright LED Daylight 750 - USER MANUAL 1 MonoBright LED DAYLIGHT 750 INTRODUCTION Thank you for choosing Genaray. The Genaray MonoBright LED Daylight 750 incorporates
MonoBright LED DAYLIGHT 1200
 MonoBright LED DAYLIGHT 1200 USER MANUAL MonoBright LED Daylight 1200 - USER MANUAL 1 MonoBright LED DAYLIGHT 1200 INTRODUCTION Thank you for choosing Genaray. The Genaray MonoBright LED 1200 incorporates
Color Star Advanced Talking Color Identifier Light Detector and Light Analyzer
 USER MANUAL Color Star Advanced Talking Color Identifier Light Detector and Light Analyzer EN TABLE OF CONTENTS 1. INTRODUCTION 2 2. DESCRIPTION OF THE DEVICE 3 3. CHARGING THE BATTERY 4 4. HOW TO TURN
User Guide HAWKEYE PRO VIDEOSCOPE
 User Guide HAWKEYE PRO VIDEOSCOPE Warning This product is not for medical use. Do not modify or disassemble the unit. Do not use in explosive atmospheres. Caution Keep the device out of the reach of children.
Check our knowledge base at
 USER MANUAL Check our knowledge base at www.paralinx.net/support Copyright 2015 Paralinx LLC All Rights Reserved TABLE OF CONTENTS 1 Important Notice 10 LCD Screen 2 Safety Instructions 11 Indicators 3
Meetinghouse Webcast Setup Guide for the Europe Area Sending Site
 Meetinghouse Webcast Setup Guide for the Europe Area Sending Site Rev 03 15 Nov 2009 Introduction This guide provides helpful information and details for successfully setting up a webcast in the Europe
SPECIFICATION. Spec No : VSS-1402-CS603B
 SPECIFICATION Spec No : VSS-1402-CS603B 1. INTRODUCTION 1.1. General This specification covers the design requirements and characteristics required of fiber optic splice closures to be used on fiber optic
3M Cold Shrink Splice Kit QS-III 5416A
 3M Cold Shrink Splice Kit QS-III 5416A for Jacketed Concentric Neutral (JCN) and Concentric Neutral Cable Instructions IEEE Std. 404 15 kv Class 150 kv BIL CAUTION Working around energized systems may
D-LITE RX FAMILY WHY D-LITE RX ONE?
 RX FAMILY D-Lite RX studio flash is the entry range of the Elinchrom family. Whether you are new to lighting, already have speedlights or just want to take your photography to the next level, the D-Lite
Quick Start Guide. Large-capacity Automatic Pet Feeder
 Quick Start Guide Large-capacity Automatic Pet Feeder Control Panel Keys CLOCK displays clock (current time) TIMER switches between preset feeding times VOL sets the feeding volume/portion-size SET enters
The ATT Deluxe Receiver
 The ATT Deluxe Receiver Operating Instructions Advanced Technology Tackle Advanced Technology Tackle UK The ATT Deluxe Receiver Located on the right hand side are 3 tactile buttons: the top one is used
Delvcam DELV-HD7-4K User Guide
 Delvcam DELV-HD7-4K User Guide 7" 4K Compatible 1080P Camera Top Monitor with Audio Meter IMPORTANT SAFETY INSTRUCTIONS Read manual before using this product. Keep manual for future reference. Do not place
1.2 GHz GS7000 Node RF Split Upgrade Application Note
 1.2 GHz GS7000 Node RF Split Upgrade Application Note Overview Introduction Cable operators have experienced an exponential rise in the requirement for more reverse path bandwidth due to the popularity
Service Call: Fiber Optic Installation and Repair
 Service Call: Fiber Optic Installation and Repair Tools Required: Tools available from www.bohlinger.biz Cable: Terex P/N 453830 Stripper Block: P/N 65-020-01 Termination Block: P/N 65-020-02 Utility Knife
First, connect the LED and the resistor, by twisting the wires together.
 Optics Activities LED Circuit: Making Light with Electronics Components: LED (Light Emitting Diode) Resistor Wires Battery We will now make a solid state light Such a light could be used to send flashing
Installation Manual VIP 1003
 Installation Manual VIP 1003 We Caring for the Environment by Recycling When you see this symbol on a Motorola product, do not dispose of the product with residential or commercial waste. Recycling your
MY-HITE ADJUSTABLE TABLE
 MY-HITE ADJUSTABLE TABLE Corner T Leg Base Model Number : FCNAHBT Please Read Instructions Before Use ASSEMBLY INSTRUCTIONS ALL WORKSTYLES WELCOME Thank you for choosing Friant. We appreciate the trust
iworx Sample Lab Experiment AN-13: Crayfish Motor Nerve
 Experiment AN-13: Crayfish Motor Nerve Background The purpose of this experiment is to record the extracellular action potentials of crayfish motor axons. These spontaneously generated action potentials
Coyote popup display set up instructions
 Coyote popup display set up instructions Frame 1 2 3 Prepare frame for assembly by locating the purple hooks on top of the frame. Stretch frame to size, snapping magnetic locking arms together. Attach
K Service Source. Apple High-Res Monochrome Monitor
 K Service Source Apple High-Res Monochrome Monitor K Service Source Specifications Apple High-Resolution Monochrome Monitor Specifications Characteristics - 1 Characteristics Picture Tube 12-in. diagonal
Installation instructions Roxtec CM PE systems
 Safety information Roxtec recommends that all installations are performed without facility operation. Follow national regulations and installation codes. ny action affecting the routed service should be
Brass Instruments. tilleulenspiegelhorn.asx. bolero_tbonn.asx. straussalsotrumpet.asx. paris_tuba.asx
 Brass Instruments bolero_tbonn.asx straussalsotrumpet.asx paris_tuba.asx tilleulenspiegelhorn.asx History Straight, silver and bronze trumpets that were still playable dating from approximately 1400 BC
TABLE OF CONTENTS INTRODUCTION 1 EQUIPMENT IN THE COURTROOM (SUMMARY) 2 SYSTEM CAPABILITIES: SUMMARY BY COMPONENT 3
 2 SYSTEM CAPABILITIES: SUMMARY BY COMPONENT 3") TABLE OF CONTENTS INTRODUCTION 1 EQUIPMENT IN THE COURTROOM (SUMMARY) 2 SYSTEM CAPABILITIES: SUMMARY BY COMPONENT 3 DETAIL: The ExhibitStation Lectern 5 OPERATION OF EQUIPMENT 6 CONTROLLING MODES OF PRESENTATION:
TABLE OF CONTENTS INTRODUCTION 1 EQUIPMENT IN THE COURTROOM (SUMMARY) 2 SYSTEM CAPABILITIES: SUMMARY BY COMPONENT 3 DETAIL: The ExhibitStation Lectern 5 OPERATION OF EQUIPMENT 6 CONTROLLING MODES OF PRESENTATION:
Spine Cable System. Implants and instruments for use when stabilizing and reconstructing spinal structures.
 Spine Cable System. Implants and instruments for use when stabilizing and reconstructing spinal structures. Technique Guide s and implants approved by the AO Foundation Table of Contents Introduction
VT VGA TFT NEMA 4/12 Flat Panel Monitor. User s Guide
 VT1040 10.4 VGA TFT NEMA 4/12 Flat Panel Monitor User s Guide 301040(A) (was document no. 920A0001 version 1.1), revised 01/98 Viewtronix Viewtronix reserves the right to make changes in specifications
Service manual Cantano W/T
 Service manual Cantano W/T Here you will see everything that should be included in your Cantano package 2 Prerequisite: Placement and leveling of the drive 5 Setting up the motor and connecting it to the
Manual placement system MPL3100. for BGA, CSP and Fine-Pitch components
 Manual placement system MPL3100 for BGA, CSP and Fine-Pitch components Part No: MPL3100BA1.0e Issue Date: 02/2001 You have opted for an ESSEMTEC MPL3100 pick and place system. We thank you for this decision
Installation instructions, accessories. Subwoofer. Volvo Car Corporation Gothenburg, Sweden. Page 1 / 29
 Installation instructions, accessories Instruction No 30752136 Version 1.1 Part. No. 30752135 Subwoofer Volvo Car Corporation Subwoofer- 30752136 - V1.1 Page 1 / 29 Equipment A0000162 A0000161 A0801178
Contacts: English Department Office 238 Moreland Media Services 109 Kidder
 Contacts: English Department Office 238 Moreland 7-3244 Media Services 109 Kidder September 2006 Welcome...3 Starting Out...5 Unlocking the Station...5 Touch Panel Operation...5 Projector...6 Selecting
PLL1920M LED LCD Monitor
 PLL1920M LED LCD Monitor USER'S GUIDE www.planar.com Content Operation Instructions...1 Safety Precautions...2 First Setup...3 Front View of the Product...4 Rear View of the Product...5 Installation...6
2179-CD Series Fiber Optic Splice Closure. Installation Instructions
 2179-CD Series Fiber Optic Splice Closure Installation Instructions 1.0 Product Introduction The new 3M TM 2179-CD Series Fiber Optic Splice Closure can be used in buried, underground, aerial, and pedestal
In-House Training Solutions for Everyone: The concept of the European Academy for Gynaecological Surgery (EAGS)
") In-House Training Solutions for Everyone: The concept of the European Academy for Gynaecological Surgery (EAGS) In-House Training Solutions for Everyone: Principles of the GESEA programme Scientific evidence
In-House Training Solutions for Everyone: The concept of the European Academy for Gynaecological Surgery (EAGS) In-House Training Solutions for Everyone: Principles of the GESEA programme Scientific evidence
Notations Used in This User s Guide
 User s Guide Notations Used in This User s Guide 1 CAUTION Indicates procedures which may result in damage or injury if sufficient care is not taken. TIP PROCEDURE Indicates additional information and
Behind this door is a slot for a future smart card. No smart card is included with this receiver.
 THE RECEIVER FRONT PANEL Smart Card Door Up and Down Arrow Buttons Power Button and Light IR Sensor and IR Blaster SMART CARD DOOR Behind this door is a slot for a future smart card. No smart card is included
User Manual LivingColors Bloom
 User Manual LivingColors Bloom Unpacking and Installing Getting started with your LivingColors If you unpack a LivingColors, the product is already linked to the remote control. You only need to plug it
3M Fiber Optic Splice Closure 2178-XSB/XSB-FR & 2178-XLB/XLB-FR 3M Cable Addition Kit 2181-XB/XB-FR
 3M Fiber Optic Splice Closure 2178-XSB/XSB-FR & 2178-XLB/XLB-FR 3M Cable Addition Kit 2181-XB/XB-FR Instructions July 2010 78-8135-0094-5-K 3 1.0 General 1.1 3M Fiber Optic Splice Closure 2178-XSB The
Enterview 2 / Enterview 2V 4 WIRE VIDEO DOORPHONE SYSTEM
 Enterview / Enterview V WIRE VIDEO DOORPHONE SYSTEM INSTALLATION AND OPERATION. Introduction This Video doorphone System is an easy-to-use system offering many benefits and conveniences, such as relieving
IVS 435 / II. Integrated Video-Assist System II for the ARRIFLEX 435 Instruction Manual. As of: August 2003
 IVS 435 / II Integrated Video-Assist System II for the ARRIFLEX 435 Instruction Manual As of: August 2003 ALL ARTWORK, PICTURES AND TEXTS ARE COVERED BY OUR COPY-RIGHT. THEY MUST NOT BE COPIED FOR REPRODUCTION
OWNER'S MANUAL SIGNAL COMMANDER
 OWNER'S MANUAL SIGNAL COMMANDER THIS MANUAL CONTAINS INSTRUCTIONS FOR: LPDA 200 - INSTALLATION - OPERATION - TROUBLESHOOTING - EXPLODED PARTS DRAWING - WARRANTY AntennaTek, Inc. 425 S. Bowen, #4 Longmont,
CM-S38901SV TVL IR Long Range camera
 5 40 TVL IR Long Range camera User s Guide CM-S38901SV SAFETY PRECAUTIONS WARNING 1. Be sure to use only the standard adapter that is specified in the specification sheet. Using any other adapter could
2178-L/S Series Fiber Optic Splice Case with Gasket
 2178-L/S Series Fiber Optic Splice Case with Gasket Instructions for: 2178-S Splice Case 2178-LS Splice Case 2178-LL Splice Case 2181-LS Cable Addition Kit May 1997 34-7041-9949-5-A 1 Table of Contents
Mid-Span Access of Loose-Tube Ribbon Fiber Optic Cable
 Application Notes Mid-Span Access of Loose-Tube Ribbon Fiber Optic Cable Author Prasanna Pardeshi and Sudipta Bhaumik Issued November 2013 Abstract In fiber optic network, it is sometime necessary to splice
Installation instructions Roxtec CF 16 EMC and Roxtec CF 16 O EMC
 Safety information Roxtec recommends that all installations are performed without facility operation. Follow national regulations and installation codes. ny action affecting the routed service should be
Installation instructions Roxtec RM ES B
 Installation instructions Roxtec RM ES B Environmental side Termination/ interior side Pipe Cable screen/armor Layers Termination/ interior side Cable sheath Layers Environmental side Vertical screen Plastic
Basic Vortex Mixer Standard Vortex Mixer Advanced Vortex Mixer Pulsing Vortex Mixer
 Instruction Manual Manual Basic Vortex Mixer Standard Vortex Mixer Advanced Vortex Mixer Pulsing Vortex Mixer Table of Contents Package Contents............... 1 Warranty............... 1 Installation...............
DH5e-V2. Delta 5 On-Camera 4K HDMI Monitor with 3D LUTs. Quick Start Guide. What s Included
 DH5e-V2 Quick Start Guide Delta 5 On-Camera 4K Monitor with 3D LUTs What s Included 1 x DH5e-V2 Monitor 1 x L Series Battery Plate 1 x AC Adapter 1 x Screen Cleaning Wipe 1 x Screen Protection Film 1 x
1-Touch Vibratory Sieve Shaker SS-10
 1-Touch Vibratory Sieve Shaker SS-10 Safety Instructions WARNING!! This machine operates on electric current. Improper operation could result in electrical shock, electrocution, or an explosion! 1. ALWAYS
Multibrackets Europe AB
 Multibrackets Europe AB Phone: +46 (0)8-615 04 00 Mail: support@multibrackets.com Postal address: Döbelnsgatan 21, 11 th floor SE-111 40 Stockholm Sweden Projektordukar-broschyr-korr.indd 1 2016-06-23
USER MANUAL. 22" Class Slim HD Widescreen Monitor L215DS
 USER MANUAL 22" Class Slim HD Widescreen Monitor L215DS TABLE OF CONTENTS 1 Getting Started Package Includes Installation 2 Control Panel / Back Panel Control Panel Back Panel 3 On Screen Display 4 Technical
Installation instructions Roxtec RM ES systems
 Safety information Roxtec recommends that all installations are performed without facility operation. Follow national regulations and installation codes. ny action affecting the routed service should be
PSC300 Operation Manual
 PSC300 Operation Manual Version 9.10 General information Prior to any attempt to operate this Columbia PSC 300, operator should read and understand the complete operation of the cubing system. It is very
Visual Presenter. Owner s Manual. Model: QD3800
 Visual Presenter Owner s Manual Model: QD3800 PRECAUTIONS Please follow these precautions: To prevent fire or shock hazard, do not expose the unit to rain or moisture. To prevent electrical shock, do not
Wireless 5.8GHz AV Sender With Built in Remote Control Extender
 Wireless 5.8GHz AV Sender With Built in Remote Control Extender AR-1913 User Manual TABLE OF CONTENTS Box Contents..................2 User Guide.............3 Installation............4 Trouble Shooting............
Hall Crystal Flutes U A & = HALL. James Hall. Handmade in. James & Jenny Hall. Retail 2018 CRYSTAL FLUTES.
 Retail 2018 Hall Crystal Flutes Handmade by James Hall HALL CRYSTAL FLUTES www.hallflutes.com James & Jenny Hall Hall Crystal Flutes, Inc. 17220 Sargent RD SW Rochester, Washington USA 98579 Phone: (360)
Spectra/Chrom Chart Recorder from Spectrum Chromatography
 Spectra/Chrom Chart Recorder from Spectrum Chromatography D20140 180296 Copyright 1996 by Spectrum Chromatography PO Box 672026 Houston, TX 77267-2026 Phone: (281) 443-2900 (800) 459-9700 (US & Canada)
iphone 7 Plus LCD Screen and Digitizer Replacement
 iphone 7 Plus LCD Screen and Digitizer Replacement Replace just the bare front panel not including the home/touch ID sensor, front-facing camera and sensor cable, or earpiece speaker in an iphone 7 Plus.
3M Fiber Optic Splice Closure 2178-XL & 2178-XL/FR
 3M Fiber Optic Splice Closure 2178-XL & 2178-XL/FR 3M Cable Addition Kit 2181-XL and 2181-XL/FR Instructions September 2017 78-8130-5055-2-M 2 September 2017 78-8130-5055-2-M 1.0 Kit Contents 2.0 General...
Product Manual. Designed and Manufactured in the UK by Optikinetics
 Product Manual Contents Product Overview... 1 Getting Started... Mounting the Projector... Inserting the Effect Wheel... Focussing the Image... Cleaning the Focussing Lens... 2 2 3 6 6 Operating the Projector...
Quick Reference Guide
 Multimedia Projector Quick Reference Guide MODEL 103-011100-01 Projection lens is optional. English Use this book as a reference guide when setting up the projector. For detailed information about installation,
3M Fiber Optic Splice Closure 2178-XL & 2178-XL/FR 3M Cable Addition Kit 2181-XL and 2181-XL/FR
 3M Fiber Optic Splice Closure 2178-XL & 2178-XL/FR 3M Cable Addition Kit 2181-XL and 2181-XL/FR Instructions July 2010 3 1.0 Contents 1.0 General...3 2.0 Kit Contents...3 3.0 Cable Preparation...4 4.0
Assembling and Mounting the Presentation Display, Speakers, Speaker Screens, and Table Door
 CHAPTER 8 Assembling and Mounting the Presentation Display, Speakers, Speaker Screens, and Table Door July 13, 2012, This document provides you with the procedures you perform to assemble and mount the