CONTENTS SAFETY PRECAUTION...3 ENVIRONMENT PROTECTION...4 FRONT PANEL...5 REAR PANEL...5 CONNECTING YOUR SYSTEM...6 REMOTE CONTROLLER...
|
|
|
- Hilary Dixon
- 5 years ago
- Views:
Transcription
1 CONTENTS SAFETY PRECAUTION...3 ENVIRONMENT PROTECTION...4 FRONT PANEL...5 REAR PANEL...5 CONNECTING YOUR SYSTEM...6 REMOTE CONTROLLER BASIC OPERATIONS TURN ON STB POWER CHANNEL UP/CHANNEL DOWN VOLUME UP/VOLUME DOWN NUMBER MUTE PAUSE RECALL FAVORITE AUDIO INFORMATION EPG TV/RADIO CHANNEL LIST PAGE UP/PAGE DOWN TELETEXT SUBTITLE FIND ZOOM MENU EXIT OK MAIN MENU CHANNLE INSTALLATION SYSTEM SETUP TOOL
2 3. UPGRADE STORAGE MANAGE EPG CAS NETWORK SETTING ADV TIMER RADIO PHOTO MUSIC MOVIE WEATHER YOUTUBE GAME TOOL SPECIFICATIONS
3 SAFETY PRECAUTION CAUTION: The lightning flash with arrowhead symbol, within an equilateral triangle, is intended to alert the user to "dangerous voltage" and to prevent from a risk of electric shock. Warning: To reduce the risk of electric shock, don't open the cabinet. Refer servicing to qualified personnel only. The exclamation point within an equilateral triangle is intended to alert the user to important operating and maintenance (servicing). WARNING: Do not use this STB where contact with / or immersion in water is a possibility. Do not use near flower vase, washbowls, kitchen sinks, laundry tubs, swimming pools, etc. WARNING: Do not put the candle or lamp stand on the cabinet; otherwise, there is the danger of fire. WARNING: The unit should be connected to a power supply only of the type described in the operating instructions or as marked on the unit. If you are not sure of the type of power supply (for example, 120 or 230 V) to your home, consult your local dealer or local power company. WARNING: This product installs diodes. Do not open the cabinet or touch any parts in the inner mechanism. Consult your local dealer for technical service if the opening is required. Note: To ensure proper use of this product, please read this User manual carefully and retain for further reference. Unit Cleaning: After the unit power is turned off, you can clean the cabinet, panel and remote control with a soft cloth lightly moistened with a mild detergent solution. Attachments: Never add any attachments and/or equipment without the manufacturer consent; as such additions may result in the risk of fire, electric shock, or other personal injury. Locating: Slots and openings in the cabinet are provided for ventilation to protect it from overheating. Do not block these openings or allow them to be blocked by placing the STB on a bed, sofa, or other similar surface, nor should it be placed over a radiator or heat register. 3

4 Power-Cord Protection: Place the power-supply cord out of the way, where it will not be walked on. Please take special attentions to cords at plugs, convenience receptacles, and the point where they exit from the unit. Object and Liquid Entry: Never put objects of any kind into this STB through openings, as they may touch dangerous voltage points or short-out parts that could result in a fire or electric shock. Never spill any liquid on the STB. Note: Moisture may be formed on the lens In the following conditions: when the unit is suddenly moved from a cold environment or an air-condition room to a warm place. immediately after a heater has been turned on. in a steamy or very humid room. If the moisture forms inside the unit, it may not operate properly. To correct this problem, turn on the power and wait about two hours for the moisture to evaporate. Parts Replacement: When the unit parts need to be replaced, user should make sure the service technician use the replacement parts specified by the manufacturer or having the same characteristics as the original part. Unauthorized replacement may put the unit In the risk of fire, electric shock or other hazards. Safety Check: After all the maintenances and repairs are done, user is required to request the service technician to conduct the overall safety check to ensure the machine is In the proper condition. Environment protection Attention! Your product is marked with this symbol. It means that the used electrical and electronic products should not be mixed with general household waste. There is a separate collection system for these products. DECLARATION OF CONFORMITY The manufacturer herewith declares the conformity of that product with the following directives and standards: 4

 USB Connector: USB 2.")
5 Front Panel 1. DC Input: 12V/1.5A input Range 2. Wifi antenna built-in wifi model 3. RS 232 SERIAL PORT: To transfer the data to another STB or PC by RS-232 cable 4. IR Port Connect the IR cable Rear Panel Please refer to the diagram above for all possible connections of your receiver Do not connect the unit to the mains socket until all other connections have been made and checked. Your configuration may vary depending on model RF IN (LNB IN 13/18V 500mA MAX) : Connect the coaxial cable from LNB of your Dish. HDMI: Audio and Video output socket for TV set with HDMI Input Jack only. Ethernet Port : Plug-in Ethernet Board (RJ45 port) USB Connector: USB 2.0 Host, connect to USB hard disk or flash disk CA slot: CA interface support AV:CVBS output 5

6 Connecting Your System There are four ways to connect the receiver to your existing TV system. We recommend using one of the following cases for the best result: 1. If you have a high definition television set, you should use a HDMI cable for best result. Plug one end of the cable into the HDMI socket on the receiver and the other end into the matching socket on your television. In this case, you do not have to make audio connections because the HDMI connector can output stereo audio or Dolby digital audio. 2. Connect one end of RCA cable to the RCA jack on the back of the receiver and the other end to a RCA jack on your TV. Finally connect the coaxial cable from the LNB to the Input on the receiver. TV with Motorized System (DiSEqC 1.2 / USALS) Connect one end of your coaxial cable to the LNB IN connector on the receiver and the other end to the Receiver connector on the DiSEqC 1.2 / USALS motor. Connect the coaxial cable from the LNB to the LNB connector on the DiSEqC 1.2 / USALS motor. All our receivers are designed to be DiSEqC 1.0 / DiSEqC 1.2 /USALS compatible. This allows multiple antennas to be connected to the receiver at the same time. If you have two or more fixed antennas or LNBs, we recommend you use a DiSEqC 1.0 switch. Connect the coaxial cable from the first LNB to the LNB 1 or LNB A input connector of the DiSEqC switch. Do the same for any other LNBs that you have. Connect one end of a coaxial cable to the RF output connector of the DiSEqC switch, Connect the other end to Input on the receiver. 6
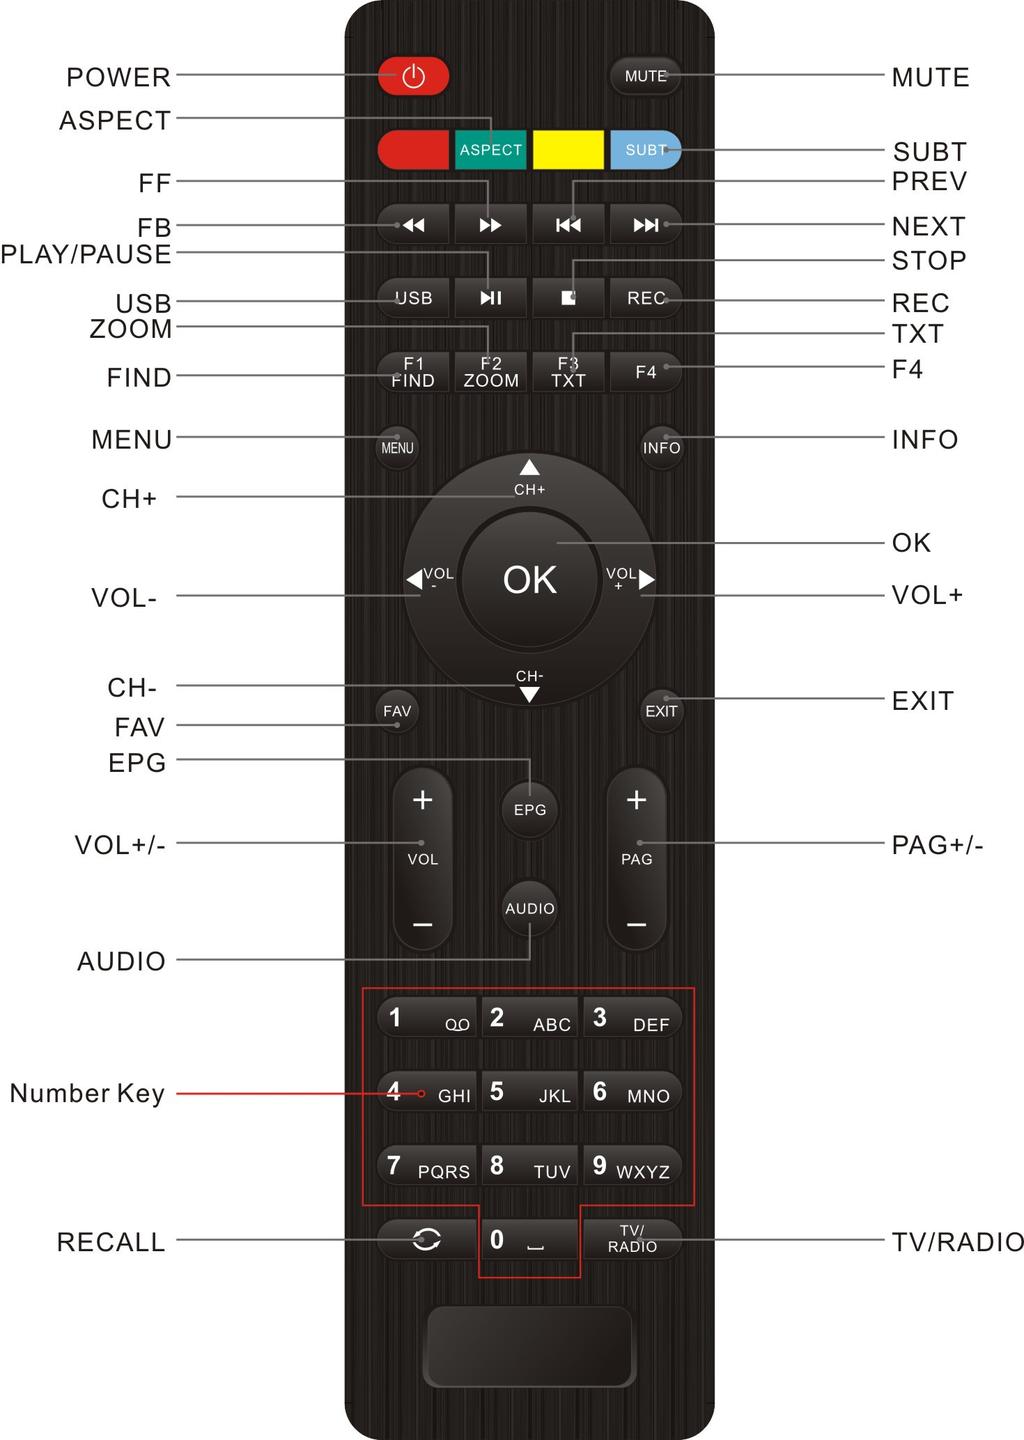
7 Remote Controller 7
8 POWER: To switch ON/OFF the receiver power supply. TV/STB To switch between TV and STB. MUTE: To mute or restore the sound TV/RADIO: To switch between TV and RADIO. NUMBER KEYPAD: To select TV/Radio channel and enter to programming parameters by the numeric keys and to input the character by the alphabetical keys. 6 RECALL: To return to the previously viewed channel. 7 RED, GREEN, YELLOW, BULE KEYS: Multi-function keys in menu mode. 8 MENU: Display the main menu or return to the previous one. 9 EXIT: To exit from the menu or pop-up window or cancel the present running functions. 10 PAGE +/-: To move up the cursor to the next or previous page in the menu or channel list. 11 SUB: To show subtitle. 12 TXT: To open teletext page on the channel which has teletext information. 13 FIND: Enter into a menu to search the channel you want. 14 ZOOM: To magnify a certain area on the images 15 OK: To carry out the selection and enter into choused menu. 16 CH Up/Dn: To turn the next or previous channel and to move the highlight bar for selecting options to upward or downward on the menu. 17 VOL +/-: To adjusts the sound volume up or down and to move the highlight bar for selecting options to right or left on the menu. 18 FAV: The shortcut key to favorite menu. 19 INFO: The shortcut key to the information menu. 20 EPG: The shortcut key to the EPG menu. 21 AUDIO : Selects the audio mode among Left / Right / Stereo / Mono 22 USB: The shortcut key to the USB menu. 23 FB/FF: To play back or forward faster. 24 PLAY/PAUSE: to pause and play the file when you press play / pause key. 25 STOP: To stop the current play. 26 STEP: Jump forward by chapter. 27 NEXT: To change into the next play. 28 PREV: To change into the previous play. 8

9 1. Basic Operations 1.1 Turn on STB First, press the Power to turn on the unit. When the STB is first used, there will play the first channel from the default Channel List. If the STB is not first used, STB will play the same channel as last time before turning off. 1.2 Power 1. Press [Power] Key can enter the Standby state 2. In Standby state, press [Power] Key again can call back the unit and go on play the previous channel 3. User can also disconnect the device s main power to end the Standby state. 1.3 Channel Up/Channel Down In full screen, press [CH Up/Dn] to change channel. 1.4 Volume Up/Volume DownIn full screen, press [Vol +/-] to adjust volume. 1.5 Number In full screen, use number key and press [OK] on the Remote Control Unit to change channel. 1.6 Mute 1. Press [MUTE] key to mute the sound and the screen will show up mute OSD. 2. Press [MUTE] key again to restore sound. 1.7 Pause By pressing [Pause] key once, the picture and sound will be paused and then, by pressing [PAUSE] key again, you can continue to watch. 1.8 Recall Press [RECALL] key will directly switch to the previous channel that you played before current channel. 1.9 Favorite 1. In full screen, press [FAV] key, it will display a window of Favorite Group on the left of the screen. 2. In the window of Favorite, you can move highlight by press [Ch Up/Dn] key and press [OK] key to select favorite group. 3. You also can press [VOL +/-] keys to select different Favorite Group. 4. Press [Exit] key to exit the current window Audio 1 In full screen, press [AUDIO] key to open the Audio window on the screen. 2 You can modify the audio track by pressing [Ch Up/Dn] key and modify the audio mode by pressing [VOL +/-] key among Left / Right / Stereo / Mono. 9
![1.11 Information In full screen, press [INFO] key can open information screen, in the window shows the parameters of current channel. 1.](/docs-images/96/128806452/images/10-0.jpg "12 EPG 1 2 3 4 5 6 The STB has an Electronic Program Guide (EPG) to help you navigate channels through all the possible viewing options.")
![The EPG supplies information such as channel listings and starting and ending times for all available channels. Press [EPG] key to display EPG screen.](/docs-images/96/128806452/images/10-1.jpg "Press [OK] key in each item can see more detail information and press [Exit] key to cancel Press [Vol +/-] to select back/current time/last program or last day/next day.")
10 1.11 Information In full screen, press [INFO] key can open information screen, in the window shows the parameters of current channel EPG The STB has an Electronic Program Guide (EPG) to help you navigate channels through all the possible viewing options. The EPG supplies information such as channel listings and starting and ending times for all available channels. Press [EPG] key to display EPG screen. Press [OK] key in each item can see more detail information and press [Exit] key to cancel Press [Vol +/-] to select back/current time/last program or last day/next day. Press [Ch Up/Dn] key to channel change. Press [Green] key in EPG menu can open timer menu. Yo can save a timer as you want. In EPG menu, press [Exit] to close EPG screen TV/RADIO In TV mode, pressing [TV/RADIO] key can switch to Radio mode. In Radio mode, press [TV/RADIO] key to switch to TV mode Channel List 1 In full screen, press [OK] key or [CH.LIST] can enter Channel List. Press [Vol +/-] key to change satellite. Press [Ch Up/Dn] key to move highlight and press [OK] key to play the highlighted channel. Press [Page +/-] key to page up and page down. Press [Exit] key to exit the channel list
![1.15 Page Up/Page Down In Channel list, press [Page +/-] key to move up the cursor to the next or previous page in the menu or channel list. 1.](/docs-images/96/128806452/images/11-0.jpg "16 Teletext 1 Press [TTX] key in full screen, you can open teletext page on the channel which has teletext information.")
![If the channel has no teletext information, it will show No Teletext Data on the screen. 2 1.17 Subtitle Press [SUB] key in full screen, you can switch subtitle on or off. 1.18 Find 1 2 3 11 Pressing [FIND] key in full screen can open the Find window.](/docs-images/96/128806452/images/11-1.jpg "Press [Vol +/-] [Ch Up/Dn] keys to move highlight and press [OK] key to input the selected symbol or letter into the dialogue. The search result display on the right screen.")
11 1.15 Page Up/Page Down In Channel list, press [Page +/-] key to move up the cursor to the next or previous page in the menu or channel list Teletext 1 Press [TTX] key in full screen, you can open teletext page on the channel which has teletext information. If the channel has no teletext information, it will show No Teletext Data on the screen Subtitle Press [SUB] key in full screen, you can switch subtitle on or off Find Pressing [FIND] key in full screen can open the Find window. Press [Vol +/-] [Ch Up/Dn] keys to move highlight and press [OK] key to input the selected symbol or letter into the dialogue. The search result display on the right screen. You can press [Red] key to delete the char, press [Blue] key to confirm, press [Green] key to cancel. Pressing [EXIT] key can close Find window.
![1.19 Zoom 1 2 3 4 The [ZOOM] key allows you to magnify a certain area on the images Press [ZOOM] key again, the image will enlarge rotate as x2, x4, x6 In x2 ~ x6 image, using [Up/ Down/ Up/ Down]](/docs-images/96/128806452/images/12-0.jpg "keys to move the image center area you want to see. In zoom mode, press [Exit] to close Zoom window. 1.")
12 1.19 Zoom The [ZOOM] key allows you to magnify a certain area on the images Press [ZOOM] key again, the image will enlarge rotate as x2, x4, x6 In x2 ~ x6 image, using [Up/ Down/ Up/ Down] keys to move the image center area you want to see. In zoom mode, press [Exit] to close Zoom window Menu Press [MENU] key can open the menu, exit the current menu to last menu or close the window Exit Press [EXIT] key can exit the current menu to last menu or close the window OK Pressing [OK] key in full screen can open the OK LIST window Press RED Button to display different SORT Group, you can list up the channels by 4 kinds of sorting ways. 12

![Main Menu When pressing the [MENU] on the RCU, the 16 icons will appear on your TV screen where you can](/docs-images/96/128806452/images/13-2.jpg "configure all your settings :Main Menu,Upgrade,Storage Manage,EPG, CAS, Network")
13 Press Green Button to display the fast find channel menu Press Yellow Button to display previous list with all channel Press Blue Button to display Satellite list with all channel 2. Main Menu When pressing the [MENU] on the RCU, the 16 icons will appear on your TV screen where you can configure all your settings :Main Menu,Upgrade,Storage Manage,EPG, CAS, Network Setting,Radio,Photo,Music,Movie,PVR,Weather,Youtube,Game,Tool. 13

![1 Channel - By selecting Channel menu, You can move highlight by press [Ch Up/Dn] key to select Radio channel editor TV channel editor NAME [Red Key] : To edit the channels name LOCK [Green Key] : To](/docs-images/96/128806452/images/14-1.jpg "lock the channels which you want to lock. - It will display a dialogue to ask you to input password. The default password is 0000.")
14 When the focus on the mainmenu,press ok key will display four items like below Channel Radio channel editor, TV channel editor Installation Satellite Find, Automatic SAT Scan, Manual Scan, SAT/TP Manager, Satellite Find System Setting Factory Setting, Upgrade&Backup, Parental control, TV setup, Time, OSD setting, Language Tool Device Removed Channel - By selecting Channel menu, You can move highlight by press [Ch Up/Dn] key to select Radio channel editor TV channel editor NAME [Red Key] : To edit the channels name LOCK [Green Key] : To lock the channels which you want to lock. - It will display a dialogue to ask you to input password. The default password is If you input the correct password you can see a lock mark in the right side of the highlighted channel. - After save and exit menu, STB will request you to input the password while you want to watch the locked channel. DEL [Yellow Key] : To delete the channel SKIP [BULE Key] : By pressing Red key, To select the channels you want to skip. FAV[FAV Key]: To select the channel which you want to add in the Favorite List Satellite [F1 Key]: Press F1 key to switch the channel list with the different satellite MOVE [F2 Key]: To move the channel to the position you want to place. SORT [F3 Key]: By pressing F3 key, you can list up the channels by 4 kinds of sorting ways. Alphabet (A-Z): To list up alphabetically. Transponder: To list up by transponder Fay-Free : To sort channel through free and scramble sequence. Default: To sort channel by default channel list from Satellite list Installation By pressing [Menu] and press [Vol+/-] to move the highlight on the Installation 14

![switch Satellites and press [OK] key can enter satellite list for you to select directly. 2 LNB Freq: In this item, press [Volume Up/ Volume Down] key can select the parameter.](/docs-images/96/128806452/images/15-1.jpg "Option is 5150/5750/5950/9750/10600/10700/10750/11300/5150-5750/Universal(9750-10600) /Universal(9750-107500)/and MDU 3 DiSEqC1.0/1.1: You can use [Volume Up/ Volume Down] key to switch options.")
15 When the highlight on the satellite setting, press OK key to satellite setting menu When the focus on the satellite list, you can press OK key to setting which satellite will be select with LNB You can press RED key to set SAT/tp Manager Press Green key to start channel search Press blue key to update transponder from network 1 Satellite: In this item, press [Volume Up/ Volume Down] key can switch Satellites and press [OK] key can enter satellite list for you to select directly. 2 LNB Freq: In this item, press [Volume Up/ Volume Down] key can select the parameter. Option is 5150/5750/5950/9750/10600/10700/10750/11300/ /Universal( ) /Universal( )/and MDU 3 DiSEqC1.0/1.1: You can use [Volume Up/ Volume Down] key to switch options. There are several options for your selection: Disable / LNB1 / LNB2 / LNB3 / LNB4 4 22K: You can use [Volume Up/ Volume Down] key to switch ON / Off. When this item is switched to ON, receiver will receive TV and radio input signal from 22K port. If the item is switched to Off, the receiver will receive all signal from 0K port.! Notice When you choose LNB type Universal, you can not modify 22K. 5 Polarity: In Polarity item, [Volume Up/ Volume Down] key to switch Auto/ H / V functions. 6 Motor You can use [Volume Up/ Volume Down] key to set Antenna type by Motor 7 Unicable You can use [Volume Up/ Volume Down] key to set unicable enable or none Motor Antenna 1 Motor Type: DiSEqC1.2/USALS 2 Motor Setting: If you select DiSEqC1.2, Local Longitude / Local Latitude is not available. It will show the screen like below: When the highlight on the mode item You can use [Volume Up/ Volume Down] key to set Motor function Automatic SAT Scan 15
.")

 / V (vertical).")
 what you want to search the channel. If you select the satellite(s), the selected satellite(s) on the list is marked.")
16 you can find sub-menus for Satellite, Transponder, Polarity, NIT, program,scan mode scan select Signal Quality Bar and etc. and press GREEN key to start channel search 1 Satellite: Select the satellite what you want to search the channel 2 Transponder : Select the desired TP (transponder). 3 NIT scan by nit search mode 4 Program scan by all/free only 5 Scan mode default one Tp blind scan 6 Scan select single sat all sat 7 Signal Intensive / Quality Bar : They show the strength and quality of signal from LNB. Manual Scan you can find sub-menus for Satellite, Transponder, Polarity, NIT, program,signal Quality Bar and etc. and press Green key to start channel search by current parameters Satellite: Select the satellite what you want to search the channel Transponder : Select the desired TP (transponder). Polarity : You can choose the polarity of satellite signal among Auto / H (horizontal) / V (vertical). NIT scan by nit search mode Program scan by all/free only Signal Intensive / Quality Bar : They show the strength and quality of signal from LNB. SAT/TP Manager You can select the satellite(s) what you want to search the channel. If you select the satellite(s), the selected satellite(s) on the list is marked. And you can you the color keys for the following purpose. - [Red] key : To edit satellite name and longitude. - [Green] key: To start channel search by this satellite - [Yellow] key : To add satellite - [Blue] key : To delete the satellite which you don t want. 16
![Satellite Find By selecting satellite find menu You can use [Vol+/-] key to switch Satellite and Transponder You can set Beep tone ON or OFF - 2.1.](/docs-images/96/128806452/images/17-0.jpg "3 System Setup By pressing [Menu] and selecting system item, and move the UP/Down key to select Language, OSD setting, time, TV setup, Parental Lock, Update&Backup Factory setting Language When you")


17 Satellite Find By selecting satellite find menu You can use [Vol+/-] key to switch Satellite and Transponder You can set Beep tone ON or OFF System Setup By pressing [Menu] and selecting system item, and move the UP/Down key to select Language, OSD setting, time, TV setup, Parental Lock, Update&Backup Factory setting Language When you enter to Language menu, you can select OSD Language, Audio language, Subtitle Language OSD Language: To select menu languages, the selections of languages include: English, French, German, Russian, Arabic, Portuguese, Turkish, Spanish, Polish, Italian and etc. 2. Audio Language : Some channels have more than one audio language for choosing; by this function you can set the first audio for this channel. If the playing channel has the same audio as the First Audio you set, system will play this audio language as default. If the channel hasn t the suited audio language, then the system will compare automatically with second audio language. Subtitle Language:You can set the subtitle language OSD Setting When you entry to OSD style Menu, you can set OSD Transparency/ Banner Display timer OSD Transparency: There are 8levels of transparency Banner display timer : support always 1s~3s~5s~10s~30s and always 17


18 Time When you entry to Timer Menu, you can see: sleep time Time Zone and GMT usage can set sleep timer. When you set a sleep timer and the time arrive, the system will enter to standby automatically. it will switch the mode between Sleep Timer Off /15/30/45/60/90/120 minutes. - GMT Usage : Select On or Off. If you select GMT Off you can adjust the current Date/Hour/Minute. If you select GMT On, you can adjust the followings The GMT Offset : To switch GMT Offset value and the range are -12:00 ~ +12:00 increase each half hour progressively. TV setup When you enter to TV System menu, you can set Tv saturation, Tv constrast, Tv brightness, Auto switch off, Power on at, digital audio output, TV Resolution, Tv Mode, Tv Format TV Format : You can switch the screen aspect ratio mode. Now we provide below options: 4:3 PS / 4:3 LB / 16:9 LB/16:9 FIT TV Mode: you can switch the tv output mode by NTSC PAL and auto Video Output: To set video output mode RCA(CVBS)/SCART(CVBS)/SCART(RGB)/YCBCR(YUV) Tv resolution: You can switch video resolution circularly by the sequence 576P <-> 720P <-> 1080i. This effect is equal to press V.Format Key under Full Screen and their last setting saving will be efficient for each others. Digital audio output: To set the both SPDIF and HDMI s digital audio output mode. It has options LPCM Out and BS Out, LPCM Out means system will decode no matter AC3 or PCM audio track data to be LPCM, digital audio decoder or HDMI TV will get LPCM digital audio data. BS Out means system won t do AC3 decode just output AC3 RAW data to SPDIF and HDMI. Power on at Auto switch off You can set whether Automatic standby or not. If On, it will enter into standby mode automatically if no operation for 3/4/5 hours TV Brightness press right/left KEY to set tv brightness TV Constrast press right/left KEY to set tv constrast 18


![Update&Backup By pressing [Menu] and selecting System item, and press OK key enter to update&backup menu when the highlight on the upgade&backup item Upgrade by network you can download new software](/docs-images/96/128806452/images/19-2.jpg "to this receiver by network Image upgrade you can download new software to this receiver by external USB memory device the upgrade file format support *ssu Image backup store the software backup to")
19 TV Saturation press right/left KEY to set tv saturation Parental control Change Password : To change password. You can input the new password in this item by using number keys directly. After you filled in 4 digital numbers, the highlight will auto skip to confirm Password and ask you to input the new password again. Default password is Channel Lock :In order to enter to the locked channels, you should input the password. The locked channels mark will show up a popup message on the screen and ask for the password. Menu Lock : In order to enter to the menu, you should input Password. Update&Backup By pressing [Menu] and selecting System item, and press OK key enter to update&backup menu when the highlight on the upgade&backup item Upgrade by network you can download new software to this receiver by network Image upgrade you can download new software to this receiver by external USB memory device the upgrade file format support *ssu Image backup store the software backup to USB memory device(support backup by user date/database and total flash) When you want to backup software, you can make sure the USB memory device is connected and build the new file first. The software will be backup to this new file Factory setting When you press [OK] key in the Factory Setting item: 1 It will show a warning message to inquiry you The operation will load default and erase all the channels that user added, continue?. 2 If you select Yes option, the all revised parameters of the receiver will reset to default value. Please carefully to using this function. 19
![3 In step 1 and step 2, select No or press [Exit] key can draw back from this item and](/docs-images/96/128806452/images/20-0.jpg "without saving.")


20 3 In step 1 and step 2, select No or press [Exit] key can draw back from this item and without saving. Internet PING When you enter Internet PING menu, you will see a screen like below Set Ping Mode option for 5times or forever Set Ping time out by 1~10sec. Set Ping Target by String and Number When the highlight on the Ping Run, press OK key to run PING function Tool When you entry to Tool menu, you can select Device Remove Choose Device Removed option, press OK button to unmount file system, and take out USB equipment safely. 3. Upgrade 20

21 Press to enter USB upgrading menu when the USB is connected. When the cursor on the Image upgrade press OK key to set image upgrade Move the cursor on the Upgrade Menu the upgrade file will display on the left menu you must select the correct file(the format like *SSU) when the cursor on the upgrade file press OK key to start USB upgrade 4. EPG By selecting EPG menu, you will see EPG information 5. Cas We provide CA slots for user. Receiver has been built in smart card module with CONAX system. By using cards provided by operators in this system, it is possible to watch many scrambled channels coded in this system. This menu shows detailed information about card inserted into card reader module. It allows inserted in order to help messages visible on the bottom of the screen. Note: All information showed in this menu and submenu is coming from inserted card. If anything is wrong, it could be card problem. After inserting the card correctly at any time, a message-box will show on the screen with message about detecting the card, in "card info" menu all available information will be displayed 6. Network setting 21

, then press [OK] key to open timer menu. 1. Current time information will display on the first column. 2.")
22 When you enter Network Local Setting menu, You can select Wired network or wireless network mode, when the cursor on the network interface and press Vol+/- key to switch When the network status display connect,you can select DHCP or input the IP address manually. The default setting for network is DHCP and it will be able to automatically obtain network settings. If you select DHCP off, you can input IP Address, Subnet Mask, Gateway, DNS Preferred, DNS Alternate and Mac Address. And select Apply to save the changed figures. 7. Adv Timer Select Timer Setting item and select a timer(s), then press [OK] key to open timer menu. 1. Current time information will display on the first column. 2. Timer Mode: There are several modes for Timer to setting, include Off, Once, Daily 3. Wakeup Channel: To select channel that you want to setting. 4. Wakeup Date: To input your wakeup date. 5. Wakeup Weekday: To input your wakeup day. 6. On Time:To input your wakeup time. Once the time s up, no matter what the system is in standby mode or in playing mode, the system will automatically switch to the channel you want and start to play. 7. Duration: After you set a time for Duration item, once the time s up, the system will automatically switch to standby mode. If you want not work this function, set the duration is 00: Move the highlight to Save button and press [OK] key to save timer. Select Cancel or press [Exit] key to cancel the operation. 22


23 8. Radio Basically, the operation of Radio Channel List is same as TV Channel List, but there is one point different: In Radio Channel List mode, there is no video information. 9. Photo If you want to view Photo files which are stored in your USB device, select Photo icon in the main menu. The screen shows up the supported photo files stored in your USB device Note: If no USB Memory Device (like HDD or USB Memory Stick) is inserted to the receiver this menu is not available. 10. Music By pressing [Menu] and selecting Music icon, you can enter Music menu. In Music menu, you can choose the Music file (MP3 file) and enjoy the music. Press RED button to display the option menu, you can setup the play mode Press GREEN button to set the file list display with folder mode Press YELLOW button to set file list display with different screen ratio When the current on the music file, press ok key to start play this file 23
 is inserted to the")


24 11. Movie If you want to enjoy to watch Movie contents, which are stored in your USB device, select each item in the Multimedia menu. The screen shows up the supported Movie files stored in your USB device Note: If no USB Memory Device (like HDD or USB Memory Stick) is inserted to the receiver this menu is not available. Press RED key to select Video play option, support Random Repeat play mode and support text Press Green key to set display mode by folder and thumbnail Press Yellow key to set display ratio Move the highlight on the movie file, press OK key to start play You can do fast forward, fast backward and seek with trick keys on remote controller. FB (fast backward) and FF (fast forward) keys support x2, x4, x8, x16, x32 PLAY / PAUSE keys : to pause and play the file when you press play / pause key. STOP key : To stop the playing file. UP key : To move to the previous file. Down key : To move to the next file. 24


25 Weather - When you entry to the weather menu, please make sure the network is connected - Press Left/Right key to switch city Press YELLOW key to setting the city information Youtube When the current on the YOUTUBE icon, press OK key entry to the YOUTUBE menu, please make sure the network is connected Press Blue key to switch video file and Group list Press Yellow key to display option menu 25

26 11. Game When you enter Game menu, you will see several games including Tetris and Othello. On the Game menu, you will see several games, including Gobang,boxman,tetris 12. Specifications Tuner Demodulator Mode Frequency Range RF Input Connector QPSK,8PSK,16APSK 950~2150MHz F-Female Video Video Decoding Video Output Video Resolution Aspect Ratio ISO/IEC MPEG1,ISO/IEC MPEG MPEG4 compliant Support to AVC high 4.1 main 4.1 CVBS(video 576i or 480i) HDMI 1.3(video format Auto), support HDCP 1080p/i 720p/i 576p/i 480p/i 4:3 16:9 Audio Audio Decoding Audio mode Subtitle Teletext MPEGI layer1/2, MPEGII Layer II, Mono/Stereo/Left/Right DVB Subtitle and Teletext Subtitle EBU Teletext Front Panel DC input Wifi RS232 Port IR 12V/1.5A input range built-in the wifi model Serial Port for Software Upgrade Connect the IR cable Rear Panel IF IN HDMI Connector Ethernet Port USB Port AV Connector CA Slot Receives the Signal from Satellite Antenna High-Definition Multimedia Interface V1.3 Plug-in Ethernet Board (RJ45 port) USB 2.0 Port for Multimedia Player, PVR and Software Upgrade/Backup CVBS Video Output Support Single CA Interface ISO7816 Accessories 26
in mm Net Weight Gross Weight 0-40 -10-65 160x115x33 DMS International www.dmsiusa.")
27 RCU Batteries User Manual HDMI Cable AV Cable IR RC3 / Other on Request (38kHz)NEC 2 x AAA Type English Power DC Input Range Power Consumption DC 12V 1.5A Max.24W Physical Specification Operating Temperature Storage Temperature Size(WxDxH)in mm Net Weight Gross Weight x115x33 DMS International ~ sales@dmsiusa.com 27
MAX T200 HD QUICK INSTALLATION GUIDE
 MAX T200 HD QUICK INSTALLATION GUIDE MAX T200 HD QUICK INSTALLATION GUIDE CONTENT receiver BATTERIES x 2 REMOTE CONTROL Quick installation guide Quick Installation Guide The lightning flash with arrowhead
Quick Start Digital Satellite Receiver
 Quick Start Digital Satellite Receiver Support of SD (MPEG2), DVB-S system Standard resolution video output - SCART Compatible with Diseqc 1.0, 1.1, 1.2, and USALS Electronic Program Guide - EPG Multilingual
SAFETY PRECAUTION ENGLISH PAG. 2. rev 1.2. dangerous voltage and to prevent only. operating and maintenance from a risk of electric shock.
 MAX S93+ SAFETY PRECAUTION The lightning fl ash with arrowhead WARNING: To reduce the risk of The exclamation point within an symbol, within an equilateral triangle, electric shock, don t open the cabinet.
Quick Start Digital Satellite Receiver HD
 Quick Start Digital Satellite Receiver HD One slot for Smart Card in Conax system One slot for Common Interface Module Support of SD / HD (MPEG2 / MPEG4 H.264), DVB-S, DVB-S2 system High resolution video
English SAFETY PRECAUTION DO NOT INSTALL THE RECEIVER: PAG. 2
 U4109 SAFETY PRECAUTION The lightning fl ash with arrowhead symbol, within an equilateral triangle, is intended to alert the user to dangerous voltage and to prevent from a risk of electric shock. Warning:
English SAFETY PRECAUTION DO NOT INSTALL THE RECEIVER: PAG. 2
 U4127 SAFETY PRECAUTION The lightning fl ash with arrowhead symbol, within an equilateral triangle, is intended to alert the user to dangerous voltage and to prevent from a risk of electric shock. Warning:
GENERAL INFORMATION INSTALLATION MENU INFORMATION. Main Features For your Safety Unpacking General Operation RCU Rear Panel.
 GENERAL INFORMATION 3 Main Features For your Safety Unpacking General Operation RCU Rear Panel 3 4 7 7 8 9 INSTALLATION 10 MENU INFORMATION Main Menu 1. Installation 1.1 Satellite list 1.2 Dish Setting
User s Manual S9 HD PVR
 User s Manual S9 HD PVR High Definition Digital Satellite Recorder Personal Video Recorder 1 Common Interface 4 CONTENTS 1. REMOTE CONTROLLER...7 2. BASIC OPERATIONS...8 2.1 TURN ON STB..8 2.2 POWER.8
SAFETY PRECAUTION ENGLISH DO NOT INSTALL THE RECEIVER: PAG. 2
 MAX S92+ HDMI SAFETY PRECAUTION The lightning fl ash with arrowhead symbol, within an equilateral triangle, is intended to alert the user to dangerous voltage and to prevent from a risk of electric shock.
Receiver/Digital Decoder DVB-T2 Set Top Box. Installation Manual & User Manual
 Receiver/Digital Decoder DVB-T2 Set Top Box Installation Manual & User Manual SAFETY PRECAUTION CAUTION: The lightening flash with arrowhead symbol, within an equilateral triangle, is intended to alert
Quick Start Digital Terrestrial Receiver
 Quick Start Digital Terrestrial Receiver Support of SD / HD (MPEG2 / MPEG4 H.264), DVB-T system PVR Ready - possibility to record on external USB drive Time Shift (video pausing, rewinding) HDMI video
English SAFETY PRECAUTION DO NOT INSTALL THE RECEIVER: PAG. 2
 U4125 SAFETY PRECAUTION The lightning fl ash with arrowhead symbol, within an equilateral triangle, is intended to alert the user to dangerous voltage and to prevent from a risk of electric shock. Warning:
User s Manual Digital Satellite Receiver
 A_ENG_110944 User s Manual Digital Satellite Receiver Please read the entire manual thoroughly and retain it for future reference. ENG - 1 General Safety Warning CAUTION RISK OF ELECTRIC SHOCK DO NOT OPEN
SYMBOLS USED ON THE RECEIVER... 3 SAFETY INSTRUCTIONS... 4 I.GENERAL INFORMATION...
 Table of Contents SYMBOLS USED ON THE RECEIVER... 3 SAFETY INSTRUCTIONS... 4 I.GENERAL INFORMATION... 5 1. Preface... 5 2. Main Features... 5 3. General Operation of the Receiver... 6 4. Front Panel...
1. Safety precautions Environment protection Features Accessories Front panel Rear panel...
 Contents 1. Safety precautions... 1 2. Environment protection... 3 3. Features... 4 4. Accessories... 4 5. Front panel... 4 6. Rear panel... 5 7. Remote controller... 6 8. Basic connection... 7 8.1. Connecting
SAFETY PRECAUTION ENGLISH DO NOT INSTALL THE RECEIVER: PAG. 2
 MAX S21 SAFETY PRECAUTION The lightning fl ash with arrowhead symbol, within an equilateral triangle, is intended to alert the user to dangerous voltage and to prevent from a risk of electric shock. Warning:
Xpresionn Digital Terrestrial Receiver. User Guide
 Xpresionn 2150 Digital Terrestrial Receiver User Guide GENERAL INFORMATION...3 A) SAFETY PRECAUTIONS...3 B) MAIN FEATURES...4 C) CONTENTS OF THE PACKAGING...4 D) REMOTE CONTROL...5 INSTALLATION...6 A)
User manual FT-8100 HD. English
 User manual FT-8100 HD English WARNING!!! On the USB Memory Function for FT-8100 HD model, user can make recording or playing function using by external USB devices such as USB Flash Memory Disk or external
SAFETY PRECAUTION. PDF 文件使用 "pdffactory Pro" 试用版本创建
 1 SAFETY PRECAUTION 1 2 CAUTION: The lightning flash with arrowhead Warning: The exclamation point within an symbol, within an equilateral triangle, To reduce the risk of electric shock, equilateral triangle
Be sure to run the vehicle engine while using this unit to avoid battery exhaustion.
 CAUTION: TO REDUCE THE RISK OF ELECTRIC SHOCK DO NOT REMOVE COVER (OR BACK) NO USER-SERVICEABLE PARTS INSIDE REFER SERVICING TO QUALIFIED SERVICE PERSONNE; Please Read all of these instructions regarding
OWNER'S MANUAL MODEL: DTV-2000 STANDBY/ON
 OWNER'S MANUAL MODEL: DTV-2000 STANDBY/ON CH+ CH- TABLE OF CONTENTS SAFETY PRECAUTIONS IMPORTANT SAFETY INSTRUCTIONS and FEATURES ACCESSORIES and LOADING BATTERIES REMOTE CONTROL UNIT FRONT PANEL and REAR
User Manual High Definition Digital Set Top Box DVBT9070 Please read this User Manual carefully to ensure proper use of this product and keep this man
 User Manual High Definition Digital Set Top Box DVBT9070 Please read this User Manual carefully to ensure proper use of this product and keep this manual for future reference. Important Safety Instructions
Table of contents. 1. Before initial operation of the receiver. 2. Installation. 3. First Time Installation (using Wizard) 4.
 4.") Table of contents 1. Before initial operation of the receiver 2. Installation 3. First Time Installation (using Wizard) 4. Basic operation 5. Electronic Program Guide-EPG 6. Edit the channel list 7. Hard
Table of contents 1. Before initial operation of the receiver 2. Installation 3. First Time Installation (using Wizard) 4. Basic operation 5. Electronic Program Guide-EPG 6. Edit the channel list 7. Hard
S7030PVR User Manual
 S7030PVR User Manual Important Safety Instructions 1) Do not use this apparatus near water. 2) Clean only with dry cloth. 3) Do not block any ventilation openings, install in accordance with the instructions.
Digital Terrestrial Television Receiver USER S MANUAL
 # 5024 Digital Terrestrial Television Receiver USER S MANUAL CAUTION RISK OF ELECTRIC SHOCK DO NOT OPEN This symbol is intended to alert the user to the presence of insulated dangerous voltage within the
Throughout the whole user manual, pay special attention to the following marks that
 Notice Warnings, Cautions and Notes Throughout the whole user manual, pay special attention to the following marks that indicate hazardous situations. Warning ** Indicates a hazardous situation which could
English CONTENTS 1. GUIDE OUTLINE THE MENU OSD INSTRUCTION TECHNICAL SPECIFICATION...17
 USER S MANUAL English CONTENTS 1. GUIDE...2 1.1 IMPORTANT SAFETY INSTRUCTIONS...2 1.2 UNPACKING...2 1.3 PRODUCT OVERVIEW& ILLUSTRATION...3 1.4 INSTALLATION OF METER...4 2. OUTLINE...5 3. THE MENU OSD INSTRUCTION...6
NMS ETA TM Stereo Advanced Digital TV Set-top Box
 Digital TV HD Set-top Box STB2-T2 NMS ETA TM Stereo Advanced Digital TV Set-top Box User Guide CONTENTS Safety Information... 3 Introduction... 4 Set-top Box Front Panel... 4 Set-top Box Back Panel...
Warning: To reduce the risk of electric shock, don't open the cabinet. Refer servicing to qualified personnel only.
 SAFETY PRECAUTION CAUTION: The lightning flash with arrowhead symbol, within an equilateral triangle, is intended to alert the user to "dangerous voltage" and to prevent from a risk of electric shock.
Table of Contents. Table of Contents. Safety Warning General Information. Installing Equipment Channel List Guide Menu Guide Main Page
 TABLE OF CONTENTS Table of Contents Table of Contents Safety Warning General Information Package Contents & Features Front Panel Rear Panel Remote Control Unit (RCU) Programing the Remote Control Installing
User Manual. High Definition Digital Set Top Box HDSTB250
 User Manual High Definition Digital Set Top Box HDSTB250 CHANNEL HDSTB250 Please read this User Manual carefully to ensure proper use of this product and keep this manual for future reference. Important
User's Manual 700HDMI PVR
 Digital Satellite Receiver User's Manual 700HDMI PVR INDEX INDEX... 3 Precautions... 5 1. Important Safety Instructions... 5 2. Notice... 5 3. Copyright... 6 4. Disclaimer... 6 Before You Begin... 7 1.
Front and Rear Panel Remote Control Connecting to a Television...4. Connecting to an Audio System...5
 Table of Contents Front and Rear Panel... 1 Remote Control...... 2 Connecting to a Television...4 Connecting to an Audio System...5 Connecting to a DVD Recorder or VCR... 6 First Time Installation... 7
DVB-T2. Digital Terrestrial Receiver WD-822T2 USER S MANUAL
 DVB-T2 Digital Terrestrial Receiver WD-822T2 USER S MANUAL Index Important Safety Instructions... 3 Main Features.... 5 Front and Rear Panel.... 6 Remote Control..... 7 Installing the Batteries..... 8
Thank you for purchasing STB10HD Digital High Definition Set Top Box.
 Thank you for purchasing STB10HD Digital High Definition Set Top Box. This manual will help you to install, use and maintain the receiver. Please read this manual carefully before operating your unit and
FV400 DIGITAL TV RECEIVER WITH MODULATOR INSTRUCTION MANUAL
 FV400 DIGITAL TV RECEIVER WITH MODULATOR INSTRUCTION MANUAL Please read this instruction manual carefully before using your receiver Table of Contents Introduction-----------------------------------------------------------------------------
STM 26 HD. DVB-S2+T2/C Compact meter User Manual. Ref R13. CAHORS Digital CS Cahors Cedex 9 FRANCE
 STM 26 HD DVB-S2+T2/C Compact meter User Manual Ref 0145225R13 Preface USER MANUAL Please read this manual carefully before using your Digital Sat meter for the first time. This operating manual will help
User manual. Model ID: High definition digital satellite receiver. English 3/2009 jp
 High definition digital satellite receiver Model ID: 7101 English 3/2009 jp Contents 1. Safety precautions... 4 2. Environment protection... 6 3. Features... 7 4. Remote Control... 8 5. Front panel...
CONTENTS 1. SAFETY INTRODUCTION FEATURES REMOTE CONTROL FRONT PANEL REAR PANEL CONNECTING YOUR SYSTEM...
 CONTENTS 1. SAFETY...3 2. INTRODUCTION...4 3. FEATURES...4 4. REMOTE CONTROL...5 5. FRONT PANEL....6 6. REAR PANEL...6 7. CONNECTING YOUR SYSTEM...6 8. BASIC OPERATIONS...8 8.1 TURN ON STB...8 8.2 POWER...8
User s Guide. Digital Satellite Receiver
 User s Guide Digital Satellite Receiver Before Getting Started Information contained in this manual is subject to change without notice. No part of this publication may be copied, reproduced, or translated
Table of Contents. Table of Contents
 Table of Contents Table of Contents 1. SAFETY PRECAUTIONS 2. GENERAL FEATURES 3. HARDWARE DESCRIPTION 4. HOW TO CONNECT YOUR RECEIVER 5. SYSTEM SETUP 6. MENU STRUCTURE 7. MENU OPERATION 7.1. USER SETTING
USER MANUAL KGN1080P32VD
 USER MANUAL KGN1080P32VD USB... Power cord Remote control/batteries Power/Standby button Picture mode button Sound mode button Multi-digits channel buttton P.MODE S.MODE FREEZE SLEEP 1 2 3 4 5 6 7 8 9
Safety warning Important Safety Instructions. Wall Mount Specifications. Electronic Program Guide. Lock Menu 18. PVR File System
 LT-32N370Z 32 INPUT Safety warning Important Safety Instructions Wall Mount Specifications Electronic Program Guide Lock Menu 18 PVR File System 11 11 11 14 15 16 17 19 20 21 21 22 23 24 25 INPUT AAA
DIGITAL SET TOP BOX STB 7017 INSTRUCTION MANUAL
 DIGITAL SET TOP BOX STB7017 INSTRUCTION MANUAL STB 7017 CHANNEL After Sales Support Now you have purchased a Tevion product you can rest assured in the knowledge that as well as your 3 year parts and labour
KGN&, > Ϯϰs USER MANUAL
 USER MANUAL KGN Contents Contents Safety Precautions Power Supply... 1 Installation... 2 Use and Maintenance... 3 Important Safety Instructions... 4-5 User Guidance Information Names of each part(front
Remote Control Unit
 Contents Declaration of Conformity --------------------------------------------------------------------------------- 3 General Information -----------------------------------------------------------------------------------------
SIRD-FTA Free-to-Air Digital Satellite Receiver PICO MACOM. SIRD-FTA-2 Owners Manual
 VOL- VOL+ MENU OK CH- CH+ P O W E R L O C K Free-to-Air Digital Satellite Receiver SIRD-FTA Free-to-Air Digital Satellite Receiver Owners Manual Please read this manual thoroughly before use. Keep this
PART 1 English 1.0 Usage
 SAT OUT SAT IN Thank you for choosing this Strong satellite receiver. This receiver is of our latest development and it is designed to be capable of safely install your receiver and to achieve its optimum
SET TOP BOX MODEL: GDB01SFV1 USER MANUAL
 SET TOP BOX MODEL: USER MANUAL 1 2 3 4 5 6 7 8 Welcome Your Set Top Box 2.1 In The Box 2.2 Front View 2.3 Rear View Quick Setup 3.1 TV Connection 3.2 Recording from the set top box 3.3 Record one channel
USER MANUAL KGNPRO19VD
 USER MANUAL KGNPRO19VD X P.MODE S.MODE SLEEP AUDIO 1 2 3 4 5 6 7 8 9 A/DTV USB/SD FAV + 0 SOURCE MENU OK INFO EXIT MUTE VOL CH ASPECT TTX TITLE /AUTO DVD.SETU P EPG SU BTITL E D.MENU ZOOM/REC.LIST GOTO
English CONTENTS 1. GUIDE OUTLINE THE MENU OSD INSTRUCTION TECHNICAL SPECIFICATION TROUBLE SHOOTING...
 USER S MANUAL English CONTENTS 1. GUIDE...2 1.1 IMPORTANT SAFETY INSTRUCTIONS...2 1.2 UNPACKING...2 1.3 PRODUCT OVERVIEW& ILLUSTRATION...3 1.4 INSTALLATION OF METER...4 2. OUTLINE...5 3. THE MENU OSD INSTRUCTION...6
DIGITAL TERRESTRIAL RECEIVER NVR-2090DU CHANNEL
 DIGITAL TERRESTRIAL RECEIVER NVR-2090DU CHANNEL 1 Espanol ~ Digital Video Broadcasting 2 3 STANDBY DTV/VCR TEXT MUTE VOL+ INFO PLAY/PAUSE EPG VOL- CH+ STOP SETUP EXIT 23 FAV- ENTER FAV+ 24 25 SOURCE CH-
The product must be installed in accordance with national regulations.
 Important safety instructions to be kept with the product Please read attentively To prevent fire and electric shock, do not expose this receiver to rain or moisture. In order to avoid any possible risk
English DMB-118HDMK3
 English DMB-118HDMK3 Table of Contents Safety Information...1 System Connection...1 Remote Control...2 First Time Installation...3 Basic Operation...3 Change Channel...3 Volume and Mute...3 Subtitle/Audio
English CONTENTS 1. GUIDE OUTLINE THE MENU OSD INSTRUCTION TECHNICAL SPECIFICATION TROUBLE SHOOTING...
 English CONTENTS 1. GUIDE...2 1.1 IMPORTANT SAFETY INSTRUCTIONS...2 1.2 UNPACKING...2 1.3 PRODUCT OVERVIEW& ILLUSTRATION...3 1.4 INSTALLATION OF METER...4 2. OUTLINE...5 3. THE MENU OSD INSTRUCTION...6
HRS 8590 LAN. User s Manual
 HRS 8590 LAN User s Manual Content Safety Precaution...3 1. Reference... 4 1.1 General Features... 4 1.2 Accessories... 4 2. Product Overview... 5 2.1 Front Panel... 5 2.2 Rear Panel... 6 2.3 Remote Control
User's Manual 980HD micro PVR
 High Definition Digital Satellite PVR User's Manual 980HD micro PVR INDEX INDEX... 3 Precautions... 5 1. Important Safety Instructions... 5 2. Notice... 5 3. Copyright... 6 4. Disclaimer... 6 5. Trademarks...
1. GUIDE Important Safety Instructions Unpacking PRODUCT OVERVIEW&ILLUSTRATION INSTALLATION OFMETER
 1. GUIDE... 3 1.1 Important Safety Instructions... 3 1.2 Unpacking... 3 1.3 PRODUCT OVERVIEW&ILLUSTRATION... 4 1.4 INSTALLATION OFMETER... 6 2. OUTLINE... 6 3. THE MENU OSD INSTRUCTION... 7 3.1 DVB S2...
< > ϯϯyyϭ USER MANUAL
 USER MANUAL Contents Contents Safety Precautions Power Supply... 1 Installation... 2 Use and Maintenance... 3 Important Safety Instructions... 4-5 User Guidance Information Names of each part(front View)
User s Guide. HD Satellite Receiver Pansat 9500HDX
 User s Guide HD Satellite Receiver Pansat 9500HDX Panarex Electronics Sun Valley, California, U.S.A. c 2011 by Panarex Electronics 1 CONTENTS 1 - GETTING STARTED... 4 1.1 Introduction... 4 1.2 Caution...
User Manual. Digital Satellite Receiver. Model ID: ALi CX. mod. English 1/2010 jp
 User Manual Digital Satellite Receiver Model ID: ALi CX mod. English 1/2010 jp CONTENTS 1. SAFETY PRECAUTIONS... 3 2. ENVIRONMENT PROTECTION... 4 3. REMOTE CONTROL... 5 4. FRONT PANEL... 7 5. REAR PANEL...
healing HHR787 HD Digital Terrestrial Twin Tuner Recorder Operating Manual INTRODUCTION... 3 HHR787 FEATURES... 4 SAFETY INSTRUCTIONS...
 CONTENTS INTRODUCTION... 3 HHR787 FEATURES... 4 SAFETY INSTRUCTIONS... 5 FRONT PANEL AND REAR PANEL...6 and 7 REMOTE CONTROL UNIT KEY FUNCTIONS...8 and 9 REMOTE CONTROL BATTERY CARE... 10 INSTALLATION
Contents. Safety instructions Reference 1.1 Genareal Features Delivery... 04
 HD 580 user manual Contents Safety instructions... 03 1. Reference 1.1 Genareal Features... 04 1.2 Delivery... 04 2. Names and key assignment 2.1 Front view... 05 2.2 Rear view... 05 2.3 Remote Control...
Alpha Plus. User Guide
 Alpha Plus User Guide Contents Contents i 1 Introduction 1 1.1 Features.............................. 1 1.2 Accessories............................ 2 1.3 The Remote Control....................... 3 1.4
CAUTION RISK OF ELECTRIC SHOCK NO NOT OPEN
 Evolution Digital HD Set-Top Box Important Safety Instructions 1. Read these instructions. 2. Keep these instructions. 3. Heed all warnings. 4. Follow all instructions. 5. Do not use this apparatus near
USER S Manual NGLT104WPD NGLT150WPD LCD TV / Monitor (IP67 Grade)
") USER S Manual NGLT104WPD NGLT150WPD LCD TV / Monitor (IP67 Grade) This Manual is revisable without further notice Contents CONTENTS ------------------------------------------------------------------- 1
USER S Manual NGLT104WPD NGLT150WPD LCD TV / Monitor (IP67 Grade) This Manual is revisable without further notice Contents CONTENTS ------------------------------------------------------------------- 1
USER S MANUAL. Digital Satellite Receiver
 USER S MANUAL Digital Satellite Receiver E109000257A STRONG & Co. (FAR EAST), LTD. P. O. Box : 85, YOKOHAMA, KANAGAWA-KEN JAPAN 231-91 - FAX : +81 45 662-4957 Website : www.strong-technologies.com E-mail
Contents. 1. Introduction Overview 1.2 Main Features. 2. Safety/Precautions Safety 2.2 Precautions
 HTS 9300 Contents 1. Introduction 2 1.1 Overview 1.2 Main Features 2. Safety/Precautions 3 2.1 Safety 2.2 Precautions 3. Check Point before Use 5 3.1 Accessories 4. Controls/Functions 6 4.1 Front Panel
Xsarius Satmeter Pro. Manual
 Xsarius Satmeter Pro Manual 1 2 Directory of content Introduction Directory of content 3 Introduction 3 Satmeter Pro 02 Frontpanel & buttons 6 Xsarius provides high quality products that enable you to
The following symbols will serve as follows: Indicates any other additional important or helpful information. Indicates warning information.
 Contents 1 2 HD2011IR User Manual Notice This manual can help you to become familiar with the many great features of our high definition digital Satellite receiver, as well as how to use and operate these
CONTENTS 1. SAFETY ENVIRONMENT PROTECTION FEATURES REMOTE CONTROL FRONT PANEL REAR PANEL...9
 CONTENTS 1. SAFETY...3 2. ENVIRONMENT PROTECTION...3 3. FEATURES...5 4. REMOTE CONTROL...6 5. FRONT PANEL...8 6. REAR PANEL...9 7. CONNECTING YOUR SYSTEM...9 8. BASIC OPERATIONS...11 8.1 TURN ON STB...11
Instructions for use. UFS 810 English IMPORTANT READ CAREFULLY BEFORE USE
 Instructions for use UFS 810 English IMPORTANT READ CAREFULLY BEFORE USE List of Contents 1 About these instructions...4 1.1 Contents...4 1.2 Markings...4 1.2.1 Pre-requirements for certain functions...4
CONNECTION TO THE SATELLITE DISH LNB
 Safety Instructions Safety Instructions This product has been manufactured to satisfy the international safety standards. Please read all of safety and operating instructions before operating the product
User Manual of digital Set Top Box PAT1 02
 User Manual of digital Set Top Box PAT1 02 Please read this User Manual carefully to ensure proper use of this product and keep this manual for future reference. Important Safety Instructions 1) Read these
User s Manual. Full HD Digital Satellite Receiver. v1310. Please read this User s Manual carefully before installing the receiver.
 User s Manual Full HD Digital Satellite Receiver v1310 Please read this User s Manual carefully before installing the receiver. 2 CONTENTS 1 Introduction 4 1.1 Features 4 1.2 Accessories 4 1.3 The Remote
DIGITAL SATELLITE RECEIVER ESR-D101 INSTRUCTION MANUAL
 DIGITAL SATELLITE RECEIVER ESR-D101 INSTRUCTION MANUAL 1 SATETY INSTRUCTION Please read the following instructions carefully Do not overload the following wall outlets, extension cords or integral convenience
4K UHD Android Hibrid Uydu Alıcısı. User Manual. 64 Bit Qcta Core A53 S912. Gigabit LAN 10/100/1000. Multi Stream. DUALBAND Wi-Fi DDR3.
 4K UHD Android Hibrid Uydu Alıcısı User Manual 64 Bit Qcta Core A53 S912 2 GB 32 GB DDR3 EMMC-Flash Gigabit LAN 10/100/1000 DUALBAND Wi-Fi Multi Stream CONTENTS CONTENTS... 1 1 SAFE CAUTION... 3 2 UNPACKING
INSTRUCTIONS MANUAL SAVE THESE INSTRUCTIONS IN A SAFE PLACE FOR FUTURE REFERENCE
 High Definition Digital Set Top Box MPF3573HU INSTRUCTIONS MANUAL SAVE THESE INSTRUCTIONS IN A SAFE PLACE FOR FUTURE REFERENCE Important Safety Instructions 1) Read these instructions. 2) Keep these instructions.
TV4U COMBO -T2 -S2 -C -IPTV SET-TOP-BOX USER MANUAL HDTV IPTV DVB-T2 DVB-S2 DVB-C H.264
 TV4U COMBO -T2 -S2 -C -IPTV SET-TOP-BOX USER MANUAL IPTV DVB-S2 HDTV DVB-T2 DVB-C H.264 1 SAFETY INFORMATION WARNING: Do not use this STB where contact with or immersion in water is a possibility. Do not
HD Digital Satellite Receiver. User s Manual
 HD Digital Satellite Receiver ZDX-670 User s Manual Keep this manual for future reference II General Safety This STB has been manufactured to meet international safety standards. Please read the following
Ref SATELLITE. User Manual. High Definition TV Satellite Receiver.
 SATELLITE High Definition TV Satellite Receiver Ref. 717501 User Manual www.televes.com Index SATELLITE 1. Safety recommendations............................................................ 4 2. General
KGNϭϬϴϬWWZKϮϮs USER MANUAL
 USER MANUAL KGN X P.MODE S.MODE SLEEP AUDIO 1 2 3 4 5 6 7 8 9 USB/SD A/DTV FAV + 0 SOURCE MENU OK INFO EXIT MUTE VOL CH ASPECT /C AN CE L TTX /SIZE D.MENU/HOLD U P G /AUTO DVD.SETU P /S B A E TITLE EPG
User s manual MAX IP90. Table of contents
 Table of contents 0. Control elements and connections...3 0.1. Receiver front panel...3 0.2. Receiver back panel...3 0.3. Remote control...4 1. First installation...5 1.1. Complete Content...5 1.2. Installation
DVB-S2 REC10 MANUAL (p. 2) High definition DVB-S2 receiver
 High definition DVB-S2 receiver") DVB-S2 REC10 MANUAL (p. 2) High definition DVB-S2 receiver 2013-03-15 ENGLISH High definition DVB-S2 receiver Introduction: We recommend that you read this manual before installing/using this product.
DVB-S2 REC10 MANUAL (p. 2) High definition DVB-S2 receiver 2013-03-15 ENGLISH High definition DVB-S2 receiver Introduction: We recommend that you read this manual before installing/using this product.
CONTENTS 8 ACCESSORIES 13 9 TROUBLE SHOOTING AND ADVICE SPECIFICATIONS BATTERY USAGE CAUTION 13
 CONTENTS 1 PREFACE 2 2 SAFETY PRECAUTIONS 2 3 FRONT & BACK VIEW, REAR CONNECTION OF LCD 3 4 TV INSTALLATION DRAWINGS 4 4.1 ANTENNA CONNECTION 4 4.2 AV1 INPUT CONNECTION 4 4.3 AV2 INPUT CONNECTION 4 4.4
HD Digital Set-Top Box Quick Start Guide
 HD Digital Set-Top Box Quick Start Guide Eagle Communications HD Digital Set-Top Box Important Safety Instructions WARNING TO REDUCE THE RISK OF FIRE OR ELECTRIC SHOCK, DO NOT EXPOSE THIS PRODUCT TO RAIN
CONTENTS 1. SAFETY INTRODUCTION FEATURES REMOTE CONTROL FRONT PANEL REAR PANEL CONNECTING YOUR SYSTEM...
 CONTENTS 1. SAFETY...3 2. INTRODUCTION...3 3. FEATURES...4 4. REMOTE CONTROL...5 5. FRONT PANEL...7 6. REAR PANEL...7 7. CONNECTING YOUR SYSTEM...7 8. BASIC OPERATIONS...9 8.1 TURN ON STB...9 8.2 POWER...9
CONNECTING YOUR SYSTEM...
 CONTENTS 1. SAFETY... 3 2. INTRODUCTION... 3 3. FEATURES... 4 4. REMOTE CONTROL... 5 5. FRONT PANEL... 6 6. REAR PANEL... 8 7. CONNECTING YOUR SYSTEM... 8 8. BASIC OPERATIONS... 11 8.1 TURN ON XFINDER...
Evolution Digital HD Set-Top Box Important Safety Instructions
 Evolution Digital HD Set-Top Box Important Safety Instructions 1. Read these instructions. 2. Keep these instructions. 3. Heed all warnings. 4. Follow all instructions. 5. Do not use this apparatus near
VIII. Local Sat When you first entry to the local sat menu, need to wait for GPS data... 34
 Safety instructions for product with Lithium battery... 4 Features... 7 Glossary... 7 Front panel... 8 Interface... 10 Introduction of Main Menu... 10 1. DVB-S/S2 System... 10 2. DVB-T System and DVB-C
Set Top Box (STB) TV STAR C101 USER MANUAL
 TV STAR C101 USER MANUAL") DIGITAL CABLE TV RECEIVER Set Top Box (STB) TV STAR C101 USER MANUAL 1 Table of contents Safety. 4 General Introduction.. 6 Front Panel / Rear Panel...8 Remote Control Unit.. 10 S.T.B Connection...13 Digital
DIGITAL CABLE TV RECEIVER Set Top Box (STB) TV STAR C101 USER MANUAL 1 Table of contents Safety. 4 General Introduction.. 6 Front Panel / Rear Panel...8 Remote Control Unit.. 10 S.T.B Connection...13 Digital
CONTENTS 1. SAFETY INTRODUCTION FEATURES REMOTE CONTROL FRONT PANEL REAR PANEL... 7
 CONTENTS 1. SAFETY... 3 2. INTRODUCTION... 3 3. FEATURES... 4 4. REMOTE CONTROL... 5 5. FRONT PANEL... 6 6. REAR PANEL... 7 7. CONNECTING YOUR SYSTEM... 8 8. BASIC OPERATIONS... 10 8.1 TURN ON STB... 10
Digital Terrestrial Receiver SRT 5300
 Digital Terrestrial Receiver SRT 5300 Picture similar User manual www.strong.tv 17 Feb 2011 21:16 1 2 3 4 5 1 Table of Contents 1.0 Instruction 2 1.1 Safety Instructions 2 1.2 Storage 3 1.3 Equipment Set-up
GDB9 INSTRUCTION MANUAL DIGITAL TERRESTRIAL RECEIVER
 GDB9 INSTRUCTION MANUAL DIGITAL TERRESTRIAL RECEIVER Goodmans Support: www.goodmans.co.uk/support Please read these instructions before use and keep for future reference IMPORTANT SAFETY INSTRUCTIONS Thank
I.General Information Preface Main Features For Your Safety General Operation of the Receiver Front Panel...
 I.General Information...3 1. Preface...3 2. Main Features...3 3. For Your Safety...4 4. General Operation of the Receiver...4 5. Front Panel...5 6. Rear Panel...6 7. Remote control unit...7 8. Installation
HDTV-Sat-Irdeto-Receiver
 HDTV-Sat-Irdeto-Receiver TABLE OF CONTENTS 1 SAFETY ADVICE... 4 2 QUICK SETUP... 6 3 FEATURES... 8 4 HOW TO CONNECT YOUR RECEIVER... 9 5 HARDWARE:... 11 6 WATCHING TV... 15 7 MENU OPERATION... 23 8 EDITING
DVH-1019 MK2 User Manual PULL
 DVH-1019 MK2 User Manual PULL Safety Rules WARNING Read all instructions. Failure to follow all instructions listed below may result in electric shock, fire and/or serious injury. The term electrical device,as
TFT-LCD TV USER MANUAL W102T READ CAREFULLY BEFORE OPERATION W102T
 TFT-LCD TV W102T USER MANUAL READ CAREFULLY BEFORE OPERATION W102T IMPORTANT SAFETY INSTRUCTIONS CAUTION RISK OF ELECTRIC SHOCK. DO NOT OPEN. This symbol indicates dangerous voltage inside the product
EDISION OS mega VIEWS
 + + H.265 HEVC VIEWS 1 2 3 4 5 Front view: 1. Power Button Switch between operation and standby modes 2. Display current menu information and channel name etc. 3. USB Connect to the External HDD or USB
AX1919/AX1922/AX1924/AX /24V LED DVD/TV
 AX1919/AX1922/AX1924/AX1932 12/24V LED DVD/TV PANEL - Display Size: 19 (48cm) - AX1919 22 (56cm) - AX1922 24 (60cm) - AX1924 32 (81cm) - AX1932 - High Definition LED TV - AX1919/32 - Full High Definition