DIY: Synesthesia Project
|
|
|
- Howard Brooks
- 6 years ago
- Views:
Transcription


1 DIY: Synesthesia Project Debut of Synesthesia for Eric Prydz at Baltimore s Soundstage.
2 Brief Background: This project was funded by a Creative Use of Technology Grant offered by the Digital Media Center at Johns Hopkins University. The goal of the project was to create an immersive, live, musical performance piece that provides the means to not only engage an audience s auditory senses, in the traditional manner through sounds, but also their visual senses through tightly-coupled, vibrant, visual displays. The project name, Synesthesia, refers to a an extraordinary sensory condition in which one sense (for example, hearing) is simultaneously perceived as if by one or more additional senses such as sight. Project Build: The heart of the project is the Teensy micro-controller ( The Teensy is very much like an arduino or a raspberry pi, but it has many advantages because it is a class compliant device, which means it does not require the installation of drivers to be used. Teensy is also powerful because its developer has ported the well known Arduino library, under the name Teensyduino, to the Teensy opening up the door for the mainstream Arduino sketches to be compatible on a class compliant device. With exponential growth in DIY and Makers over the past years many companies have popped up to explicitly serve this growing community. LED projects seem to be at the top of many Makers lists and LED light strips have become increasingly available and incorporated in many complex projects. Teensy developer, Paul Stoffregen, decided to make an extremely computationally efficient high performance LED library, called OctoWS2811 ( which allows Teensy to simultaneously update 8 LED strips at the same time. Additionally, he designed an adaptor board ( that sits on top of the teensy to simplify the electronics to where you only have to attach the power and two ethernet cords. Before the development of this sophisticated library, being able to create multiple LED integrated visual displays would have been limited to the more advanced programmers familiar with both the

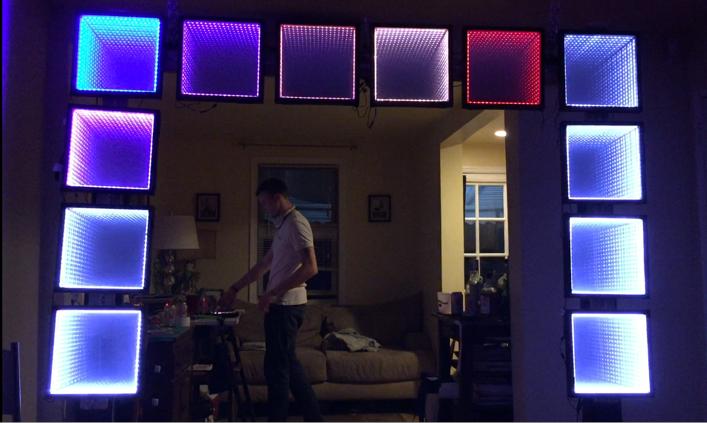
3 intricacies of the LEDs and the coding. Now it is easily approachable to novice Makers such as myself and many others. The design of Synesthesia was inspired by a combination from multiple Makers smaller builds found on the internet, but many of the modular hardware design ideas stem directly from this Makers blog ( ). The concepts of the individual displays being modular lend Synesthesia the capability of having diverse arrangements of panels to create different geometrical presentation environments. The infinity mirrors were chosen because they are a great visual medium that adds a huge element of depth with a minimum amount of LEDs. The panels were initially going to be made using shadowboxes, but cost restrictions led to us making them from scratch. What follows are the basic steps to make the project for yourself. Enjoy Nathan Towles - Evan Reynolds
 ***NOTE: It is very important to make sure the cuts are precise and square.")

4 Making The Boxes: We started with 96 x 3/2 x 3/4 strips of wood that were already primed. (This made painting much easier) The frame for each box is made up of 4 pieces. Step 1: Cut 2-13 and 2-10 pieces. (We used a table saw to make all the relevant cuts) ***NOTE: It is very important to make sure the cuts are precise and square. Having a table saw makes it much easier to ensure precision. *** Step 2: For the best infinity effect there needs to be 1 spacing between the front glass and the back mirror. Since the wood is 3/2 thick, set the saw blade so it will cut grooves 1/8 inwards from each edge and to where the groove will have a depth of 1/8. Because the mirror and glass panels were each 3/32 thick the cut needed to be 1/8 wide for a snug fit. Use a few spares to get this depth correct because these grooves are going to hold the mirror and glass pieces properly in place. Step 3: Paint all the pieces. (Plan to use a few coats of paint to cover the white completely) Step 4: Use pencil to make all alignment and drilling markings needed for future steps. (*** Doing this ahead of time will expedite the build process.***) List of marks to make: 1. Center-line running the full length of each piece 2. Dotted line on either side of the center line that is 1/4 away from center. ( Neopixel strips are 1/2 wide so these lines show where to place the strips.) 3. On either end make a mark that is 1/4 in from the edge that intersects the center line to mark where to pre-drill for the screws)

5 Step 5: Pre-drill 2 holes in the 13 pieces for the screws that will join the box together. We ended up making a paper guide to help us center the hole to align properly. The guide holes should be 1/4 in from the edge and centered between the two grooves. These holes are necessary because the wood kept splitting at the ends. Step 6: Drill 2 more holes in 13 pieces 7/8-1 in from the edge. These are used to pass the wires to the outside of the boxes. We wish this step wouldn't have been necessary, but soldering the short wires in the corners was a nightmare. Having the exit holes allowed for us to have a quicker assembly line process for making many boxes. Step 7: Make 2 L-shaped pieces by joining a 10 and a 13 piece. Use clamps to help position the vertical 10 piece where it is flush with the end of the 13 piece and the grooves intersect cleanly. (***Once you have made sure everything is lined up***) Use pre-drilled hole from Step 5 to screw the pieces together.

6 Making The 2 Way Mirrors: We used glass because it was cheap, but if you have extra money we would recommend using plexiglass or something similar to have a more durable design that does not shatter. Additionally, because square 12 x 12 glass panes aren't common we had to purchase 12 x 16 panes and get them cut to the right dimensions at Lowes. (**The edges were very sharp**) To make the 2 way mirror, we used a Privacy Control Window Film made by Gila, which can be found online at Home Depot. We also got the recommended application kit, which is most useful for the solution you spray on during application. **Note: This film comes in a tight roll and is rather difficult to deal with because it wants to curl up. We ended up cutting it into pieces that are slightly larger than the glass pane, which helped, but you still need 2 people to do this part of the job. *** Step 1: Cut film into manageable pieces that are at least 15 x 15. Step 2: Clean the glass surface thoroughly with water. And wipe it down with lent free paper towel (e.g. the blue shop towels you find in the automotive section at Walmart). (Repeat this step at least twice because there will inevitably be some speck of glass or dirt on the pane that you could have removed had you done this step better.) Step 3: Follow the instructions included in the film box. If you follow these you will be fine. also has helpful videos on the process.
 Step 4: Cut excess off the edge using the cutter from the application kit.")
7 (*** Note: the application card that comes with the application kit is not ideal and can scratch the film pretty easily. I recommend using a real squeegee. We actually used a squeegee for silk screening and it worked superbly.***) Step 4: Cut excess off the edge using the cutter from the application kit. Alternatively, an exact-o knife and a straight edge will work well. Lay the glass pane with the newly applied mirror film FACE DOWN on a paper towel with a book on top. Let dry overnight. Preparing the Neopixels: Neopixels are one of Adafruits signature LED strips products. These have the WS2812b integrated chips that allow them to function natively with the OctoWS2811 Library and Adaptor. We ordered ours through adafruit for convenience, but there are many other places you could purchase them. The strips are sold in 1 meter lengths that have 60 pixels per meter. Step 1: From a larger roll of neopixels, we cut 4 segments that each had 17 pixels for each box. When cutting through the copper pads, make sure that you bisect the strips so you have equal amounts of copper on either side to make a good connection. Step 2: It is helpful at this point to go ahead and prepare all of your segments of wiring needed. Use solid core wiring if possible. - For the start strip you will want to have extended lengths of wire (We used about 8-12 lengths). Its also easier if you have 2 grounds entering into the strip (1 for power ground, 1 for data ground). All in all you will need to have 4 extended lengths entering (1 power, 1 data, 2 grounds) and 3 shorter (about 4-6 ) lengths exiting to chain to the next strip. (1 power, 1 data, and 1 ground) - For the other 3 strips in the chain you can just cut 6 shorter lengths for each side (2 power, 2 data, and 2 ground) - By now you should have a total of 25 wires ( 8 power, 8 data, 9 ground).with all the wires cut, you can now strip small parts of each end of all the wires.

 to solder the wires of each power and ground to each end of a strip.")
8 Step 3: Data only flows one direction on the strips (indicated by the arrows) and is only relayed to the contiguous pixel. This means you must connect the data-out pad on the 17th pixel of a segment directly to the data-in pad of the 1st pixel on the next segment. The power and ground can really be connected wherever as long as there is a connection between each segment. This is useful because you can use the larger pads (that weren't cut) to solder the wires of each power and ground to each end of a strip. * This can be seen in the image above* Then its easier to only solder the data wires to the small pads on either end. Step 4: Once you have good connections, which you have verified by lighting each segment up separately, as well as joined together and with a voltmeter, use a hot glue gun on every soldered joint to stabilize the connections. ** The smaller pads are especially vulnerable to breaking off as you can see in the image above** Assembling the Boxes: At this point you should have all your strip segments prepared with the wires soldered to each end. Additionally, the framed L-joints should be ready with the proper alignment markings to help place the neopixel strips centered. Step 1: To attach the strips we used heavy-duty double-sided duct tape that can be purchased at a hardware store. Cut the tape into long strips about 1/2 wide and place it between the two lines that indicate the width of the neopixel strips. Step 2: Place the neopixel strips where the middle of the 9th pixel from either end lines up with the centerline of the frame.


9 ***REMEMBER***Data flows only one direction so you need to make sure you orient the strips to where they make a complete loop Take your time and make sure you get the placement of the strips right before you close the boxes. *** Step 3: Check to make sure all the strips are in the right position and test all the connections one more time. Next guide the wire ends through the exit holes in the frame. Step 4: Clean the surface of the back-mirror and 2- way front-mirror with Windex (multiple times). Slide the back-mirror in the back grooves and then place the 2-way front-mirror in the front slot. ** The film side should face toward the INSIDE of the box** Screw the two L-Joints together to hold everything together tightly. Be careful not to over tighten because you could inadvertently crack one of the pieces of glass. Step 5: Match the appropriate wire pairs together outside the box. Solder all the pairs together and you are finished with the box. Interfacing with the Teensy: At this point you just need to wire up the power and one of the grounds to a 5V power supply. The other ground and the data line will be wired to the Teensy using an ethernet cable. Read through the details on the OctoWS2811 adaptor at octo28_adaptor.html. This will explain the necessary steps needed to get the box started making visuals.

10 Controlling the Teensy with MIDI: We chose to rely on MIDI signals to couple the Synesthesia visuals to music. MIDI was chosen because many different pieces of music software can easily output MIDI as well as the Teensy can work as a native midi device. Details can be found here td_midi.html. We started experimenting using the included OctoWS2811 examples for the teensy and the midi-output to trigger different colors using different notes in the software. Using code from we were able to control the Teensy clock using the Ableton Live BPM. This was great because it yielded perfectly timed visuals. Ultimately, the code that we developed to run the Synesthesia setup live employs different midi-notes to identify which panels to activate. The velocity of the notes are mapped to different colors e.g. (1-10 is White, is Red etc.). The sub-ranges in velocity denote a logarithmic brightness scale to control the intensity of the lights. The benefit of Ableton is that you can store all of this midi-information in live clips that can be triggered whenever. Additionally, clips allow you to send preset Program Change messages to the teensy, which we use to switch between more sophisticated pixel-mapped programs. An added bonus to using live is that all midi-effects that can operate on instruments also work on the midi-clips. This facilitates endless combinations for spontaneous live lighting routines. We routed all of these different midi-effects into midi-effect racks and map them to rack macros that can be pre-programmed within clip envelopes as well. The programming possibilities using Ableton are endless and part of the fun is discovering novel ways to create new interesting visuals.
Obtained from Omarshauntedtrail.com
 http://www.cindybob.com/halloween/ledlighting/ledspotlights/ Introduction In our 2005 haunt providing 120V AC power to the various lights and props requiring it became a fairly large problem. Extension
READ ME FIRST. Touchstone TV Lift
 Whisper Lift II PRO 2 READ ME FIRST 1. After completing the unpacking and uncrating of the cabinet, you will find the Owner s Manual, TV, installation hardware, and the wireless remote all together and
Cable System Installation Guide
 Overview Cable System Installation Guide 5/19/2008 Our recommended approach for the installation of your Circle Graphics Cable Systems on the panels in your market is to install the fixed hardware (namely
DEM 9ULNACK 3.4 GHz. PHEMT LNA amplifier complete kit assembly guide
 DEM 9ULNACK 3.4 GHz. PHEMT LNA amplifier complete kit assembly guide SPECIFICATIONS Noise Figure: < 0.8 db Gain: > 15 db Frequency Range: 3400-3500 MHz Input Voltage: 7-16 VDC Description: The 9ULNACK
HD Flex Patch Panel. ASSEMBLY VIEW (FLEX1UPN** shown) FS128B. CONTENTS: (#) indicates FLEX4UPN** quantity
 FS128B. CONTENTS: (#) indicates FLEX4UPN** quantity") HD Flex Patch Panel Part Numbers: FLEX1UPN**, FLEX2UPN**, FLEX4UPN** Panduit Corp. 2018 INSTALLATION INSTRUCTIONS Note: HD Flex Patch Panels are compatible with HD Flex Fiber System Components. HD Flex
HD Flex Patch Panel Part Numbers: FLEX1UPN**, FLEX2UPN**, FLEX4UPN** Panduit Corp. 2018 INSTALLATION INSTRUCTIONS Note: HD Flex Patch Panels are compatible with HD Flex Fiber System Components. HD Flex
INSTALLATION INSTRUCTIONS RGB / RGBW 24V LED TAPE
 LLI-LCC4.4W LLI-LCCW4.4W LLI-LCCW5.8W **DANGER: Prior to installation, disconnect power at the source.** Make sure you have all components listed below: LED tape 24VDC Power Supply Connectors (if creating
Experimental Procedure
 1 of 15 9/13/2018, 3:16 PM https://www.sciencebuddies.org/science-fair-projects/project-ideas/energy_p009/energy-power/human-powered-energy (http://www.sciencebuddies.org/science-fair-projects /project-ideas/energy_p009/energy-power/human-powered-energy)
E4200 Antenna Installation Instructions: 1. Soldering required (here is the list of tools you will need)
") Thank you for purchasing the 6 Antenna Mod Kit for your Linksys router. First we will show you how to install the antennas for your router. Next we will teach you how to setup the DD-WRT firmware which
Thank you for purchasing the 6 Antenna Mod Kit for your Linksys router. First we will show you how to install the antennas for your router. Next we will teach you how to setup the DD-WRT firmware which
Snail Fence InteleCell Deployment Guide
 Snail Fence InteleCell Deployment Guide Preparation 1. Prepare deployment trip by making sure you have the following materials and tools when you fly up to the site: InteleCell NEMA Enclsoure (grey plastic
AT-AUTO (tm) QRO Keyline Upgrade Kit Installation Manual
 QRO Keyline Upgrade Kit Installation Manual") AT-AUTO (tm) QRO Keyline Upgrade Kit Installation Manual P.O. Box 341543 Beavercreek, Ohio 45434 5 September, 2015 Copyright 2015 ii Contents 1 Introduction 2 1.1 General Description and Purpose........................
AT-AUTO (tm) QRO Keyline Upgrade Kit Installation Manual P.O. Box 341543 Beavercreek, Ohio 45434 5 September, 2015 Copyright 2015 ii Contents 1 Introduction 2 1.1 General Description and Purpose........................
Introduction. The Clock Hardware. A Unique LED Clock Article by Craig A. Lindley
 Introduction As hard as it might be to believe, I have never built an electronic clock of any kind. I've always thought electronic clocks were passe and not worth the time to design and build one. In addition,
MAKE AN RGB CONTROL KNOB.
 MAKE AN RGB CONTROL KNOB. This is a knob based colour changing controller that uses a custom programmed microcontroller to pack a lot of features into a small affordable kit. The module can drive up to
HCS - HES Cabling Systems
 HCS - HES Cabling Systems Installation Manual for HCS High-Capacity Fiber-Optic Rack-Mount Cabinets Be sure to read and completely understand this procedure before applying product. Be sure to select the
Triax TechInfo. Installing and pulling Fibre Optic cables
 Installation methods for both wire cables and Fibre Optical cables are similar. Fibre cable can be pulled with much greater force than copper wire if you pull it correctly. Just remember these rules: 1)
imac Intel 20" EMC 2133 and 2210 LCD Backlights (CCFL) Replacement
 Replacement") imac Intel 20" EMC 2133 and 2210 LCD Backlights (CCFL) Replacement The CCFL back lights are replaceable. I have pulled mine apart and documented my method. '''NOTE''' This is not for the feint hearted!
imac Intel 20" EMC 2133 and 2210 LCD Backlights (CCFL) Replacement The CCFL back lights are replaceable. I have pulled mine apart and documented my method. '''NOTE''' This is not for the feint hearted!
Multi-Key v2.4 Multi-Function Amplifier Keying Interface
 Multi-Key v2.4 Multi-Function Amplifier Keying Interface ASSEMBLY & OPERATION INSTRUCTIONS INTRODUCTION The Harbach Electronics, LLC Multi-Key is a multi-function external device designed for the safe
White Paper. Discone Antenna Design
 White Paper Discone Antenna Design Written by Bill Pretty Highpoint Security Technologies Property of Highpoint Security Technologies Inc The user of this document may use the contents to recreate the
DIY. How to install a PL-259 connector. Parts list: Tools list: Worthwhile projects you can build on your own
 DIY Worthwhile projects you can build on your own Just like you, I often need to install a PL-259 connector on a length of coax (coaxial cable), to attach it to the mating SO-239 connector of a mobile
HOW TO BUILD AND BIND A BOOK. A step by step guide to using the screw & post method
 HOW TO BUILD AND BIND A BOOK A step by step guide to using the screw & post method FIVE THINGS YOU CAN DO BEFORE BUILDING YOUR PORTFOLIO Presenting a finished body of work in a way that you're proud of
HDMI over Wireless Extender - 65 ft. (20 m) p
 p") HDMI over Wireless Extender - 65 ft. (20 m) - 1080p Product ID: ST121WHDS This HDMI over wireless extender kit lets you extend your HDMI video signal wirelessly to a remote location, up to 65 ft. (20 m)
HDMI over Wireless Extender - 65 ft. (20 m) - 1080p Product ID: ST121WHDS This HDMI over wireless extender kit lets you extend your HDMI video signal wirelessly to a remote location, up to 65 ft. (20 m)
LP-PAN Preamp Kit Assembly Manual
 LP-PAN Preamp Kit Assembly Manual December 2010 TelePost Incorporated Rev. A9 1 Table of Contents Introduction... 2 Specifications... 3 Parts List... 4 Assembly... 5 Checkout / Schematic... 9 Introduction
Reference Manual. Notes 9/16 Series H
 Reference Manual Notes 9/16 Series 173.01H Copyright notice The information in this document is subject to change without prior notice and does not represent a commitment on the part of Q-MATIC AB. All
Christmas LED Snowflake Project
 Christmas LED Snowflake Project Version 1.1 (01/12/2008) The snowflake is a follow-on from my Christmas star project from a few years ago. This year I decided to make a display using only white LEDs, shaped
How To Build Megavolt s Small Buffered JTAG v1.2
 How To Build Megavolt s Small Buffered JTAG v1.2 Abstract A JTAG cable should be considered mandatory equipment for any serious tester. It provides a means to backup the information in the receiver and
Toughsat Flyaway Users Manual
 Toughsat Flyaway Users Manual TOUGHSAT FLYAWAY USERS MANUAL V.1.6 September 2012 Important warning regarding your TOUGHSAT System All power to the system (controller, modem, external network devices) MUST
COLOUR CHANGING USB LAMP KIT
 TEACHING RESOURCES SCHEMES OF WORK DEVELOPING A SPECIFICATION COMPONENT FACTSHEETS HOW TO SOLDER GUIDE SEE AMAZING LIGHTING EFFECTS WITH THIS COLOUR CHANGING USB LAMP KIT Version 2.1 Index of Sheets TEACHING
Notes on Making a Book February 10, 2017
 Notes on Making a Book February 10, 2017 Many methods have been used over the centuries to bind pages into a book. The subject is fundamentally divided between books made up of signatures and book made
Tip: Faller Mittelstadt Apartments with Controlled LED Lighting Date: , Addition
 Hi All, I have had the 130926 Mittelstadt apartments shown below on my layout for a long time and thought it was about time to add LED lighting to the buildings. With my success at upgrading the Faller
PRJTPFL inch PRJTPFL inch PRJTPFL inch. Fixed Wall Mount Projector Screen. Universal Home/Office Projector Viewing Display
 PRJTPFL102-100 - inch PRJTPFL112-110 - inch PRJTPFL122-120 - inch Fixed Wall Mount Projector Screen Universal Home/Office Projector Viewing Display Be sure to read this manual before use so you will know
Lab 7: Soldering - Traffic Light Controller ReadMeFirst
 Lab 7: Soldering - Traffic Light Controller ReadMeFirst Lab Summary The two-way traffic light controller provides you with a quick project to learn basic soldering skills. Grading for the project has been
Lab 7: Soldering - Traffic Light Controller ReadMeFirst
 Lab 7: Soldering - Traffic Light Controller ReadMeFirst Lab Summary The two way traffic light controller provides you with a quick project to learn basic soldering skills. Grading for the project has been
Assembling and Mounting the Presentation Display, Speakers, Speaker Screens, and Table Door
 CHAPTER 8 Assembling and Mounting the Presentation Display, Speakers, Speaker Screens, and Table Door July 13, 2012, This document provides you with the procedures you perform to assemble and mount the
The Haply Development Kit
 The Haply Development Kit Introduction The Haply development kit is a robust and adaptable open-source hardware development platform for haptic applications. Designed to be accessible to novices and experts
Bill of Materials: Super Simple Water Level Control PART NO
 Super Simple Water Level Control PART NO. 2169109 Design a simple water controller in which electrodes are required to sense high and low water levels in a tank. Whenever the water level falls below the
New Products. New Possibilities.
 Visit us at CES! Booth #94 (Central Hall) New Products. New Possibilities. Discover the innovations of 0 WHAT S INSIDE Furniture Mount System (FMS) Basic Series Furniture Super Slim Full-Motion Mounts
PowerBook G4 Aluminum 12" GHz LCD panel upgrade
 PowerBook G4 Aluminum 12" 1-1.5 GHz LCD panel upgrade Upgrade a 1400x1050 LCD panel. Written By: martin ifixit CC BY-NC-SA www.ifixit.com Page 1 of 18 INTRODUCTION The original LCD 1024x768 resolution
Modifying the RW1127 and similar TWTs for 24GHz
 Modifying the RW1127 and similar TWTs for 24GHz Some notes by Brian G4NNS updated after the EME conference. Issue 1.04 During a visit from Johannes DF1OI he explained how Ulli DK3UC had modified Siemens
FOSC-600 C and D I N S T A L L A T I O N I N S T R U C T I O N
 FOSC-600 C and D I N S T A L L A T I O N I N S T R U C T I O N In-line and butt version Cold applied re-usable fiber optic closure Contents 1 Introduction 1.1 Product description 1.2 Capacity 2 General
Chapter 4. Dish Antenna Installation. Installing a DISH 500 Antenna. Finding the Satellites
 These instructions guide you through the installation of a satellite system which includes your receiver (included with this manual), and a DISH Pro DISH 500 antenna system that can be identified by the
NewScope-7A Operating Manual
 2016 SIMMCONN Labs, LLC All rights reserved NewScope-7A Operating Manual Preliminary May 13, 2017 NewScope-7A Operating Manual 1 Introduction... 3 1.1 Kit compatibility... 3 2 Initial Inspection... 3 3
y POWER USER MUSIC PRODUCTION and PERFORMANCE With the MOTIF ES Mastering the Sample SLICE function
 y POWER USER MUSIC PRODUCTION and PERFORMANCE With the MOTIF ES Mastering the Sample SLICE function Phil Clendeninn Senior Product Specialist Technology Products Yamaha Corporation of America Working with
INSTALLATION GUIDE DYNAMIC TRIM CONTROL SYSTEM SERIES S
 INSTALLATION GUIDE DYNAMIC TRIM CONTROL SYSTEM SERIES S Drill bits TOOLS Power drill Ø Ø Ø Ø Ø 2.5 mm (3/32 ) 3 mm (1/8 ) 3.5 mm (9/64 ) 4 mm (5/32 ) 5 mm (3/16 ) Sealant Hole saw Screw bits Ø 76 mm (3
MY-HITE ADJUSTABLE TABLE
 MY-HITE ADJUSTABLE TABLE Corner T Leg Base Model Number : FCNAHBT Please Read Instructions Before Use ASSEMBLY INSTRUCTIONS ALL WORKSTYLES WELCOME Thank you for choosing Friant. We appreciate the trust
CABLE MANAGEMENT PRODUCTS Cable Managers & Accessories
 CABLE MANAGEMENT PRODUCTS Cable Managers & Accessories Evolution Cable Management Page 5-3 Velocity Cable Management Page 5-8 Velocity Standard Pack Page 5-12 Vertical Cable Management Page 5-13 Global
VITALink Taped Splice Straight Through Crimp
 A Marmon Wire & Cable Berkshire Hathaway Company VITALink Taped Splice Straight Through Crimp 2 Hour Fire-Rated Splice VITALink MC Cables, UL FHIT 120 Installation Instructions Description The VITALink
GENUINE PARTS SATELLITE RADIO INSTALLATION INSTRUCTIONS. 1. DESCRIPTION: Satellite Radio System 2. APPLICATION: Frontier (2006~)
") GENUINE PARTS SATELLITE RADIO INSTALLATION INSTRUCTIONS 1. DESCRIPTION: Satellite Radio System 2. APPLICATION: Frontier (2006~) Xterra (2006~) 3. PART NUMBERS: XM Tuner Kit 999U9-AS003 SIRIUS Tuner Kit
GENUINE PARTS SATELLITE RADIO INSTALLATION INSTRUCTIONS 1. DESCRIPTION: Satellite Radio System 2. APPLICATION: Frontier (2006~) Xterra (2006~) 3. PART NUMBERS: XM Tuner Kit 999U9-AS003 SIRIUS Tuner Kit
3.22 Finalize exact specifications of 3D printed parts.
 3.22 Finalize exact specifications of 3D printed parts. This is the part that connect between the main tube and the phone holder, it needs to be able to - Fit into the main tube perfectly - This part need
Gigabit Multi-mode SX to Single Mode LX Converter. User s Manual NGF-728 Series. Warning COPYRIGHT
 COPYRIGHT Gigabit Multi-mode SX to Single Mode LX Converter User s Manual NGF-728 Series All rights reserved. No part of this publication may be reproduced, stored in a retrieval system, or transmitted
RACKS, ENCLOSURES AND CABLE MANAGEMENT
 and RS3 RACK SYSTEM (pages 6.2 6.3) RS RACK SYSTEM (pages 6.4 6.5) EXTENDED DEPTH RS RACK SYSTEM (page 6.5) Vertical Side Rail Capacity Cable Manager Covers Accessories 117mm x 152mm (4.6 in. x 6.0 in.)
Assembly instructions
 Assembly instructions Model: MXR0024/KIT TV Aerial - 18 Element Kit Contact: Helpline: +44 (0)1553 811000 Email: support@maxview.co.uk Web: www.maxview.co.uk Maxview reserve the right to change specifications
Installing a Wire Mesh Pulling Grip on All-Dielectric DX Armored Fiber Optic Cables
 revision history Issue Date Reason for Change Related literature SRP-004-136 Accessing All-Dielectric DX Armored Fiber Optic Cables Admonishments 1. General This procedure provides instructions for installing
Tube Cricket Build Guide
 Tube Cricket Build Guide The Tube Cricket is a small-wattage amp that puts out about 1 watt of audio power. With a 12AU7 tube-preamp and a JRC386 power amp, the Tube Cricket gives you great tone in a compact
Cellular Signal Booster
 Drive 4G-X Cellular Signal Booster THE ALUMINUM CASING OF YOUR SIGNAL BOOSTER!! WILL ADJUST TO THE TEMPERATURE OF ITS ENVIRONMENT, BUT IS DESIGNED TO PROTECT THE SIGNAL BOOSTER TECHNOLOGY. FOR EXAMPLE,
INSTALLATION INSTRUCTIONS
 LIGHTGUARD 350-20-WTC SEALED FIBER OPTIC CLOSURE VIEW ONLINE TABLE OF CONTENTS: GENERAL...2 SPECIFICATIONS...2 PACKAGE CONTENTS...3 PACKAGE CONTENTS: ACCESSORIES...3 RECOMMENDED TOOLS...3 ADD-ON COMPONENTS...4
Motor Operated Solar Shade with Valance Installation and Care Instructions Complete Video Instructions Available Online at
 * Motor Operated Solar Shade with Valance Installation and Care Instructions Complete Video Instructions Available Online at www.keystonefabrics.com Step 1: Identify the parts of your shade (parts shown
TITLE: FIBER OPTIC SHOCK FIXTURES
 ENGINEERING PRACTICE STUDY TITLE: FIBER OPTIC SHOCK FIXTURES 18 January 2007 STUDY PROJECT 60GP-2006-019 FINAL REPORT Study Conducted By Dave Leight DSCC-VAT Fiber Optic Group Prepared by: Dave Leight
INSTALATION PROCEDURE
 INSTALLATION PROCEDURE Overview The most difficult part of an installation is in knowing where to start and the most important part is starting in the proper start. There are a few very important items
K Service Source. Apple High-Res Monochrome Monitor
 K Service Source Apple High-Res Monochrome Monitor K Service Source Specifications Apple High-Resolution Monochrome Monitor Specifications Characteristics - 1 Characteristics Picture Tube 12-in. diagonal
HQ Electromagnetic Channel Locks
 HQ Electromagnetic Channel Locks Table of Contents Overview... 2 Kit Contents... 2 Tools Required... 5 Installation... 5 Using the HQ Electromagnetic Channel Locks... 10 Troubleshooting... 11 Overview
PLL1920M LED LCD Monitor
 PLL1920M LED LCD Monitor USER'S GUIDE www.planar.com Content Operation Instructions...1 Safety Precautions...2 First Setup...3 Front View of the Product...4 Rear View of the Product...5 Installation...6
Aruba Outdoor AP Antenna Weatherproofing
 Aruba Outdoor AP Antenna Weatherproofing Installation Guide Installing Antennas 1. Before connecting the antennas, identify which of your antennas are 2.4 GHz and which are 5 GHz. 2. After identifying
FOSC 450 C6 and D6 Closures
 FOSC 450 C6 and D6 Closures I N S T A L L A T I O N I N S T R U C T I O N Fiber Optic Splice Closure 1. General Product Information The FOSC 450 C6 and D6 fiber optic splice closures use compressed gel
GENUINE PARTS CAUTION
 GENUINE PARTS SATELLITE RADIO INSTALLATION INSTRUCTIONS 1. DESCRIPTION: SATELLITE RADIO SYSTEM 2. PART NUMBERS: XM tuner kit 999U9-NV003 XM antenna kit 999U9-VR000 Sirius tuner kit 999U9-NV004 Sirius antenna
Azatrax Model Railroad Track Signal Control - Single Track
 Installation Guide Azatrax Model Railroad Track Signal Control - Single Track TS2 What it is: The TS2 operates one or two trackside block signals (one in each direction) on one track to simulate the block
 English CCM7 Welcome to Bowers and Wilkins and the CCM7 Series Thank you for choosing Bowers & Wilkins. When John Bowers first established our company he did so in the belief that imaginative design, innovative
3 Closure preparation 3.1 Work-stand 3.2. Opening FIST-GCOG2-Dx Preparing drop cable with micro-tubes
 FIST-GCOG2-Dx24 I N S T A L L A T I O N I N S T R U C T I O N FTTH closure for micro-tubes and micro-cables Content 1 Introduction 2 Kit content 3 Closure preparation 3.1 Work-stand 3.2. Opening FIST-GCOG2-Dx24
IPad 4 REPAIR GUIDE. Version Edition
 IPad 4 REPAIR GUIDE Version 1 2016 Edition IPad 4 REPAIR GUIDE LCD AND DIGITIZER REPLACEMENT RiAna Soto Repair Training Specialist rsoto@cellairis.com FOR EVERY REPAIR MAKE SURE TO COMPLETE, INITIAL, AND
Instructions for WiP Relay Block Kit
 Instructions for WiP Relay Block Kit So you re working on a larger-than-normal electrical project? That s what this relay kit is offered for (it s also for use with the regular project that you may add
IPad 3 (glass) REPAIR GUIDE. Version Edition
 REPAIR GUIDE. Version Edition") IPad 3 (glass) REPAIR GUIDE Version 1 2016 Edition IPad 4 REPAIR GUIDE LCD AND DIGITIZER REPLACEMENT RiAna Soto Repair Training Specialist rsoto@cellairis.com FOR EVERY REPAIR MAKE SURE TO COMPLETE, INITIAL,
IPad 3 (glass) REPAIR GUIDE Version 1 2016 Edition IPad 4 REPAIR GUIDE LCD AND DIGITIZER REPLACEMENT RiAna Soto Repair Training Specialist rsoto@cellairis.com FOR EVERY REPAIR MAKE SURE TO COMPLETE, INITIAL,
19" TiRAX cabinet system. from page 3. 19" NETcell cabinet system from page 31. Open 19" racks from page 43
 19" TiRAX cabinet system from page 3 19" NETcell cabinet system from page 31 Open 19" racks from page 43 all-mounting/stand-alone distribution systems from page 53 all-mounting enclosure systems from page
2002 Martin Professional A/S, Denmark.
 Freekie user manual 2002 Martin Professional A/S, Denmark. All rights reserved. No part of this manual may be reproduced, in any form or by any means, without permission in writing from Martin Professional
NC-1000 INSTALLATION MANUAL NC-1000 FIBRE OPTIC CROSS-CONNECTION SYSTEM
 NC-1000 INSTALLATION MANUAL NC-1000 FIBRE OPTIC CROSS-CONNECTION SYSTEM Content 1. General 5 2. The products of NC-1000 system 6 3. Mounting of the frame 8 4. Earthing of the frame 8 NC-1000 FIBRE OPTIC
STRAIGHT TWO WAY JOINT3/C, PAPER INSULATED, SHIELDED, LEAD COVERED CABLE. Revised: October 10, 2008 Revised By: SGL Approved By: RHS SPLICES
 STRAIGHT TWO WAY JOINT3/C, PAPER INSULATED, SHIELDED, LEAD COVERED CABLE I. INSTALLATION INSTRUCTIONS I.1. PRECAUTIONS: I.1.1. Expansion bends must be made in the cables to allow for cable movement while
Satellite Dish Installation Manual (Ver. 2) 1
 1") Satellite Dish Installation Manual Provided by DiscoverNet, Inc. Satellite Dish Installation Manual (Ver. 2) 1 Table of Contents Section 1: Introduction Page 3 Section 2: Recommended Tools and Materials
Satellite Dish Installation Manual Provided by DiscoverNet, Inc. Satellite Dish Installation Manual (Ver. 2) 1 Table of Contents Section 1: Introduction Page 3 Section 2: Recommended Tools and Materials
SEP Bright Pi v1.0 Assembly Instructions
 SEP Bright Pi v1.0 Assembly Instructions When you purchased your Bright Pi v1.0 kit, you should have received an anti-static bag with some components in it which will require soldering together in order
Cold Shrink Straight Joint
 Cold Shrink Straight Joint 3M QS2000E 22 kv Single Core Straight Joint Instruction Sheet All dimensions shown are in mm unless otherwise stated Kits contains components for one single core cable -2-2*
Pelican PL-957. Adding additional Tos Link (Digital Optical) inputs, and / or IR Remote
 inputs, and / or IR Remote") Pelican PL-957 Adding additional Tos Link (Digital Optical) inputs, and / or IR Remote Table of Contents: Background;... 2 Section 1: Adding TosLink receivers... 3 Section 2: Adding Remote Capability...
Pelican PL-957 Adding additional Tos Link (Digital Optical) inputs, and / or IR Remote Table of Contents: Background;... 2 Section 1: Adding TosLink receivers... 3 Section 2: Adding Remote Capability...
Safety Rules Parts Check Lists and Photos Cable Diagrams for Various Crane Configurations Step by Step Instructions Tips for Packaging and Storage
 EZ CRANE USER MANUAL INCLUDED INSIDE Safety Rules Parts Check Lists and Photos Cable Diagrams for Various Crane Configurations Step by Step Instructions Tips for Packaging and Storage WATCH THE INSTRUCTIONAL
GENUINE PARTS. SIRIUS Under Glass Antenna Kit
 GENUINE PARTS SATELLITE RADIO INSTALLATION INSTRUCTIONS 1. DESCRIPTION: Satellite Radio System 2. APPLICATION: Pathfinder (2006-2007) 3. PART NUMBERS: XM Tuner Kit 999U9-AS005 SIRIUS Tuner Kit 999U9-AS006
3M Better Buried Compound Compression Closure System
 3M Better Buried Compound Compression Closure System Instructions March 2016 78-0015-2948-2-A Contents: 1.0 General...3 2.0 Kit Contents...3 3.0 Closure Selection Guide...4 4.0 LHS End Cap Installation...5
Optical Distribution Box 300 Installation Guide. Version : R0.0
 Optical Distribution Box 300 Installation Guide Document No. : OD16-546-L-01 Version : R0.0 Date: 21-Mar-2018 IMPORTANT INSTRUCTIONS When using fiber optic equipment, basic precautions should always be
UAV Ultimate Atari Video A7800
 UAV Ultimate Atari Video A7800 Basic Install guide because this is really easy mod to do! The UAV is a wonderful piece of tech for what it can do. To summarize, the UAV is a replacement video encoder and
USER MANUAL. GOLDMUND LOGOS 1N-2N SPEAKER SYSTEM Active Speaker
 USER MANUAL GOLDMUND LOGOS 1N-2N SPEAKER SYSTEM Active Speaker Thank you for purchasing the Goldmund LOGOS 1N-2N SPEAKER SYSTEM The Goldmund Logos line fully incorporates the technological expertise developed
PRODUCT MANUAL. Product Description. Product Features. Manual will Review. LED Mini Neon 80W 24V DC. LED Mini Neon 80W 24V DC
 Product Description Thank you for purchasing Solid Apollo s! Solid Apollo s LED Mini Neon is a state of the art Neon LED lighting simulating the effect and look of neon in a thin continuous well-balanced
2178-L/S Series Fiber Optic Splice Case with Gasket
 2178-L/S Series Fiber Optic Splice Case with Gasket Instructions for: 2178-S Splice Case 2178-LS Splice Case 2178-LL Splice Case 2181-LS Cable Addition Kit May 1997 34-7041-9949-5-A 1 Table of Contents
TKEY-K16. Touch CW automatic electronic keyer. (No moving parts no contacts) Assembly manual. Last review: March 15, 2018
 Assembly manual. Last review: March 15, 2018") TKEY-K16 Touch CW automatic electronic keyer (No moving parts no contacts) Assembly manual Last review: March 15, 2018 Commands and use manual of the K16 and Updates and news: www.ea3gcy.com Thanks for
TKEY-K16 Touch CW automatic electronic keyer (No moving parts no contacts) Assembly manual Last review: March 15, 2018 Commands and use manual of the K16 and Updates and news: www.ea3gcy.com Thanks for
Telecommunications Service Technician
 Telecommunications Service Technician Telecommunications Service Technician This Construction Zone workstation will teach you the basic fundamentals of installing telecommunication cables, as you acquire
A Beginner's Guide to Digital 3-D Projection: A Guide for the Not-Too-Technically Inclined by David Starkman -
 A Beginner's Guide to Digital 3-D Projection: A Guide for the Not-Too-Technically Inclined by David Starkman - reel3d@aol.com A few years ago, thanks to the electronic and mechanical construction skills
Robot Preemptive Troubleshooting
 Robot Preemptive Troubleshooting In FIRST Robotics Competion, robots take a lot of stress while driving around the field. It is important to make sure that connections are tight, parts are bolted securely
K Service Source. Apple High-Res Monochrome Monitor
 K Service Source Apple High-Res Monochrome Monitor K Service Source Specifications Apple High-Resolution Monochrome Monitor Specifications Characteristics - 1 Characteristics Picture Tube 12-in. diagonal
Hip Hop Activity Box. Instruction Manual. Hip Hop Activity Box 22875, October 2018 Copyright ROMPA Ltd
 Hip Hop Activity Box Instruction Manual Hip Hop Activity Box 22875, October 2018 Copyright ROMPA Ltd Contents 3 Panel Overview 5 Colour 5 Description 5 Technical Specification 6 Dimensions 7 Contents 8
TV Lift System Model CL-65 Installation Instructions
 TV Lift System Model CL-65 Installation Instructions Contact: Support@Nexus21.com Toll Free: (866) 500-5438 Phone: (480) 951-6885 Fax: (480) 951-6879 Revised: 01/17/17 Below is a parts list describing
Cable ISOBUS Active Termination
 ISOBUS Retrofit Kit Ag Leader Technology Note: Indented items indicate parts included in an assembly listed above Part Name/Description Part Number Quantity ISOBUS Retrofit Kit 4100843 1 Hex Head Bolt
National Wire and Cable and National Cable Molding Headquarters Los Angeles California
 National Wire and Cable and National Cable Molding Headquarters Los Angeles California CAPABILITIES Medical Business Machines Communications Equipment Computer Equipment Audio Systems General Instrumentation
SECTION 7 -- CROSS-CONNECT SYSTEMS
 DETAIL ENGINEERING REQUIREMENTS AT&T March, 2016 Section 7, ATT-TP-76400 Revised NA SECTION 7 -- CROSS-CONNECT SYSTEMS CONTENTS PAGE 1. GENERAL... 7-2 1.1. Introduction... 7-2 1.2. Cable Holes... 7-2 1.3.
2178 Fiber Optic Splice Case and 2181 Cable Addition Kit
 2178 Fiber Optic Splice Case and 2181 Cable Addition Kit Instructions January 1994 Issue 1, 34-7029-6387-6 1 2 Contents: 1.0 General... 4 2.0 Specifications... 4 3.0 Kit Contents... 5 SECTION 1: 2178 Splice
Star Series Star Floor Kit (CLSSFK25-50 or CLSSFK50-50) LED driven Fiber Optic Lighting
 LED driven Fiber Optic Lighting") Star Series Star Floor Kit (CLSSFK25-50 or CLSSFK50-50) LED driven Fiber Optic Lighting Installation Instructions Read all instructions before attempting to perform installation work 79-15279-00 REV6/18
Star Series Star Floor Kit (CLSSFK25-50 or CLSSFK50-50) LED driven Fiber Optic Lighting Installation Instructions Read all instructions before attempting to perform installation work 79-15279-00 REV6/18
VITEK VTM-TLM191 VTM-TLM240
 VTM-TLM191 VTM-TLM240 19 & 24 Professional LED Monitors with HDMI, VGA, and Looping BNC VITEK FEATURES 19 & 24 Wide Screen LED Display Panel HDMI, VGA, and Looping BNC Composite Video Inputs & Stereo Audio
Home Cinema LCD Projector with 4K Enhancement and HDR
 Home Cinema 4000 3LCD Projector with 4K Enhancement and HDR Contact Us 800.463.7766 Mon-Fri 6am-8pm, Sat 7am-4pm PT The elite 4Ke home theater projector that brings color to life. The Home Cinema 4000
7 SEGMENT LED DISPLAY KIT
 ESSENTIAL INFORMATION BUILD INSTRUCTIONS CHECKING YOUR PCB & FAULT-FINDING MECHANICAL DETAILS HOW THE KIT WORKS CREATE YOUR OWN SCORE BOARD WITH THIS 7 SEGMENT LED DISPLAY KIT Version 2.0 Which pages of