Digital Satellite Receiver
|
|
|
- Willis Chester May
- 5 years ago
- Views:
Transcription

1 Digital Satellite Receiver 5000 * * 1 4 Ы eg- 9j I User's Manual Please read this User's Manual carefully before installing this Receiver

2 (JABLE0FC0NTENTS_ GENERALSAFETY GENERAL INFORMATION 3 I. UNPACKING 2 II. FEATURES g III. REMOTE CONTROL UNIT (RCU) IV. FRONT PANEL V. REAR PANEL ^ ^ д INSTALLING EQUIPMENT g CHANNEL LIST GUIDE 9 MENU GUIDE 11 MAIN PAGE 11 I.CHANNEL MANAGER 11 II. INSTALLATION 13 III. OPTIONS I* IV. UTILITY 18 V.USB PVR TROUBLESHOOTING ^ on ^ SPECIFICATIONS lolisconnectthea^u^rrt^ mains socket, therefore the mains plug shall be readily operable.

3 # GENERAL SAFETY О WARNING Please read the following recommended instructions carefully to avoid the risk of your physical Injury before the product is operated. Do not cover the receiver and keep clear space around the receiver for sufficient. Check the receiver's operation voltage V, 50Hz-60Hz, Max 30W Keep liquid away from the receiver. The receiver shall not be exposed to dripping or splashing and no objects that filled with liquid shall not be placed on the receiver. Unplug the receiver from the wall outlet before cleaning. Use a soft cloth and a mild solution of washing-up liquid to clean the casing. Do not block the receiver's ventilation slots which are provided for ventilation and protection from overheating. Please maintain the receiver in a free airflow. Do not allow the receiver to be exposed to hot, cold or humid condition. Do not use any cable and attachment that are not recommended as these may damage your equipment. Please unplug the receiver from the wall outlet and disconnect the cable between the receiver and the antenna when you will not use it for long time. Do not remove the cover to reduce the risk of electric shock. Do not attempt to service the receiver yourself. Refer all serving to qualified service personnel. Manual may be updated as new features.
 Remote Control Unit (RCU) 2) Batteries (2EA) 3) User's Manual 4)A/VCable II.")
4 # GENERAL INFORMATION " 1 rj» (.UNPACKING Please ensure that the following items are included with the receiver in your packing. 1) Remote Control Unit (RCU) 2) Batteries (2EA) 3) User's Manual 4)A/VCable II. FEATURES - MPEG-2 Digital & Fully DVB-S Compliant - On-Screen Display with 65,536 Color Full Resolution - Blind search (Power Scan) - DiSEqC Control version 1.0,1.2 and USALS compatible - Renameable 8 Favorite Channel groups - Upgrade Software & Updata Channel Database through USB Port & RS Digital Bitstream Out through S/PDIF A/V Output via RCA, SCART - Teletext by VBI, OSD (Optional)
5 (GENERAL

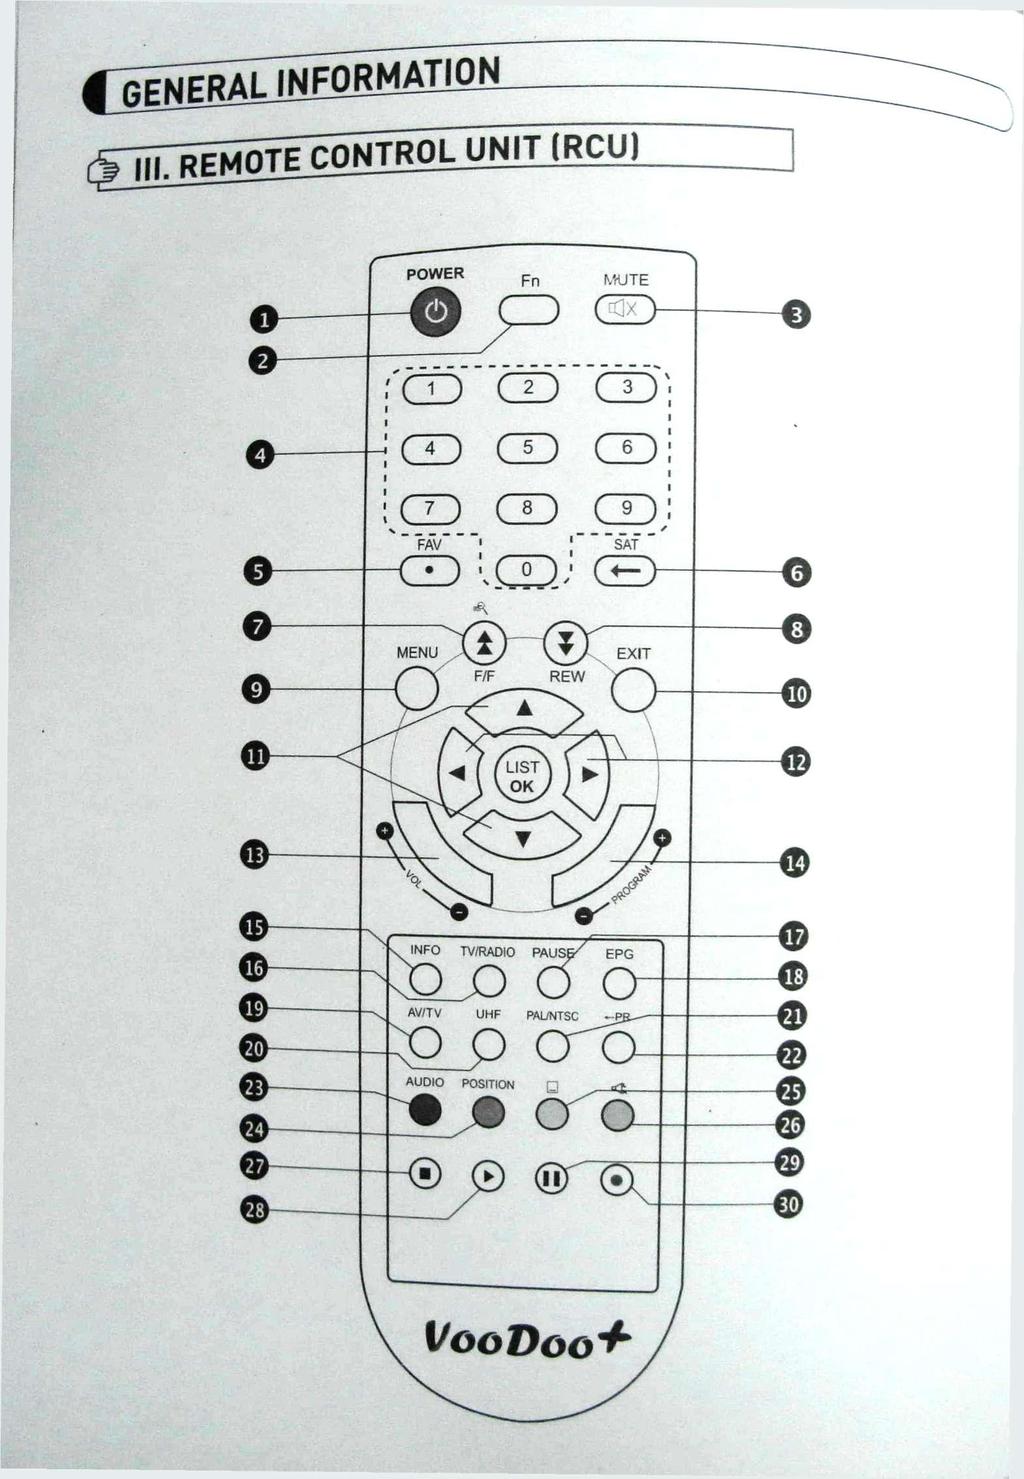
6 # GENERAL INFORMATION C> III. REMOTE CONTROLUNITIRCU) 1. POWER О Switch the receiver between operation and standby mode. 2. Fn Reserved. 3. MUTE (#) Enable or disable the audio. 4. Numeric buttons Select the TV or Radio service channel and individual menu. 5. FAV Toggle the selected favorite mode. 6. SAT Toggle the selected Satellite list. 7. ± (Щ) Move up a page in the channel list. (Select zoom in/out). 8. * Move down a page in the channel list. 9. MENU Display the main menu on screen. 10. EXIT Return to the previous menu or normal viewing mode from a menu. 11. AY Change channel or move to the item in the menu. 12. Л» Adjust the volume or move to left or move item in the menu. 13.V+/V- Turn volume up or down. 14. P+/P- Change channel up or down on normal mode. 15. INFO Display the program information box on the screen and edit the name of favorite channel list. 16. TV/RADIO Switch between TV and Radio. 17. PAUSE Pause the playing picture or go to normal mode, (for Live Mode) 18. EPG Display the TV or Radio program guide. (Electronic Program Guide) 19.AV/TV Select the TV or AV mode. 20. UHF Switch to UHF turning mode. 21. PAL/NTSC Switch PAL or NTSC mode. 22. *-PR Select the previously viewed channel. 23. Audio Change the audio languages. 24. POSITION Display position bar on the screen to adjust the antenna. 25. Q Enable subtitle and teletext mode. 26. Select the sound mode (LEFT/RIGHT/STEREO). 27. STOP Stop recording or playing. 28. Play Display file lists and play slow/normal. 29. PAUSE Pause the playing picture or go to normal mode, (for Recording Mode) 30. Record Record the program. ( ^

7 1. POWER Switch the receiver power On and Standby. 2. MENU Get into Main Page screen. 3. OK Execute the selected item. 4. CH Up/Down Channel up / down or select the item of Menu. 5. VOL Up/Down Volume up/down or select the item of Menu. ФМОТЕ: All USB 2.0 flash drive may not be compatible with the product.

8 # GENERAL INFORMATION V. REAR PANEL i ж 111 # i u 11 minim о «@ /f\ 1.LNBIN 2. LNB OUT 3. DIGITAL AUDIO 4. AUDIO-R 5. VIDEO 6. AUDIO-L 7.TVSCART 8. TV/VCR 9. ANT 10. Ethernet 11. RS POWER SUPPLY 13. POWER BUTTON Connect to Satellite antenna cable. Connect to another STB. Output for connecting to a digital amplifier. Connect to AUDIO RIGHT to TV or other equipment. Connect VIDEO to the TV or other equipment. Connect to AUDIO LEFT to TV or other equipment. Connect to TV SCART cable. Connect to TV or VCR. Connect to TV antenna input. Connect to Lan Cable. Connect to personal computer for software upgrade VAC, 50/60Hz, 30W. Turn On/Off.

9 # INSTALLING EQUIPMENT This section explains several ways of connecting the receiver to your existing TV. VCR and Hi-Fi system. You can choose one of the following setups that we recommend. If you have any problem or need help, consult your dealer or service provider. Please ensure that the following items are included with the receiver in your packing ф I. CONNECTING THE RECEIVER TO TV 1-1. Connecting the receiver to TV wrh the SCART cable Connect one end of the SCRAT cable to the TV SCRAT cocket on the rear panel of the recew and the other end to a SCRAT socket on the TV. О» II. CONNECTING THE RECEIVER TO TV WITH CINCH CABLE 1И.Connecting the receiver to TV with the CINCH cable Connect one end of the CINCH cable to the Audio-RlRed). the Audio-UWhitebnd the Video (Yellow) socket on the rear panel of the receiver and and other end to the AwBo- R(Red), the Audio-L(White) and the VIDEO(Yellow) socket on the TV.
 When you select one channel, information bar appears automatically on the screen for few seconds. This bar provides you the current channel information.")
10 ^CHANNEL LIST GUIDE Щ CONNECTING T H E R ^ i ^ ^ ^ g ^ Connecting the receiver to TV/VCR with RF cable 1. Normal Live Mode a) When you select one channel, information bar appears automatically on the screen for few seconds. This bar provides you the current channel information. b) Press INFO button to see the information during normal live mode. 2. Simple Channel List a) Press OK on the normal live mode to go to the channel list. b) When detail channel list is displayed on screen press RED button to go to simple channel list. 3. Detail Channel List a) Press OK on the normal live mode to go to the channel list. b) When simple channel list is displayed on screen press RED button to go to detail channel list. c) Press 4» and A Yto sort by Alphabet. d) Press SAT button to sort by Satellite and FAV button for Favorite 1-8. С

11 # CHANNEL LIST GUIDE e) Press GREEN button to return to All Channel or EXIT to return to the current live channel. f) Press the SAT key to show Satellite Pop-UP Window then select satellite. Channel list of selected satellite will be displayed. g Press the FAV key to show Favorite Pop-UP Window then select FAV list. Channel list of selected FAV will be displayed. h) Press the Green key then all searched channel list will be displayed. i) Press MENU key then cursor will move to ALL, placed on the left. jl Sort Key (Yellow Keyl-A-Z/Z-A/FAT/CAS. k Press Yellow key for sorting A-Z/Z-A/FAT/CAS. If you want to go back to unsort from the selected CAS go back to Pop-UP Window then select unsort. 4.EPG (Electronic Program Guide) a) Press EPG button on the live mode. b) EPG of the current channel appears on the screen. c) Select the channel that you want to watch program. d) To reserve program with recording function, press REC(#) button.(pvr model only) e) It will be appear like rightside picture. f) If you reserve program, then it will be record automatically at reserved time.lpvr model only) g) Press Select button twice to return to current live channel. 5. ZOOM IN/OUT a) By selecting page up key (* ) in a normal live mode you can use Zoom In/Out function. b) From the Pop-Up Window of Zoom function you can selectl*2*3*4)by page up key! ± ), for Zoom out press page down key. c) When you move cursor of Zoom focus by key (4 H Y ) then you can select Zoom In/Out on the focused point by pressing page up/down keys. Press Pause key then live mode will be paused on the mode of Zoom. 10

12 # MENU GUIDE ^ ^ Malm Page Press the MENU button on the RCU to open Main Page on the screen. Mam Page w#u be displayed. 1. You can move into the main page using A T 4» on the RCU. 2. Press OK to confirm your selection. 1 Press ЕШк return to the previous menu or press MENU to go to the current Wve channel I. Channel Manager ^ Utility II. Installations v USB PVR III. Options TNss 1 L Channel Manager on may help you to organize channels accw Channel Manager in the Main Page with 2. TV Channel Manager Page displays on the screen. 3. Select the mode that you want using 4 ling to your preference, and press OK. - о see the channel that you choose, go to the channel and then press RED bolton. 5. Press EXIT to return to the previous menu or press MENU to go to the current live channel H. Favorite 1-2. Rename 1-1 Move 1-4. Lock k& Delete 1-1. Favorite 1.Using 4» got the Favorite mode then press utton to choose Favorite 1-8. sokonthed lei Aat you want to add go to other modelrename-deletel except Favorite and then press FAV button to check Favorite Press EXIT to return to the previous menu or press MENU to go to the current live channel

13 L3 I. Channel Manager 1-2. Rename 1. Using 4» go to the Rename mode. 2. Select the channel that you want to rename using AT and then press OK. 3. Keypad Dialog displays on the screen. 4. Edit the name entering NUMBERS and / or WORDS in the Keypad Dialog. 5. Press YELLOW button to rename Favorite 1-8 and press BLUE button to rename Satellite. 6. Press EXIT to return to the previous menu or press MENU to go to the current live channel. * * * * * * * 1-3. Move 1. Using Л» go to the Move mode. 2. Select channels which you want to move by pressing OK key. 3. Move cursor that you want to place on than press GREEN button. 4. Press EXIT to return to the previous menu or press MENU to go to the current live channel Lock 1. Using 4» go to the Lock mode. 2. Select the channel that you want to lock and then press OK. will be marked at the end of the selected channel name bar. To delete press OK again. 3. Press EXIT to go to Main Page or press MENU to go to the current live channel Delete 1. Using 4 к go to the Delete mode. 2- Сесиле channel that you want to delete and then press ОК. Щ will be marked on the selected channel number. To delete press Blue button again. 3. Press YELLOW button to delete TP. Select one channel and press Blue button. All channels of that TP will be automatically selected. and press Blue button. All channels of that the Satellite will be automatically selected. 6. Message Box displays on the screen. 7.Select OK on the Message Box and then press OK to delete the markedchann^

14 # MENU GUIDE II. Installation ШкЗПСИПгЯ This section may help you to set up antenna and scan satellite or transponder, etc. Select Installations in Main Page using A v and press OK. Press EXIT to return to the previous menu or press MENU to go to the current live channel Channel Search II-2. DiSEqC Switch Motor Setup Factory Default I.You can move the cursor using AT and press OK when you select the value that you want. a) Satellite - Press OK to display the Satellite List Box. - Select the proper Satellite and then press OK. Ы DiSEqC - Press OK to display the DiSEqC Port List. - Select the proper DiSEqC port and then press OK. c) Frequency - Press OK to display the Frequency List. - Select the proper Frequency and then press OK. d) LNB - Press OK to display the LNB Frequency List. - Select the proper LNB Frequency and then press OK. -You can also input directly the numbers using NUMBER KEY on the RCU. e)22khztone - Select the one among None, 0 KHz or 22 KHz depending on the user's antenna switch box. f Search Option - Press OK to display the Search Option list. - Select the Search Option that you want and then press OK. g) Search - Press Search to start scan channels. - Selected Satellite displays on the screen. - Press» to select more Satellite or 4 to cancel the selected Satellites. - Press OK to start scanning. ж TP EDIT: To Edit TP, Press the RED button on the RCU. С 13
 If you select DiSEqC Switch and press OK on the menu will be, DiSEqC Switch Page will be displayed. b) Select the proper Satellite of each DiSEqC port (A-D) using 4» and AT and press SEARCH.")
15 4 MENU GUIDE 6 II. Installation DiSEqC Switch 1. Select Channel Search in Installation using AT and press OK. a) If you select DiSEqC Switch and press OK on the menu will be, DiSEqC Switch Page will be displayed. b) Select the proper Satellite of each DiSEqC port (A-D) using 4» and AT and press SEARCH. Selected Satellites will be searched automatically Motor Setup 1. You can move the cursor using AT and press OK when you select the value that you want, al Motor Type : DiSEqC 1.2. USAL - Press OK to display Motor Type - Select the proper Motor Type and then press OK. b) Satellite - Press OK to Display the Satellite List Box - Select the proper Satellite and then press OK. cl Switch & LNB - Press OK to Display the LNB frequency list or Switch Setting - Select proper LNB & proper Switch, d) Frequency - Press OK to Display the Frequency List. - Select the proper Frequency and then press OK. e Motor Movement - Search the appropriate position of the selected Satellite using 4». 1

16 # MENU GUIDE ф II. Installation 1 e) Motor Control Select the position using 4 к and then press OK. Message box displays on the screen. - Store Sat position : Stores the current position of the motor for the selected satellite. - Goto Sat Position : Moves the motor to the stored position of the selected satellite. - Goto 0 : Goes to the center of the motor. - Reset Position : Resets all stored position of the motor. f Satellite Position - Input directly the position using NUMBER KEY on the RCUl. -Selectthe direction using 4» (WEST/EAST). h) Search - Press Search to start scan channels. - Press OK to start scanning. g) Search Option - Press OK to display the Search Option list. - Select the Search Option that you want and then press OK. Ж TP EDIT: To Edit TP Press the RED button on the RCU. 2. Edit my local position - Press Green Button to edit local Position. a) Longitude - Input directly the Longitude using NUMBER KEY on the RCU. - Select the direction using 4» (WEST / EAST). Ы Latitude - Input directly the Latitude using UNMBER KEY on the RCU. - Select the direction using 4» (NORTH/SOUTHdl. 3. Press EXIT to return to the previous menu or press MENU to go to the current live channel Factory Default Use Factory Default function only when you want to return the receiver to the condition of factory default. All settings and channels will be deleted. 1. Select Factory Default in Installations using AT and press OK. 2. Message box displays on the screen. 3. Select OK to return the receiver to the condition of factory default and then press OK. 4. Press EXIT to return to the previous menu or press MENU to go to the current live channel. С

17 4 MENU GUIDE ф III. Options This section may help you to set up OSD language, time, etc. Select Options in Main Page using AT and press OK. Press EXIT to return to the previous menu or press MENU to go to the current live channel OSD Setup Control Panel III-3. Time Adjust III-4. Parental Lock Setup OSD Setup 1. Select OSD Setup in Options using AT and press OK. a) OSD Language - Press OK to display OSD Language list. - Select the language that you want and then press OK. b) Audio Language - Press OK to display Audio Language list. - Select the language that you want and then press OK. c) Display Info Bar - Press OK to display Display Info Bar time list. - Select the second that you want to display and then press OK. d) OSD Position - Press OK to change Horizontal and Vertical Position of the OSD. - OSD Position box displays on the screen. - Select Hor Position /Ver Position using AT. - Move the OSD Position to right/left or up/down using 4». - Select OK on the OSD Position box and then press OK. e) Screen format - Press OK to display screen format list. - Select the format that you want and then press OK. 2. Press EXIT to return to the previous menu or press MENU to go to the current live channel. С 1 16

18 # MENU GUIDE ф III. Options 2. Control Panel 1. Select TV Setup in Options using AT and press OK. a) Video Output - Press OK to display Video Output list. - Select RGB if your SCART supports RGB control and then press OK. - Select CVBS if your SCART does not support RGB control and the press OK. Ы TV Type - Press OK to display TV Type list. - Select the proper mode according to your TV type and press OK. c) UHF Channel - Press OK to display UHF Channel list. - Select the proper channel and then press OK. d) UHF Standard - Press OK to display UHF Standard list. - Select the proper mode and then press OK. 2. Press EXIT to return to the previous menu or press MENU to go to the current live channel Time Adjust Set your local time according to your location. 1. Select Time Setup in Options using 4» and press OK. 2. Time Adjust page displays on the screen. 3. Move the cursor using 4», A Yand press OK when you select the value that you want. (Input Hour directly using number keys on the RCU] 4. Press EXIT to return to the previous menu or press MENU to go to the current live channel Parental Lock Setup 1. Select Parental Lock Setup in Options using 4» and press OK. 2. Parental Lock Page displays on the screen. 3. You can lock and unlock Parental Lock selecting ON or OFF using AT (For Channels). 4. You can lock and unlock Install Lock selecting ON or OFF using AT (For Installation Settings]. 5. Enter new password if you want to change the current password. Z. а о о о 6. Confirm your new password entering new password again. 7. Press EXIT to return to the previous menu or press MENU to go to the current live channel. Note. DEFAULT PASSWORD IS С

19 # MENU GUIDE IV.Utility This section may hetp you to use USB, etc. Select Utility in Main Page using ж v and press OK. IV -1. System Information IV-2. USB IV-3. Game ;w wow**;***, IV-1. System Information This option help you to know the current S/W and H/W version. Also provides you the product name. 1. Select System Information in Options using ATand pres OK. 2. Press EXIT to return to the previous menu. IV-2 USB The receiver is equipped with host. 1. Select USB in Utility with А т and press OK. 2. If you want to change mode(s/w Upgrade, BootLoader Upgrade), press RED button on the RCU. 3. Select the file which you want to upgrade using А т and press OK. 4. After downloading the selected file, the receiver will reboot automatically. IV-3 Game Enjoy various games with the receiver.

20 # MENU GUIDE ф V.USB PVR Connect your USB memory device to STB 1. Record - IF you want to record the program, Press "RECbutton. - Press "STOP" button to stop recording. 2.PLAY - If you want to play the recorded file in your USB memory device, press "PLAY" button and then File List will be displayed. - Select the file which you want to play using ATand press OK. - If you want play other file, press OK button and File List will be displayed - SLOW: Press "PLAY" button. If you press "PLAY" button again, the speed will be normal. - F/F, Rewind, Pause is supported. 3. File Manager (Go to Main Menu -»Utility-»USB) - Delete - If you want to delete the file, press Yellow button. - Select the file which you want to delete using A V and press OK. Format - The STB supports only FAT32 file system - If you want to format your memory device onto FAT32, press Blue button. - After format, the all data will be deleted. 4. Caution - The only USB 2.0 high speed device is supported for PVR function. S / W download and MP3 play supports USB 1Л full speed. - Plesae use more than 2GByte memory device or USB HDD for PVR function. - Normally IGBtye can record minutes depends on program. - Some USB memory device cannot be supported. - Memory fragmentation can occur record problem, please format your USB memory device ossasionally. - For more information and updated software, please visit our website. 19

21 # TROUBLESHOOTING Problem Nothing appears on the Front Panel or No power supply Solution - Check that the power cable is plugged into the power socket. No Picture - Check the dish and adjust it. - Check the cable connection and correct it. - Get out of UHF mode. - Check channel and video output. No Sound - Check the volume level of the TV and receiver. - Check the mute status of TV and receiver. - Check the cable connection and correct. Remote Control Unit dose not work - Replace batteries. - Aim the remote control unit directly to the receiver. - Checking that nothing blocks the front panel. Service is not running or scrambled - Check the Conditional Access Module and smart card are appropriate for the selected service. - Check the Conditional Access Module and smart card are correctly inserted or not. "No Signal" on the screen - Check the signal strength and the signal quality in the menu. - Check the LNB and replace the LNB if necessary. - Check the LNB cable. - Check the Dish and adjust it. Tuner Defective Check - Go to the Option and select System Information. You have forgotten your secret PIN Code - Contact your Service Provider. (20 ^ ^ )
 compatibility Specification F-type (Output loop-through), IEC 169-24, Female -25 to -65 dbm LNB Power & Vertical :+13.5/18.5Vdc± 5% Polarization Horizotal: +18.")
22 (.Conditional Access Module Interface Rem SMART CARD II. Tuner & Channel Item Input Connector Signal Level Specification 1 SLOT.ISO 7816, GSM11.11 and EMV (payment systems) compatibility Specification F-type (Output loop-through), IEC , Female -25 to -65 dbm LNB Power & Vertical :+13.5/18.5Vdc± 5% Polarization Horizotal: +18.5Vd dc± Current: Max.SOOmA.Overload protected 22KHz Tone Frequency = 22KHz+2KHz DiSEqC Control Demodulation Input Symbol Rate Amplitude : 0.8± 0.2V Version 1.2 USALS Compatible OPSK 2~45Ms/s Convolution Code Rate 1/2, 2/3, 3/4, 5/6, 7/8 with Constraint Length K=7 III. A/V& Data In/Out Item TV Scart Output RCA Output Digital Data Interface IV. RF-Modulator Item RF-Connector Frequency Output Channel TV Standard Audio Output Preset Channel Specification CVBS, RGB, L, R Output with Volume Control CVBS(Yellow), L, R OutputlWhite, Redlwith Volume Control Digital Bitstream Out (Coaxial) RS-232, Bit Rate 115,200baud Connector: 9-Pin D-Sub Male type USB : Type A Connector Specification 75 ohm IEC 169-2, Male/Female 470MHz to 860MHz CH for the Demodulator PAL G/l/K Selectable by Menu Setting Mono with Volume Control Ch 38(or TBD), Software changeable by Menu Screen (
/720 x 480INTSC) Audio Decoding MPEG/Musicam Layer 1 & II Audio Mode Single channel/dual channel Joint Stereo/Stereo Teletext VBI& OSD(Optional) Sampling Rate")
23 # SPECIFICATIONS V. MPEG Transport Stream & A/V Decoding - Item Transport Stream Specification MPEG-2 ISO/IEC 13818/TransporTslrealnS^ Profile Level MPEG-2 MPOML Input Rate Max. 90 Mbit/ Video Resolution 720 X 576(PAL)/720 x 480INTSC) Audio Decoding MPEG/Musicam Layer 1 & II Audio Mode Single channel/dual channel Joint Stereo/Stereo Teletext VBI& OSD(Optional) Sampling Rate 32,44.1 and 48KHz VI. System Resources Item Specification Main Processor ARM946 RISC Processor Flash Memory 2Mbyte Program DRAM 32 Mbyte Channel Capacity Digital Channel: 5000 ' VII. Power Supply Item Input Voltage Power Consumption Poteciton Type VIII. Physical Specification Item Size(WxHxD) Net Weight Specification AC 90 to 250V, 50-60Hz Max. 30W Separate Internal Fuse SMPS Specification 290x50x220(mm) 1.4Kg
Table of Contents. Table of Contents. Safety Warning General Information. Installing Equipment Channel List Guide Menu Guide Main Page
 TABLE OF CONTENTS Table of Contents Table of Contents Safety Warning General Information Package Contents & Features Front Panel Rear Panel Remote Control Unit (RCU) Programing the Remote Control Installing
GDB9 INSTRUCTION MANUAL DIGITAL TERRESTRIAL RECEIVER
 GDB9 INSTRUCTION MANUAL DIGITAL TERRESTRIAL RECEIVER Goodmans Support: www.goodmans.co.uk/support Please read these instructions before use and keep for future reference IMPORTANT SAFETY INSTRUCTIONS Thank
User s Manual Digital Satellite Receiver
 A_ENG_110944 User s Manual Digital Satellite Receiver Please read the entire manual thoroughly and retain it for future reference. ENG - 1 General Safety Warning CAUTION RISK OF ELECTRIC SHOCK DO NOT OPEN
Xpresionn Digital Terrestrial Receiver. User Guide
 Xpresionn 2150 Digital Terrestrial Receiver User Guide GENERAL INFORMATION...3 A) SAFETY PRECAUTIONS...3 B) MAIN FEATURES...4 C) CONTENTS OF THE PACKAGING...4 D) REMOTE CONTROL...5 INSTALLATION...6 A)
FV400 DIGITAL TV RECEIVER WITH MODULATOR INSTRUCTION MANUAL
 FV400 DIGITAL TV RECEIVER WITH MODULATOR INSTRUCTION MANUAL Please read this instruction manual carefully before using your receiver Table of Contents Introduction-----------------------------------------------------------------------------
User s Guide. Digital Satellite Receiver
 User s Guide Digital Satellite Receiver Before Getting Started Information contained in this manual is subject to change without notice. No part of this publication may be copied, reproduced, or translated
SYMBOLS USED ON THE RECEIVER... 3 SAFETY INSTRUCTIONS... 4 I.GENERAL INFORMATION...
 Table of Contents SYMBOLS USED ON THE RECEIVER... 3 SAFETY INSTRUCTIONS... 4 I.GENERAL INFORMATION... 5 1. Preface... 5 2. Main Features... 5 3. General Operation of the Receiver... 6 4. Front Panel...
DIGITAL SET TOP BOX STB 7017 INSTRUCTION MANUAL
 DIGITAL SET TOP BOX STB7017 INSTRUCTION MANUAL STB 7017 CHANNEL After Sales Support Now you have purchased a Tevion product you can rest assured in the knowledge that as well as your 3 year parts and labour
Front and Rear Panel Remote Control Connecting to a Television...4. Connecting to an Audio System...5
 Table of Contents Front and Rear Panel... 1 Remote Control...... 2 Connecting to a Television...4 Connecting to an Audio System...5 Connecting to a DVD Recorder or VCR... 6 First Time Installation... 7
CONNECTION TO THE SATELLITE DISH LNB
 Safety Instructions Safety Instructions This product has been manufactured to satisfy the international safety standards. Please read all of safety and operating instructions before operating the product
OWNER'S MANUAL MODEL: DTV-2000 STANDBY/ON
 OWNER'S MANUAL MODEL: DTV-2000 STANDBY/ON CH+ CH- TABLE OF CONTENTS SAFETY PRECAUTIONS IMPORTANT SAFETY INSTRUCTIONS and FEATURES ACCESSORIES and LOADING BATTERIES REMOTE CONTROL UNIT FRONT PANEL and REAR
S7030PVR User Manual
 S7030PVR User Manual Important Safety Instructions 1) Do not use this apparatus near water. 2) Clean only with dry cloth. 3) Do not block any ventilation openings, install in accordance with the instructions.
STM 26 HD. DVB-S2+T2/C Compact meter User Manual. Ref R13. CAHORS Digital CS Cahors Cedex 9 FRANCE
 STM 26 HD DVB-S2+T2/C Compact meter User Manual Ref 0145225R13 Preface USER MANUAL Please read this manual carefully before using your Digital Sat meter for the first time. This operating manual will help
GENERAL INFORMATION INSTALLATION MENU INFORMATION. Main Features For your Safety Unpacking General Operation RCU Rear Panel.
 GENERAL INFORMATION 3 Main Features For your Safety Unpacking General Operation RCU Rear Panel 3 4 7 7 8 9 INSTALLATION 10 MENU INFORMATION Main Menu 1. Installation 1.1 Satellite list 1.2 Dish Setting
Table of Contents. Table of Contents
 Table of Contents Table of Contents 1. SAFETY PRECAUTIONS 2. GENERAL FEATURES 3. HARDWARE DESCRIPTION 4. HOW TO CONNECT YOUR RECEIVER 5. SYSTEM SETUP 6. MENU STRUCTURE 7. MENU OPERATION 7.1. USER SETTING
English CONTENTS 1. GUIDE OUTLINE THE MENU OSD INSTRUCTION TECHNICAL SPECIFICATION...17
 USER S MANUAL English CONTENTS 1. GUIDE...2 1.1 IMPORTANT SAFETY INSTRUCTIONS...2 1.2 UNPACKING...2 1.3 PRODUCT OVERVIEW& ILLUSTRATION...3 1.4 INSTALLATION OF METER...4 2. OUTLINE...5 3. THE MENU OSD INSTRUCTION...6
User manual FT-8100 HD. English
 User manual FT-8100 HD English WARNING!!! On the USB Memory Function for FT-8100 HD model, user can make recording or playing function using by external USB devices such as USB Flash Memory Disk or external
Contents. Safety instructions Reference 1.1 Genareal Features Delivery... 04
 HD 580 user manual Contents Safety instructions... 03 1. Reference 1.1 Genareal Features... 04 1.2 Delivery... 04 2. Names and key assignment 2.1 Front view... 05 2.2 Rear view... 05 2.3 Remote Control...
Content. Safety Precaution General Features Accessories Front Panel Rear Panel Remote Control Unit...
 Content Safety Precaution...3 1. Reference 1.1 General Features...4 1.2 Accessories...5 2. Basic Function 2.1 Front Panel...6 2.2 Rear Panel...7 2.3 Remote Control Unit...8 3. Installation and Connection
User Manual High Definition Digital Set Top Box DVBT9070 Please read this User Manual carefully to ensure proper use of this product and keep this man
 User Manual High Definition Digital Set Top Box DVBT9070 Please read this User Manual carefully to ensure proper use of this product and keep this manual for future reference. Important Safety Instructions
Remote Control Unit
 Contents Declaration of Conformity --------------------------------------------------------------------------------- 3 General Information -----------------------------------------------------------------------------------------
Xsarius Satmeter Pro. Manual
 Xsarius Satmeter Pro Manual 1 2 Directory of content Introduction Directory of content 3 Introduction 3 Satmeter Pro 02 Frontpanel & buttons 6 Xsarius provides high quality products that enable you to
Thank you for purchasing STB10HD Digital High Definition Set Top Box.
 Thank you for purchasing STB10HD Digital High Definition Set Top Box. This manual will help you to install, use and maintain the receiver. Please read this manual carefully before operating your unit and
PART 1 English 1.0 Usage
 SAT OUT SAT IN Thank you for choosing this Strong satellite receiver. This receiver is of our latest development and it is designed to be capable of safely install your receiver and to achieve its optimum
IMPORTANT SAFETY INSTRUCTIONS
 IMPORTANT SAFETY INSTRUCTIONS All the safety and operating instructions should be read before operating this product. The safety and operating instructions should be retained for future reference. All
HD Digital Satellite Receiver. User s Manual
 HD Digital Satellite Receiver ZDX-670 User s Manual Keep this manual for future reference II General Safety This STB has been manufactured to meet international safety standards. Please read the following
The following symbols will serve as follows: Indicates any other additional important or helpful information. Indicates warning information.
 Contents 1 2 HD2011IR User Manual Notice This manual can help you to become familiar with the many great features of our high definition digital Satellite receiver, as well as how to use and operate these
Throughout the whole user manual, pay special attention to the following marks that
 Notice Warnings, Cautions and Notes Throughout the whole user manual, pay special attention to the following marks that indicate hazardous situations. Warning ** Indicates a hazardous situation which could
English DMB-118HDMK3
 English DMB-118HDMK3 Table of Contents Safety Information...1 System Connection...1 Remote Control...2 First Time Installation...3 Basic Operation...3 Change Channel...3 Volume and Mute...3 Subtitle/Audio
HRS 8590 LAN. User s Manual
 HRS 8590 LAN User s Manual Content Safety Precaution...3 1. Reference... 4 1.1 General Features... 4 1.2 Accessories... 4 2. Product Overview... 5 2.1 Front Panel... 5 2.2 Rear Panel... 6 2.3 Remote Control
English CONTENTS 1. GUIDE OUTLINE THE MENU OSD INSTRUCTION TECHNICAL SPECIFICATION TROUBLE SHOOTING...
 USER S MANUAL English CONTENTS 1. GUIDE...2 1.1 IMPORTANT SAFETY INSTRUCTIONS...2 1.2 UNPACKING...2 1.3 PRODUCT OVERVIEW& ILLUSTRATION...3 1.4 INSTALLATION OF METER...4 2. OUTLINE...5 3. THE MENU OSD INSTRUCTION...6
English SAFETY PRECAUTION DO NOT INSTALL THE RECEIVER: PAG. 2
 U4127 SAFETY PRECAUTION The lightning fl ash with arrowhead symbol, within an equilateral triangle, is intended to alert the user to dangerous voltage and to prevent from a risk of electric shock. Warning:
Quick Start Digital Satellite Receiver
 Quick Start Digital Satellite Receiver Support of SD (MPEG2), DVB-S system Standard resolution video output - SCART Compatible with Diseqc 1.0, 1.1, 1.2, and USALS Electronic Program Guide - EPG Multilingual
English CONTENTS 1. GUIDE OUTLINE THE MENU OSD INSTRUCTION TECHNICAL SPECIFICATION TROUBLE SHOOTING...
 English CONTENTS 1. GUIDE...2 1.1 IMPORTANT SAFETY INSTRUCTIONS...2 1.2 UNPACKING...2 1.3 PRODUCT OVERVIEW& ILLUSTRATION...3 1.4 INSTALLATION OF METER...4 2. OUTLINE...5 3. THE MENU OSD INSTRUCTION...6
OPERATION Channel Manager HDD Installation... 22
 1.General Information... 3 2. Main Features... 3 3. FOR YOUR SAFETY... 4 4. ACCESSORIES... 4 OVERVIEW... 6 1. REMOTE CONTROL KEY... 6 2.FRONT PANEL... 8 3.REAR PANEL... 9 CONNECTION DIAGRAMS... 11 1. PVRX2
I.General Information Preface Main Features For Your Safety General Operation of the Receiver Front Panel...
 I.General Information...3 1. Preface...3 2. Main Features...3 3. For Your Safety...4 4. General Operation of the Receiver...4 5. Front Panel...5 6. Rear Panel...6 7. Remote control unit...7 8. Installation
The User s Manual. Digital Terrestrial Receiver Personal Video Recorder
 TM The User s Manual Digital Terrestrial Receiver Personal Video Recorder Please read this User's Manual carefully. The menu structure and specification can be changed without notice. TABLE OF CONTENTS
English SAFETY PRECAUTION DO NOT INSTALL THE RECEIVER: PAG. 2
 U4125 SAFETY PRECAUTION The lightning fl ash with arrowhead symbol, within an equilateral triangle, is intended to alert the user to dangerous voltage and to prevent from a risk of electric shock. Warning:
MAX T200 HD QUICK INSTALLATION GUIDE
 MAX T200 HD QUICK INSTALLATION GUIDE MAX T200 HD QUICK INSTALLATION GUIDE CONTENT receiver BATTERIES x 2 REMOTE CONTROL Quick installation guide Quick Installation Guide The lightning flash with arrowhead
SATELLITE FINDER SK-3200 USER MANUAL
 SATELLITE FINDER SK-3200 USER MANUAL CONTENTS 1. GUIDE...1 1.1 IMPORTANT SAFETY INSTRUCTIONS... 1 1.2 UNPACKING...1 1.3 PRODUCT OVERVIEW & ILLUSTRATION... 2 2. OUTLINE...4 3. THE MENU OSD INSTRUCTION...5
8.2 EPG Subtitle Teletext Additional Information Trouble Shooting Technical Specification...
 HD AX 150 Content 1. Reference... 4 1.1 General Features... 4 2. Product Overview... 5 2.1 Front Panel... 5 2.2 Rear Panel... 5 2.3 Remote Control Unit (RCU)... 6 3. Installation... 7 3.1 Antenna Settings...
English SAFETY PRECAUTION DO NOT INSTALL THE RECEIVER: PAG. 2
 U4109 SAFETY PRECAUTION The lightning fl ash with arrowhead symbol, within an equilateral triangle, is intended to alert the user to dangerous voltage and to prevent from a risk of electric shock. Warning:
User s Guide. HD Satellite Receiver Pansat 9500HDX
 User s Guide HD Satellite Receiver Pansat 9500HDX Panarex Electronics Sun Valley, California, U.S.A. c 2011 by Panarex Electronics 1 CONTENTS 1 - GETTING STARTED... 4 1.1 Introduction... 4 1.2 Caution...
Quick Start Digital Satellite Receiver HD
 Quick Start Digital Satellite Receiver HD One slot for Smart Card in Conax system One slot for Common Interface Module Support of SD / HD (MPEG2 / MPEG4 H.264), DVB-S, DVB-S2 system High resolution video
Digital Terrestrial Television Receiver USER S MANUAL
 # 5024 Digital Terrestrial Television Receiver USER S MANUAL CAUTION RISK OF ELECTRIC SHOCK DO NOT OPEN This symbol is intended to alert the user to the presence of insulated dangerous voltage within the
Table of contents 1 / 20
 Table of contents 1 GUIDE...3 1.1 Important Safety Instructions...3 1.2 Unpacking...3 1.3 PRODUCT OVERVIEW & ILLUSTRATION...4 1.4 INSTALLATION OF METER...5 2 OUTLINE...6 3. THE MENU OSD INSTRUCTION...6
CONNECTION TO THE SATELLITE DISH LNB
 Safety Instructions Safety Instructions This product has been manufactured to satisfy the international safety standards. Please read all of safety and operating instructions before operating the product
Satellite locator WS-6933
 R Satellite locator WS-6933 User's Manual English CONTENTS 1. GUIDE...2 1.1 IMPORTANT SAFETY INSTRUCTIONS...2 1.2 UNPACKING...2 1.3 PRODUCT OVERVIEW&ILLUSTRATION...3 2. OUTLINE...4 3. THE MENU OSD INSTRUCTION...5
Contents. 1. Introduction Overview 1.2 Main Features. 2. Safety/Precautions Safety 2.2 Precautions
 HTS 9300 Contents 1. Introduction 2 1.1 Overview 1.2 Main Features 2. Safety/Precautions 3 2.1 Safety 2.2 Precautions 3. Check Point before Use 5 3.1 Accessories 4. Controls/Functions 6 4.1 Front Panel
DSR 9500A FTA, CI, EM VIA, VIA CI. Instructions for use REV 1.0 DIGITAL SATELLITE RECEIVER MF A
 DSR 9500A FTA, CI, EM VIA, VIA CI Instructions for use REV 1.0 GB MF68-00247A DIGITAL SATELLITE RECEIVER SAFETY INSTRUCTIONS This STB has been manufactured to satisfy international safety standards. Please
SAFETY PRECAUTION ENGLISH DO NOT INSTALL THE RECEIVER: PAG. 2
 MAX S92+ HDMI SAFETY PRECAUTION The lightning fl ash with arrowhead symbol, within an equilateral triangle, is intended to alert the user to dangerous voltage and to prevent from a risk of electric shock.
1. Before Getting Started Main Features Accessories 2
 çêðð Ð Í» Š ̱ Š Þ± Ë» Ž Ù«¼» For your safety Information contained in this manual is subject to change without notice. No part of this publication may be copied, reproduced, or translated to another
CONTENTS. 1. Introduction Overview 1.2. Main Features
 CONTENTS 1. Introduction 4 1.1. Overview 1.2. Main Features 2. Safety/Precaution 5 2.1. Safety 2.2. Precaution 3. Check Point before Use 7 3.1. Accessories 3.2. The Satellite dish 4. Controls/Functions
Be sure to run the vehicle engine while using this unit to avoid battery exhaustion.
 CAUTION: TO REDUCE THE RISK OF ELECTRIC SHOCK DO NOT REMOVE COVER (OR BACK) NO USER-SERVICEABLE PARTS INSIDE REFER SERVICING TO QUALIFIED SERVICE PERSONNE; Please Read all of these instructions regarding
User's Manual 700HDMI PVR
 Digital Satellite Receiver User's Manual 700HDMI PVR INDEX INDEX... 3 Precautions... 5 1. Important Safety Instructions... 5 2. Notice... 5 3. Copyright... 6 4. Disclaimer... 6 Before You Begin... 7 1.
User s Manual. Digital Satellite Receiver. INSTRUCTION ABOUT WEEE SYMBOL I/B parenthesis to offer information for user. Viaccess CAS Embedded
 INSTRUCTION ABOUT WEEE SYMBOL I/B parenthesis to offer information for user. User s Manual Viaccess CAS Embedded This marking shown on the product or its literature, indicates that it should not be disposed
USER S MANUAL. Digital Satellite Receiver
 USER S MANUAL Digital Satellite Receiver E109000257A STRONG & Co. (FAR EAST), LTD. P. O. Box : 85, YOKOHAMA, KANAGAWA-KEN JAPAN 231-91 - FAX : +81 45 662-4957 Website : www.strong-technologies.com E-mail
SatKing DVBS-250S2RF. Instruction Manual
 SatKing DVBS-250S2RF Instruction Manual SAFETY Safety Precaution The IRD is complied with international safety standards. Please read these simple guidelines carefully before using this device. Power Supply
1. GUIDE Important Safety Instructions Unpacking PRODUCT OVERVIEW&ILLUSTRATION INSTALLATION OFMETER
 1. GUIDE... 3 1.1 Important Safety Instructions... 3 1.2 Unpacking... 3 1.3 PRODUCT OVERVIEW&ILLUSTRATION... 4 1.4 INSTALLATION OFMETER... 6 2. OUTLINE... 6 3. THE MENU OSD INSTRUCTION... 7 3.1 DVB S2...
DIGITAL SATELLITE RECEIVER ESR-D101 INSTRUCTION MANUAL
 DIGITAL SATELLITE RECEIVER ESR-D101 INSTRUCTION MANUAL 1 SATETY INSTRUCTION Please read the following instructions carefully Do not overload the following wall outlets, extension cords or integral convenience
User Manual. High Definition Digital Set Top Box HDSTB250
 User Manual High Definition Digital Set Top Box HDSTB250 CHANNEL HDSTB250 Please read this User Manual carefully to ensure proper use of this product and keep this manual for future reference. Important
5 Getting Started Connecting the DVB-T Receiver First Steps... 9
 Table of Contents 1. Introduction... 2 2. Features... 3 3. Safety Notes... 4 4. Your Receiver and its Functions... 5 4.1 Remote Control Functions... 5 4.2 Front Panel Controls... 7 4.3 Rear Panel Connections...
NMS ETA TM Stereo Advanced Digital TV Set-top Box
 Digital TV HD Set-top Box STB2-T2 NMS ETA TM Stereo Advanced Digital TV Set-top Box User Guide CONTENTS Safety Information... 3 Introduction... 4 Set-top Box Front Panel... 4 Set-top Box Back Panel...
SAFETY PRECAUTION ENGLISH DO NOT INSTALL THE RECEIVER: PAG. 2
 MAX S21 SAFETY PRECAUTION The lightning fl ash with arrowhead symbol, within an equilateral triangle, is intended to alert the user to dangerous voltage and to prevent from a risk of electric shock. Warning:
User Manual Of Digital Set Top Box Manhattan RC-1978
 User Manual Of Digital Set Top Box Manhattan RC-1978 Please read this User Manual carefully to ensure proper use of this product and keep this manual for future reference Table of Contents Important Safety
DVB-T2. Digital Terrestrial Receiver WD-822T2 USER S MANUAL
 DVB-T2 Digital Terrestrial Receiver WD-822T2 USER S MANUAL Index Important Safety Instructions... 3 Main Features.... 5 Front and Rear Panel.... 6 Remote Control..... 7 Installing the Batteries..... 8
Digital Terrestrial Television Receiver USER S MANUAL
 Digital Terrestrial Television Receiver USER S MANUAL CAUTION RISK OF ELECTRIC SHOCK DO NOT OPEN This symbol is intended to alert the user to the presence of insulated dangerous voltage within the products
SET TOP BOX MODEL: GDB01SFV1 USER MANUAL
 SET TOP BOX MODEL: USER MANUAL 1 2 3 4 5 6 7 8 Welcome Your Set Top Box 2.1 In The Box 2.2 Front View 2.3 Rear View Quick Setup 3.1 TV Connection 3.2 Recording from the set top box 3.3 Record one channel
SAFETY PRECAUTION ENGLISH PAG. 2. rev 1.2. dangerous voltage and to prevent only. operating and maintenance from a risk of electric shock.
 MAX S93+ SAFETY PRECAUTION The lightning fl ash with arrowhead WARNING: To reduce the risk of The exclamation point within an symbol, within an equilateral triangle, electric shock, don t open the cabinet.
Set Top Box (STB) TV STAR C101 USER MANUAL
 TV STAR C101 USER MANUAL") DIGITAL CABLE TV RECEIVER Set Top Box (STB) TV STAR C101 USER MANUAL 1 Table of contents Safety. 4 General Introduction.. 6 Front Panel / Rear Panel...8 Remote Control Unit.. 10 S.T.B Connection...13 Digital
DIGITAL CABLE TV RECEIVER Set Top Box (STB) TV STAR C101 USER MANUAL 1 Table of contents Safety. 4 General Introduction.. 6 Front Panel / Rear Panel...8 Remote Control Unit.. 10 S.T.B Connection...13 Digital
DIGITAL TERRESTRIAL RECEIVER NVR-2090DU CHANNEL
 DIGITAL TERRESTRIAL RECEIVER NVR-2090DU CHANNEL 1 Espanol ~ Digital Video Broadcasting 2 3 STANDBY DTV/VCR TEXT MUTE VOL+ INFO PLAY/PAUSE EPG VOL- CH+ STOP SETUP EXIT 23 FAV- ENTER FAV+ 24 25 SOURCE CH-
Thank you for purchasing DVBS2 800CA Digital Satellite Receiver.
 Thank you for purchasing DVBS2 800CA Digital Satellite Receiver. This manual will help you to install, use and maintain the receiver. Please read this manual carefully before operating your unit and keep
The product must be installed in accordance with national regulations.
 Important safety instructions to be kept with the product Please read attentively To prevent fire and electric shock, do not expose this receiver to rain or moisture. In order to avoid any possible risk
Dreambox DM 100. Bedienungsanleitung. User Manual. Digital satellite receiver for free and encrypted Digital Video Broadcasting (DVB).
.") Dreambox DM 100 Bedienungsanleitung Digitaler Satellitenempfänger zum Empfang von freien und verschlüsselten DVB-Programmen. Kommunikations-Schnittstelle Smartcard Leser Real Time OS User Manual Digital
Dreambox DM 100 Bedienungsanleitung Digitaler Satellitenempfänger zum Empfang von freien und verschlüsselten DVB-Programmen. Kommunikations-Schnittstelle Smartcard Leser Real Time OS User Manual Digital
SatKing DVBS-100HD. Instruction Manual
 SatKing DVBS-100HD Instruction Manual SAFETY Safety Precaution The IRD is complied with international safety standards. Please read these simple guidelines carefully before using this device. Power Supply
User s Manual S9 HD PVR
 User s Manual S9 HD PVR High Definition Digital Satellite Recorder Personal Video Recorder 1 Common Interface 4 CONTENTS 1. REMOTE CONTROLLER...7 2. BASIC OPERATIONS...8 2.1 TURN ON STB..8 2.2 POWER.8
Safety warning Important Safety Instructions. Wall Mount Specifications. Electronic Program Guide. Lock Menu 18. PVR File System
 LT-32N370Z 32 INPUT Safety warning Important Safety Instructions Wall Mount Specifications Electronic Program Guide Lock Menu 18 PVR File System 11 11 11 14 15 16 17 19 20 21 21 22 23 24 25 INPUT AAA
healing HHR787 HD Digital Terrestrial Twin Tuner Recorder Operating Manual INTRODUCTION... 3 HHR787 FEATURES... 4 SAFETY INSTRUCTIONS...
 CONTENTS INTRODUCTION... 3 HHR787 FEATURES... 4 SAFETY INSTRUCTIONS... 5 FRONT PANEL AND REAR PANEL...6 and 7 REMOTE CONTROL UNIT KEY FUNCTIONS...8 and 9 REMOTE CONTROL BATTERY CARE... 10 INSTALLATION
RFT-851FTA. Twin DVB-T to PAL remodulator. User Manual
 RFT-851FTA Twin DVB-T to PAL remodulator User Manual 1. Purpose of use RFT-851FTA is designed for prosessing two COFDM modulated signals into standard CCIR channels. RFT-851FTA is supplied with a A2 stereo/dual/swap
English CONTENTS 1. GUIDE OUTLINE THE MENU OSD INSTRUCTION TECHNICAL SPECIFICATION TROUBLE SHOOTING...
 USER S MANUAL English CONTENTS 1. GUIDE...2 1.1 IMPORTANT SAFETY INSTRUCTIONS...2 1.2 UNPACKING...2 1.3 PRODUCT OVERVIEW& ILLUSTRATION...3 1.4 INSTALLATION OF METER...4 2. OUTLINE...5 3. THE MENU OSD INSTRUCTION...6
Quick Start Digital Terrestrial Receiver
 Quick Start Digital Terrestrial Receiver Support of SD / HD (MPEG2 / MPEG4 H.264), DVB-T system PVR Ready - possibility to record on external USB drive Time Shift (video pausing, rewinding) HDMI video
1.0, 1.1, 1.2, 1.3 (USALS)
") Main Features Twin Tuner HD Satellite Receiver HDMI Output (up to 1080p) DiSEqC 1.0, 1.1, 1.2, 1.3 (USALS) Compatible Dolby Digital audio output (S/PDIF) Extended EPG and program reservation on EPG Open
Main Features Twin Tuner HD Satellite Receiver HDMI Output (up to 1080p) DiSEqC 1.0, 1.1, 1.2, 1.3 (USALS) Compatible Dolby Digital audio output (S/PDIF) Extended EPG and program reservation on EPG Open
M5-H002. Multiview T-35. DVB-T to PAL / 5 channels on all TV s
 120531 M5-H002 Multiview T-35 DVB-T to PAL / 5 channels on all TV s Contents Multiview... 3 Features... 3 Caution... 3 Front & Rear Panel... 4 Connecting... 5 Programming... 6 Information... 7 Installation...8
Goodmans Helpline Phone Number
 Goodmans Helpline Phone Number 0870 873 0080 contents Introduction 4 Connecting up 5 Overview diagrams 6 Getting started 8 Using the main menu 10 Troubleshooting 15 Technical Specifications 16 3 introduction
User manual. Model ID: High definition digital satellite receiver. English 3/2009 jp
 High definition digital satellite receiver Model ID: 7101 English 3/2009 jp Contents 1. Safety precautions... 4 2. Environment protection... 6 3. Features... 7 4. Remote Control... 8 5. Front panel...
Receiver/Digital Decoder DVB-T2 Set Top Box. Installation Manual & User Manual
 Receiver/Digital Decoder DVB-T2 Set Top Box Installation Manual & User Manual SAFETY PRECAUTION CAUTION: The lightening flash with arrowhead symbol, within an equilateral triangle, is intended to alert
Digital Terrestrial Receiver SRT 5200/SRT 5202/SRT5205
 Digital Terrestrial Receiver SRT 5200/SRT 5202/SRT5205 Picture similar User manual Table of Contents 1.0 Instruction 2 1.1 Safety Instructions 2 1.2 Storage 3 1.3 Equipment Set-up 4 1.4 Features & Accessories
User Manual of digital Set Top Box PAT1 02
 User Manual of digital Set Top Box PAT1 02 Please read this User Manual carefully to ensure proper use of this product and keep this manual for future reference. Important Safety Instructions 1) Read these
DVB-S2 REC10 MANUAL (p. 2) High definition DVB-S2 receiver
 High definition DVB-S2 receiver") DVB-S2 REC10 MANUAL (p. 2) High definition DVB-S2 receiver 2013-03-15 ENGLISH High definition DVB-S2 receiver Introduction: We recommend that you read this manual before installing/using this product.
DVB-S2 REC10 MANUAL (p. 2) High definition DVB-S2 receiver 2013-03-15 ENGLISH High definition DVB-S2 receiver Introduction: We recommend that you read this manual before installing/using this product.
1. Safety precautions Environment protection Features Accessories Front panel Rear panel...
 Contents 1. Safety precautions... 1 2. Environment protection... 3 3. Features... 4 4. Accessories... 4 5. Front panel... 4 6. Rear panel... 5 7. Remote controller... 6 8. Basic connection... 7 8.1. Connecting
Instructions for use GB
 Instructions for use DIGITAL TERRESTRIAL RECEIVER SAFETY INSTRUCTIONS SAFETY INSTRUCTIONS This STB has been manufactured to satisfy international safety standards. Please read the following recommended
USER MANUAL KGN1080P32VD
 USER MANUAL KGN1080P32VD USB... Power cord Remote control/batteries Power/Standby button Picture mode button Sound mode button Multi-digits channel buttton P.MODE S.MODE FREEZE SLEEP 1 2 3 4 5 6 7 8 9
Digital High Definition Satellite Receiver SRT 7000
 Digital High Definition Satellite Receiver SRT 7000 Picture similar User Manual Table of Contents 1.0 Instruction 2 1.1 Safety Instructions 2 1.2 Storage 2 1.3 Equipment Set-up 2 1.4 Accessories 3 1.5
For Freeview HD User s Manual
 extra Terrestrial HD For Freeview HD User s Manual 1 Table of contents 1 INTRODUCTION...4 2 MAIN FUNCTIONS AND FEATURES...4 3 THE REMOTE CONTROL...5 4 FRONT AND REAR PANEL...7 4.1 FRONT PANEL... 7 5 FIRST
Table of Contents. Safety Instruction 2. Trademark Information 3 Introduction 4. Package Contents 4. Features 5. Product Overview 6 Front Panel 6
 - 0 - Table of Contents Safety Instruction 2 Trademark Information 3 Introduction 4 Package Contents 4 Features 5 Product Overview 6 Front Panel 6 Rear Panel 7 Remote Control 8 System Installation 11 Setting
Table of contents. 1. Before initial operation of the receiver. 2. Installation. 3. First Time Installation (using Wizard) 4.
 4.") Table of contents 1. Before initial operation of the receiver 2. Installation 3. First Time Installation (using Wizard) 4. Basic operation 5. Electronic Program Guide-EPG 6. Edit the channel list 7. Hard
Table of contents 1. Before initial operation of the receiver 2. Installation 3. First Time Installation (using Wizard) 4. Basic operation 5. Electronic Program Guide-EPG 6. Edit the channel list 7. Hard
HD X1 Technical specification
 2013 HD X1 Technical specification DVB-C HD MPEG-4 Receiver FOR INTERNAL USE ONLY GLOBO MULTIMEDIA Sp. z o.o. Sp. k. Gryfińska 104, 70-772 Szczecin, Poland 2013-09-10 Version 2.03 Albin Kimsa albin.kimsa@globo.com.pl
3 Safety Instructions. 4 Safety Instructions. 5 Unpacking 6 RCU. 7 Rear Panel. 8 Installation. 11 Satellite Scan. 12 Add Satellite.
 USER MANUAL How To Use Contents 1 Main Features 2 For Your Safety 3 Safety Instructions 4 Safety Instructions 5 Unpacking 6 RCU 7 Rear Panel 8 Installation 9 MENU INFORM ATION Main Menu 10 Satellite Scan
HDTV-Sat-Irdeto-Receiver
 HDTV-Sat-Irdeto-Receiver TABLE OF CONTENTS 1 SAFETY ADVICE... 4 2 QUICK SETUP... 6 3 FEATURES... 8 4 HOW TO CONNECT YOUR RECEIVER... 9 5 HARDWARE:... 11 6 WATCHING TV... 15 7 MENU OPERATION... 23 8 EDITING
INSTRUCTIONS MANUAL SAVE THESE INSTRUCTIONS IN A SAFE PLACE FOR FUTURE REFERENCE
 High Definition Digital Set Top Box MPF3573HU INSTRUCTIONS MANUAL SAVE THESE INSTRUCTIONS IN A SAFE PLACE FOR FUTURE REFERENCE Important Safety Instructions 1) Read these instructions. 2) Keep these instructions.