Let s build the EdDigger Difficulty:
|
|
|
- Joshua Barber
- 6 years ago
- Views:
Transcription


1 EdBuild Let s build the EdDigger Difficulty: The EdDigger EdBuild by Microbric Education is licensed under a Creative Commons Attribution-ShareAlike 4.0 International License.
2 EdBuild the EdDigger The EdDigger is a remote-controlled excavator, which can be programmed using the barcodes in this guide and controlled with a standard TV or DVD remote control. You will be able to drive the EdDigger forwards, backwards and spin it right or left. You will also be able to lift and lower the scoop bucket. Build difficulty rating The EdDigger is rated a level 2 build. Difficulty rating Recommended age Programming skills needed Barcodes and remote control Barcodes and remote control Barcodes and remote control EdPy - Barcodes and remote control AND - EdWare OR - EdPy To successfully complete and operate a build, you will need an understanding of the programming skills listed. Learn more about programming with Edison at: Barcodes: Appropriate for ages 4+. No prior experience with programming or robotics is assumed or required. EdWare: Best suited to students aged 11 to 13. A basic understanding of programming fundamentals may be helpful. EdPy: Best suited to students aged 13 to 16 years old. A basic understanding of programming fundamentals may be helpful.
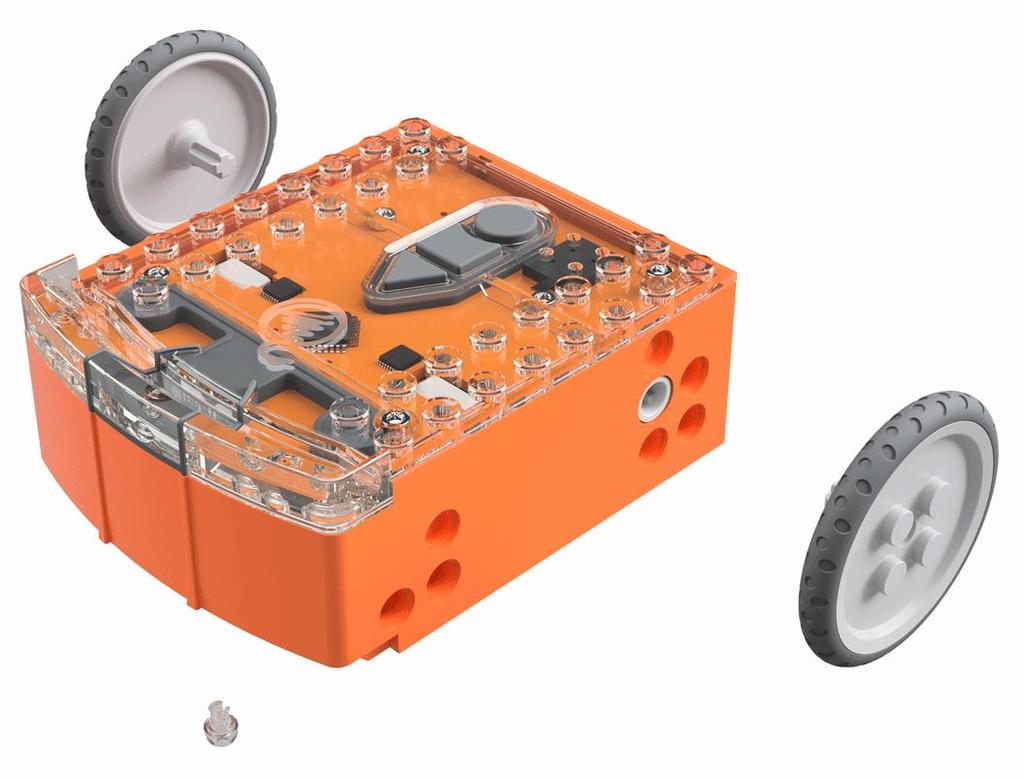
3 Get set up Before you begin this build, check that you have everything you need and that you can do the programming required. It s also a good idea to get familiar with how to build with your Edison robot. What you need To make the EdDigger, you will need: 2 Edison robots 1 EdCreate Edison robot creator s kit 1 TV or DVD remote 1 print-out of the Bottom Edison barcodes sheet (from in this guide) 1 print-out of the Top Edison barcodes sheet (from in this guide) Programming required in this build To program the EdDigger, you will need to program a remote control with six different commands using the barcodes in this guide. Building with Edison You can build with Edison using an EdCreate creator s kit or any other LEGO brick compatible building system. Bricks can be attached to the top and bottom of your Edison robot. Pegs can be attached on the sides of Edison. When Edison s wheels are removed, cross axles can be used in the powered sockets. There are three types of holes on the side of Edison: pin holes, stud holes, and cross axle sockets. Look at the following images to learn more about how to connect and build with Edison.


4 Edison s side and top connections 2 x 8 studs 2 x 8 studs stud holes Stud hole Pin hole pin holes Powered cross axle socket Stud hole Hole type Description Connects to Pin hole Stud hole Cross axle socket A full-depth hole for connecting pegs. A hole of normal studdepth which works with half pegs. A powered socket which rotates. Removable skid 2 x 8 sockets 2 x 8 sockets 2 x 2 studs Edison s bottom and wheel connections
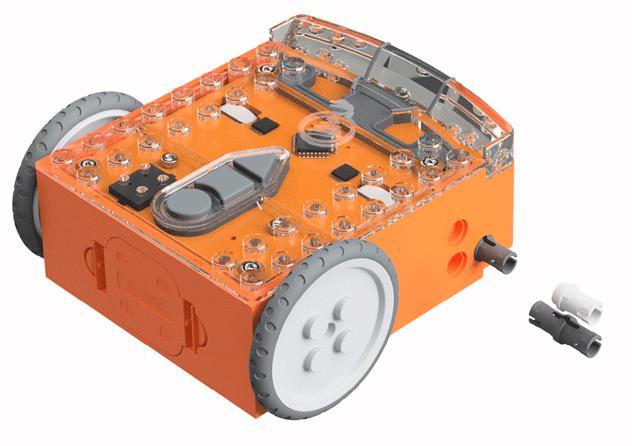
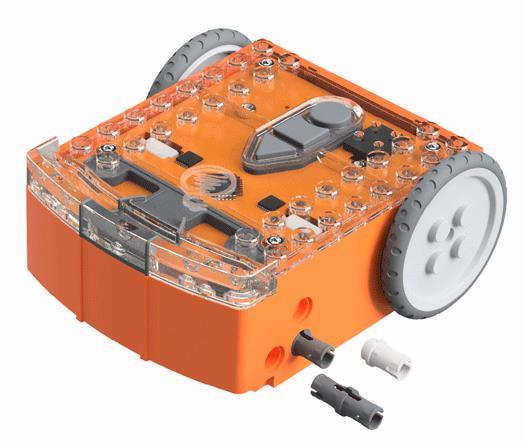
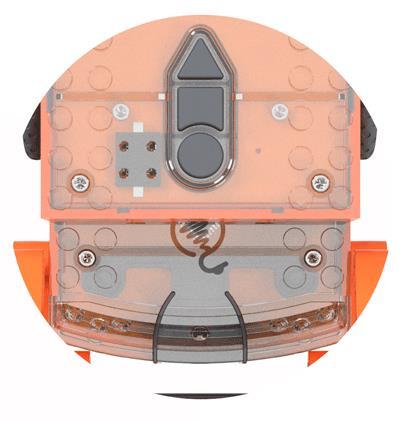
5 Let s build the EdDigger! The EdDigger is a remote-controlled excavator, or digger, with a scoop that you can drive around. The digger scoop of the EdDigger can lift or lower and can carry small objects such as parts from the EdCreate kit. This is what the finished EdDigger looks like: Step 1: Program Edison Before you begin building with the EdCreate parts, you will need to program the remote-control codes into both Edison robots. The next two pages have the remote-control barcodes for the bottom and top Edison robots. Print out these pages so you can drive your Edison robots over the barcodes.


6 Bottom Edison barcodes The bottom Edison is the driving Edison. Print out this page! Program the driving Edison The driving Edison will control the movement of the EdDigger (forwards, backwards, spin left and spin right). Drive this Edison over the following barcodes, programming each to a button that corresponds well with the driving manoeuvre on the remote control. Don t use buttons that you want to use to control the scoop bucket. Reading the barcode 1. Place Edison facing the barcode on the right side 2. Press the record (round) button 3 times 3. Edison will drive forward and scan the barcode 4. Press a button on your TV/DVD remote that you want to activate that function Barcode IR learn drive forward Barcode IR learn drive backward Barcode IR learn spin left Barcode IR learn spin right
7 Top Edison barcodes The top Edison controls the scoop bucket. Print out this page! You may want to mark the Edison robots so you don t confuse which one is programmed to be the bottom robot and which one is programmed to be the top one while you are building. You can mark one of the Edison s as the top robot by using a spare brick or a piece of tape to indicate it is the top Edison. You can also take the wheels off the top robot as soon as you finish programming this Edison so you won t get confused! Program the scoop bucket Edison The scoop bucket Edison will control lifting and lowering the bucket. Drive this Edison over the following barcodes, programming each to a button that corresponds well with the lifting or lowering the scoop bucket on the remote control. Don t use buttons that you used to control how the EdDigger drives. Reading the barcode 1. Place Edison facing the barcode on the right side 2. Press the record (round) button 3 times 3. Edison will drive forward and scan the barcode 4. Press a button on your TV/DVD remote that you want to activate that function Barcode IR learn bucket lift up Barcode IR learn bucket lower down
.")
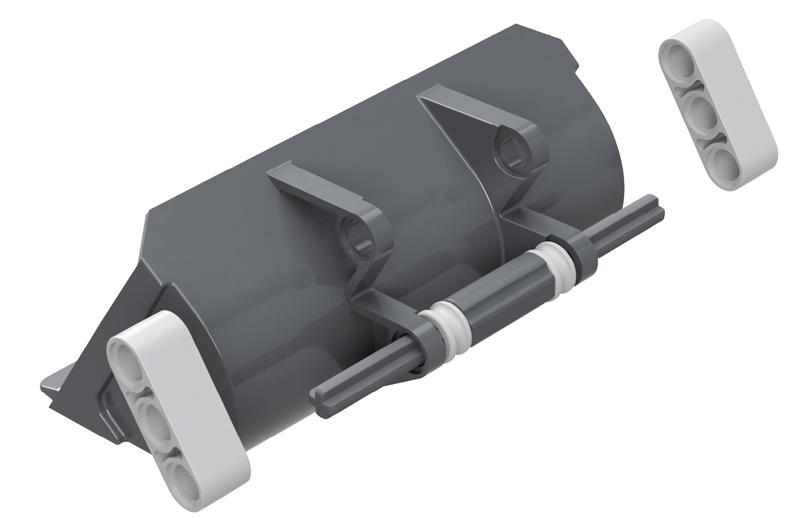
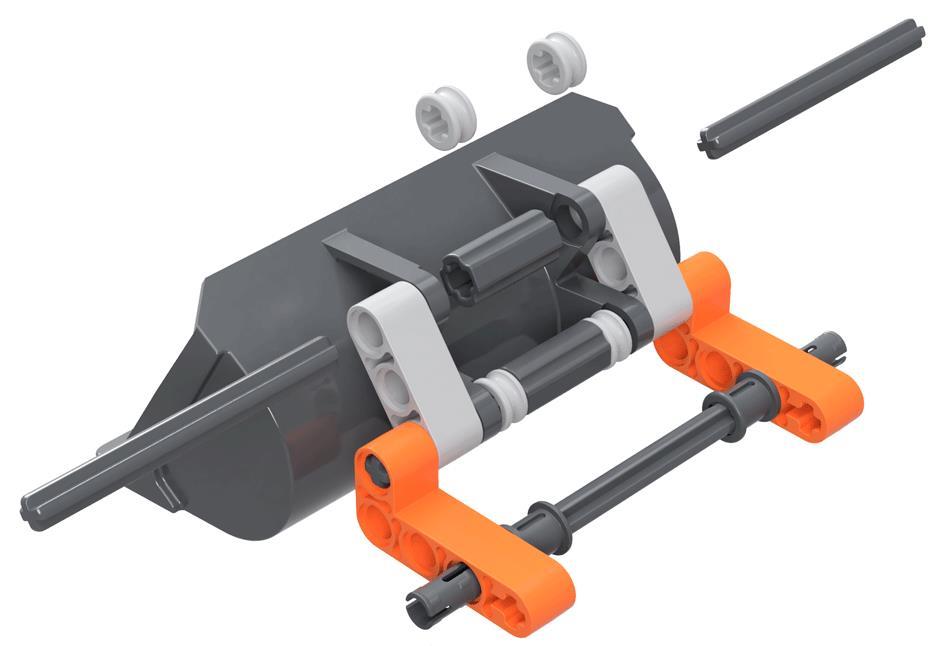
8 Suggested remote control button setup for the EdDigger Spin left Drive forwards Spin right Drive backwards Lift the scoop bucket up Lower the scoop bucket down Step 2: Assemble the EdDigger Follow the illustrations step by step to build the EdDigger. Reading the instructions: Step number Build instructions Parts key One-to-one piece measurement (when printed at 100% on A4 page). The number in the circle indicates the part s length in number of studs.
9 1 1x 2 1x


10 3 1x 1x 1: :1 3


11 5 1x 1:1 6 6


12 7 1x 1:1 6 8


13 x 1:1 5


14 11 1x 1:


15 13 14

16 15 16

17 17 18
Let s build the EdRoboClaw Difficulty:
 EdBuild Let s build the EdRoboClaw Difficulty: The EdRoboClaw EdBuild by Microbric Education is licensed under a Creative Commons Attribution-ShareAlike 4.0 International License. EdBuild the EdRoboClaw
Let s build the EdCrane Difficulty:
 EdBuild Let s build the EdCrane Difficulty: The EdCrane EdBuild by Microbric Education is licensed under a Creative Commons Attribution-ShareAlike 4.0 International License. EdBuild the EdCrane The EdCrane
Your EdVenture into Robotics You re a Programmer
 Your EdVenture into Robotics You re a Programmer meetedison.com Contents Introduction... 3 Getting started... 4 Meet EdWare... 8 EdWare icons... 9 EdVenture 1- Flash a LED... 10 EdVenture 2 Beep!! Beep!!...
Your EdVenture into Robotics You re a Controller
 Your EdVenture into Robotics You re a Controller Barcode - Clap controlled driving meetedison.com Contents Introduction... 3 Getting started... 4 EdVenture 1 Clap controlled driving... 6 EdVenture 2 Avoid
Materials: Programming Objectives:
 Lessons Lesson 1: Basic Chassis Overview TETRIX Getting Started Guide In this lesson, users will learn how to use the elements of the TETRIX system that will be involved in building the basic chassis of
Meet Edison. This is Edison, the programmable robot. What is a robot? A robot is a machine that can be made to do a task on its own.
 Edison and EdBlocks Activity 1 Programmer s Name Meet Edison This is Edison, the programmable robot. What is a robot? A robot is a machine that can be made to do a task on its own. There are many types
LEGO MINDSTORMS PROGRAMMING CAMP. Robotics Programming 101 Camp Curriculum
 LEGO MINDSTORMS PROGRAMMING CAMP Robotics Programming 101 Camp Curriculum 2 Instructor Notes Every day of camp, we started with a short video showing FLL robots, real robots or something relevant to the
Lego Robotics Module Guide
 Lego Robotics Module Guide The RCX is a programmable, microcontroller-based brick that can simultaneously operate motors, sensors, an infrared serial communications interface, a display and speaker. Get
Endurance Robotics PT-3
 Endurance Robotics PT-3 The Endurance Robotics Pan and Tilt PT-3 base is a rugged pan and tilt system based around standard sized hobby servos. Featuring all around rigid 1/4" ABS laser cut construction,
Step 1. 1x NXT Ultrasonic Sensor
 Start with the build completed in Lesson 3 of the TETRIX Getting Started Guide. Step 1 involves removing an element from the model. This element will be reattached later. Parts to be Removed Step 1 1x
Step 1. 2x Kep Nut 1x Left Motor Assembly
 Start with the build completed in Lesson 3 of the TETRIX Getting Started Guide. Steps 1 to 3 involve removing elements from the model. These elements will be reattached later. Parts to be Removed Step
INTERMEDIATE PROGRAMMING LESSON
 INTERMEDIATE PROGRAMMING LESSON COLOR LINE FOLLOWER MY BLOCK WITH INPUTS: MOVE FOR DISTANCE By Sanjay and Arvind Seshan Lesson Objectives 1. Learn how to write a line follower that takes multiple inputs
(Skip to step 11 if you are already familiar with connecting to the Tribot)
") LEGO MINDSTORMS NXT Lab 5 Remember back in Lab 2 when the Tribot was commanded to drive in a specific pattern that had the shape of a bow tie? Specific commands were passed to the motors to command how
LEGO MINDSTORMS NXT Lab 5 Remember back in Lab 2 when the Tribot was commanded to drive in a specific pattern that had the shape of a bow tie? Specific commands were passed to the motors to command how
If you have any problems please contact our office at Thank You! And Enjoy! Like us on Facebook /AllenLeighSC
 If you have any problems please contact our office at 204-728-8878 1-866-289-8164 Thank You! And Enjoy! Like us on Facebook /AllenLeighSC Follow us on Twitter @AllenLeighSC Also check out additional accessories
Perform in the spotlight
 Student sheet 1 Perform in the spotlight Let s get the Edison robot to play music or dance when it detects light, just like a performer in the spotlight! To do this, there are a few things we need to learn:
Installation Guide. V 1.3 Deep Color. HDMI42CS-V1.3 HDMI Inputs 4 HDMI Ouputs 2 Version 1.3. HDCP pass thru. Deep Color Support
 Description Specifications Model HDMI42CS-V1.3 HDMI Inputs 4 HDMI Ouputs 2 Version 1.3 IN/Out Connectors 19 pin HDMI female type-a HDCP HDCP pass thru Display Selection Remote, Manual, Smart Scan Single
2x2 HDMI Matrix Switch - 4K with Fast Switching and Auto-Sensing
 2x2 HDMI Matrix Switch - 4K with Fast Switching and Auto-Sensing Product ID: VS222HD4K Save time and hassle by automatically switching between your HDMI audio/video sources. This 2x2 HDMI matrix switcher
2-Port HDMI Automatic Video Switch - 4K with Fast Switching
 2-Port HDMI Automatic Video Switch - 4K with Fast Switching Product ID: VS221HD4KA Create a powerful visual experience, with the ability to switch between two 4K video sources seamlessly. This 2-port HDMI
HDMI 4x2 Matrix. Operation Manual CHMX-42
 HDMI x Matrix Operation Manual CHMX- TABLE OF CONTENTS. Introduction.... Features.... Package Contents.... Operation Controls and Functions.... Front Panel.... Rear Panel.... Remote Control.... RS- Protocol.....
A Motor can be in many groups, by assigning additional channel# on it.
 Timer Remote Control Instruction How to use the channel numbers - There are 32 channels on the Remote Control Timer you can assign to Curtain Motor(s). To operate the Motors individually by itself only,
Hargray Television Equipment
 Setting up Your Hargray Television Equipment Explorer SD Set Top Box Instructions 1.877.HARGRAY Internet Television Telephone Welcome to your new Explorer SD Set Top Box. This guide is intended to help
HC20 Healthcare Kit Installation Instructions
 Our HC20 installation kit uses technology that allows a standard hospital pillow speaker to control a TV and receive audio from the TV at the pillow speaker next to the patient. The HC20 product, when
Instruction Manual for Electronic Blowers and Flashboards
 Instruction Manual for Electronic Blowers and Flashboards These instructions cover both the table model 17212 table top Electronic Bingo Blower (Fig 1) and the 17213 floor model Electronic Bingo Blower
INSTRUCTION MANUAL. Made in the U.S.A. by USA Dance Floor. Copyright 2017 USA Dance Floor, LLC
 1 INSTRUCTION MANUAL Made in the U.S.A. by USA Dance Floor Copyright 2017 USA Dance Floor, LLC 2 BEFORE YOU BEGIN Plan ahead! First read all of this manual and get familiar with all of the parts. Failing
HDMI 4x4 Matrix. Operation Manual CHMX-44
 HDMI 4x4 Matrix Operation Manual CHMX-44 TABLE OF CONTENTS. Introduction.... Features... 3. Package Contents... 4. Operation Controls and Functions... 4. Front Panel... 4. Rear Panel... 4.3 Remote Control...
Kramer Electronics, Ltd.
 Kramer Electronics, Ltd. Preliminary USER MANUAL Model: FC-113 HDMI to SD/HD-SDI Converter Contents Contents 1 Introduction 1 2 Getting Started 1 2.1 Quick Start 2 3 Overview 2 3.1 About HDMI 3 3.2 About
KRAMER ELECTRONICS LTD. USER MANUAL MODEL: RTBUS-12 Round Table Connection Bus. P/N: Rev 1
 KRAMER ELECTRONICS LTD. USER MANUAL MODEL: RTBUS-12 Round Table Connection Bus P/N: 2900-300099 Rev 1 Contents 1 Introduction 1 2 Getting Started 2 2.1 Achieving the Best Performance 2 3 Overview 3 3.1
Prototyping & Engineering Electronics Kits Magic Mandala Kit Guide
 Prototyping & Engineering Electronics Kits Magic Mandala Kit Guide odysseyboard.com Please refer to www.odysseyboard.com for a PDF updated version of this guide. Magic Mandala Guide version 1.0, February,
Blu-ray Disc /DVD Home Theatre System BDV-E6100 BDV-E4100 BDV-E3100 BDV-E2100. Start here. Quick start guide BDV-E6100 BDV-E4100 BDV-E3100 BDV-E2100
 Blu-ray Disc /DVD Home Theatre System BDV-E6100 BDV-E4100 BDV-E3100 BDV-E2100 GB Start here Quick start guide BDV-E6100 BDV-E4100 BDV-E3100 BDV-E2100 1 What s in the box/setting up the speakers BDV-E6100
Projector Lift. User Guide INSTALLATION OPERATION SETUP PROGRAM IR REMOTE FACTORY RESET
 INSTALLATION OPERATION SETUP PROGRAM IR REMOTE FACTORY RESET MODELS: Small - Standard Deep - Wide - Large X-Large - XX-Large Projector Lift User Guide ver 26.01.012 2012 PureTheatre CONTENTS Part Checklist...
Installation Guide. V 1.3 Deep Color. HDMI Inputs 4 HDMI Outputs 4 Version 1.3. RS-232 control port 1. Deep Color Support
 Description Specifications Model HDMX44-V1.3 HDMI Inputs 4 HDMI Outputs 4 Version 1.3 HDCP IN/Out Connectors Yes 19 pin HDMI female type-a RS-232 control port 1 Display Selection Video Resolution Video
H.264 HDMI Extender over IP Extender With LED, Remote, POE, RS232 Operating Instruction
 H.264 HDMI Extender over IP Extender With LED, Remote, POE, RS232 Operating Instruction 1 Introduction This HDMI over IP Extender use the advanced H.264 as the compression type, which makes it occupy lower
HDMI 2x4 Matrix. Operation Manual CHMX-24
 HDMI x4 Matrix Operation Manual CHMX-4 TABLE OF CONTENTS. Introduction.... Features... 3. Package Contents... 4. Operation Controls and Functions... 4. Front Panel... 4. Rear Panel... 4.3 Remote Control...
Scan Converter Quick Installation Guide
 Scan Converter Quick Installation Guide Software Note: No software is required to use your scan converter. Please complete the hardware installation and system setup before you determine the need to the
Neutron Spectrometer Operation Manual
 Neutron Spectrometer Operation Manual MIT Department of Physics (Dated: October 16, 2014) This document is for assisting in the understanding and accessing of the technical aspects of the neutron physics
WDP02 Wireless FHD Kit User Manual
 WDP02 Wireless FHD Kit User Manual Copyright Copyright 2015 by BenQ Corporation. All rights reserved. No part of this publication may be reproduced, transmitted, transcribed, stored in a retrieval system
Pelican PL-957. Adding additional Tos Link (Digital Optical) inputs, and / or IR Remote
 inputs, and / or IR Remote") Pelican PL-957 Adding additional Tos Link (Digital Optical) inputs, and / or IR Remote Table of Contents: Background;... 2 Section 1: Adding TosLink receivers... 3 Section 2: Adding Remote Capability...
Pelican PL-957 Adding additional Tos Link (Digital Optical) inputs, and / or IR Remote Table of Contents: Background;... 2 Section 1: Adding TosLink receivers... 3 Section 2: Adding Remote Capability...
Home Monitoring. Wired Color Camera. User Manual. For indoor/outdoor use. Do not use in wet locations.
 45231 Home Monitoring Wired Color Camera User Manual For indoor/outdoor use. Do not use in wet locations. www.jascoproducts.com 1-800-654-8483 2 Thank you for purchasing the GE 45231 Wired Color Camera.
Kramer Electronics, Ltd.
 Kramer Electronics, Ltd. Preliminary USER MANUAL Model: FC-322 SD/HD-SDI to HDMI Converter/Switcher/DA Contents Contents 1 Introduction 1 2 Getting Started 1 2.1 Quick Start 2 3 Overview 2 3.1 About HDMI
M203 LG. Multiroom Planer V2.00. Introduction. New features from software V2.00
 of M203 LG D 2.06 Attention! After updating the M203 firmware to version 2.00 or higher, we recommend completely resetting the M203 interface by pressing the Disable softkey on setup page #2 for several
MACH3 LaserAce Installation Manual Revision 1. MACH3 LaserAce Installation Manual
 WWW.LASERARCADE.COM MACH3 LaserAce Installation Manual Revision 1 MACH3 LaserAce Installation Manual Table of Contents Introduction...1 Parts supplied with MACH3 FNI...1 Why the MACH3 FNI is required...2
STREAMER. Users Instructions. Elation Professional R 4295 Charter Street Los Angeles CA
 STREAMER Users Instructions Elation Professional R 4295 Charter Street Los Angeles CA. 958 www.elationlighting.com Features We would first like to congratulate you on the purchase of this magic fibre lighting-streamer!
OWNER'S MANUAL KIT INCLUDES. 3M VHB Mounting Pad Mounting Hardware PART # 40040
 dmx led effects OWNER'S MANUAL KIT INCLUDES 3M VHB Mounting Pad Mounting Hardware PART # 40040 IMPORTANT It is strongly recommended that this product be installed by a professional. 1. PRODUCT DESCRIPTION...3
Installation Guide. V 1.3 Deep Color. HDMI42MX-V1.3 HDMI Inputs 4 HDMI Outputs 2 Optical Audio Output 1 Version 1.3
 Description Specifications Model HDMI42MX-V1.3 HDMI Inputs 4 HDMI Outputs 2 Optical Audio Output 1 Version 1.3 IN/Out Connectors 19 pin HDMI female type-a HDCP HDCP Display Selection Remote, Manual, Smart
Component Video Matrix Switcher Series ITEM NO.: YS04MA, YS04MD
 Component Video Matrix Switcher Series ITEM NO.: YS04MA, YS04MD Our component video switcher allows four different component video and stereo/digital audio sources to share two video displays. Manage multiple
LCD4215 Installation Guide 42 LCD Display Rev 1.1
 Contents: Product Description and Notes Page 1 Tilt Angle and Rotation Page 1 Ventilation Requirements Page 2 Display Dimensions Front, Top & Right Side Page 3 Rear & Bottom Page 4 New I/O Connections
The Haply Development Kit
 The Haply Development Kit Introduction The Haply development kit is a robust and adaptable open-source hardware development platform for haptic applications. Designed to be accessible to novices and experts
English DOWNLOAD ONLY
 English What's included? English Easy Setup Guide HDMI Cable Power Adapter Power Cord External IR Cable RCU Battery RCU 1 Front Panel Idle Server Mode Left Side CI Module slot Smartcard reader slot 2 Rear
For Your Information...
 For Your Information... Additional Wiring Configurations for the Spacer SystemTM Remote Wall Mounted Master Control () Overview APPLICATION NOTE #83 The Spacer System Remote Wall Mounted Master Control
Introduction. Introduction
 Introduction Introduction Note: In this user guide Pronto is used for both ProntoPro and Pronto remote controls. RFX6000 is compatible with TSU3000 and TSU6000. About the RFX6000 Most remote control systems
Introduction. The Clock Hardware. A Unique LED Clock Article by Craig A. Lindley
 Introduction As hard as it might be to believe, I have never built an electronic clock of any kind. I've always thought electronic clocks were passe and not worth the time to design and build one. In addition,
Contents. Loudspeaker setup surround sound, 3 Find out how to turn your television into a surround sound system.
 Contents 2 Loudspeaker setup surround sound, 3 Find out how to turn your television into a surround sound system. Connect a set-top box or decoder, 7 Find out how to connect a set-top box or decoder to
QTI Line Follower AppKit for the Boe-Bot (#28108)
") Web Site: www.parallax.com Forums: forums.parallax.com Sales: sales@parallax.com Technical: support@parallax.com Office: (916) 624-8333 Fax: (916) 624-8003 Sales: (888) 512-1024 Tech Support: (888) 997-8267
Web Site: www.parallax.com Forums: forums.parallax.com Sales: sales@parallax.com Technical: support@parallax.com Office: (916) 624-8333 Fax: (916) 624-8003 Sales: (888) 512-1024 Tech Support: (888) 997-8267
NETWORK COMPASS USER MANUAL CONTENTS
 CONTENTS NETWORK COMPASS USER MANUAL GENERAL INTRODUCTION TO B&G NETWORK...2 INTRODUCTION TO NETWORK COMPASS...3 COMPASS DISPLAY UNIT...4 EXAMPLE SYSTEMS USING NETWORK COMPASS...4 INITIAL POWER-UP...5
Make sure you have these items handy
 Quick Start Guide TV Av Info Exit R DSL 1 2 RESET ETH1 ETH2 ETH3 ETH4 PWR Make sure you have these items handy What we ve sent you: A. Yes TV by Fetch box B. Ethernet Cable (3m) (You ll receive 3 of these
KB Hybrid USB Digital TV Tuner Install Guide V1.0
 KB Hybrid USB Digital TV Tuner Install Guide V1.0 USB VHF/UHF Connect the USB TV Tuner to a spare USB port and connect your aerial to the aerial socket on the USB TV Tuner. Also connect the A/V dongle
2.4GHZ Digital Wireless Reversing Camera Kit
 2.4GHZ Digital Wireless Reversing Camera Kit I. Safety precautions for the product The receiving host is installed on the console of the car securely. Do not impact the LCD screen of the receiving host.
More Skills 14 Watch TV in Windows Media Center
 M05_TOWN5764_01_SE_SM5.QXD 11/24/10 1:08 PM Page 1 Chapter 5 Windows 7 More Skills 14 Watch TV in Windows Media Center You can watch and record broadcast TV in Windows Media Center. To watch and record
HDMI Switcher ITEM NO.: HS04, HS07, RC01
 HDMI witcher ITEM NO.: H04, H07, RC01 H04, H07 HDMI switch allows multi different digital (video & audio) sources to share one video display. Built in Auto can and Auto Jump function for variety application.
TELEVISION. User Guide. Interactive Guide and DVR (Digital Video Recorder) Manual FiberNetMonticello.com
 Manual FiberNetMonticello.com") TELEVISION User Guide Interactive Guide and DVR (Digital Video Recorder) Manual 763.314.0100 FiberNetMonticello.com Table of Contents DVR Remote Control Button Features...3 Getting Started Turning On The
TELEVISION User Guide Interactive Guide and DVR (Digital Video Recorder) Manual 763.314.0100 FiberNetMonticello.com Table of Contents DVR Remote Control Button Features...3 Getting Started Turning On The
LINE IN, LINE OUT AUDIO IN, AUDIO OUT FIXED, VARIABLE TO TV, VIDEO IN, VIDEO OUT Sony Electronics Inc. All rights reserved.
 This is a general recommendation based on the information you provided. You can customize the connections to suit your individual preferences and viewing habits. Some hookup recommendations have two cable
Elite Screens Frequently Asked Questions. Screens FAQs
 Elite Screens Frequently Asked Questions Screens FAQs Q1: How can I extend my RJ-45 accessory such as my 3-way wall switch, 5-12v trigger, and IR "eye" sensor? A: You can extend the length of your accessory
INSTALLATION AND OPERATION INSTRUCTIONS EVOLUTION VIDEO DISTRIBUTION SYSTEM
 INSTALLATION AND OPERATION INSTRUCTIONS EVOLUTION VIDEO DISTRIBUTION SYSTEM ATTENTION: READ THE ENTIRE INSTRUCTION SHEET BEFORE STARTING THE INSTALLATION PROCESS. WARNING! Do not begin to install your
User Guide USING THE REMOTE CONTROL ABOUT THE REMOTE CONTROL. Page 3-2
 User Guide USING THE REMOTE CONTROL ABOUT THE REMOTE CONTROL The remote control is designed for use with applicable DBS receivers. It provides easy access to all the features of the Bell ExpressVu system,
Selecon LED Fixtures. PL3 LED Luminaire. Features SPECIFICATION SUBMITTAL
 A revolutionary breakthrough in stage and studio lighting, the PL3 LED Luminaire delivers full control of the beam color composition irrespective of intensity. Drawing on technology and specific insight,
LCD6520L-BK Installation Guide 65 LCD Display Rev 1.0
 Contents: Product Description and Notes Page 1 Tilt Angle and Rotation Page 1 Ventilation Requirements Page 2 Display Dimensions Front, & Right Side Page 3 Rear Page 4 Display Dimensions w/optional Speakers
TeamWork Installation Guide
 C G G 00-0V/ A MAX TX RX +V APARATUS US 0 TeamWork Installation Guide TeamWork TeamWork is a fully customizable collaboration system comprised of an switcher, Show Me cables, a control processor, and a
Booya16 SDR Datasheet
 Booya16 SDR Radio Receiver Description The Booya16 SDR radio receiver samples RF signals at 16MHz with 14 bits and streams the sampled signal into PC memory continuously in real time. The Booya software
TV Lift System Model CL-65 Installation Instructions
 TV Lift System Model CL-65 Installation Instructions Contact: Support@Nexus21.com Toll Free: (866) 500-5438 Phone: (480) 951-6885 Fax: (480) 951-6879 Revised: 01/17/17 Below is a parts list describing
Car-Solutions.com. Warning / Caution. Warning. Caution
 Video Interface for Volkswagen Golf 7 with Discover Media Update Date 2013.11.14 Model User Guide QPI-G7-MAIN-V2.0 Firmware Date 131028 Warning / Caution Warning Caution When installing the main unit,
Part No. ENC-LAB01 Users Manual Introduction EncoderLAB
 PCA Incremental Encoder Laboratory For Testing and Simulating Incremental Encoder signals Part No. ENC-LAB01 Users Manual The Encoder Laboratory combines into the one housing and updates two separate encoder
Binary s UFO Inventors Manual
 Binary s UFO Inventors Manual - Parents please read the instructions carefully with your children prior to first use. - Please keep this instruction manual as it contains important safety information -
CS-200 SOLAR PORTABLE TRAFFIC SIGNAL SYSTEM FIELD MANUAL. 134 Ogilvie Avenue, Echuca 3564 (03)
") CS-200 SOLAR PORTABLE TRAFFIC SIGNAL SYSTEM FIELD MANUAL CS-200 FIELD OPERATING INSTRUCTIONS ONE-WAY OPERATION DESCRIPTION OF CS-200 MODES Flash Manual 1 Auto Normal Both Master and Slave flash yellow.
CS-200 SOLAR PORTABLE TRAFFIC SIGNAL SYSTEM FIELD MANUAL CS-200 FIELD OPERATING INSTRUCTIONS ONE-WAY OPERATION DESCRIPTION OF CS-200 MODES Flash Manual 1 Auto Normal Both Master and Slave flash yellow.
1.0 ThermoNicolet Nexus 670 FTIR Spectrometer Instructions
 1.0 ThermoNicolet Nexus 670 FTIR Spectrometer Instructions 1.1 Click on the OMNIC icon to open the software. 1.2 Check that a signal is being measured by opening the Experiment Setup menu under the Collect
How to make Retractable Door Mirrors Automatic Open/Close for Volvo V
 How to make Retractable Door Mirrors Automatic Open/Close for Volvo V70-2001 VER. 1.3 (electronic changed, C3 moved) 1. Why we did it? Because we did not want to spend 200 Euro for a product on the marked,
TeamWork Kits Installation Guide
 TX 0 RX COM +5V APARATUS US TeamWork Kits Installation Guide TeamWork 400 and TeamWork 600 Kits The TeamWork 400 and TeamWork 600 kits consist of an HDMI switcher, system controller, Cable Cubby, and cables
1 Unpack. Taking the TV Out of the Box. Included in this Box. Stand Parts and Cables. Remote Control. Also included
 1 Unpack Taking the TV Out of the Box Warning: Do not touch the TV s screen when you take it out of the box. Hold it by its edges only. If you touch the screen, you can cause the TV panel to crack. Included
Acer Home Series Projectors H9500BD
 Acer Home Series Projectors H9500BD Product Highlights Exceptional home entertainment Acer H9500BD 2 Acer projector family Acer projectors offer exceptional color performance for all content, in any type
8mm PrecisionPro (Green) DL Spliceable 7-13 Tape Feeder. T Rev. B hd This document supports assembly Rev. -
 DL Spliceable 7-13 Tape Feeder. T Rev. B hd This document supports assembly Rev. -") 8mm PrecisionPro (Green) DL Spliceable Tape Feeder 8mm PrecisionPro (Green) DL Spliceable Tape Feeder 8mm PrecisionPro (Green) DL Spliceable Tape Feeder 8mm PrecisionPro (Green) DL Spliceable 7-13 Tape
8mm PrecisionPro (Green) DL Spliceable Tape Feeder 8mm PrecisionPro (Green) DL Spliceable Tape Feeder 8mm PrecisionPro (Green) DL Spliceable Tape Feeder 8mm PrecisionPro (Green) DL Spliceable 7-13 Tape
Folding arm dish kit Instructions
 Folding arm dish kit Instructions Kit Check list. You should have the following components in your kit: itechworld folding arm dish. itechworld folding easy base (this is the base section of the dish).
Manually Program Time Warner Remote Control Volume Not Working
 Manually Program Time Warner Remote Control Volume Not Working How to program my UR2-DTA Digital Adapter Universal Remote from Time Download Remote Manual Volume Control If any of the functions do not
RMB4. User guide type User guide, English. Operate these devices using the modified Beo4:
 User guide type 35104379 RMB4 User guide, English OneRemote RMB4 controller installed in a Bang & Olufsen Beo4 remote control. Operate these devices using the modified Beo4: Dantax flat screen TV 2010
Nanoleaf Light Panels
 Nanoleaf Light Panels Large Installation Setup Guide Product Introduction This is the star of the show, the flat smooth side is the side that will light up. Light Panels Used to figure out the design on
HDMI over Optical Fibre Transmitter & Receiver Kit # 15354
 HDMI over Optical Fibre Transmitter & Receiver Kit # 15354 Operation Manual Introduction With HDMI becoming more and more popular around the world, many consumers have been searching for a way to transmit
Approved by: / / R. Battaglia 12/16/2016
 Fabrication Laboratory Revision: H Rev Date: 12/16/16 Approved by: Process Engineer / / R. Battaglia 12/16/2016 Equipment Engineer 1 SCOPE The purpose of this document is to detail the use of the Varian
TABLE OF CONTENTS ENGLISH
 TABLE OF CONTENTS 1 Health, Safety and Environment... 3 1.1 Precautions and safety issues... 3 1.2 Country specific conditions... 4 1.3 End of life... 5 2 General... 6 2.1 Denominations... 6 2.2 Functional
Guía del usuario Español ( 7 10 ) Guide d utilisation Français ( ) Guida per l uso Italiano ( ) Benutzerhandbuch Deutsch ( )
 Guide d utilisation Français ( ) Guida per l uso Italiano ( ) Benutzerhandbuch Deutsch ( )") User Guide English ( 3 6 ) Guía del usuario Español ( 7 10 ) Guide d utilisation Français ( 11 14 ) Guida per l uso Italiano ( 15 18 ) Benutzerhandbuch Deutsch ( 19 22 ) Appendix English ( 23 ) User Guide
User Guide English ( 3 6 ) Guía del usuario Español ( 7 10 ) Guide d utilisation Français ( 11 14 ) Guida per l uso Italiano ( 15 18 ) Benutzerhandbuch Deutsch ( 19 22 ) Appendix English ( 23 ) User Guide
WD TV Live. that allow third party equipment to be operated via a Bang & Olufsen remote control system.
 Beo4 and Beo5 are remote control terminals from Bang & Olufsen. OneRemote supplies interface modules that allow third party equipment to be operated via a Bang & Olufsen remote control system. Beocompatible
High Performance (Gold Plus) Spliceable Tape Feeder Part Number: Part Number: Revision 3 Jun 2008 No.
 Spliceable Tape Feeder Part Number: Part Number: Revision 3 Jun 2008 No.") 8mm High Performance (Gold Plus) Spliceable Tape Feeder Part Number: 50934707 12mm High Performance (Gold Plus) Spliceable Tape Feeder Part Number: 50934807 Revision 3 Jun 2008 No. 0930D-E010 i Table
8mm High Performance (Gold Plus) Spliceable Tape Feeder Part Number: 50934707 12mm High Performance (Gold Plus) Spliceable Tape Feeder Part Number: 50934807 Revision 3 Jun 2008 No. 0930D-E010 i Table
DVB-LR10. Compatible with Land Rover touch-screen navigation systems version 2
 dvblogic DVB-T Tuner Compatible with Land Rover touch-screen navigation systems version 2 Product features full plug and play vehicle-specific dual DVB-T Tuner with two active DVB-T glass-mount antennas
of Loewe E 2.10_m1 1
 of Loewe E 2.10_m1 1 Attention! After updating the M203 firmware to version 2.00 or higher, we recommend completely resetting the M203 interface by pressing the Disable softkey on setup page #2 for several
BOCS Media Hub. Installation & Usage Manual
 BOCS Media Hub Installation & Usage Manual Important Safety Instructions: 1) Read these instruction 2) Keep these instructions 3) Heed all warnings 4) Follow all instructions 5) Do not use this apparatus
DVB-C25. Compatible with navigation systems Mercedes Benz Comand 2.5
 dvblogic DVB-T Tuner Compatible with navigation systems Mercedes Benz Comand 2.5 Product features full plug and play vehicle-specific dual DVB-T Tuner with two active DVB-T glass-mount antennas integrated
BARC Tips for Tiny Libraries
 BARC Tips for Tiny Libraries Getting Started Using Biblionix Apollo Integrated Library System Prepared By Sian Brannon Sian.Brannon@unt.edu July 3, 2015 BARC Tips for Tiny Libraries Title BARC Tips for
ipad mini 4 LTE Right Cellular Antenna Replacement
 ipad mini 4 LTE Right Cellular Antenna Replacement Replace the right cellular antenna in an ipad mini 4 LTE. Written By: Evan Noronha ifixit CC BY-NC-SA www.ifixit.com Page 1 of 22 INTRODUCTION Follow
AUDI 3G MMI Video Interface
 AUDI 3G MMI Video Interface For 2009 UP With 3G MMI system Round LVDS connector Main Features: 1. It is suitable for 2009 up version Round connector LVDS 3G MMI Audi A4, A5, A6, A8, Q5, Q7 series. 2. With
Digital Real Time Recording VCR
 Digital Real Time Recording VCR Digitally encoded picture of more than 520 TV line horizontal resolution Frame recording and frame playback capability Digital recording on S-VHS tapes Packet recording
Simple and highly effective technology to communicate your brand s distinctive character
 . . . Advantages 4 Simple and highly effective technology to communicate your brand s distinctive character COST EFFECTIVE No need to print graphics, you can change your message every day! No media player
BRIGHTLINK HDMI EXTENDER OVER ETHERNET - H METER MODEL: BL-EXT-IP-264
 BRIGHTLINK HDMI EXTENDER OVER ETHERNET - H.264-120 METER MODEL: BL-EXT-IP-264 Operating Instructions BRIGHTLINKAV.COM 1 Introduction This HDMI over IP Extender use the advanced H.264 as the compression
Kaleidescape Co-Star for Lumagen
 Kaleidescape Co-Star for Lumagen Installation Guide The Co-Star solution allows a Strato movie player to present a unified onscreen library that includes all of a Kaleidescape customer s movies from DVD