Let s build the EdCrane Difficulty:
|
|
|
- Louisa Cummings
- 6 years ago
- Views:
Transcription


1 EdBuild Let s build the EdCrane Difficulty: The EdCrane EdBuild by Microbric Education is licensed under a Creative Commons Attribution-ShareAlike 4.0 International License.
2 EdBuild the EdCrane The EdCrane is a remote-controlled crane which can be programmed using the barcodes in this guide plus a downloadable program and controlled with a standard TV or DVD remote control. You will be able to turn the crane clockwise or counterclockwise on its base. You will also be able to lift and lower the magnetic hook. Build difficulty rating The EdCrane is rated a level 4 build. Difficulty rating Recommended age Programming skills needed Barcodes and remote control Barcodes and remote control Barcodes and remote control EdPy - Barcodes and remote control AND - EdWare OR - EdPy To successfully complete and operate a build, you will need an understanding of the programming skills listed. Learn more about programming with Edison at: Barcodes: Appropriate for ages 4+. No prior experience with programming or robotics is assumed or required. EdWare: Best suited to students aged 11 to 13. A basic understanding of programming fundamentals may be helpful. EdPy: Best suited to students aged 13 to 16 years old. A basic understanding of programming fundamentals may be helpful.
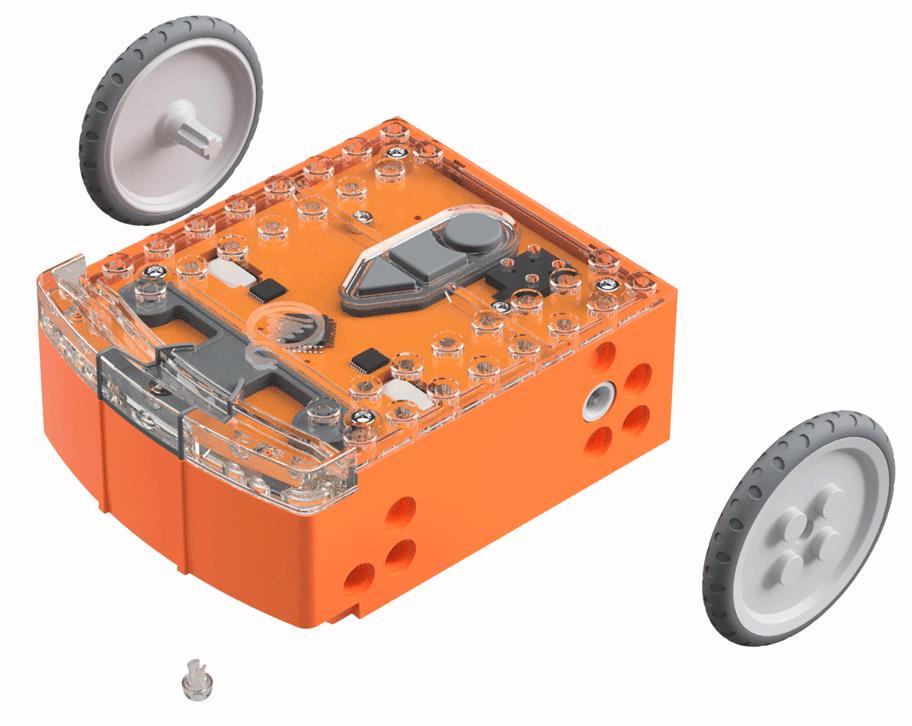
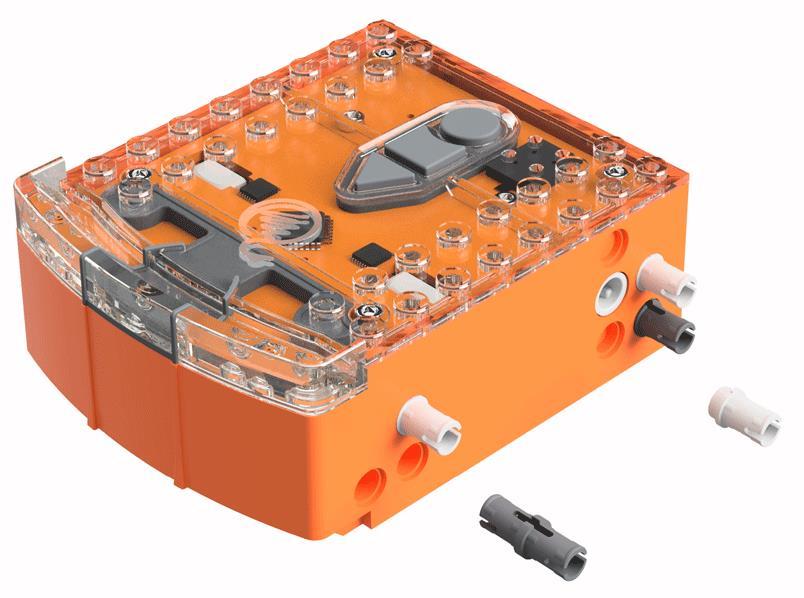
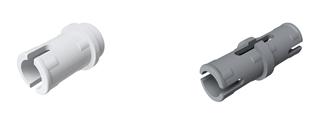
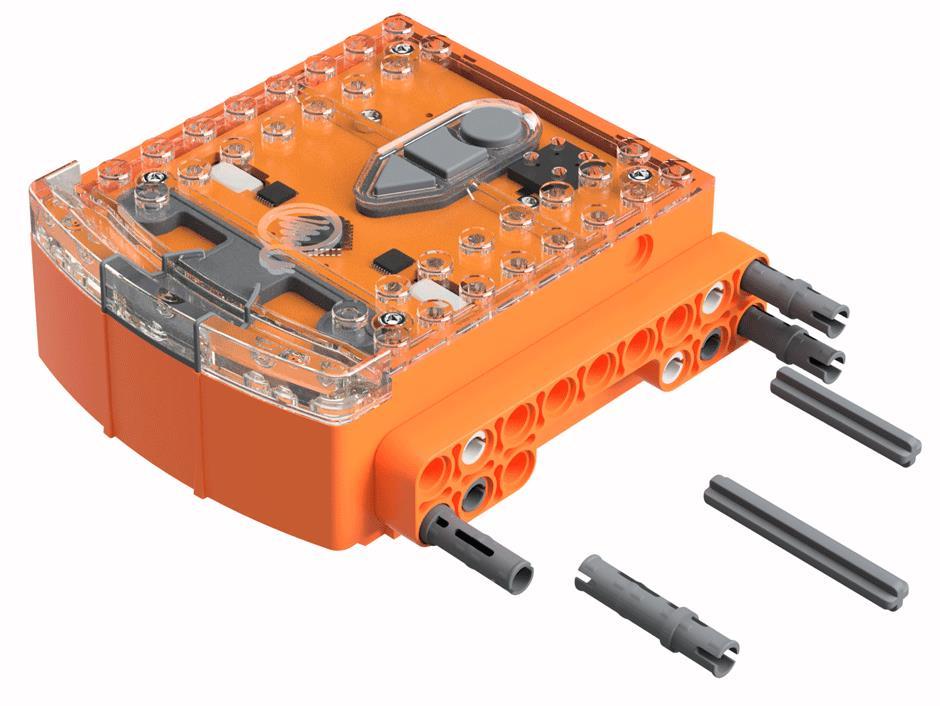
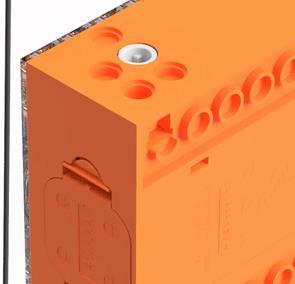
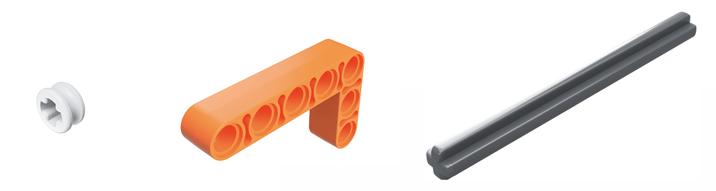
3 Get set up Before you begin this build, check that you have everything you need and that you can do the programming required. It s also a good idea to get familiar with how to build with your Edison robot. What you need To make the EdCrane, you will need: 1 Edison robot 1 EdCreate Edison robot creator s kit 1 TV or DVD remote 1 print-out of the barcodes sheet (from in this guide) Access to a computer with an internet connection It is recommended that the magnetic hook used in the EdCrane be pre-assembled before beginning this build by and adult or under adult supervision. As this hook uses a real magnet, it is important to keep this hook and the small parts it contains away from children under 3 years of age. Please see the section on building the magnetic hook in this guide for details. Programming required in this build To program the EdCrane, you will need to program a remote control with four different commands using the barcodes in this guide. You will also need to program the Edison robot using either the EdWare or the EdPy robotic programming language. Links to the programs you need are provided in this guide. Building with Edison You can build with Edison using an EdCreate creator s kit or any other LEGO brick compatible building system. Bricks can be attached to the top and bottom of your Edison robot. Pegs can be attached on the sides of Edison. When Edison s wheels are removed, cross axles can be used in the powered sockets. There are three types of holes on the side of Edison: pin holes, stud holes, and cross axle sockets. Look at the following images to learn more about how to connect and build with Edison.


4 Edison s side and top connections 2 x 8 studs 2 x 8 studs 2x stud holes Stud hole Pin hole 2x pin holes Powered cross axle socket Stud hole Hole type Description Connects to Pin hole Stud hole Cross axle socket A full-depth hole for connecting pegs. A hole of normal studdepth which works with half pegs. A powered socket which rotates. Removable skid 2 x 8 sockets 2 x 8 sockets 2 x 2 studs Edison s bottom and wheel connections
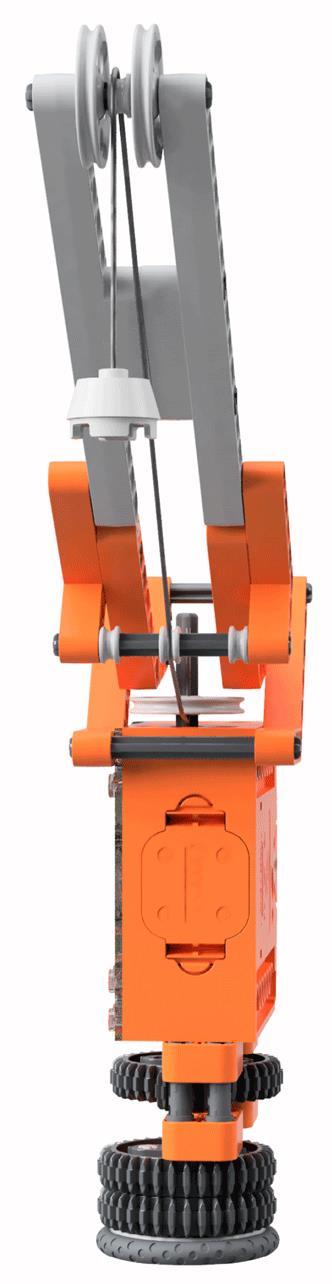
5 Let s build the EdCrane! The EdCrane is a remote-controlled crane with a magnetic hook which you can raise and lower. The magnetic hook of the EdCrane can lift or lower small ferrous-metal objects, such as metal paper clips or small screws. The EdCreate kit includes a metal peg which can be attached to one of the parts from the EdCreate kit, such as a 3-hole beam, and used with the magnetic hook. This is what the finished EdCrane, using the magnetic hook, looks like: Step 1: Program Edison How the EdCrane is programmed Before you begin building with the EdCreate parts, you will need to program the remote control codes into the Edison robot using the barcodes in this guide. Like other EdCreate EdBuilds, the EdCrane responds to a TV or DVD remote control. However, the EdCrane does not use the barcodes in the same way. Instead, the EdCrane uses remote control commands in combination with a downloaded program which you will also need. The downloaded program tells the EdCrane what action to perform when a specific remote code is detected. You will need to download the remote control program into the Edison robot using either EdWare or EdPy. You can do this before or after you build the crane.

6 Program the barcodes The next page has the remote control barcodes for the Edison robot. Print out this page so you can drive your Edison robot over the barcodes. N.B. These remote control barcodes are the same ones used to drive Edison robots remotely. As such, when you first pair the robot to a button, it will react by demonstrating the default behaviour of that barcode. For example, TV/DVD remote code #1 defaults to drive backwards. Once you download your program and press the play (triangle) button on the robot, the robot will run the programmed action instead of the barcode default. Suggested remote control button setup for the EdCrane Spin the crane counterclockwise Spin the crane clockwise Spin the magnetic hook spool clockwise Spin the magnetic hook spool counter-clockwise


 button 3 times 3.")

7 Programming Edison barcodes Print out this page! The crane uses one Edison robot which needs to be programmed with four barcodes. The Edison robot will control the movement of the EdCrane on its base (spin clockwise and spin counter-clockwise) and the movement of the spool which winds the magnetic hook clockwise or counter-clockwise in order to raise or lower the hook. Drive your Edison over the following barcodes, programming each to a button on the remote control. Reading the barcode 1. Place Edison facing the barcode on the right side 2. Press the record (round) button 3 times 3. Edison will drive forward and scan the barcode 4. Press a button on your TV/DVD remote that you want to activate that function Barcode TV/DVD remote code #1 spin magnetic hook spool clockwise Barcode TV/DVD remote code #2 spin magnetic hook spool counter-clockwise Barcode TV/DVD remote code #3 spin EdCrane counter-clockwise Barcode TV/DVD remote code #4 spin EdCrane clockwise


8 Programming Edison downloading a program You can download the remote control command program into the EdCrane using either EdWare or EdPy. EdWare available at Use the share code to open the official EdCrane program in EdWare. You can download this program as-is into your Edison robot. You can also use this program as a base to make your own EdCrane program. EdPy available at Use the share code to open the official EdCrane program in EdPy. You can download this program as-is into your Edison robot. You can also use this program as a base to make your own EdCrane program.

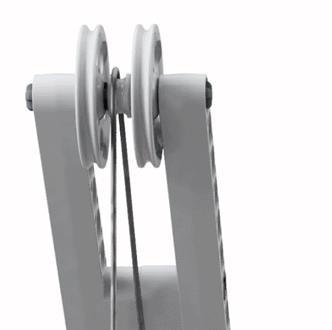
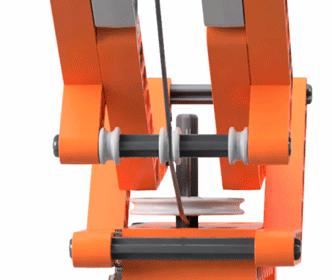
9 Step 2: Assemble the EdCrane s magnetic hook Before building the EdCrane, it is recommended that you set up the magnetic hook. To set up the magnetic hook, you need three of the pieces from the EdCreate kit: the string, the magnet and the hook case. The magnet and string, along with the metal peg for use with the magnetic hook, come in a small bag which you will need scissors to open. Keep the contents of this bag away from young children to ensure they do not swallow the magnet. Steps to set up the magnetic hook 1. Feed one end of the string into the top of the hook case. 2. Make a knot in the string near the end of the string. Check that the knot is tight and cannot be pulled back up through the hook case. Double-knot if needed. 3. Push the magnet into the hole in the bottom of the hook case, no more than 0.5cm from the end of the string, trapping the knot and string inside. All of the string needs to be behind the magnet inside of the cavity in the hook case. Trim off excess string below the knot if required. See image: 4. Make a second knot in the string near to opposite end of the string (away from the hook). This will be used to anchor that end of the string in place on the spool by sliding it into the groove in the pulley piece. (Refer to step 10 in the build for further details.) See image:
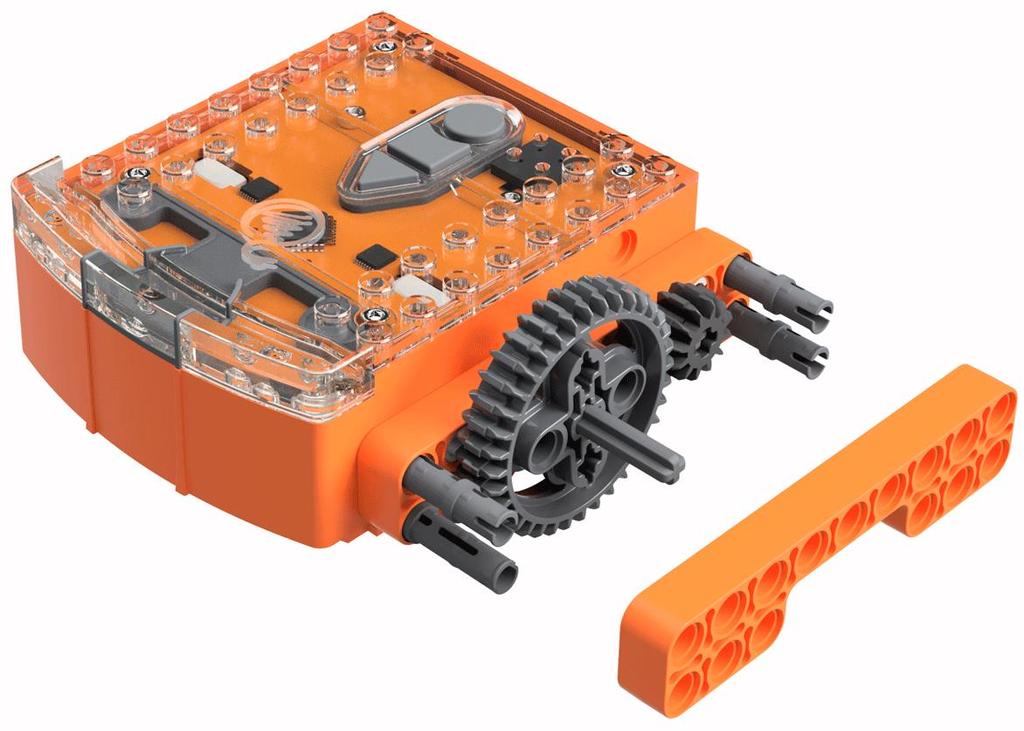
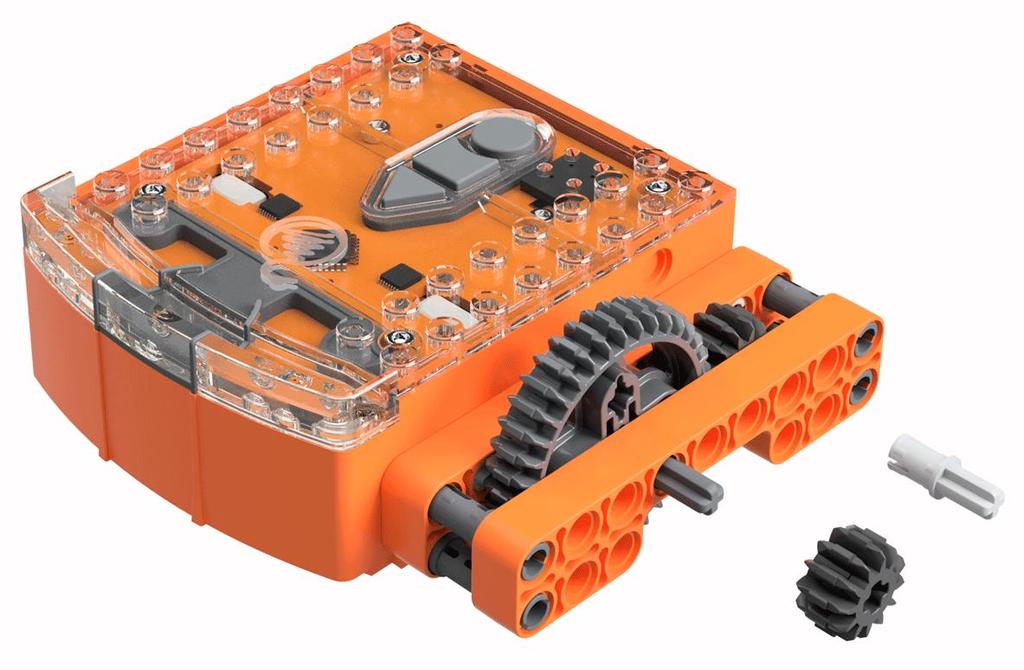
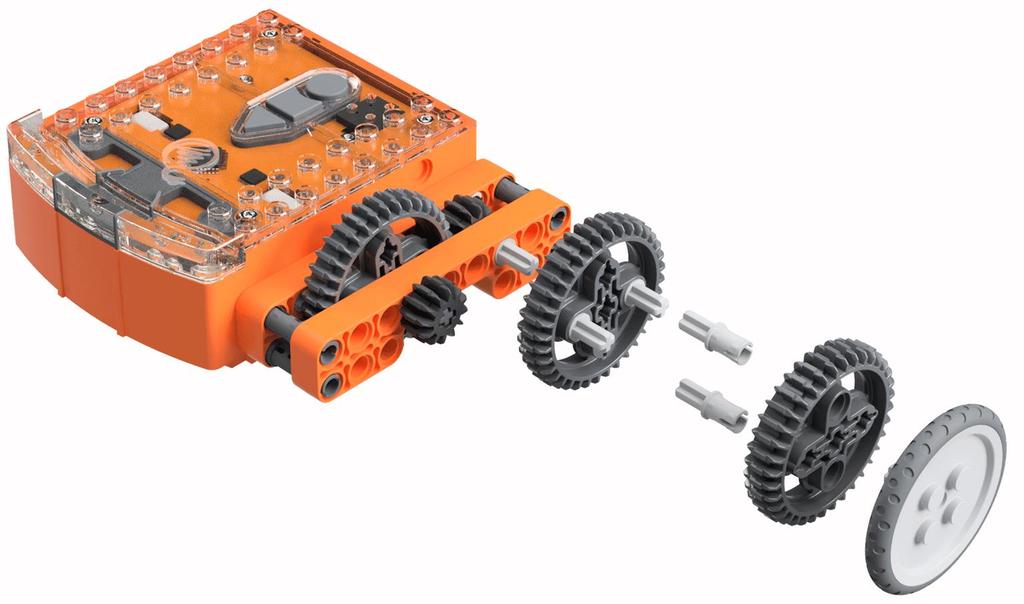
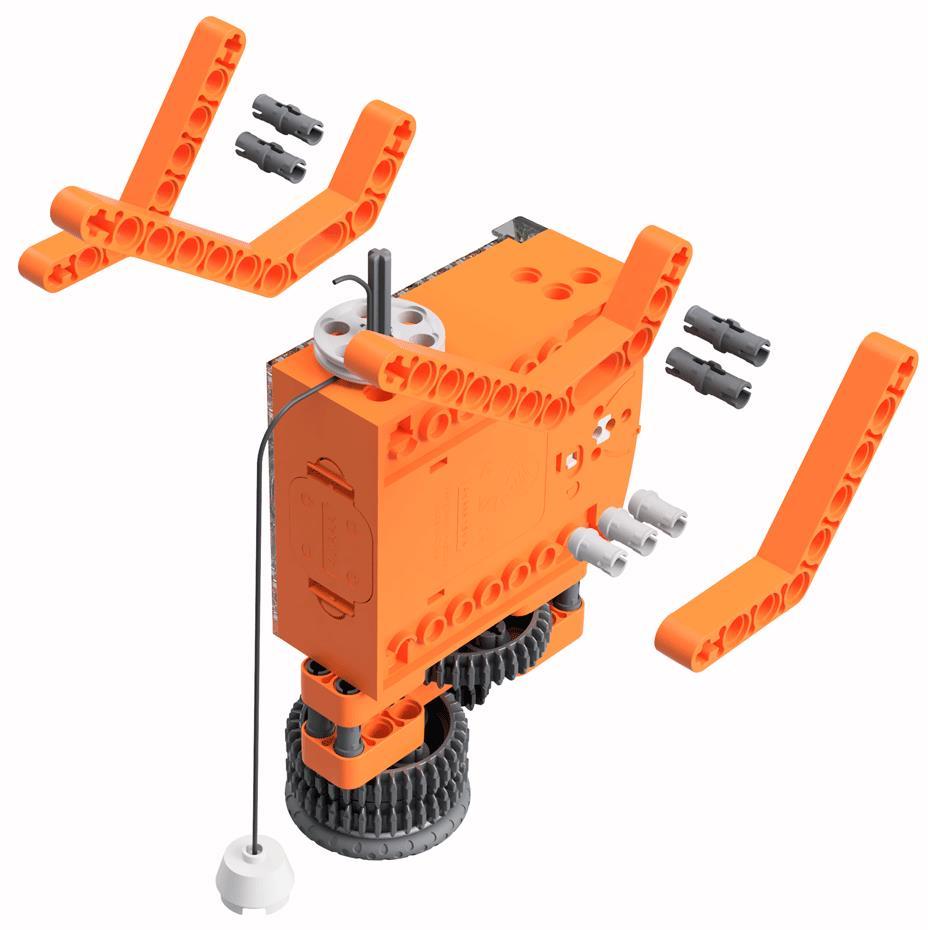
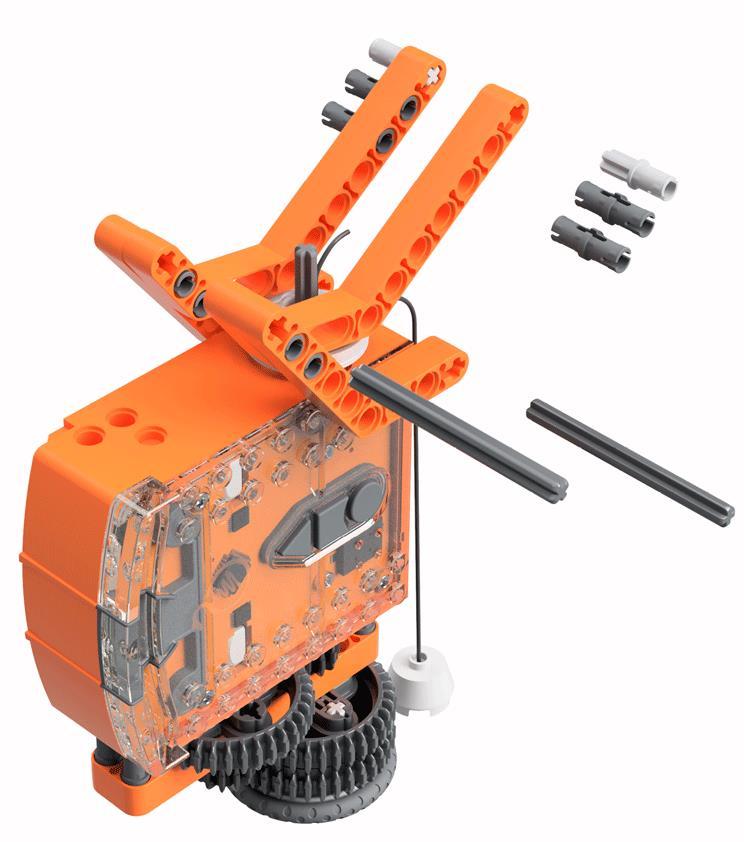
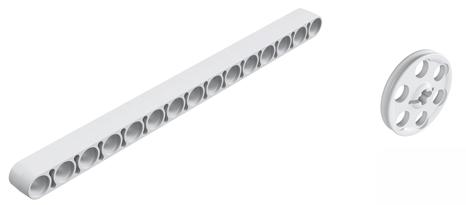
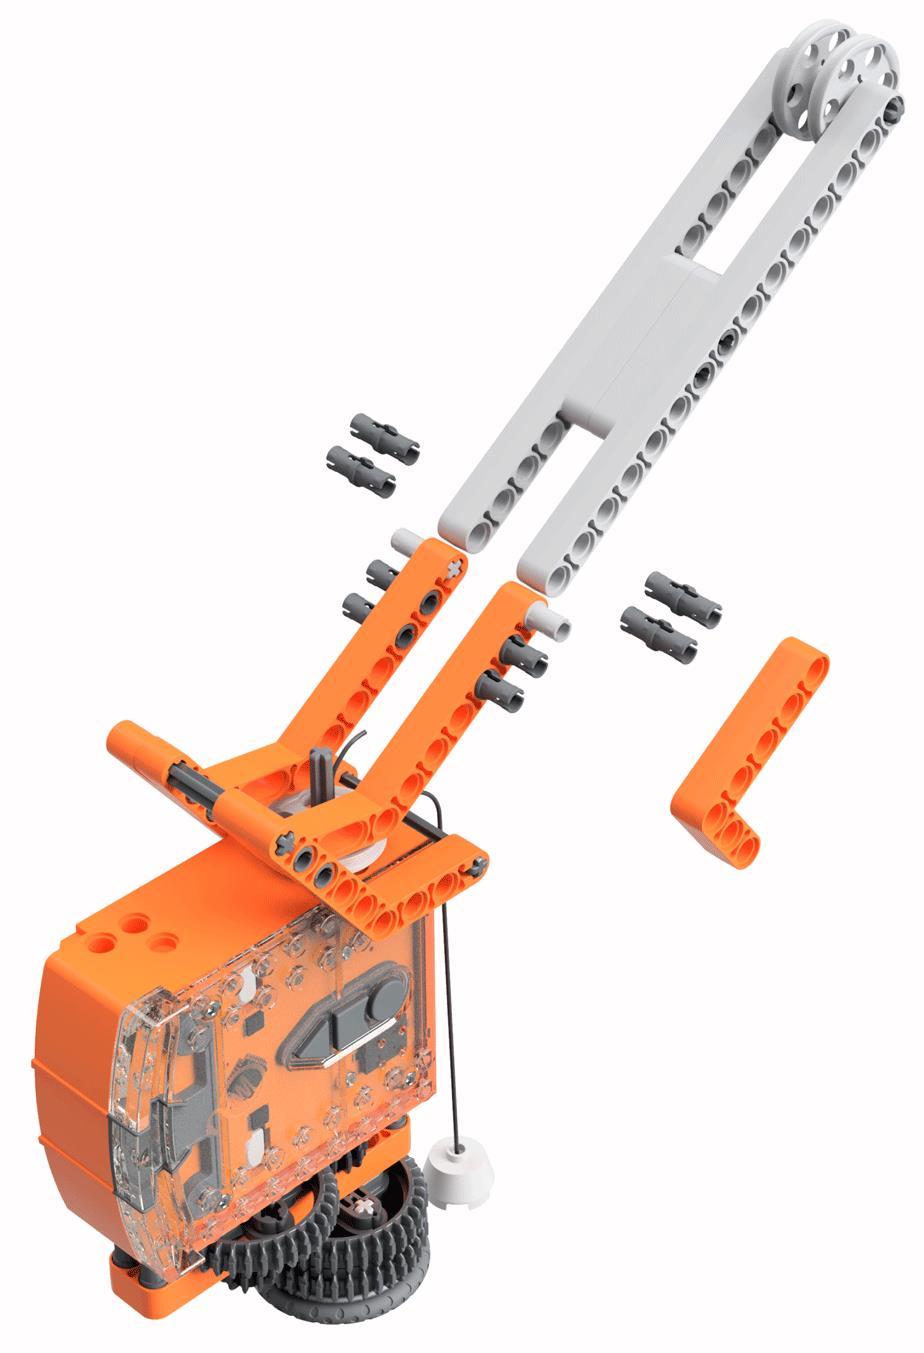
10 Step 3: Assemble the EdCrane Follow the illustrations step by step to build the EdCrane. Reading the instructions: Step number Build instructions Parts key One-to-one piece measurement (when printed at 100% on A4 page). The number in the circle indicates the part s length in number of studs.
11 1 2 3x 2x


12 3 4 4x 1:1 4 3


13 5 6

14 7 8 2x 4x

15 :1 4

16 x 2x 3x 4x

17 x 4x 2x 1:1 6


18 15 2x 2x 4x 2x 5 1: x

19 17 3x 1:1 6 18


20 :1 3
21 21
Let s build the EdRoboClaw Difficulty:
 EdBuild Let s build the EdRoboClaw Difficulty: The EdRoboClaw EdBuild by Microbric Education is licensed under a Creative Commons Attribution-ShareAlike 4.0 International License. EdBuild the EdRoboClaw
Let s build the EdDigger Difficulty:
 EdBuild Let s build the EdDigger Difficulty: The EdDigger EdBuild by Microbric Education is licensed under a Creative Commons Attribution-ShareAlike 4.0 International License. EdBuild the EdDigger The
Your EdVenture into Robotics You re a Controller
 Your EdVenture into Robotics You re a Controller Barcode - Clap controlled driving meetedison.com Contents Introduction... 3 Getting started... 4 EdVenture 1 Clap controlled driving... 6 EdVenture 2 Avoid
Your EdVenture into Robotics You re a Programmer
 Your EdVenture into Robotics You re a Programmer meetedison.com Contents Introduction... 3 Getting started... 4 Meet EdWare... 8 EdWare icons... 9 EdVenture 1- Flash a LED... 10 EdVenture 2 Beep!! Beep!!...
Materials: Programming Objectives:
 Lessons Lesson 1: Basic Chassis Overview TETRIX Getting Started Guide In this lesson, users will learn how to use the elements of the TETRIX system that will be involved in building the basic chassis of
Step 1. 1x NXT Ultrasonic Sensor
 Start with the build completed in Lesson 3 of the TETRIX Getting Started Guide. Step 1 involves removing an element from the model. This element will be reattached later. Parts to be Removed Step 1 1x
Meet Edison. This is Edison, the programmable robot. What is a robot? A robot is a machine that can be made to do a task on its own.
 Edison and EdBlocks Activity 1 Programmer s Name Meet Edison This is Edison, the programmable robot. What is a robot? A robot is a machine that can be made to do a task on its own. There are many types
Assembly Instructions Clearlight Infrared Sauna: CE-C
 1 2 Assembly Instructions Clearlight Infrared Sauna: CE-C Part List...4 Pre-Assembly Instructions...5 Assembly Instructions...6-8 Control Panel Instructions...9 Color Light Therapy Instructions...10 Using
LEGO MINDSTORMS PROGRAMMING CAMP. Robotics Programming 101 Camp Curriculum
 LEGO MINDSTORMS PROGRAMMING CAMP Robotics Programming 101 Camp Curriculum 2 Instructor Notes Every day of camp, we started with a short video showing FLL robots, real robots or something relevant to the
NETWORK COMPASS USER MANUAL CONTENTS
 CONTENTS NETWORK COMPASS USER MANUAL GENERAL INTRODUCTION TO B&G NETWORK...2 INTRODUCTION TO NETWORK COMPASS...3 COMPASS DISPLAY UNIT...4 EXAMPLE SYSTEMS USING NETWORK COMPASS...4 INITIAL POWER-UP...5
Coyote popup display set up instructions
 Coyote popup display set up instructions Frame 1 2 3 Prepare frame for assembly by locating the purple hooks on top of the frame. Stretch frame to size, snapping magnetic locking arms together. Attach
Lego Robotics Module Guide
 Lego Robotics Module Guide The RCX is a programmable, microcontroller-based brick that can simultaneously operate motors, sensors, an infrared serial communications interface, a display and speaker. Get
Inspire Station. Programming Guide. Software Version 3.0. Rev A
 Inspire Station Programming Guide Software Version 3.0 Rev A Copyright 2016 Electronic Theatre Controls, Inc. All rights reserved. Product information and specifications subject to change. Part Number:
Lynx Broadband Installation Manual for Residential Packages with a 35 db Amp Quick Start Guide (first 3 pages)
") Lynx Broadband Installation Manual for Residential Packages with a 35 db Amp Quick Start Guide (first 3 pages) 1. Be sure that your kit includes all the parts shown in the Check the Equipment section in
Lynx Broadband Installation Manual for Residential Packages with a 35 db Amp Quick Start Guide (first 3 pages) 1. Be sure that your kit includes all the parts shown in the Check the Equipment section in
High Performance (Gold Plus) Spliceable Tape Feeder Part Number: Part Number: Revision 3 Jun 2008 No.
 Spliceable Tape Feeder Part Number: Part Number: Revision 3 Jun 2008 No.") 8mm High Performance (Gold Plus) Spliceable Tape Feeder Part Number: 50934707 12mm High Performance (Gold Plus) Spliceable Tape Feeder Part Number: 50934807 Revision 3 Jun 2008 No. 0930D-E010 i Table
8mm High Performance (Gold Plus) Spliceable Tape Feeder Part Number: 50934707 12mm High Performance (Gold Plus) Spliceable Tape Feeder Part Number: 50934807 Revision 3 Jun 2008 No. 0930D-E010 i Table
(Skip to step 11 if you are already familiar with connecting to the Tribot)
") LEGO MINDSTORMS NXT Lab 5 Remember back in Lab 2 when the Tribot was commanded to drive in a specific pattern that had the shape of a bow tie? Specific commands were passed to the motors to command how
LEGO MINDSTORMS NXT Lab 5 Remember back in Lab 2 when the Tribot was commanded to drive in a specific pattern that had the shape of a bow tie? Specific commands were passed to the motors to command how
OWNER'S MANUAL SIGNAL COMMANDER
 OWNER'S MANUAL SIGNAL COMMANDER THIS MANUAL CONTAINS INSTRUCTIONS FOR: LPDA 200 - INSTALLATION - OPERATION - TROUBLESHOOTING - EXPLODED PARTS DRAWING - WARRANTY AntennaTek, Inc. 425 S. Bowen, #4 Longmont,
MP Maker Pro Mk.1. Quick Start Guide
 MP Maker Pro Mk.1 P/N 33013 Quick Start Guide ONLINE SUPPORT Monoprice is pleased to provide free online support. For order related issues, contact the Customer Service department through the Live Chat
24-Fiber LANLINXS (Model # ) 48-Fiber LANLINXS (Model # ) User Manual
 48-Fiber LANLINXS (Model # ) User Manual") 24-Fiber LANLINXS (Model # 055-8632-5000) 48-Fiber LANLINXS (Model # 055-8832-5000) User Manual 24-Fiber LANLINXS (Model # 055-8632-5000) 48-Fiber LANLINXS (Model # 055-8832-5000) User Manual, Part Number
24-Fiber LANLINXS (Model # 055-8632-5000) 48-Fiber LANLINXS (Model # 055-8832-5000) User Manual 24-Fiber LANLINXS (Model # 055-8632-5000) 48-Fiber LANLINXS (Model # 055-8832-5000) User Manual, Part Number
High Performance DL-60 (Gold Plus) (7 in - 13 in) Dual Lane Spliceable Tape Feeder Part Number: Revision 3 Sep No.
 (7 in - 13 in) Dual Lane Spliceable Tape Feeder Part Number: Revision 3 Sep No.") 8mm High Performance DL-60 (Gold Plus) (7 in - 13 in) Dual Lane Spliceable Tape Feeder Part Number: 50381212 Revision 3 Sep. 2010 No. 0730D-E043 Page i Table of Contents Functional Description...1 Procedures
8mm High Performance DL-60 (Gold Plus) (7 in - 13 in) Dual Lane Spliceable Tape Feeder Part Number: 50381212 Revision 3 Sep. 2010 No. 0730D-E043 Page i Table of Contents Functional Description...1 Procedures
HQ Electromagnetic Channel Locks
 HQ Electromagnetic Channel Locks Table of Contents Overview... 2 Kit Contents... 2 Tools Required... 5 Installation... 5 Using the HQ Electromagnetic Channel Locks... 10 Troubleshooting... 11 Overview
E-TEXTILES STARTER PACK
 LEARN HOW TO SEW A CIRCUIT WITH THIS E-TEXTILES STARTER PACK WHITE LEDs BLUE LEDs LARGE COIN CELL MINIATURE COIN CELL SEWABLE ELECTRONICS INTRODUCTION TO ELECTRO-FASHION Electro-Fashion is Kitronik's own
Product Manual. Designed and Manufactured in the UK by Optikinetics
 Product Manual Contents Product Overview... 1 Getting Started... Mounting the Projector... Inserting the Effect Wheel... Focussing the Image... Cleaning the Focussing Lens... 2 2 3 6 6 Operating the Projector...
Asse mbly Instructions Clearlight Infrare d Sauna: CE-1
 1 2 Asse mbly Instructions Clearlight Infrare d Sauna: CE-1 Part List...4 Pre-Assembly Instructions...5 Assembly Instructions...6-8 Control Panel Instructions...9 Color Light Therapy Instructions...10
INSTRUCTION MANUAL. Made in the U.S.A. by USA Dance Floor. Copyright 2017 USA Dance Floor, LLC
 1 INSTRUCTION MANUAL Made in the U.S.A. by USA Dance Floor Copyright 2017 USA Dance Floor, LLC 2 BEFORE YOU BEGIN Plan ahead! First read all of this manual and get familiar with all of the parts. Failing
Instruction Manual for Electronic Blowers and Flashboards
 Instruction Manual for Electronic Blowers and Flashboards These instructions cover both the table model 17212 table top Electronic Bingo Blower (Fig 1) and the 17213 floor model Electronic Bingo Blower
Endurance Robotics PT-3
 Endurance Robotics PT-3 The Endurance Robotics Pan and Tilt PT-3 base is a rugged pan and tilt system based around standard sized hobby servos. Featuring all around rigid 1/4" ABS laser cut construction,
CONNECTING THE FUTURE 19" LINXS LIGHTWAVE INTEGRATED CROSS-CONNECT SYSTEM USER MANUAL
 CONNECTING THE FUTURE 19" LINXS LIGHTWVE INTEGRTED CROSS-CONNECT SYSTEM USER MNUL 109003 Issue Rev 2 19" Lightwave Integrated Cross-Connect System (LINXS) User Manual Document Number 109003 Issue Rev 2
1.0 ThermoNicolet Nexus 670 FTIR Spectrometer Instructions
 1.0 ThermoNicolet Nexus 670 FTIR Spectrometer Instructions 1.1 Click on the OMNIC icon to open the software. 1.2 Check that a signal is being measured by opening the Experiment Setup menu under the Collect
PRJTPFL inch PRJTPFL inch PRJTPFL inch. Fixed Wall Mount Projector Screen. Universal Home/Office Projector Viewing Display
 PRJTPFL102-100 - inch PRJTPFL112-110 - inch PRJTPFL122-120 - inch Fixed Wall Mount Projector Screen Universal Home/Office Projector Viewing Display Be sure to read this manual before use so you will know
ELECTRICAL ADJUSTMENT INSTRUCTIONS
 ELECTRICAL ADJUSTMENT INSTRUCTIONS General Note: "CBA" is abbreviation for "Circuit Board Assembly." NOTE: Electrical adjustments are required after replacing circuit components and certain mechanical
Motor Operated Solar Shade with Valance Installation and Care Instructions Complete Video Instructions Available Online at
 * Motor Operated Solar Shade with Valance Installation and Care Instructions Complete Video Instructions Available Online at www.keystonefabrics.com Step 1: Identify the parts of your shade (parts shown
FOSC-600 C and D I N S T A L L A T I O N I N S T R U C T I O N
 FOSC-600 C and D I N S T A L L A T I O N I N S T R U C T I O N In-line and butt version Cold applied re-usable fiber optic closure Contents 1 Introduction 1.1 Product description 1.2 Capacity 2 General
3. Electronics and MMU2 unit assembly
 Written By: Jakub Dolezal 2018 manual.prusa3d.com/ Page 1 of 34 Step 1 Tools necessary for this chapter Please prepare tools for this chapter: 2.5mm Allen key for M3 screws 2mm Allen key for nut alignment
PRODUCT DATASHEET Ronda series last update 20/12/2016
 PRODUCT DATASHEET series last update 20/12/2016 FCN15302_RONDA-WW 19.8 mm ["socket", "screw"] FCN15303_RONDA-WWW 19.8 mm ["screw", "socket"] FCN15314_RONDA-WAS 25.42 mm FCN15315_RONDA-WW 19.8 mm (simulated)
OWNER'S MANUAL SIGNAL COMMANDER
 OWNER'S MANUAL SIGNAL COMMANDER THIS MANUAL CONTAINS INSTRUCTIONS FOR: MOD 550 - INSTALLATION - OPERATION - TROUBLESHOOTING - EXPLODED PARTS DRAWING - WARRANTY AntennaTek, Inc. 425 S. Bowen, #4 Longmont,
Modulate Magnetic Kit 10-01
 Modulate Magnetic Kit 10-01 MOD-10-01-M MOD-10-01-M-OCE Modulate Fabric Banner kits feature unique angles and shapes, are portable and now are even easier to configure to achieve your dream space! Modulate
LeRIBSS MTC MANUAL. Issue #1. March, MTC Control Unit Definitions, Information and Specifications. MTC Control Unit Electronic Schematics
 LeRIBSS MTC MANUAL Issue #1 March, 2008 Contents: MTC Control Unit MTC Control Unit Definitions, Information and Specifications Programming the MTC Control Unit Program Parameters Initial Setup Measuring
I OPERATING PRECAUTIONS
 I OPERATING PRECAUTIONS Please place the turntable on a horizontal support free of vibrations. For prevention of acoustical feedback, the speakers must be placed a sufficient distance from the turntable.
TABLE OF CONTENTS ENGLISH
 TABLE OF CONTENTS 1 Health, Safety and Environment... 3 1.1 Precautions and safety issues... 3 1.2 Country specific conditions... 4 1.3 End of life... 5 2 General... 6 2.1 Denominations... 6 2.2 Functional
ART2000i Digital Dimming System. Installation guide. Stock number *8200-
 ART2000i Digital Dimming System Installation guide Stock number 8200-0159 *8200- 0159* Useful Avolites phone numbers:- Avolites England Sales and service* (+44) (0) 20 8965 8522 Service out of hours* (+44)
Cable System Installation Guide
 Overview Cable System Installation Guide 5/19/2008 Our recommended approach for the installation of your Circle Graphics Cable Systems on the panels in your market is to install the fixed hardware (namely
Neutron Spectrometer Operation Manual
 Neutron Spectrometer Operation Manual MIT Department of Physics (Dated: October 16, 2014) This document is for assisting in the understanding and accessing of the technical aspects of the neutron physics
Perform in the spotlight
 Student sheet 1 Perform in the spotlight Let s get the Edison robot to play music or dance when it detects light, just like a performer in the spotlight! To do this, there are a few things we need to learn:
Step 1. 2x Kep Nut 1x Left Motor Assembly
 Start with the build completed in Lesson 3 of the TETRIX Getting Started Guide. Steps 1 to 3 involve removing elements from the model. These elements will be reattached later. Parts to be Removed Step
IP-LINX Fiber :: X-XXXX
 Fiber :: 055-797X-XXXX User Manual Telect, Inc. All rights reserved. 146653-A0 Table of Contents Chapter 1: Introduction...3 1.1 Tools Required...3 1.2 Additional Parts...3 1.3 Assemblies...3 Chapter 2:
Guía del usuario Español ( 7 10 ) Guide d utilisation Français ( ) Guida per l uso Italiano ( ) Benutzerhandbuch Deutsch ( )
 Guide d utilisation Français ( ) Guida per l uso Italiano ( ) Benutzerhandbuch Deutsch ( )") User Guide English ( 3 6 ) Guía del usuario Español ( 7 10 ) Guide d utilisation Français ( 11 14 ) Guida per l uso Italiano ( 15 18 ) Benutzerhandbuch Deutsch ( 19 22 ) Appendix English ( 23 ) User Guide
User Guide English ( 3 6 ) Guía del usuario Español ( 7 10 ) Guide d utilisation Français ( 11 14 ) Guida per l uso Italiano ( 15 18 ) Benutzerhandbuch Deutsch ( 19 22 ) Appendix English ( 23 ) User Guide
SCdefault. 900 Installation instructions. Accessories Part No. Group Date Instruction Part No. Replaces :36-29 Sep
 SCdefault 900 Installation instructions SITdefault Upgrade to Premium 300 sound system MONTERINGSANVISNING INSTALLATION INSTRUCTIONS MONTAGEANLEITUNG INSTRUCTIONS DE MONTAGE Accessories Part No. Group
Bionic Elephant Trunk. Assembly Instructions
 Bionic Elephant Trunk Assembly Instructions Equipment and Supplies Required items from the Bionics Kit and/or Materials Pack: 1. Tail fin (small) assembled 2 see Start Here for tail fin assembly instructions
Doorphone Video Intercom
 HOME SERIES INSTRUCTION MANUAL Doorphone Video Intercom with Colour 4.3 LCD Monitor EN Getting to know your LCD Screen (Front) 1 2 3 4 5 6 1) LCD Screen - This is where you view your visitor that the intercom
HCS - HES Cabling Systems
 HCS - HES Cabling Systems Installation Manual for HCS High-Capacity Fiber-Optic Rack-Mount Cabinets Be sure to read and completely understand this procedure before applying product. Be sure to select the
Prototyping & Engineering Electronics Kits Magic Mandala Kit Guide
 Prototyping & Engineering Electronics Kits Magic Mandala Kit Guide odysseyboard.com Please refer to www.odysseyboard.com for a PDF updated version of this guide. Magic Mandala Guide version 1.0, February,
NAVIGATOR OWNER S MANUAL
 OWNER S MANUAL UNCHARTED WATERS, NEW HORIZONS Making shapes spin and move is notoriously difficult for pattern synthesis based only on oscillators synchronized to horizontal and vertical frequency ranges.
8mm PrecisionPro (Green) DL Spliceable 7-13 Tape Feeder. T Rev. B hd This document supports assembly Rev. -
 DL Spliceable 7-13 Tape Feeder. T Rev. B hd This document supports assembly Rev. -") 8mm PrecisionPro (Green) DL Spliceable Tape Feeder 8mm PrecisionPro (Green) DL Spliceable Tape Feeder 8mm PrecisionPro (Green) DL Spliceable Tape Feeder 8mm PrecisionPro (Green) DL Spliceable 7-13 Tape
8mm PrecisionPro (Green) DL Spliceable Tape Feeder 8mm PrecisionPro (Green) DL Spliceable Tape Feeder 8mm PrecisionPro (Green) DL Spliceable Tape Feeder 8mm PrecisionPro (Green) DL Spliceable 7-13 Tape
KZONE computer designed for Johnny G Krankcycle by Matrix
 KZONE computer designed for Johnny G Krankcycle by Matrix Caution! Read all precautions and instructions in this manual before you begin using this equipment. Please keep this manual for future reference.
Assembling and Mounting the Presentation Display, Speakers, Speaker Screens, and Table Door
 CHAPTER 8 Assembling and Mounting the Presentation Display, Speakers, Speaker Screens, and Table Door July 13, 2012, This document provides you with the procedures you perform to assemble and mount the
Replacing the PanelMate epro PS, PanelMate epro PS EE, and PanelMate epro PS OD 7685x-12 Series Backlight Assembly
 Replacing the PanelMate epro PS, PanelMate epro PS EE, and PanelMate epro PS OD 7685x-12 Series Backlight Assembly Introduction The Backlight Replacement Kit provides a replacement backlight for the PanelMate
KRAMER ELECTRONICS LTD. USER MANUAL MODEL: RTBUS-12 Round Table Connection Bus. P/N: Rev 1
 KRAMER ELECTRONICS LTD. USER MANUAL MODEL: RTBUS-12 Round Table Connection Bus P/N: 2900-300099 Rev 1 Contents 1 Introduction 1 2 Getting Started 2 2.1 Achieving the Best Performance 2 3 Overview 3 3.1
Caution. Hanging the Screen:
 Installation Instructions for Laminar and Laminar XL Projection Screens Caution 1. Read Instructions through completely before proceeding; keep them for future reference. Follow these instructions carefully.
Modulate Magnetic Kit 10-07
 Modulate Magnetic Kit 10-07 MOD-10-07-M MOD-10-07-M-OCE Modulate Fabric Banner kits feature unique angles and shapes, are portable and now are even easier to configure to achieve your dream space! Modulate
3 Closure preparation 3.1 Work-stand 3.2. Opening FIST-GCOG2-Dx Preparing drop cable with micro-tubes
 FIST-GCOG2-Dx24 I N S T A L L A T I O N I N S T R U C T I O N FTTH closure for micro-tubes and micro-cables Content 1 Introduction 2 Kit content 3 Closure preparation 3.1 Work-stand 3.2. Opening FIST-GCOG2-Dx24
IP-LINX. Installation Guide
 Installation Guide Installation Guide, 146653-4 Copyright 2017, Telect, Inc. All Rights Reserved Telect and Connecting the Future are registered trademarks of Telect, Inc. 22425 East Appleway Ave. # 11
Car-Solutions.com. Warning / Caution. Warning. Caution
 Video Interface for Volkswagen Golf 7 with Discover Media Update Date 2013.11.14 Model User Guide QPI-G7-MAIN-V2.0 Firmware Date 131028 Warning / Caution Warning Caution When installing the main unit,
Figure 1. MFP-3D software tray
 Asylum MFP-3D AFM SOP January 2017 Purpose of this Instrument: To obtain 3D surface topography at sub-nanometer scale resolution, measure contact and friction forces between surfaces in contact, measure
BAE AUDIO 500C INSTRUCTION MANUAL
 BAE AUDIO 500C INSTRUCTION MANUAL BAE AUDIO 500C 500C Features Congratulations! You ve purchased a 500C 500 Series compressor! The BAE 500C compressor is a 500 Series compatible FET style audio compressor/limiter
Simple and highly effective technology to communicate your brand s distinctive character
 . . . Advantages 4 Simple and highly effective technology to communicate your brand s distinctive character COST EFFECTIVE No need to print graphics, you can change your message every day! No media player
Projector Lift. User Guide INSTALLATION OPERATION SETUP PROGRAM IR REMOTE FACTORY RESET
 INSTALLATION OPERATION SETUP PROGRAM IR REMOTE FACTORY RESET MODELS: Small - Standard Deep - Wide - Large X-Large - XX-Large Projector Lift User Guide ver 26.01.012 2012 PureTheatre CONTENTS Part Checklist...
SUBCARRIER TRANSFER FILTER INSTRUCTION BOOK IB622702
 SCF611S SUBCARRIER TRANSFER FILTER INSTRUCTION BOOK IB622702 SCF611S SUBCARRIER TRANSFER FILTER TABLE OF CONTENTS PAGE SHIPPING INSPECTION 2 MODULE CONFIGURATION 2 INSTALLING MODULES 2-3 CABLING 3 FRONT
Folding arm dish kit Instructions
 Folding arm dish kit Instructions Kit Check list. You should have the following components in your kit: itechworld folding arm dish. itechworld folding easy base (this is the base section of the dish).
Optical Distribution Box 300 Installation Guide. Version : R0.0
 Optical Distribution Box 300 Installation Guide Document No. : OD16-546-L-01 Version : R0.0 Date: 21-Mar-2018 IMPORTANT INSTRUCTIONS When using fiber optic equipment, basic precautions should always be
Setup Guide. Read me BefoRe unpacking!
 Setup Guide Read me BefoRe unpacking! Package Contents In The Replicator package The Replicator SD card (in The Replicator SD card slot) In the Accessory Box found within The Replicator frame Single or
Quick Start Bruker Dimension Icon AFM
 Do not remove Quick Start Bruker Dimension Icon AFM March 3, 2015 GLA Contacts Harold Fu (hfu@caltech.edu) Weilai Yu (wyyu@caltech.edu) Bruker Tech Support (AFMSupport@bruker-nano.com 800-873-9750) Watch
PLL1920M LED LCD Monitor
 PLL1920M LED LCD Monitor USER'S GUIDE www.planar.com Content Operation Instructions...1 Safety Precautions...2 First Setup...3 Front View of the Product...4 Rear View of the Product...5 Installation...6
Introduction. Introduction
 Introduction Introduction Note: In this user guide Pronto is used for both ProntoPro and Pronto remote controls. RFX6000 is compatible with TSU3000 and TSU6000. About the RFX6000 Most remote control systems
WDK-2500-STROBE. User Guide
 WDK-2500-STROBE User Guide Warning: This device complies with Part 15 of the FCC rules, operation of this device is subject to the following conditions: 1. This device may not cause harmful interference.
Safety Rules Parts Check Lists and Photos Cable Diagrams for Various Crane Configurations Step by Step Instructions Tips for Packaging and Storage
 EZ CRANE USER MANUAL INCLUDED INSIDE Safety Rules Parts Check Lists and Photos Cable Diagrams for Various Crane Configurations Step by Step Instructions Tips for Packaging and Storage WATCH THE INSTRUCTIONAL
Teacher s Guide and Suggested Lesson Plans
 Educational Resources Teacher s Guide and Suggested Lesson Plans Introduction provides children with a hands-on experience in which they assemble, and then play, a fully functioning table-top sized pipe-organ.
Site Installation Model MP-8433
 Site Installation Model MP- Rev. //0 SCOREBOARD SITE INSTALLATION INSTRUCTIONS CAUTION: All American Scoreboards (AAS) recommends the sign be installed by a licensed contractor, and must meet all local
Site Installation Model MP-8424
 Site Installation Model MP- Rev. //0 SCOREBOARD SITE INSTALLATION INSTRUCTIONS CAUTION: All American Scoreboards (AAS) recommends the sign be installed by a licensed contractor, and must meet all local
STREAMER. Users Instructions. Elation Professional R 4295 Charter Street Los Angeles CA
 STREAMER Users Instructions Elation Professional R 4295 Charter Street Los Angeles CA. 958 www.elationlighting.com Features We would first like to congratulate you on the purchase of this magic fibre lighting-streamer!
Installation Instructions
 SuperBus 2000 Concord 4 GSM Module 466-2262A October 2006 Copyright 2006, GE Security Inc. Introduction This is the GE SuperBus 2000 Concord 4 GSM Module Installation Instructions for part number 600-1053.
VPM2. Operator's Manual
 VPM2 Operator's Manual Whip Mix Corporation 361 Farmington Ave. P.O. Box 17183 Louisville, KY 40217-0183 USA 502-637-1451 800-626-5651 Fax 502-634-4512 www.whipmix.com Features The Whip Mix VPM2 is designed
1. Get support Attention Safety Caution Applications View Cameras on Screen (ex. HD TV or PC monitor) 3. Change Time Zone 5
 3. Change Time Zone 5") 1. Get support 1 2. Attention 1 3. Safety Caution 1 4. Applications 1 5. View Cameras on Screen (ex. HD TV or PC monitor) 3 Change Time Zone 5 6. Installation Guide for ONWOTE Cameras 6 7. View Cameras
1. Get support 1 2. Attention 1 3. Safety Caution 1 4. Applications 1 5. View Cameras on Screen (ex. HD TV or PC monitor) 3 Change Time Zone 5 6. Installation Guide for ONWOTE Cameras 6 7. View Cameras
HQ Electromagnetic Channel Locks. For the HQ Infinity
 HQ Electromagnetic Channel Locks For the HQ Infinity Table of Contents Overview... 2 Kit Contents... 2 Tools Required... 4 Installation... 4 Using the HQ Electromagnetic Channel Locks... 9 Troubleshooting...
Zero-G. Owner s Manual. External Mount INSTALLERS: PLEASE LEAVE THIS MANUAL WITH THE OWNER.
 Zero-G Owner s Manual External Mount INSTALLERS: PLEASE LEAVE THIS MANUAL WITH THE OWNER. APPLY S/N STICKER HERE LIMITED ONE YEAR WARRANTY ON SCREEN INNOVATIONS PRODUCTS Screen Innovations warrants its
Instructions. Cable with Armor F CAUTION. October Rev A
 3M Single Conductor Accessory Breakout Kits (BOK's) for use with 3M Cable Accessories (Terminations, T-Bodies and Push-On Elbows) For Use With Single Conductor Accessories On Three-Core Conductor Cables
INSTRUCTION MANUAL AND PARTS LIST
 7360R-2SS INSTRUCTION MANUAL AND PARTS LIST 1. COVER COMPONENTS Ref. No Part No. Name Qty 1 100 1400 Face plate arm 1 2 100 1401 Gasket 1 3 100 1287 Rubber plug (ɸ19) 1 4 100 1288 Rubber plug (ɸ11.8)
INTRODUCTION 1-3. Notice 1. Approval Information (fcc/ce) 1-2. Restrictions '3. Maintenance "3 PRODUCT 4-6. Package Contents 4
 1-2. Restrictions '3. Maintenance 3 PRODUCT 4-6. Package Contents 4") User's Manual 2.4GHz Color Wireless Camera Kit MODELCM-A815 TABLE OF CONTENTS INTRODUCTION 1-3 Notice 1 Approval Information (fcc/ce) 1-2 Restrictions '3 Maintenance "3 PRODUCT 4-6 Package Contents 4 Feature
User's Manual 2.4GHz Color Wireless Camera Kit MODELCM-A815 TABLE OF CONTENTS INTRODUCTION 1-3 Notice 1 Approval Information (fcc/ce) 1-2 Restrictions '3 Maintenance "3 PRODUCT 4-6 Package Contents 4 Feature
Aluminum spun system one piece reflector Parabolik Prime Focus AZ/EL or Polar Mount Easy Installation
 C Band & KU Band LS 5000 5 Meter Satellite Earth Station Antennas Aluminum spun system one piece reflector Parabolik Prime Focus AZ/EL or Polar Mount Easy Installation Electronic Performance Specifications
DH551C/DH550C/DL550C Double Sided Display User Manual
 DH551C/DH550C/DL550C Double Sided Display User Manual Disclaimer BenQ Corporation makes no representations or warranties, either expressed or implied, with respect to the contents of this document. BenQ
MIRAGE. Skyline Mirage Set-Up Instructions Skyline Exhibits
 MIRAGE Skyline Mirage Set-Up Instructions www.skyline.com Table of Contents Mirage Pop-up is available in many sizes from 32 tall tabletops to 92 tall backwalls. The following set-up and repacking instructions
Kit Components. Installing the Pro Power Kit Working with your doorbell s wires might seem intimidating, but installation is easy!
 1 Install the Pro Power Kit Welcome The Pro Power Kit is required to power your Ring Doorbell Pro. For more info, visit: ring.com/pro-power Hi, I m Jamie Siminoff, inventor of your Ring Video Doorbell.
Syntor X Flash Memory Module Revision C
 Syntor X Flash Memory Module Revision C The PIEXX SynXFlash memory module, along with the supplied PC software, replaces the original SyntorX code plugs and allows you to easily set modify and update your
GENUINE PARTS CAUTION
 GENUINE PARTS SATELLITE RADIO INSTALLATION INSTRUCTIONS 1. DESCRIPTION: SATELLITE RADIO SYSTEM 2. PART NUMBERS: XM tuner kit 999U9-NV003 XM antenna kit 999U9-VR000 Sirius tuner kit 999U9-NV004 Sirius antenna
Home Monitoring. Wired Color Camera. User Manual. For indoor/outdoor use. Do not use in wet locations.
 45231 Home Monitoring Wired Color Camera User Manual For indoor/outdoor use. Do not use in wet locations. www.jascoproducts.com 1-800-654-8483 2 Thank you for purchasing the GE 45231 Wired Color Camera.
3.22 Finalize exact specifications of 3D printed parts.
 3.22 Finalize exact specifications of 3D printed parts. This is the part that connect between the main tube and the phone holder, it needs to be able to - Fit into the main tube perfectly - This part need
If you have any problems please contact our office at Thank You! And Enjoy! Like us on Facebook /AllenLeighSC
 If you have any problems please contact our office at 204-728-8878 1-866-289-8164 Thank You! And Enjoy! Like us on Facebook /AllenLeighSC Follow us on Twitter @AllenLeighSC Also check out additional accessories
Model DT-311J. And DT-311J-230V(AC) DIGITAL STROBOSCOPE INSTRUCTION MANUAL
 DIGITAL STROBOSCOPE INSTRUCTION MANUAL") Test Equipment Depot - 800.517.8431-99 Washington Street Melrose, MA 02176 - TestEquipmentDepot.com Model DT-311J And DT-311J-230V(AC) DIGITAL STROBOSCOPE INSTRUCTION MANUAL 1. GENERAL The DT-311J DIGITAL
Test Equipment Depot - 800.517.8431-99 Washington Street Melrose, MA 02176 - TestEquipmentDepot.com Model DT-311J And DT-311J-230V(AC) DIGITAL STROBOSCOPE INSTRUCTION MANUAL 1. GENERAL The DT-311J DIGITAL
CN Remove the scanner assembly (X476 and X576 models) and all doors/covers.
 and all doors/covers.") CN598-67045 www.hp.com/support IMPORTANT: Ensure the product firmware is upgraded to at least version 1336MR before performing this repair procedure. If the firmware upgrade cannot be completed, contact
CN598-67045 www.hp.com/support IMPORTANT: Ensure the product firmware is upgraded to at least version 1336MR before performing this repair procedure. If the firmware upgrade cannot be completed, contact
SonoruS Audio. ATR10 Analog Tape Reproducer. Operating Manual
 SonoruS Audio ATR10 Analog Tape Reproducer Operating Manual 1 OPERATING INSTRUCTIONS FOR THE SonoruS ATR10 IMPORTANT NOTES Protect your tape deck from excessive heat and humidity. Install it in a manner